CREATING MOVIE CLIP INSTANCES DYNAMICALLY
| You can dynamically create a movie clip instance by using one of the following three methods of the movie clip object:
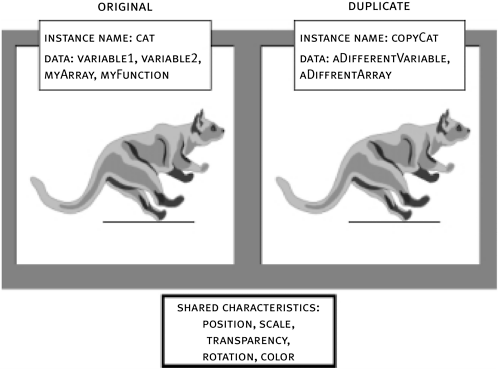
You will use each of these methods in the course of the exercises for this lesson. duplicateMovieClip()Although we introduced you to this method in Lesson 10, Automating Scripts With Loops, we didn't cover it in detail there. Now, at last, you get to learn everything you need to know about the powerful duplicateMovieClip() method! Using the duplicateMovieClip() method, you can direct Flash to duplicate a movie clip instance that is currently on the stage and give it a new instance name. If the movie clip instance is not on the stage (that is, it's in a previous frame or in a frame not yet visited), Flash cannot duplicate it. In addition, the movie clip instance can only be duplicated into the same timeline as the original, and it will exist in the same relative hierarchical position as the original. (To dynamically generate a movie clip instance that also allows dynamic timeline insertion, you would use attachMovie() , which we'll discuss later in this lesson.) When a movie clip instance is duplicated, the duplicate inherits all of the instance's current physical properties. A duplicated movie clip instance inherits the following from the original:
A duplicated movie clip does not inherit the following:
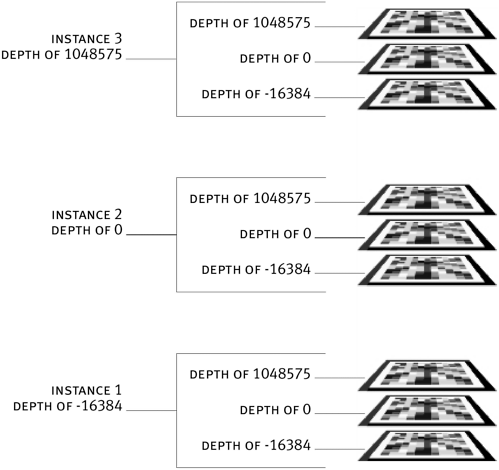
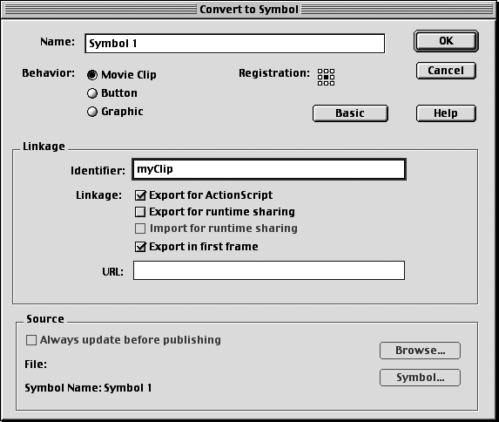
NOTE A duplicated movie clip instance starts playing at Frame 1, even if the original from which it was copied was at another frame at the time the duplicate was created. The following is the syntax for duplicating a movie clip instance: myClip.duplicateMovieClip(name, depth, object); This line of ActionScript starts with the instance name (target path) of the movie clip to be duplicated and then invokes the duplicateMovieClip() method of the MovieClip object to create a new instance called the value of name at a depth of depth . The object parameter is optional. For example: name = "ball2"; depth = 100; ball.duplicateMovieClip(name, depth); These three lines of ActionScript, duplicate the ball movie clip instance, name the new instance ball2, and place it into a depth of 100. NOTE When we talk about depth here, we're referring to the stacking order of movie clip instances in a particular timeline. If two movie clip instances overlap in Flash, one must appear to be above the other, with the top instance having a higher depth. Every movie clip instance has a unique depth in relation to other objects on the stage. When a movie clip instance is duplicated, you can assign it a numeric depth of any positive integer. The higher the integer, the higher the depth in that timeline. Although you may not be aware of it, any movie clip instances that you manually place in a particular timeline while authoring a movie are placed at a depth starting from -16384. This means that if a dynamically created instance is placed in a timeline at a depth of 1, it will appear above any manually placed instances. Each timeline has its own range of depths, from -16384 to 1048575. These depths are relative to the depth of the parent timeline. In other words, instance1 contains child instances at levels on its timeline from -16384 to 1048575. But instance1 is below instance2, so that even the highest placed child instance in the timeline of instance1 is still lower than the lowest placed child instance in instance2. A depth can only contain one movie clip instance at a time. If you duplicate a movie clip instance into a depth that already contains another movie clip instance, you will destroy the movie clip instance that is already there. Movie clip instances can be placed in a total of 1064960 (-16384 to 1048575) depths in a single timeline. Every timeline in a movie has its own set of depths that do not interfere with any other timelines. This means, for example, that you can duplicate instances into a depth of 10 in as many timelines as you like. The third parameter in the duplicateMovieClip() method, object , is optional though useful. The properties of any object specified in that parameter are used to populate the newly duplicated movie clip instance. If the parameter is left blank, it's ignored. To extend the above example, take a look at the following: myObject = new Object(); myObject.ballColor = "red" name = "ball2"; depth = 100; ball.duplicateMovieClip(name, depth, myObject); When the new instance of ball is created, it will contain all of the properties of the myObject object. In this case, that means that a variable ballColor with a value of "red" is created in the new instance. TIP To copy the variables from the original instance into the duplicate, use the instance name of the original as the initializing object. For example: ball.duplicateMovieClip(name, depth, ball); attachMovie()Using attachMovie() , you can actually pull a movie clip out of the library dynamically and "attach" an instance of it to any timeline currently available on the stage in essence adding the content of the attached movie clip instance to the content of the movie to which it's attached. The attached movie becomes a child of the timeline to which it's attached. As such, the attached movie takes on any graphical transformations performed on its parent (size, rotation, transparency, and so on) yet remains separate with respect to data, visibility, current frame, and so on (for more information on parent/child relationships, see Lesson 3, Understanding Target Paths). So what are the main differences between this method and the duplicateMovieClip() method? As mentioned earlier, you can use attachMovie() to attach a movie clip instance from the library to any timeline currently in the scene. Because this method attaches clip instances from the library (and the library contains all of your movie clips), the movie clip to which you attach the instance doesn't have to be on stage when you attach it. With duplicateMovieClip() , on the other hand, an instance of the movie clip that you wish to duplicate does need to exist on the stage. What's more, you must place the duplicate inside the same timeline as the original you can't duplicate it to another timeline. In addition, if the instance you're duplicating has any attached clip events (data , enterframe , mouseDown , and so on), the duplicate will automatically inherit those same clip events. Although there are ways to add clip events to an attached movie clip instance, the process is not as straightforward as in the duplication process. In the simplest terms, attaching movie clip instances allows you to add virtually any timeline to any other timeline. Duplicating movies, in contrast, enables you to make exact replicas of movie clip instances for inclusion in the same timeline as the original. There are several steps you'll need to follow to use the attachMovie() method in a project the first of which is to specify, in the library, which movie clips you want to make available for attaching. This is called linkage. Linkage may not seem to be the best term to describe identifying movie clips in the library that can be attached. However, the term also pertains to sharing libraries in which assets in one SWF's library are linked, or shared, by another SWF. When specifying movie clips to make available for attaching, or when sharing assets between two SWFs, the movie clips involved must be given identifier names. Macromedia therefore considers any process that involves giving a movie clip in the library an identifier name to be linkage. To add the most common type of linkage to a movie clip:
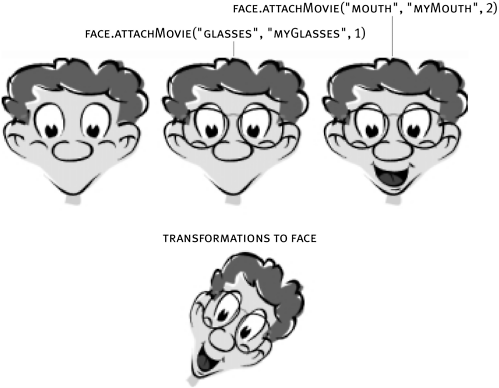
TIP You can also set the linkage when creating a movie clip in the Convert to Symbol pop-up window by pressing the Advanced button. NOTE When setting linkage, there is one other option to note: "Export in first frame," which is checked by default. This option is used to determine when a linked (or attachable) movie clip is downloaded when your project is viewed over the Web. If this box is left checked, that movie clip will be downloaded before Frame 1 of your movie so that the clip's content is available before your first opportunity to attach it (that is, Frame 1). If you're using large movie clips (say ones that contain many other movie clips or sounds), Flash may appear to hang. Don't worry: It's just preloading the contents of all linked movie clips. If you uncheck the "Export in first frame" option, the movie clip will not be preloaded before the first frame (as just described). If you choose this option, you must place an instance of that movie clip on the stage at some point before it can be attached (so that Flash knows when to load it). After it is instantiated (seen or placed in your movie) on some frame, you can attach it anywhere. For example, if there is an action on Frame 25 that attaches the movie clip, then an instance of that clip must have been placed on Frame 24 or lower in order for the attachMovieClip() action to work. Any frames after Frame 24 can attach the instance, since it has been loaded into memory. Here is the syntax to attach an instance of a movie clip in the library to a timeline: path.attachMovie(identifier, newName, depth, object) For example: _root.wall.attachMovie("paint", "paint2", 10) This script will attach the movie clip in the library with the identifier name of "paint" to the _root.wall movie clip instance. The newly attached movie is given an instance name of paint2 and placed on a depth of 10. Since an attached movie becomes a child of the movie clip instance to which it's attached, the newly attached instance will have a target path of _root.wall.paint2 . Notice in the above syntax (first line) that, again, the option is available to populate the newly created clip with the properties and variables of an object. However, as with duplicateMovieClip(), this parameter is optional and thus we left it out in the example above (second line). TIP The easiest way to dynamically assign a clip event to an attached (or duplicated) movie is to define the assignment immediately after the attachment (or duplication) action, as the following shows: _root.attachMovie("box", "dynamicBox", 1); dynamicBox.onEnterFrame = function (){ dynamicBox._rotation += 15; } In this example, an instance of the movie clip named box (its identifier name in the library) is dynamically attached to the root timeline. The attached instance is given a name of dynamicBox. On the next few lines, after the attach action, a clip event is assigned to this newly attached instance. createEmptyMovieClip()Using the createEmptyMovieClip() method, you can dynamically create (in any timeline) a new instance of an empty movie clip instance. Why would you want to do such a thing? Take a look at the following examples:
Here is the syntax for creating an empty movie clip instance in a timeline: Path.createEmptyMovieClip(name, depth); For example: _root.createEmptyMovieClip("box", 1); The first parameter is the instance name that you want to assign to the empty movie clip instance you create; the second parameter is the depth at which you want to place that movie clip instance. If you were to test this action, you wouldn't get a visual result because you're creating an empty movie clip instance. Later in this lesson you'll learn how to use createEmptyMovieClip() to hold drawn lines. |

EAN: 2147483647
Pages: 161