Keeping Your Mac Safe: Networks and the Internet
The vast majority of today's Mac users are on the Internet, many of them using broadband connections. Although this is great for web browsing, sharing files, playing games, and many other Internet-related activities, it also means that network security is much more important today than it was when most users were connected to the Internet via slow dial-up connections (if they were connected at all). Remember that when you connect to the Internet, you're actually connecting to one huge network of computers, all of which can theoretically connect to, or at least contact, your computer. Some are used by people you want to be able to connect (Personal File Sharing users, for example), but most aren't. If one of the more unsavory characters can find a way into your Mac, they may be able to erase files, steal personal information, or use your Mac as a relay for unsolicited e-mail or Internet attacks on other computers. Needless to say, these are officially Bad Things.
I already mentioned, both in the previous section and in Chapter 10, that three of the best things you can do to prevent unauthorized network access are to turn off unnecessary services (Personal File Sharing, FTP Access, Remote Login, etc.); make sure that users have effective passwords; and restrict access to secure methods such as Personal File Sharing, SFTP, and SSH. These steps are easy to take and provide a significant increase in system security, since hackers generally try to take advantage of enabled services and use them as "doors" into a system. However, the truth is that operating systems have vulnerabilities. Even when you think you have all the windows of opportunity closed tight, it's possible that the operating system itself has a security flaw. This is where firewalls come in.
What Is a Firewall?
At the most general level, a firewall is software that acts as a gateway between a network or single computer and other networks. In the case of a single computer, a firewall is usually an application that watches all network traffic as it enters the computer. In the case of a network, the firewall typically operates on a router or gateway server through which all external traffic must pass. In either case, the firewall intercepts all incoming network traffic at the packet level (packets are small pieces of network data) and decides which packets of data should be forwarded to the network or computer and which should be rejected.
Firewalls operate based on rules, set up by the firewall's administrator; every packet of incoming data is compared to these rules and either forwarded to its intended destination or refused. Some rules are based on packet origin: did the data come from a domain or IP address designated as "safe?" (The downside to these types of rules is that domains and IP addresses can be faked, or "spoofed" in network parlance.) Others are based on ports: is the firewall supposed to allow network traffic on the port the packets are destined for? (You'll remember our discussion of ports in Chapter 10.) Finally, rules can also be based on protocols: is the protocol used by the data (TCP or UDP, types of transmission protocols) allowed, especially for the particular destination port? As a packet of data is compared to each rule, it is either allowed or denied. If it is specifically allowed by a particular rule, or makes it past all rules without being denied, it gets passed through the firewall to the network or computer. If it's denied by any rule, it doesn't get through. Although each rule is surprisingly simple, the complete system of rules can be very complex.
| Note | Most firewalls also include logging features that allow you to see a record of denied network traffic. |
The benefit of a firewall is that unlike disabling specific services on your computer—which may still leave vulnerable ports open—a firewall enables access for only those ports you know you (or others on your network) need to use. Think of a firewall as the security guard for a gated community. Even if you happen to leave a window open in your house, the security guard should keep out anyone who might sneak in that window.
| Note | In addition to keeping bad traffic out, firewalls are also used to restrict access to external content for computers behind the firewall. For example, a network administrator can restrict traffic from certain websites, or close the ports used by streaming video or audio. This is especially true on larger networks, like those in business and academic settings. |
The most effective firewalls are dedicated computers that are separate from the rest of the network and do nothing else but act as firewalls; in this scenario the firewall computer can't accidentally provide access to the network via its own security flaws. Many hardware routers provide effective firewall services for the same reason (see "Hardware Routers as Firewalls"). However, even software firewalls that run on your own computer can be extremely effective if set up properly. These firewalls monitor all the traffic that passes through your network ports (modem, Ethernet, AirPort). Mac OS X actually has a software firewall built in. (I'll talk about it later in the chapter.)
The biggest problem end users generally have with firewalls is that if they're too restrictive, you can't access content you want to access (streaming media files, or even web pages), and other users can't connect to your computer to access Personal File Sharing and other services. Whether you're using an Internet router or OS X's built-in firewall (or both), in the next couple of sections I'll tell you how to set up and use your firewall, including opening up access when you need to.
Hardware Routers as Firewalls
As I mentioned, most hardware routers provide firewall services. This is true even of the Internet routers many home users use to share an Internet connection between multiple computers. As I discussed in Chapter 9, Internet routers use network address translation (NAT)—the process of translating the destination address of incoming Internet traffic to the internal IP address of the destination computer—to allow multiple computers to use a single Internet connection. If you request a web page from a web server, your Internet router knows to forward that data to your computer when it arrives. However, the flip side of NAT is that if a web server sends a page that you didn't request, it won't be forwarded. Since the outside world cannot connect to a computer behind the router unless that computer specifically requested such contact, any unrequested traffic dies at the router. This system provides an effective firewall for computers behind the router.
But what if your computer is behind an Internet router and you want certain people or computers to be able to initiate communications? For example, if you have Personal File Sharing enabled, users trying to connect to your computer to access files will have their attempts rebuffed out of hand by your router. In this situation, you need to set up port mapping on your router. If you remember from Chapter 10, every service on a computer is assigned specific ports. Personal File Sharing, for example, uses port 548. Port mapping (also called port forwarding) allows you to specify that all traffic to a certain port or ports be forwarded to a certain computer behind the router. In the example of Personal File Sharing, you would tell your router that any incoming traffic for port 548 should be forwarded, requested or not, to the internal IP address of the computer with Personal File Sharing enabled.
How you do this varies from router to router, but most have a pretty straightforward interface, accessible from a web browser on a connected computer. For example, our home has a Macsense XRouter (which is very similar to the popular Linksys routers); it has a settings page called Virtual Server that lets you map particular ports to internal IP addresses (Figure 13.1). (See "Port Portals: Common Ports Used by OS X Services" for a list of ports used by OS X for providing services.)
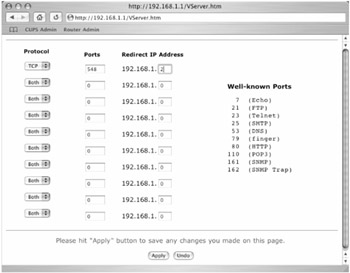
Figure 13.1: The port mapping settings for a Macsense Internet router
| Note | As a rule, you don't want to open too many ports using port mapping, since that port is then open for anyone, not just those who have legitimate reason to connect to your computer. |
The downside to port mapping is that you can only map a port to one computer. In other words, if you have three computers behind an Internet router, all sharing a single external IP address, only one of the three computers can share files over the Internet via Personal File Sharing. All three will be able to share files with each other, but only the one that is designated as the target computer for incoming traffic for port 548 will receive Internet File Sharing requests. If you want another one of the computers to share files over the Internet, you'll need to use a different service (Windows File Sharing, SFTP, NFS, etc.) on that computer and have the corresponding port traffic mapped to it.
Finally, some routers also have a feature that opens up NAT for all ports for one computer. This feature is designed for use with computers running so many services that setting up port mapping would be too much of a hassle (or sometimes just because the router doesn't provide enough port mapping setting fields). I don't recommend using this feature unless you absolutely have to, since it defeats the purpose of having a firewall at all.
| Note | Having an Internet router doesn't mean you should ignore OS X's built-in firewall, especially if your Mac is connected to the Internet over broadband. Two layers of security are always better than one. |
If your Mac is behind an Internet router and you need to use port mapping to allow others to access services on your Mac, here are the ports used by the most common OS X services. Keep in mind that you don't need to map ports for services you access on other computers over the Internet (e.g., retrieving e-mail from your ISP); you only need to worry about ports for services your Mac is actually serving/providing to other computers over the Internet.
| Port(s) | Protocol | Service |
|---|---|---|
| 20 and 21 | TCP | FTP |
| 22 | TCP | SSH (secure shell) and SFTP |
| 80 | TCP | Web Sharing (HTTP), WebDAV, and iDisk |
| 123 | TCP and UDP | Network Time Protocol (NTP) (used if you've enabled a network time server in Date & Time preferences) |
| 137 and 138 | UDP | Windows Name Service (WINS) and Network Neighborhood (used by Windows File Sharing) |
| 139 | TCP | Windows File Sharing (SMB) |
| 427 | TCP and UDP | Personal File Sharing (AFP) and Web Sharing (HTTP) |
| 445 | TCP | SMB (without netbios) |
| 515 | TCP | LPR (Internet printing) |
| 548 | TCP | Personal File Sharing (AFP) |
| 554 | TCP and UDP | QuickTime Streaming (RTSP/QTSS) |
| 631 | TCP | CUPS web administration |
| 2049 | UDP | Network File System (NFS) |
| 3031 | TCP and UDP | Program Linking |
| 3283 | UDP | Apple Network Assistant, Apple Remote Desktop |
| 5190 | TCP | iChat file transfers |
| 5298 | TCP and UDP | iChat via Rendezvous |
| 6970–6999 | TCP and UDP | QuickTime Streaming (RTSP/QTSS) |
| 7070 | TCP and UDP | QuickTime Streaming alternate (RTSP/QTSS) |
For the full list of OS X ports, check out http://docs.info.apple.com/article.html?artnum=106439. You can also visit http://docs.info.apple.com/article.html?artnum=24514 for more information from Apple about ports in general. Also, if you've installed third-party networking software (such as Timbuktu, discussed in Chapter 11), be sure to check its documentation to see if it uses a non-standard port.
OS X's Built-in Firewall
Although firewalls used to be the purview of well-paid network administrators, nowadays many home computers take advantage of firewalls, either by installing third-party software or by taking advantage of security built into their operating systems. Mac OS X can do both. I'm going to talk about third-party firewalls—briefly—a bit later in the chapter, but the truth is that the firewall that comes with OS X, the Unix program ipfw, is actually quite capable, and Apple has provided a very simple interface for basic setup and configuration. In addition, with a little knowledge and/or some help from third-party utilities, you can customize it to be as comprehensive as you need.
Enabling and Configuring the OS X Firewall: Basics
| User Level: | admin |
| Affects: | computer |
| Terminal: | no |
To enable OS X's built-in firewall, go to the Sharing pane of System Preferences, and then click the Firewall tab. Click the Start button, and the firewall is enabled. It's really as simple as that. OS X's firewall comes preconfigured with several general rules that allow the Internet/network traffic most users would want, while blocking traffic most users wouldn't want. (See "OS X's Default Firewall Rules" for a list of these default rules.)
What's more, OS X comes with preconfigured rules that open traffic for particular Sharing services. If you enable any services in Sharing preferences (Personal File Sharing, Remote Login, FTP Access, etc.), OS X automatically enables the particular firewall rule that opens traffic for the port(s) used by that service. You can see these predefined rules in the Allow box in the Firewall tab (Figure 13.2). To really appreciate how easy OS X makes this, switch to the Services tab in Sharing preferences, and enable one of the services. If you switch back to the Firewall tab, you'll see that OS X has automatically enabled the rule to allow access. If you disable the service, OS X will disable the corresponding rule.
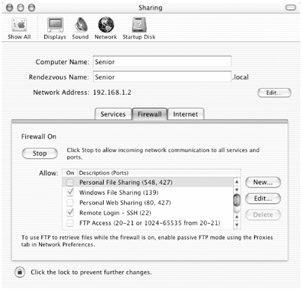
Figure 13.2: Mac OS X's firewall preferences
| Note | As noted at the bottom of the Firewall tab, if you want to download files via FTP when the firewall is enabled, you need to open Network preferences, switch to the network port used for Internet access, and then switch to the Proxies tab. Check the box next to "Use Passive FTP Mode (PASV)." This enables passive FTP transfers. The reason this is necessary has to do with the difference between active and passive FTP modes; many firewalls block all active FTP traffic. This procedure is not needed for other people to connect to your Mac via FTP Access. |
You can also "open" ports in your firewall for many popular services by clicking the Edit… button. In the resulting sheet, the Port Name pop-up menu lists some of the more common services (AOL Instant Messenger, ICQ, IRC, Retrospect, and Timbuktu are a few examples). Select a service and the "Port Number, Range or Series" field lists the ports that will be opened; click OK and the change takes effect, and is then listed in the Allow box. What you've actually done is add a new rule to your firewall's configuration file. To remove the rule, either uncheck it in the Allow box, or select it and click Delete.
If you're using a service that isn't listed in the Port Name pop-up menu (in the Edit… sheet)—for example, many MP3-swapping applications and file sharing systems like Kazaa use specific ports—select Other from the Port Name pop-up menu; the "Port Number, Range or Series" box will become editable. Enter the ports you need to open, enter a name for the firewall rule in the Description field, and then click OK to create the new rule. It will appear in the Allow box just like OS X's predefined rules.
As a Unix program, OS X's firewall, ipfw, uses a simple text file for its settings. Each firewall rule is simply a line of text in that file. The basic rules for ipfw firewall have a particular format:
RuleNumber allow/deny ip/tcp/udp from ip/any to port/any in/out/via
RuleNumber is a number assigned to the rule; incoming data is checked against rules in numerical order, so a lower number rule will be encountered earlier than a higher number. This number is important because once a packet of data is allowed or denied (i.e., matches a rule), it does not get checked against any other rule.
allow/deny is the action taken by a rule. An allow rule allows packets that match the rule to pass the firewall; a deny rule prevents matching packets from passing.
ip/tcp/udp designates which type of packets the rule should check: tcp, udp, or both (ip).
from ip/any designates which source the rule should check for; an IP address means the rule will only apply to data packets from that IP address, whereas any will check all data.
to port/any designates which destination port the rule should check for; including a port number means the rule will only apply to data packets destined for that port, whereas any means the rule applies to all destination ports.
in/out/via tells the rule to check incoming packets, outgoing packets, or packets passing through a particular interface (via). For example, the first rule of OS X's firewall is allow ip from any to any via lo*. This rule tells the firewall to allow any traffic via the interface lo*. Its purpose is to allow traffic from any local service (* is a wildcard, meaning it matches any number of any characters). Another example of an ipfw firewall rule is allow tcp from any to 22 in. This rule tells the firewall that if it encounters incoming TCP traffic from any source to port 22 on your Mac, to allow that traffic to pass.
As a packet of data enters your network port, it encounters the firewall, which checks it against the rules, in numerical order. If the data packet doesn't match the first rule, the firewall attempts to match the second rule, and so on. As soon as the data packet matches a rule, and is allowed or denied, the process stops. There are actually many more options available in ipfw rules. If you're really interested, type man ipfw <RETURN> in Terminal to see the ipfw man page.
Configuring the OS X Firewall: BrickHouse
| User Level: | admin |
| Affects: | computer |
| Terminal: | no |
In addition to the basic firewall configuration options offered in the Firewall tab of Sharing preferences, it's possible to use Terminal or several third-party utilities to customize OS X's built-in firewall. In fact, because of third-party utilities such as BrickHouse (http://personalpages.tds.net/~brian_hill/brickhouse.html), sunShield (http://homepage.mac.com/opalliere/shield_us.html), and Xupport (http://www.computer-support.ch/Xupport/info.html), there's little reason for most users to even venture into Terminal to configure their firewall. (Although to be honest, I do use Terminal every once in a while to see a list of currently active firewall rules; type sudo ipfw list <RETURN> to see yours.)
BrickHouse is my pick as the most user-friendly utility for enhancing and extending the OS X firewall. Its setup assistant walks you through the process of customizing your firewall. When you first launch the application, it asks you what type of connection you have to the Internet (modem, DSL, cable, etc.), as well as whether you have a dynamic or static IP address. It then asks you what Public Services you want others to be able to access (Figure 13.3). All of OS X's Sharing services are listed, but BrickHouse also includes many others, such as Quake 3 Arena (a network-based game), mail services (if you run your own e-mail server), and even high-end database services like 4D and Oracle. If you click on a service, BrickHouse will provide you with details about the service itself and the ports used by that service. Select any service you use regularly, and then click Continue. (Remember, you don't need to enable things like POP3 Mail to use e-mail; these are for services you are providing on your computer. Also, don't worry about things you might someday use; you can always add rules later.)
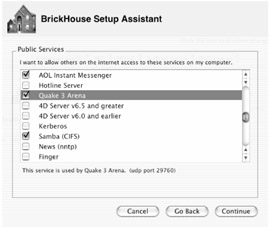
Figure 13.3: BrickHouse's Setup Assistant lets you add less common services to your firewall rules.
The next screen, Blocked Services, is a bit confusing, mainly because of the way ipfw works. The window lists many common server hacks and attacks. By default, all of these hacks are already blocked by the firewall as general "denied" traffic; however, BrickHouse allows you to view denied traffic in its Monitor window. By creating rules that specifically deny each of these hacks and attacks, the Monitor window will provide much more detail. (Like the Public Services screen, clicking on a hack or attack provides information about it.) Think of the Blocked Services screen as a list of items that you want to be able to identify in your firewall's logs.
Finally, the Firewall Setup Complete screen lets you apply the rules you just set up to the current firewall configuration by clicking Apply Configuration. If you want this configuration to be used every time your Mac boots up, click the Install Startup Script. This installs a configuration script that applies your settings each time your Mac starts up. (Remember our discussion of the StartupItems folder in Chapter 3? This is an example of a script that resides inside that folder.)
| Warning | The Setup IP Sharing button allows you to modify the settings for the natd program used by OS X for Internet Sharing. Unless you are using Internet Sharing and know exactly what you're doing in terms of natd configuration, I'd leave it alone. |
You can re-run the BrickHouse Setup Assistant at any time to reconfigure your settings (and install an updated startup script) by clicking the Assistant button in the main window. However, you can also view and edit firewall rules manually. In the main BrickHouse window (which defaults to the Quick view), click the tab for the network interface you use for Internet access (Ethernet, Modem, PPP, PPPoE, or AirPort). You'll see a list of rules (called Filters by BrickHouse) with their conditions—action, type of service, from, and to—clearly identified. To edit any Filter, select it and click Edit Filter (or click Delete Filter to remove it completely). You can also add a rule by clicking Add Filter; BrickHouse provides a helpful interface for setting up the new rule. You can also edit the order that rules are applied; rules are listed in order from top to bottom; to make a rule apply earlier, drag it towards the top of the list, to make it apply later, drag it towards the bottom.
If you prefer to edit your firewall rules and settings manually, click the Expert button in the toolbar. You'll be presented with a commented script that you can edit to your preference. However, like the IP Sharing settings, if you're not 100 percent sure about what to do here, leave the Expert screen to the experts.
Regardless of how you made changes (using Quick or Expert view), click the Apply button in the toolbar to apply those changes to the current firewall settings. If you want those changes to be permanent, click the Install button in the toolbar to install an updated startup script.
Another great feature of BrickHouse is that you can create different sets of firewall rules using the Settings button in the toolbar, and then switch between them as needed (remember to Apply changes after you switch between settings). Finally, BrickHouse also provides Log and Monitor windows that allow you to keep track of firewall activity (e.g., denied requests). You can even filter the log by rule number to see if a particular rule has been applied.
| Tip | Using BrickHouse, you can actually enable the firewall for multiple network ports, and can in fact set up different firewall rules for each port. For example, if you connect to the Internet via Ethernet, but connect to other computers in your home or office via AirPort, you can set up different firewall settings for each. Simply check the Enable Firewall box for the appropriate network port(s), and then configure each the way you want. |
To remove BrickHouse's configuration, choose Options ➣ Clear All Rules and the click the Apply button. (If you've installed a startup script, also choose Options ➣ Remove Startup File.) You can then go to the Firewall tab of Sharing preferences and set up the firewall as you normally would.
If you enable OS X's built-in firewall and have no Sharing services enabled, the firewall uses a fairly simple set of rules:
02000 allow ip from any to any via lo* 02010 deny ip from 127.0.0.0/8 to any in 02020 deny ip from any to 127.0.0.0/8 in 02030 deny ip from 224.0.0.0/3 to any in 02040 deny tcp from any to 224.0.0.0/3 in 02050 allow tcp from any to any out 02060 allow tcp from any to any established 12180 reset tcp from any to any setup 12190 deny tcp from any to any
If you enable any Sharing services, OS X automatically adds the appropriate rule(s) to allow that service to function properly:
02070 allow tcp from any to any 80 in (Personal Web Sharing) 02080 allow tcp from any to any 427 in (Personal Web Sharing) 02090 allow tcp from any to any 548 in (Personal File Sharing) 02100 allow tcp from any to any 427 in (Personal File Sharing) 02110 allow tcp from any to any 20-21 in (FTP Access) 02120 allow tcp from any 20,21 to any 1024-65535 in (FTP Access) 02130 allow tcp from any to any 3031 in (Remote Apple Events) 02140 allow tcp from any to any 22 in (Remote Login) 02150 allow tcp from any to any 139 in (Windows File Sharing) 02160 allow tcp from any to any 631 in (Printer Sharing)
Third-Party Firewalls for OS X
In addition to OS X's built-in firewall, there are also several third-party firewalls on the market, including the shareware Firewalk X (http://www.pliris-soft.com/products/firewalkx/index.html) and the commercial Norton Personal Firewall (which is part of the Norton Internet Security package, http://www.symantec.com/sabu/nis/nis_mac/index.html) and Intego NetBarrier (http://www.intego.com/netbarrier/home.html). Third-party firewalls work in much the same way your built-in firewall does. However, they also tend to add a better interface (much like BrickHouse), as well as more "convenience" features. For example, FireWalk X and Personal Firewall allow you to specify which applications can (or cannot) access the Internet, which can protect you from Trojan horses, which are applications that try to covertly send data from your computer. All three also offer firewall logging and monitoring, and instant alerts (via sounds, pop-up messages, and/or e-mails) to let you know when unauthorized attempts to access your Mac are made.
In addition, Intego NetBarrier and Norton Privacy Control (which comes bundled with Personal Firewall in the Norton Internet Security package) provide an innovative approach to protecting your personal data. They allow you to enter confidential data, such as credit card numbers, social security numbers, unlisted phone numbers, passwords—any kind of info you want to make sure doesn't get surreptitiously obtained—into a database. They then watch all outgoing Internet and network traffic; if one of your private bits of data is being sent out, they stop it, let you know what the data is and where it's being sent, and ask for your approval. (If you want to regularly allow a certain piece of data to be sent to a specific website or computer, you can also specify such an exception.)
|
|