File Basics
Before you can master the Finder, you need to master files. Fortunately, doing so isn't too difficult. However, a few topics deserve your attention, as understanding them will become extremely valuable the deeper you get into using your Mac.
File Types, Creator Types, and File Extensions
For years, one of the biggest "incompatibilities" between the Mac OS and other operating systems had to do with how the respective operating systems determined what kind of file a particular file was. The Classic Mac OS used two different codes—the creator code and file type—attached to the file. The creator code was a four-letter code that identified the application with which a file should be identified. (MSWD was the creator code for Microsoft Word, for example.) The file type indicated what kind of file a particular file was (APPL was an application, WDBN was a Word document, etc.).
Windows and Unix-based systems, on the other hand, use three-letter codes appended to the end of filenames to determine each file's purpose and type. For example, in Windows, any file that ends in .exe is an application, and any file that ends in .doc will open in Microsoft Word.
The reasons for these different approaches are too complex to get into here; I point them out here because under Mac OS X, Apple has attempted to make many files, especially documents, more cross-platform-compatible. Files created in or used in Mac OS X generally have file extensions like .doc, .txt, and .app. However, because so many Mac users also interact with users of older versions of the Mac OS, Apple had to ensure backwards-compatibility as well.
What this means for you is that under Mac OS X, some files have creator and type codes, but no file extensions; some have no creator/type codes but do have file extensions; some have both; and, believe it or not, some have none of the above (these files are bound to the application that created them or first opened them). In addition, each setting can be changed by the user (as I'll talk about in a bit).
Understanding and Changing File Associations
| User Level: | normal or admin |
| Affects: | individual user or computer |
| Terminal: | no |
Given all these possible settings, when you double-click on a document, how does Mac OS X know how to open it? The answer is that OS X uses a hierarchical model for associating documents with applications. The best depiction I've seen of this model is actually in the Type, Creator & Extension panel of the utility XRay (http://www.brockerhoff.net/xray/). In Figure 5.1 I've used XRay to get information on a sample text file. The vertical arrow on the left side indicates how OS X determines what application will be used to open the file if you double-click it.
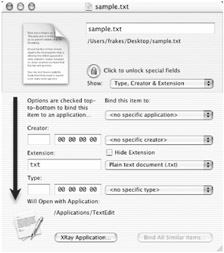
Figure 5.1: A document's application associations in XRay
The first thing checked is whether or not the file has been explicitly bound to an application. If no specific application has been set, the creator code is checked (Mac OS 9's creator code). If there is no creator set, OS X then looks at the file's three-character extension. If no file extension exists, OS X looks for a type code (Mac OS 9's file type)—if one exists, the OS checks to see which application files with that type code are generally opened with. Finally, if none of this data exists (if all of these fields are blank in XRay), double-clicking the file brings up a dialog asking what application you want to use to open it.
Just as XRay provides the best view for understanding the various identifiers a file can have, it is also my favorite for changing these identifiers. You can click on the pop-up menu next to any option to select a specific application to associate with the document; to select an application from which the creator code should be taken; to select a file extension; or to select an application from which the type code should be taken. Once you've made your changes, you need to choose File ➣ Save Changes. If you've changed the "Bind this item to" setting, you can also click the "Bind All Similar Items…" button to bind all documents with similar settings to the chosen application.
The XRay window for an application looks slightly different than the one for a file window (Figure 5.2). Although it still has an Extension field (which is empty in the example shown here), and a Type field (which is set to APPL here, indicating this is an application), the other two fields differ. The top pop-up menu lists all extensions "claimed" by this application, and the second menu lists all file types claimed by it. In other words, if you double-click any document with an extension and/or file attributes listed in these menus, it will be opened in this application, unless you have specifically set another application to open files with those characteristics.

Figure 5.2: An application's Type, Creator & Extension window in XRay
| Warning | Although it's generally OK to change file types, creators, extensions, and bindings for documents (especially when you really want to change the application a document is opened in), be careful when changing these variables for other types of files. In Mac OS X, most application and system support files are identified only by their file extensions. For example, if you remove the .app from the end of an application name, it may no longer function as an application. |
Changing File Extensions
Although you need to use a utility such as XRay to change a file's file type and creator code you can change a file's extension in the Get Info window for the file (see the next section for details), or in the Finder. To change it in the Finder, simply select the file, press return to edit the file's name, and add, edit, or delete the appropriate extension. However, be sure you know what you're doing here—simply changing a file's extension does not actually change the file in any way. For example, changing a Word document's name from document.doc to document.txt won't convert it to a text document; it will still be a complex Word document that will look pretty ugly opened in a text editor. Likewise, changing a graphic file's name from picture.tiff to picture.jpg won't actually change the file from a TIFF file to a JPEG file. In addition, as I'll explain later when I talk about Finder Preferences, just because a filename doesn't show an extension in the Finder doesn't mean it doesn't have one. For this reason, I recommend using the Get Info window to change file extensions.
| Tip | If you don't have the "Always show file extensions" box checked in Finder Preferences, changing a file's extension will bring up an alert window asking you if you're sure you want to change the extension. The default button is to keep the original extension, which means you can't just press the return key to get on with your work. However, you can press the escape key to quickly dismiss the dialog and accept the change. |
One more point about file extensions: if you've chosen to show file extensions in Finder Preferences (I talk more about that in the next section), extensions will be visible for all files that have them. However, if you've chosen not to show file extensions in the Finder, don't expect all extensions to disappear. The reason is that each file has its own hide/show extension setting. If this setting has not been used, the file will obey the Finder Preferences setting; however, if it has been set (by you, by the developer, by another user), the file's own setting will override the Finder's setting. I point this out because it's very easy—too easy, in my opinion—to add a file extension to a file that's already got a hidden one.
The Get Info Window
I talked about the Finder's Get Info window several times in Chapter 1 when I discussed changing file ownership and permissions. However, you can view and edit quite a few other bits of info in the Get Info window's other panels. Here are a few tidbits about these panels.
| Tip | The Get Info window in Mac OS X 10.0 and 10.1 was actually a dynamic window called the Show Info Inspector—you could only have a single Show Info window open, and it changed to reflect the info for whatever Finder item you clicked on. Due to user feedback, Apple changed the Get Info window to its current OS 9-like implementation—each item gets its own Get Info window, and you can open as many windows as you like. If you prefer the inspector version, press the option key and File ➣ Get Info changes to File ➣ Show Inspector. |
The General Panel
The General panel is the default view of Get Info windows. For all types of files and folders, it shows you the item's icon and name; the kind of file (taken from the file's type code, or, if one doesn't exist, from the file extension); the size of the file; the location of the file; the creation date and time; the date and time the item was last modified; and whether or not the item is locked. You can toggle the Locked status on and off; on (locked) means the item cannot be modified or deleted.
In addition, the General panel provides other information depending on the file type. Get Info windows for documents include a Stationary Pad option. When checked, the document becomes a sort of template—if you open the file, a copy is made and opened instead, leaving the original untouched. Get Info windows for applications include information on the application's version number and (usually) developer. Finally, when you Get Info on a volume, the General panel provides information on the volume format, capacity, and the amount of space used and available.
The Name & Extension Panel
The Name & Extension panel simply provides a way for you to edit the item's name and extension. Although you can change an item's extension in the Finder, it is preferable to do it here or using a third-party file utility, because (as I mentioned earlier) sometimes the Finder doesn't show the true extension.
You can also choose to show or hide a file's extension in this panel; this setting takes precedence over the setting in Finder Preferences to show or hide extensions.
The Open with Panel
The Open with panel is only present for documents; it lets you choose an application with which to open the document. As I mentioned earlier, if you choose an application in this panel, the setting overrules any other application association, such as creator type, file type, or file extension. If you click the Change All… button, the setting will be applied to all documents with the same characteristics as the current file.
The Content Index Panel
This panel is only present for folders and volumes. I discuss it in detail later in the chapter when I talk about finding files by content, but it basically allows you to index the content of volumes and folders, and to see when the most recent index occurred.
The Preview Panel
The Preview panel is virtually identical to the Preview column in Finder windows viewed as columns. It exists for all Get Info windows, but its contents differ depending on the type of file. For any kind of item but a document, the Preview panel is simply a larger version of the item's icon. However, for document files, the Preview icon often provides you with a helpful preview of the file's contents (Figure 5.3). Note that not all documents take advantage of the Preview function; Word documents, for example, simply show a document icon.
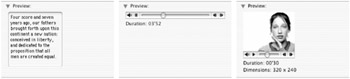
Figure 5.3: The Preview panel for (left to right) a text file, an MP3, and a QuickTime movie
| Tip | When previewing a music or video file, you can click the volume icon to change the volume. If you press shift as you change the volume, you can force the volume to play much louder. For some reason, this trick only seems to work in the Preview panel of Get Info or the Preview column of Finder windows (it doesn't work in applications). |
The Memory Panel
The Memory panel only appears for Classic applications—applications written specifically for Mac OS 9. As I'll talk about in Chapter 8, "Clobbering Classic," Classic applications will run in Mac OS X's Classic Environment, but still use OS 9's memory management system. The memory panel shows the suggested, minimum, and preferred memory allocations for each Classic app (and allows you to edit the minimum and preferred amounts as needed).
The Languages Panel
The Languages panel only appears for applications; it allows you to disable supported languages in an application, and re-enable them later. If you've done any digging around inside application packages, you know that language support is usually contained inside the /Contents/Resources directory of a package. If you select a language in this panel and then click the Remove… button, a new directory, /Contents/Resources Disabled, is created, and the resources for the selected language are moved there. This doesn't save any hard drive space, nor does it affect how fast the application loads or runs. However, if you change your OS language to Spanish, for example, but have removed Spanish from an application's Languages panel, the application will not play along with the rest of the Spanish-speaking system. The only reason I can see for using this feature is if an application's language files are causing problems. If you need to re-enable a language that you've removed, click the Add… button and navigate to the Resources Disabled folder inside the application package to find it.
The Plug-ins Panel
The Plug-ins panel works just like the Languages panel, but is only shown for applications that support the standard Mac OS X plug-in architecture (iMovie is a good example). You can remove plug-ins, and later add them back in if desired. If one of your plug-ins is misbehaving, this solution is much easier than having to dig into the package contents of the iMovie application. This is also a convenient way to add third-party plug-ins to applications like iMovie.
The Comments Panel
Finally, all documents, folders, applications, volumes, etc., have a Comments panel. You can use it to type in any sort of comment about the file that you like. I never use this panel, but I know people who type each application's serial or registration number into its Comments field.
| Note | Even though Mac OS 9 also has a Comments field in its Get Info windows, those comments, and Mac OS X's, are not transferable. I talk more about this problem in Appendix A, "A Tale of Two Systems." |
Other File Attributes
In addition to the standard attributes I just discussed, files in OS X also have other attributes that aren't as accessible (and aren't used very often by most users). A few, such as the SetUID, SetGID, Sticky bits, and the immutable flag, are fairly esoteric and beyond the purview of this book. However, one, invisibility, is fairly common, and another, labels, is available only by installing third-party software.
Invisibility
Invisibility is actually a pretty important file attribute in OS X. The OS uses invisibility to hide the many files—used by the system but typically not by the user—that would otherwise clutter folders and volumes. Invisibility is also used to hide files that shouldn't be deleted or moved by the user.
There are three ways a file becomes invisible in OS X. The first is the invisible bit. A file with the invisible bit enabled won't be visible in the Finder. Although you can't enable/disable the invisible bit from the Finder's Get Info window, it's fairly easy to do using a third-party utility such as XRay, FileXaminer (http://www.gideonsoftworks.com/filexaminer.html), or File Buddy (http://www.skytag.com/). All of these utilities have a simple check box that lets you toggle the invisible bit; note that once you toggle the bit, you generally have to relaunch the Finder for the actual visibility to change. (You can do this by selecting Force Quit… from the Apple Menu, and force quitting the Finder; it will relaunch automatically.)
Although it's easy to make a visible file invisible, making an invisible file visible is a bit tougher—because you have to access the file, and it's, well, invisible. There are a number of utilities available that allow you to find or view invisible files, but for me the easiest way to find an invisible file is to use the Finder's Find tool. I talk about this tool in more detail later in the chapter, but for now, just choose File ➣ Find… in the Finder. In the Find window, select the location to search using the "Search in" pop-up, select "visibility" from the "Add criteria…" pop-up, and then select "off" from the pop-up next to "visibility." If you know the name of the file, type it into the "file name contains" field; otherwise leave that field blank. Click the Search button and you'll get a window with a list of all the invisible files that match your criteria. Find the one you want, and drag its icon from the results window onto one of the file utilities mentioned above. You can then disable the invisible bit. Whew!
| Note | If you've installed the Developer Tools, you can also change visibility using the SetFile command in Terminal, but it's not as quick and easy; however, Terminal does have the advantage of ignoring the invisible bit, so if you list a directory's contents in Terminal, all files will be visible, even those that are supposed to be invisible. |
The second way a file becomes invisible in Mac OS X is if it begins with a period (.). If it does, the Finder hides the file. Although you can change an item's file extension in the Finder, you can't add a period to the beginning of its name to make it invisible—the Finder simply won't let you do it. However, you can drag it to your favorite file utility and change the name there.
If you want to remove the period from a filename to make the file visible, you need to use a technique like the one listed above to access the file; then drag it to your favorite file utility and change the name from within the utility's file info window.
The final way a file becomes invisible is via a text file called .hidden, located at the root level of the startup volume (and, of course, invisible due to the period at the beginning of its name). Any file or folder included in this file will be hidden from view in the Finder. Although it's technically possible to edit this file to include your own files or folders (or to remove files from the file to make them visible), I wouldn't do it, because the .hidden file is created by the OS. First, you might change something you shouldn't, and second, the next time you install a major system update, the file has a good chance of being replaced by a newer version. If you really want to view the file just to see what its contents look like, use the Finder's Find tool again, this time searching for files whose name is ".hidden" and whose visibility is off; when the search is complete, drag the .hidden file from the results window onto the TextEdit application.
Labels? You Bet
One of the extremely popular file attributes present in Mac OS 9 and earlier but missing in Mac OS X (at least at the time of this writing) is the Finder label. Users could label files and folders using various colors in order to categorize and identify them.
If you're one of the many users who have bemoaned the lack of labels in OS X, you can get them back using the shareware Labels X (http://www.unsanity.com/haxies/labels/). Labels X is a preference pane that provides the ability to apply labels (colors) to files and folders via a contextual menu—control/right-click on a file, select a label, and you're back to OS 9.
In addition, Labels X also adds a Label column to windows in list view, allowing you to sort file lists by label (one of the things I used labels for the most in OS 9). Finally, if you apply a label to a file in OS X, it transfers over if you boot into OS 9, and vice versa—so if you did a lot of file labeling in OS 9, and those files are still on your computer, you'll be pleased to find out that all of your previous labels show up in OS X when Labels X is installed.
|
|
- The Second Wave ERP Market: An Australian Viewpoint
- Context Management of ERP Processes in Virtual Communities
- Distributed Data Warehouse for Geo-spatial Services
- Intrinsic and Contextual Data Quality: The Effect of Media and Personal Involvement
- Healthcare Information: From Administrative to Practice Databases