Changing the Appearance of a Form
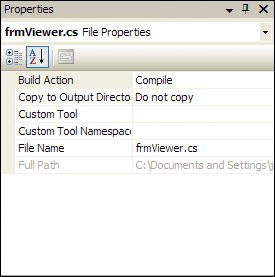
| The Properties window can actually show two different sets of properties for a form. Right now, it's probably showing the file properties of the form (the properties that describe the physical file(s) on the hard drive as shown in Figure 5.2). If so, click the form in the designer once again to view its development properties. Clicking the form itself will show the form's development properties, while clicking the name of the form in the Solution Explorer will show you the physical file properties for the form. This is why I usually tell you to click the form before setting its properties. Figure 5.2. File properties can be useful, but they don't allow you to do much with the form. Take a moment to browse the form's properties in the Properties window. In this hour, I'll show you how to use the more common properties of the form to tailor its appearance. Displaying Text on a Form's Title BarYou should always set the text in a form's title bar to something meaningful. (Note: Not all forms have title bars, as you'll see later in this hour.) The text displayed in the title bar is the value placed in the form's Text property. Generally, the text should be one of the following:
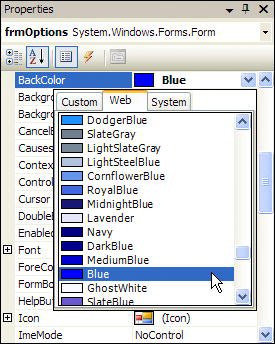
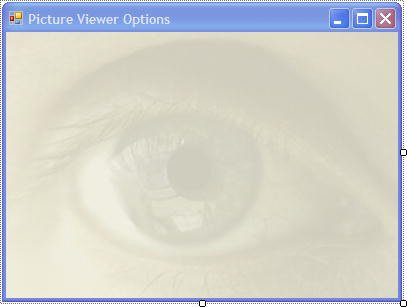
Change the Text property of your form to Picture Viewer Options. Your form should now look like the one in Figure 5.3. Figure 5.3. Use common sense when setting title bar text.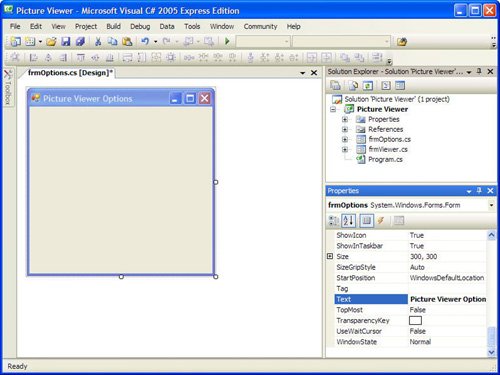 By the Way As with most other form properties, you can change the Text property at any time using Visual C# code. Changing a Form's Background ColorAlthough most forms appear with a gray background (this is part of the standard 3D color scheme in Windows), you can change a form's background to any color you want. To change a form's background color, you change its BackColor property. The BackColor property is a unique property in that you can specify a named color or an RGB value in the format red, green, blue. By default, the BackColor property is set to the color named Control. This color is a system color and might not be gray. When Windows is first installed, it's configured to a default color scheme. In the default scheme for all Windows versions other than XP, the color for forms and other objects is the familiar battleship gray. For XP installations, this color is a light tan (although it still looks gray on most monitors). As a Windows user, however, you're free to change any system color you want. For instance, some people with color blindness prefer to change their system colors to colors that have more contrast than the defaults so that objects are more clearly distinguishable. When you assign a system color to a form or control, the appearance of the object adjusts itself to the current user's system color scheme. This doesn't just occur when a form is first displayed; changes to the system color scheme are immediately propagated to all objects that use the affected colors. By the Way Try to use system colors whenever possible, to make your application behave as closely as possible to what the user expects and to avoid problems such as using colors that are indistinguishable from one another to someone who is color blind! Change the background color of your form to blue now by deleting the word Control in the BackColor property in the Properties window. In its place enter 0,0,255 and press Enter or Tab to commit your entry. When you commit the entry, the RGB value changes to the word Blue. If Visual C# has a named color that matches your RBG values, it automatically switches to the name for you. Your form should now be blue because you entered an RGB value in which you specified no red, no green, and maximum blue (color values range from 0 to 255). In reality, you'll probably rarely enter RGB values. Instead, you'll select colors from color palettes. To view color palettes from which you can select a color for the BackColor property, click the drop-down arrow in the BackColor property in the Properties window (see Figure 5.4). Figure 5.4. All color properties have palettes from which you can choose a color. By the Way System colors are discussed in detail in Hour 18, "Working with Graphics." When the drop-down list appears, the color blue is selected on the Web tab. Again, this happens because when you enter the RGB value 0,0,255, Visual C# looks for a named color composed of the same values and finds blue. The color palettes were explained in Hour 2, "Navigating Visual C# 2005," so I'm not going to go into detail about them here. For now, select the System tab to see a list of the available system colors and choose Control from the list to change the BackColor property of your form back to the default Windows color. Adding an Image to a Form's BackgroundIn addition to changing the color of a form's background, you can place a picture on it. To add a picture to a form, set the form's BackgroundImage property. When you add an image to a form, the image is painted on the form's background. All the controls that you place on the form appear on top of the picture. Add an image to your form now by following these steps:
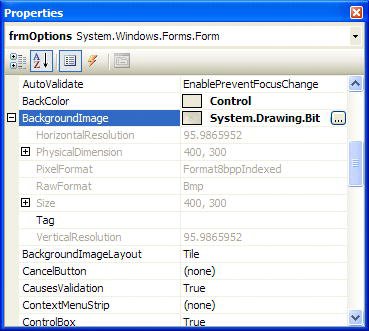
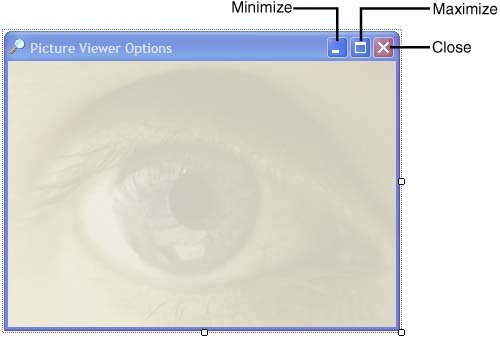
If the image you select is smaller than the form, Visual C# displays additional copies of the picture, creating a tiled effect. The image you selected was specifically made to be the same size as the form, so you don't have to worry about this. Notice that to the left of the BackgroundImage property in the Properties window is a small box containing a plus sign. This indicates that there are related properties, or sub-properties, of the BackgroundImage property. Click the plus sign now to expand the list of subproperties (see Figure 5.7). In the case of the BackgroundImage property, Visual C# shows you a number of properties related to the image assigned to the property, such as its dimensions and image format. Note that these subproperties are read-only (with the exception of the Tag property); not all subproperties are read-only. Figure 5.7. The subproperties show you details about the image. Did you Know? Adding a background image to a form can add pizzazz to a program, but it can also confuse users by making the form unnecessarily busy. Try to avoid adding images just because you can. Use discretion and add an image to a form only when the image adds value to the interface. Removing an image from a form is just as easy as adding the image in the first place. To remove the picture that you just added to your form, right-click the BackgroundImage property name and choose Reset from the shortcut menu that appears. Feel free to try this, but load the image once again before continuing. By the Way You must right-click the Name column of the property or the Build button in the value column, but not the Value column itself. If you right-click the value of the property, you get a different shortcut menu that doesn't have a Reset option. Giving a Form an IconThe icon assigned to a form appears in the left side of the form's title bar, in the taskbar when the form is minimized, and in the iconic list of tasks when you press Alt+Tab to switch to another application, as well as other places. The icon often represents the application; therefore, you should assign an icon to any form that a user can minimize. If you don't assign an icon to a form, Visual C# supplies a default icon to represent the form when it's minimized. This default icon is generic, unattractive, and doesn't really represent anythingyou should avoid it. In the past, it was recommended that every form have a unique icon that represented the form's purpose. This proved difficult to accomplish in large applications containing dozens or even hundreds of forms. Instead, it's usually just best to set the Icon property of all your forms to the icon that best represents your application. You assign an icon to a form in much the same way that you assign an image to the BackgroundImage property. Add an icon to your form now by clicking the form's Icon property in the Properties window, clicking the Build button that appears, and selecting an icon file from your hard drive (use the same icon you used in Hour 1). After you've selected the icon, it appears in the form's title bar to the left. Adding Minimize, Maximize, and Control Box Buttons to a FormTake a look at the title bar of the Picture Viewer Options form that you've created and notice that it has three buttons on it (see Figure 5.8). Figure 5.8. You control which, if any, of these buttons are displayed. The three buttons in the form's title bar are
Also note that the form's icon acts as a button as well, but only while running the application, not in design mode. If the user clicks the icon, a drop-down menu appears with some basic options. The Minimize and Maximize buttons make it easy for a user to quickly hide a form or make it fill the entire display, respectively. You've probably used these buttons on applications you work with. You'll be happy to know that you don't have to write code to implement thisit's handled automatically by Windows. All you have to do is decide whether you want a Maximize or Minimize button on a form. In the case of this Options form, the contents won't be resizable, so there's no need for a Maximize button. Also, you're going to want the user to close the form when they're finished with it, so there's no need for a Minimize button either. Remove these buttons now by setting the following properties of the form:
If you don't want the user to be able to close the form with the Close button (the button with the X in it in the upper-right corner of the form), you would set the ControlBox property to False. Be aware, however, that the minimize and maximize buttons are hidden automatically when ControlBox is set to false. If you want a Minimize or Maximize button, you have to set ControlBox = True. Changing the Appearance and Behavior of a Form's BorderYou might have noticed while working with other Windows programs that the borders of forms can vary. Some forms have borders that you can click and drag to change the size of the form, some have fixed borders that can't be changed, and still others have no borders at all. The appearance and behavior of a form's border is controlled by its FormBorderStyle property. The FormBorderStyle property can be set to one of the following values:
Run your project now by pressing F5, and move the mouse pointer over one of the borders of your main Picture Viewer form. This form has a sizable border, which means that you can resize the form by dragging the border. Move the pointer over an edge of the form and notice how the pointer changes from a large arrow to a line with arrows pointing on either side, indicating the direction you can stretch the border. When you move the pointer over a corner, you get a diagonal cursor that indicates that you can stretch both of the sides that meet at the corner. Clicking and dragging the border changes the size of the form. Stop the project now by choosing Debug, Stop Debugging from the menu (or click the Close button on the form) and change the frmOptions form's FormBorderStyle property to None (you'll need to double-click frmOptions.cs in the Solution Explorer to display the form in the form designer again). Notice that the title bar disappears as well (see Figure 5.9). Of course, when the title bar is gone, there's no visible title bar text, no control box, and no Minimize or Maximize buttons. In addition, there's no way to move or resize the form. It's rarely appropriate to specify None for a form's BorderStyle, but if you need to do so (a splash screen comes to mind), Visual C# 2005 makes it possible. Figure 5.9. A form with no border also has no title bar.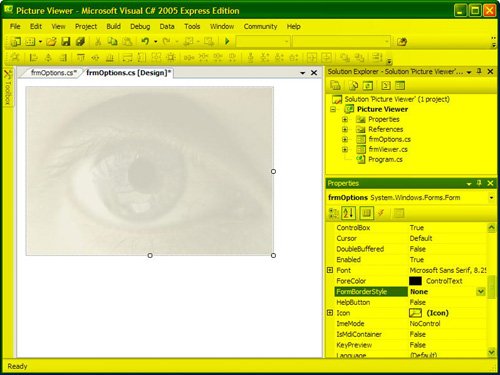 Next, change the frmOptions form's FormBorderStyle property to FixedToolWindow. This setting causes the title bar of the form to appear smaller than normal and the text to display in a smaller font (see Figure 5.10). In addition, the only thing displayed on the title bar besides the text is a Close button. Visual C#'s various design windows, such as the Properties window and the toolbox, are good examples of tool windows. Figure 5.10. A tool window is a special window whose title bar takes up the minimum space possible. The FormBorderStyle is a good example of how changing a single property can greatly affect the look and behavior of an object. Controlling the Minimum and Maximum Size of a FormOrdinarily, if a form can be resized, it can be maximized to fill the user's entire display. The form can be minimized right down to the taskbar as well. If you want to restrict the minimum or maximum size of a form, set the MinimumSize or MaximumSize properties, respectively. In general, you should avoid doing this, but it can be useful. Be aware that setting a specific MinimumSize doesn't stop the user from minimizing the form, if it has a minimize button. |

EAN: 2147483647
Pages: 248
- Chapter IX Extrinsic Plus Intrinsic Human Factors Influencing the Web Usage
- Chapter X Converting Browsers to Buyers: Key Considerations in Designing Business-to-Consumer Web Sites
- Chapter XI User Satisfaction with Web Portals: An Empirical Study
- Chapter XIII Shopping Agent Web Sites: A Comparative Shopping Environment
- Chapter XVII Internet Markets and E-Loyalty