Writing the Code Behind an Interface
| You have to write code for the program to be capable of performing actions and responding to user interaction. Visual C# 2005 is an event-driven language, which means that code is executed in response to events. These events might come from users, such as a user clicking a button, or from Windows itself (see Hour 4, "Understanding Events," for a complete explanation of events). Currently, your application looks nice, but it won't do a darn thing (sort of like me on Saturday morningsbefore kids). The user can click the Select Picture button until they can file for disability with carpel tunnel syndrome, but nothing will happen because you haven't told the program what to do when the user clicks the button. You can see this for yourself now by pressing F5 to run the project. Feel free to click the buttons, but they don't do anything. When you're finished, close the window you created to return to Design mode. You're going to write code to accomplish two tasks. First, you're going to write code that lets the user browse their hard drives to locate and select a picture file and then display the file in the picture box (this sounds a lot harder than it is). Second, you're going to add code to the Quit button that shuts down the program when the user clicks the button. Letting a User Browse for a FileThe first bit of code you're going to write enables the user to browse their hard drives, select a picture file, and then see the selected picture in the PictureBox control. This code executes when the user clicks the Select Picture button; therefore, it's added to the Click event of that button (you'll learn all about events in later hours). When you double-click a control on a form in Design view, the default event for that control is displayed in a code window. The default event for a Button control is its Click event, which makes sense because clicking is the most common action a user performs with a button. Double-click the Select Picture button now to access its Click event in the code window (see Figure 1.12). Figure 1.12. You'll write all code in a window such as this.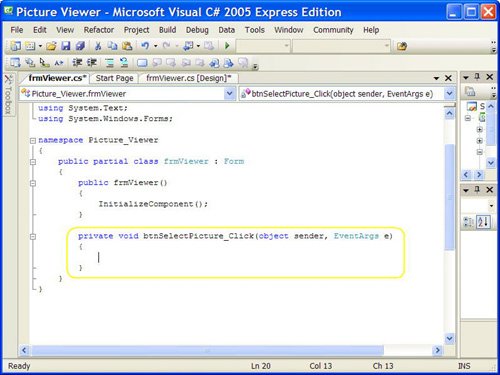 When you access an event, Visual C# builds an event handler (the code highlighted in the rectangle in Figure 1.12), which is essentially a template procedure in which you add the code that executes when the event occurs. The cursor is already placed within the code procedure, so all you have to do is add code. By the time you're finished with this book, you'll be madly clicking away as you write your own code to make your applications do exactly what you want them to dowell, most of the time. For now, just enter the code as I present it here. It's important that you get in the habit of commenting your code, so the first statement you're going to enter is a comment. Beginning a statement with two forward slashes designates the statement as a comment; the compiler won't do anything with the statement, so you can enter whatever text you want after the two forward slashes. Type the following statement exactly as it appears and press the Enter key at the end of the line: // Show the open file dialog box.The next statement you'll enter triggers a method of the OpenFileDialog control that you added to the form. You'll learn all about methods in Hour 3. For now, think of a method as a mechanism to make a control do something. The ShowDialog() method tells the control to show its Open dialog box and let the user select a file. The ShowDialog() method returns a value that indicates its success or failure, which you'll then compare to a predefined result (DialogResult.OK). Don't worry too much about what's happening here; you'll be learning the details of all this in later hours, and the sole purpose of this hour is to get your feet wet. In a nutshell, the ShowDialog() method is invoked to let a user browse for a file. If the user selects a file, more code is executed. Of course, there's a lot more to using the OpenFileDialog control than I present in this basic example, but this simple statement gets the job done. Enter the following two code statements, pressing Enter at the end of each line: if (ofdSelectPicture.ShowDialog() == DialogResult.OK) {By the Way Capitalization is important. Visual C# is a case-sensitive language, which means ShowDialog() is not the same as ShowDialog(). If you get the case of even one letter wrong, Visual C# will not recognize the word and you're code won't work, so always enter code exactly as it appears in this book! The opening brace (the { character) is necessary for this if statement because it denotes that this if construct will be made up of multiple lines. Time for another comment. Your cursor is currently on the line below the { that you entered. Type this statement and remember to press Enter at the end of the code line. // Load the picture into the picture box.This next statement, is the line of code that actually displays the picture in the picture box. (If you're itching to know more about graphics, take a look at Hour 18, "Working with Graphics.") Enter the following statement: picShowPicture.Image = Image.FromFile(ofdSelectPicture.FileName);In addition to displaying the selected picture, your program is also going to display the path and filename of the picture in the title bar. When you first created the form, you changed the Text property of the form using the Properties window. To create dynamic applications, properties need to be constantly adjusted at runtime, and this is done using code. Insert the following two statements (press Enter at the end of each line): // Show the name of the file in the form's caption. this.Text = string.Concat("Picture Viewer(" + ofdSelectPicture.FileName + ")"); The last statement you need to enter is a closing brace (a } character). Whenever you have an opening brace, you have to have a closing brace. This is how Visual C# groups multiple statements of code. Enter this statement now: }After you've entered all the code, your editor should look like that shown in Figure 1.13. Figure 1.13. Make sure that your code exactly matches the visible code shown here.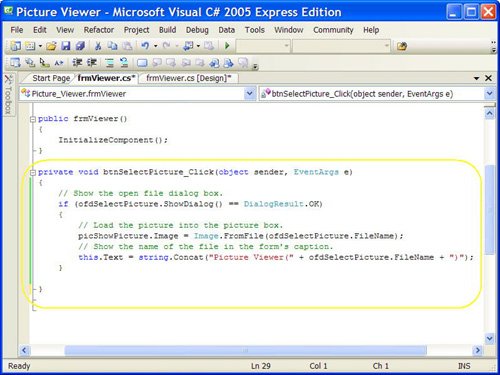 Terminating a Program Using CodeThe last bit of code you'll write terminates the application when the user clicks the Quit button. To do this, you'll need to access the Click event handler of the btnQuit button. At the top of the code window are two tabs. The current tab has the text frmViewer.cs*. This is the tab containing the code window for the form with the filename frmViewer.cs. Next to this is a tab that contains the text frmViewer.cs [Design]*. Click this tab now to switch from Code view to the form designer. If you receive an error when you click the tab, the code you entered contains an error, and you need to edit it to make it the same as shown in Figure 1.13. After the form designer appears, double-click the Quit button to access its Click event. Enter the following code in the Quit button's Click event handler, press Enter at the end of each statement: // Close the window and exit the application this.Close(); By the Way The this.Close(); statement closes the current form. When the last loaded form in a program is closed, the application shuts itself downcompletely. As you build more robust applications, you'll probably want to execute all kinds of cleanup routines before terminating an application, but for this example, closing the form is all you need to do. |
EAN: 2147483647
Pages: 248