Chapter 13. Debugging
Directives
16.1 Spell-check your interface.
Although Visual Basic .NET has no internal tool to spell-check your interface (the text that appears in label controls, message boxes, and such), you should visually spell-check all of your forms before compiling a final build. Spelling errors probably won't affect the stability or usability of your program, but they will leave your users with a negative impression. Once users begin to react negatively to a program, they tend to overreact to every little issue they come across. The way users deal with truly important problems (bugs) depends greatly on their overall impression of the product. Making sure all visible text is spell-checked and that correct grammar is used is an easy step toward overall customer satisfaction.
16.2 Adjust the alignment of controls on all forms.
I'm not suggesting that you revisit the layout of each of the forms in your project. However, as you work with a form, it's rather easy to inadvertently move a control. For example, have you ever intended to double-click a control to access its events and accidentally dragged the control out of position if even by only a few pixels? Users notice these fine points, and as with spelling problems, an interface that appears sloppy or shows a lack of detail has a negative effect on their impression of the program as a whole.
16.3 Test the tab order of all forms.
In Chapter 15, "User Input and Notification," I discussed the importance as well as the mechanics of setting the proper tab order for controls on a form. Before you build the final release of a project, it's a good idea to test the tab order of all the project's forms. This is a simple process really: you must display the form and start pressing the Tab key. Also note which control has the focus when the form is first displayed there might be times that you want this to be a control other than the one with the lowest tab order!
16.4 Check for duplicate access keys.
Access keys (keys that, when pressed in conjunction with Alt, cause something to happen) can be assigned to menus, buttons, and labels. Forms are often designed and tweaked over a period of time, and it's all too easy to duplicate access keys on a form. For example, you might copy the menus of one form and paste them on another, not realizing that one of the menu items has an access key that is already assigned to a button on the new form. Run each form in Run mode, and look for duplicate access keys. If you find any, you need to rethink the key assignments and make adjustments accordingly. Another good way to test this is to press the combination of each access key you find on a form. If a function other than the one you're expecting occurs (such as a button gets clicked instead of a menu item being triggered), you've got the access key assigned to two items and one is "winning" over the other.
16.5 Check all dialog boxes for accept and cancel buttons.
As I mentioned in Chapter 15, the accept button of a form is the button that gets "clicked" whenever the user presses the Enter key, regardless of the control that has the focus. The cancel button, on the other hand, gets "clicked" whenever the user presses the Escape key, regardless of the control that has the focus. Every dialog box should have both an accept button and a cancel button unless extenuating circumstances make one or both of these buttons undesirable. One such case is when a dialog box contains a multiline text box. Users are accustomed to pressing Enter to create a new line in multiline text boxes, so assigning a button as the accept button for such a dialog box is not a good idea. Rarely should you not include a cancel button, however.
16.6 Check the format of your message boxes.
It's a good idea to scan your code looking at MessageBox.Show statements and making sure that the buttons and icons are assigned properly. In addition, make sure that the default button is designated in the best interest of the user (such as defaulting to No when asking the user if she wants to perform some irreversible operation). Refer to Chapter 15 for more information.
16.7 Ensure that every procedure has an exception handler.
Every single statement executed at run time has some risk of throwing an exception. To safeguard against your program crashing to the desktop, all code should be wrapped in an exception handler (a Try End Try structure). You should take the time to scan all of your modules to make sure each and every procedure has an exception handler you might be surprised at how often you or another developer has forgotten to add exception handlers. Chapter 10, "Exception Handling," talks in great detail about trapping and dealing with exceptions.
16.8 Verify that you are using the proper versions of third-party components.
Most applications these days make use of third-party components (controls, DLLs, and so forth). Before distributing your program, you should contact the vendors of each and every component that you use to check on compatibility issues and to make sure you are running the latest version of the component. This is particularly true of any COM components that you use and distribute with your program, as it is easy to run into conflicts if an end-user has a newer version of the COM component installed on his or her machine. Sometimes component developers discover serious bugs in a component, and the time to find out a problem is before you distribute the component to hundreds of users.
16.9 Assign a logical root namespace to all distributed programs.
Every application developed within the .NET Framework has a root namespace. For example, if you had a root namespace of PictureViewer and you exposed a class named Application, the class's namespace would be PictureViewer.Application. By default, the root namespace of a project is set to the name of the project itself, but you might choose to use something different. To change the root namespace, right-click the project in the Solution Explorer window (not the setup project, but rather a project whose output you are including), choose Properties, and change the root namespace as required. You should assign a good name before creating any builds; avoid changing this value after the build has been distributed.
Important
You cannot use spaces in the value of a namespace, but you can use underscores instead. Be aware, however, that this isn't recommended; instead, you should use mixed casing, as in PictureViewer.
16.10 Thoroughly test and debug your program.
This one sounds obvious, doesn't it? Unfortunately, this is a step that rarely gets the time and attention it requires. This isn't the place to discuss the ins and outs of testing that subject can and has filled entire books but I want to point out that it's critical that you have time to test and that you have some sort of testing process in place before you ship your product. If you adhere to the standards presented throughout this book, your code will be more stable than it would be otherwise, but bugs and issues are a part of software development; you have to accept the fact that there are probably bugs in the software and do everything possible to catch and correct them before they are encountered by a user.
16.11 Check your conditional compilation constants.
In Chapter 13, "Debugging," I discussed the merits of using conditional compilation as a means to include or leave out debug code. Conditional compilation isn't just for debug code; it can be used for cultural localization, limiting functionality (standard build, enterprise build, and so on), and so much more. Before you perform the distributable build of your project, be sure that all compiler constants are set accordingly; you might not want to include debug code, and you probably wouldn't be happy distributing an enterprise build to customers who paid for only a standard release.
16.12 Avoid installing files to the user's desktop.
A user's desktop is private property and should be treated as such. There is almost always a better place to put a file or a shortcut than the user's desktop. If you really feel that you need to put a file on the desktop, use a custom dialog box and get confirmation from the user first.
16.13 Don't place shortcuts directly in the Program Files folder.
Most users like to keep control over their Program Files folder on their Start menu. The best place to create shortcuts is in a custom folder that has the following structure:
[PROGRAMFILES][CompanyName]\[ProductName]
The techniques used to accomplish this have been discussed in this chapter. Note that this is the way most commercial applications create shortcuts. Although you might consider the matter trivial, users have strong feelings about these situations, and you should do everything you can to make sure your applications behave as the user expects which includes the behavior of your custom setup programs.
16.14 Include a bootstrapper unless you are certain all target machines have the appropriate Windows Installer technology installed.
I've actually attempted to install a Windows Installer (.msi) file on a computer only to find that the machine in question didn't have the Windows Installer technology in place. I had to go to the Web and download a support file in order to get the application to install I was not a happy camper. Generally, you should include a bootstrapper in your primary setup application why run the risk of a user not being able to install your application? For subsequent service packs that rely on your product being installed, you can distribute just the .msi file because the target machine will already have the Windows Installer technology installed (because your previous bootstrap will make sure of that).
16.15 Name your setup projects ProgramName Installer.
Remember, you can't have two projects with the same name appear in the same solution. So, if you create a project titled Picture Viewer (the application you want to distribute), you can't add a setup project titled Picture Viewer. Instead, you should create a setup project named Picture Viewer Installer. Be sure to overwrite the name that appears in the Add Or Remove Programs dialog box, as explained earlier in this chapter in the "Specifying Uninstall Information" section.
16.16 Set the version number of your project appropriately.
Each and every version of a component that you distribute should have a unique, updated version number. See Chapter 17 for more information.
16.17 Give every installed component a meaningful icon.
The default icon assigned to a component isn't all that attractive (and even less meaningful). Before creating a build, set the icon of a project to something meaningful by viewing the project Property Pages for the project, viewing the Build page, and specifying a custom icon. Use the same icon for any shortcuts created for the component.
16.18 Always use the path [ProgramFilesFolder] [Manufacturer]\[ProductName] as the default Application Folder.
Although a user can overwrite your default Application Folder, most won't. Therefore, set the default to the industry standard, which is to create a subfolder structure under the user's \Program Files folder named \Manufacturer\Product. All of your products should use the same \Manufacturer folder, but the subfolder should be changed accordingly.
16.19 Create all custom folders under your Application Folder unless you have a specific reason to do otherwise.
If your application requires custom folders, such as a Sample folder or a Tutorial folder, create them under your application folder. One exception to this is if you plan on creating a folder in which users are encouraged to save documents for your application. In this case, you should create the folder in the user's \My Documents folder, to stay consistent with other applications.
16.20 Include debug information only if you intend to use it.
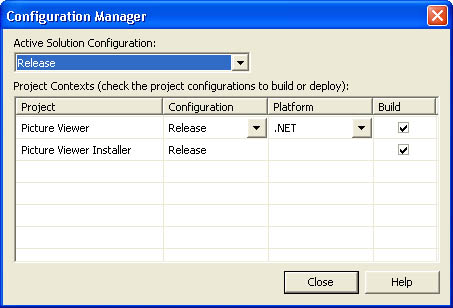
As I mentioned in an earlier chapter, you can build a component in a Debug or Release configuration. In a Debug configuration, the compiler adds additional debug code that can be used with additional debugging tools. However, this can bloat the component and negatively impact performance. Therefore, always create Release builds when distributing a component unless you plan on using the extra debug information. To change the configuration settings, right-click the setup project in the Solution Explorer, choose Properties, click the Configuration Manager button in the project Property Pages dialog box, and change the configuration as necessary using the Configuration Manager dialog box. (See Figure 16-28.)
Figure 16-28. Distribute Release builds unless you plan on using the additional debug information.
16.21 Set the SharedLegacy property of all COM files to True.
.NET components don't suffer from the "DLL Hell" found in the COM world. (Refer to Chapter 17 for more information.) However, when installing COM components with your .NET solution, you must be mindful of the issues that exist with COM, such as the fact that shared components must be counted by Windows so that a shared component isn't uninstalled with an application. When you set the SharedLegacy property of a file to True, Windows keeps track of the number of times the file is installed, and it won't uninstall it when your application is uninstalled if other programs make use of the component.
16.22 Set the Vital property of critical files to True.
Most installations include critical files that are required in order to run the solution. For example, an installation might be of no use if the primary output component doesn't get installed. For such critical files, set their Vital property to True. If the installer is unable to install a file that has its Vital property set to True, the installation is cancelled and rolled back.
16.23 Set the build order appropriately for the setup project.
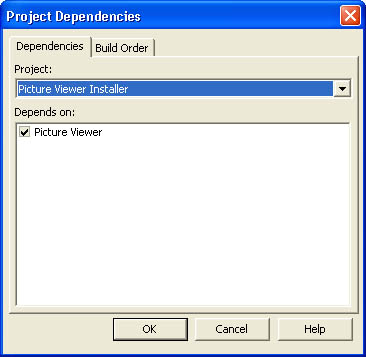
If your setup project installs the output of more than one .NET project, it might be necessary to adjust the order in which the subordinate projects are built. For example, you might want server components built before any clients that use them. To change the order in which projects are built, select the setup project in Solution Explorer and then choose Project Build Order from the Project menu. The Build Order tab of the Project Dependencies dialog box shows the current order in which the projects will be built. (See Figure 16-29.) To change the build order, click the Dependencies tab, choose a project, and change its dependencies. (See Figure 16-30.) Dependencies are compiled first, before the components that rely on them.
Figure 16-29. Projects are built in the order in which they appear in this list.
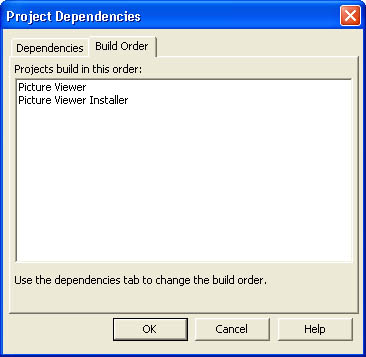
Figure 16-30. Dependencies determine the order in which components are built.
16.24 Set all custom-created registry keys to DeleteAtUninstall unless you have a specific reason to do otherwise.
One of the problems with the registry is that it tends to get polluted over time. Often, registry keys created for applications aren't removed when the corresponding application is uninstalled. You can ensure that your custom registry keys are removed upon uninstall by setting the DeleteAtUninstall property of your custom registry keys to True.
EAN: 2147483647
Pages: 84