Types of Exception Handlers
Breakpoints
Breakpoints allow you to halt the execution of code at any statement. Once the code is stopped, you can query or change the value of a variable, make use of some of the other debugging windows, and even step through code execution one line at a time. Although setting and removing a breakpoint is a trivial task, it's one of the most important pieces of the debugging puzzle. Visual Basic .NET has added considerable functionality to breakpoints, including the ability to turn them off and on and to save them with the project. (This last one has been a long time coming.) To make the most of your debugging sessions, you need to make the most of breakpoints.
Creating and Removing Breakpoints
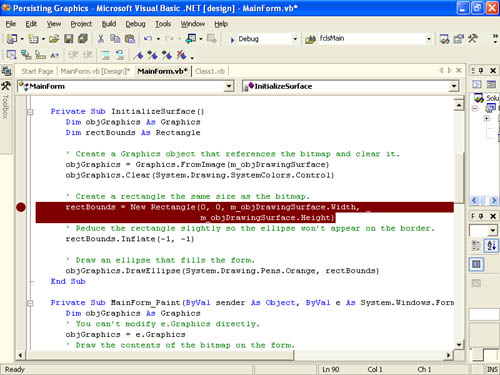
To add a breakpoint, position the cursor in the statement at which you want code to break and press F9. Alternatively, you can click in the gray area to the left of the statement. When you click in the gray area, Visual Basic displays a red circle and highlights the statement in red, denoting a breakpoint at that statement. (See Figure 13-7.) To clear a breakpoint, click the red circle of the breakpoint or click on the statement and press F9 once again; F9 toggles breakpoints on and off. When Visual Basic encounters a breakpoint while executing code, execution is halted at the breakpoint, ready to execute the break statement.
Figure 13-7. A breakpoint statement is highlighted in red and has a red circle next to it.
Entering Break Mode
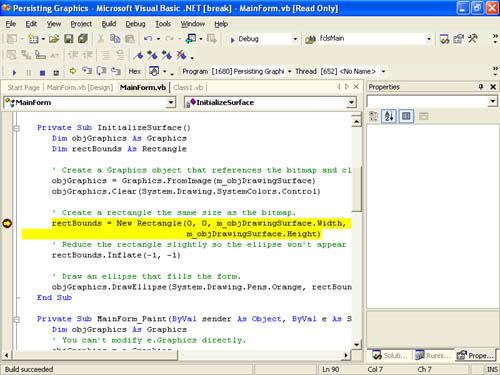
When code execution encounters a break statement, the code enters Break mode and the statement is shown highlighted in yellow. (See Figure 13-8.) In addition to the highlight, a yellow arrow appears in the red circle. The yellow highlight and arrow indicate the next statement to be executed. Note that as you step through the code, the arrow and yellow highlight will move to different statements, highlighting the execution path; the arrow and yellow highlight won't always appear on a break statement.
Figure 13-8. The next statement to be executed appears highlighted in yellow with a yellow arrow to its left.
You can take a number of actions once code has entered Break mode, as shown in Table 13-2.
Note
The keystrokes I list in Table 13-2 are applicable if your keyboard environment settings use the Default Settings mapping scheme. If you are using different settings, such as the Visual Basic 6 mapping scheme, the keystrokes might be different.
| Action | Keystroke | Description |
|---|---|---|
| Continue execution | F5 | Continues execution at the current break statement. |
| Step into | F11 | Executes the statement at the breakpoint and then stops at the next statement. If the current statement is a function call, F11 enters the function and stops at the first statement in the function. |
| Step over | F10 | Executes the statement at the breakpoint and then stops at the next statement. If the current statement is a function call, the function is run in its entirety; execution stops at the statement following the function call. |
| Step out | Shift+F11 | Runs all of the statements in the current procedure and halts execution at the statement following the one that called the current procedure. |
Also while in Break mode, you can use many of the debugging windows, such as the Locals window. I won't go into the details of using those windows here, because each has its own section. Just keep in mind that many of the debugging windows are most useful while code is in Break mode.
Tip
You can clear all of the breakpoints in a project by choosing Clear All Breakpoints from the Debug menu.
Managing Breakpoints by Using the Breakpoints Window
Visual Basic .NET includes a number of new features that greatly enhance the functionality of breakpoints, including a new interface to manage these features: the Breakpoints window. (See Figure 13-9.) To display the Breakpoints window, open the Debug menu, point to Windows, and then choose Breakpoints.
Figure 13-9. The Breakpoints window lets you easily manage the breakpoints in a project.
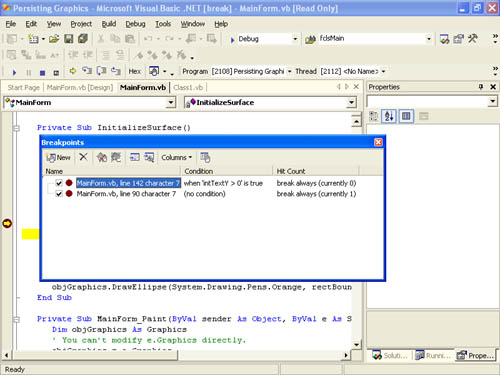
When you delete a breakpoint, it's permanently removed. In order to break at the statement again, you'd have to create a new breakpoint. The check mark next to each of the listed breakpoints in the Breakpoints window denotes the enabled state of a breakpoint. To disable a breakpoint, simply uncheck its check box. When a breakpoint is disabled, it still exists in the breakpoints list but it's ignored when execution reaches it. Disabled breakpoint statements appear in the editor with a red circle and red outline, much like an enabled breakpoint, but the circle and outline aren't filled in. (See Figure 13-10.) Note that the statement itself isn't disabled, only the breakpoint. To turn a breakpoint back on, click its check box.
Tip
Double-clicking a breakpoint in the list takes you to the breakpoint in the code editor.
Figure 13-10. Disabled breakpoints appear like this in the code editor.

One of the powerful features of the Breakpoints window is that it keeps track of the number of times a breakpoint is encountered in code. This allows you, at a glance, to see the code that hasn't been tested by looking for breakpoints that haven't been hit. You can even make use of this count to determine when to break, as you'll see.
In the past, execution always entered Break mode when a breakpoint was encountered. Now, you can disable breakpoints without deleting them, but that's just the tip of the iceberg. Visual Basic .NET allows you to define conditions that must be met in order for a breakpoint to actually stop code execution. To view and set these conditions, right-click a breakpoint in the Breakpoints window and choose Properties. This displays the Breakpoint Properties dialog box shown in Figure 13-11.
Figure 13-11. Breakpoints now have properties, such as conditions that define when they actually break code execution.
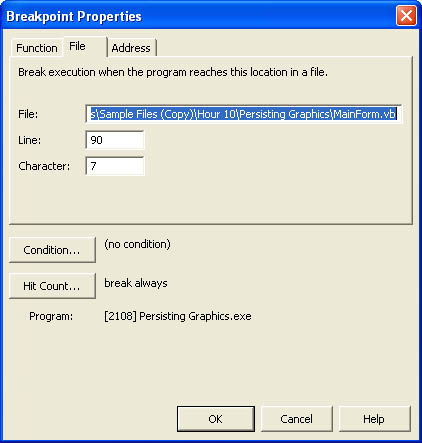
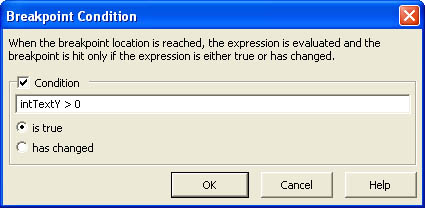
To set a condition that determines whether the breakpoint halts execution, click Condition. This displays the Breakpoint Condition dialog box shown in Figure 13-12. Note that you can specify the breakpoint to halt execution when the chosen expression is true or when it has changed (which is similar to setting a watch, as discussed later).
Figure 13-12. You can specify that a breakpoint should halt execution only under specific conditions.
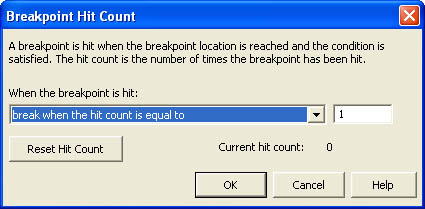
In addition to using expressions to determine when to break code, you can also use the hit count I mentioned earlier. To do so, click Hit Count on the Breakpoint Properties dialog box to display the Breakpoint Hit Count dialog box shown in Figure 13-13. Using this dialog box, you can choose to have the breakpoint always break, break when encountered a specific number of times, break when the hit count is a multiple of a specified number, or break when the hit count is greater than or equal to a number. These settings greatly aid debugging in certain situations, such as within complex loops. You can also reset the current hit count from this dialog box.
Figure 13-13. A breakpoint can be defined to break only after being reached a certain number of times.
Entering Break Mode with the Stop Statement
As with previous versions of Visual Basic, you can enter Break mode by using a Stop statement. Note, however, that Stop statements encountered while running your application as a compiled component will throw an exception that, if not trapped, will terminate your application. There will be times when a Stop statement is the best choice, but when possible, use a breakpoint instead of a Stop statement.
EAN: 2147483647
Pages: 84