Managing Project Files with the Solution Explorer
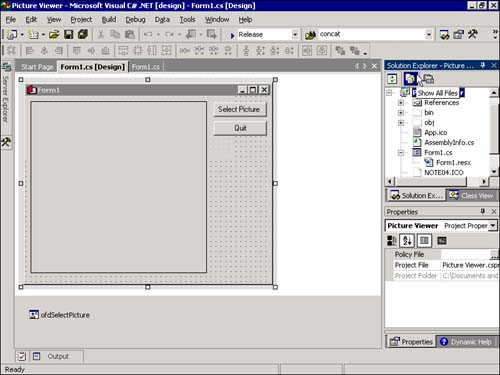
As you develop projects, they'll become more and more complex, often containing many objects such as forms and modules. Each object is defined by one or more files. In addition, you can build complex solutions composed of more than one project. The Solution Explorer window shown in Figure 2.19 is the tool for managing all the files in a simple or complex solution. Using the Solution Explorer, you can add, rename, and remove project files, as well as select objects to view their properties. If the Solution Explorer window isn't visible on your screen, show it now by choosing Solution Explorer from the View menu.
Figure 2.19. Use the Solution Explorer window to manage all the files that make up a project.

To better understand the Solution Explorer window, follow these steps:
-
Locate the Picture Viewer program you created in the Quick Tour by choosing File, Open , and then clicking Project.
-
Open the Picture Viewer project. The file you need to select is located in the Picture Viewer folder that C# created when the project was constructed . The file has the extension .sln (for solution). If you're asked whether you want to save the current project, choose No.
-
Select the Picture Viewer project item in the Solution Explorer. When you do, a button becomes visible toward the top of the window. This button has a picture of pieces of paper and has the ToolTip Show All Files (see Figure 2.20). Click this button and the Solution Explorer displays all files in the project.
Figure 2.20. Notice that the form you defined appears as two files in the Solution Explorer.
Your design environment should now look like the one in Figure 2.20. If your screen looks much different from the one in this figure, use the techniques you've learned in this hour to change your design environment so that it's similar to the one shown here. Be sure to widen the Solution Explorer window so that you can read all the text it contains.
 | Some forms and other objects may be composed of more than one file. By default, C# hides project files that you don't directly manipulate. Click the plus sign (+) next to the form item and you'll see a sub item titled Form1.resx. You'll learn about these additional files in Hour 5, "Building FormsPart I." For now, click the Show All Files button again to hide these related files. |
You can view any object listed within the Solution Explorer using the object's default viewer by double-clicking the object. Each object has a default viewer but may actually have more than one viewer. For instance, a form has a Form Design view as well as a Code view. By default, double-clicking a form in the Solution Explorer displays the form in Form Design view, where you can manipulate the form's interface.
You've already learned one way to access the code behind a formdouble-click an object to access its default event handler. You'll frequently need to get to the code of a form without adding a new event handler. One way to do this is to use the Solution Explorer. When a form is selected in the Solution Explorer, buttons are visible at the top of the Solution Explorer window that allow you to display the code editor or the form designer, respectively.
You'll use the Solution Explorer window so often that you'll probably want to dock it to an edge and set it to Auto Hide, or perhaps keep it visible all the time. The Solution Explorer window is one of the easiest to get the hang of in C#; navigating the Solution Explorer window will be second nature to you before you know it.
Working with Solutions
In truth, the Solution Explorer window is the evolution of the Project Explorer window from versions of Visual Studio prior to .NET, and the two are similar in many ways. Understanding solutions is easier to do when you understand projects.
A project is what you create with C#. Often, the words project and program are used interchangeably; this isn't much of a problem if you understand the important distinctions. A project is the set of source files that make up a program or component, whereas a program is the binary file that you build by compiling source files into something such as a Windows executable file (.exe). Projects always consist of a main project file and may be made up of any number of other files, such as form files, module files, or class module files. The main project file stores information about the projectall the files that make up the project, for exampleas well as properties that define aspects of a project, such as the parameters to use when the project is compiled into a program.
What then, is a solution? As your abilities grow and your applications increase in complexity, you'll find that to accomplish your development goals, you'll have to build multiple projects that work harmoniously. For instance, you might build a custom user control such as a custom data grid that you use within other projects you design, or you may isolate the business rules of a complex application into separate components to run on isolated servers. All the projects used to accomplish those goals are collectively called a solution. Therefore, a solution (at its most basic level) is really nothing more than a grouping of projects.
| | You should group projects into a single solution only when the projects relate to one another. If you have a number of projects that you're working on, but each of them is autonomous, work with each project in a separate solution. |
Understanding Project Components
As I stated earlier, a project always consists of a main project file, and it may consist of one or more secondary files, such as files that make up forms or code modules. As you create and save objects within your project, one or more corresponding files are created and saved on your hard drive. All files that are created for C# source objects have the extension .cs, designating that they define C# objects. Make sure that you save your objects with understandable names , or things might get confusing as the size of your project grows.
All the files that make up a project are text files. Some objects, however, need to store binary information, such as a picture, for a form's BackgroundImage property. Binary data is stored in an XML file (which is still a text file). Suppose you had a form with an icon on it. You'd have a text file defining the form (its size, the controls on it, and the code behind it), and an associated resource file with the same name as the form file but with the extension .resx. This second file would be in XML format and would contain all the binary data needed to create the form.
| | If you want to see what the source file of a form file looks like, use Notepad to open a form file on your computer. Don't save any changes to the file, however, or it may never work again. |
The following is a list of some of the components you may use in your projects:
-
Forms Forms are the visual windows that make up the interface of your application. Forms are defined using a special type of module.
-
Class Modules Class modules are a special type of module that enable you to create object-oriented applications. Throughout the course of this book, you're learning how to program using an object-oriented language, but you're mostly learning how to use objects supplied by C#. In Hour 17, "Designing Objects with Classes," you'll learn how to use class modules to create your own objects. Forms are derived from a special type of class module.
-
User Controls User controls (formerly ActiveX controls, which are formerly OLE controls) are controls that can be used on the forms of other projects. For example, you could create a User control with a calendar interface for a contact manager. Creating user controls requires the skill of an experienced programmer; therefore, I won't be covering them in this book.
Setting Project Properties
C# projects have properties, just as other objects do, such as forms and controls. Projects have lots of properties, many of them relating to advanced functionality that I won't be covering in this book. However, you need to be aware of how to access project properties and how to change some of the more commonly used properties.
To access the properties for a project, right-click the project in the Solution Explorer window and choose Properties from the shortcut menu. Do this now.
| | In earlier versions of Visual Studio, you accessed the project properties via the Project menu. You can still do this, but you must have the project selected in the Solution Explorer, or the Properties menu won't appear on the Project menu. If you don't remember this, you could spend a lot of time trying to find the propertiesI sure did. |
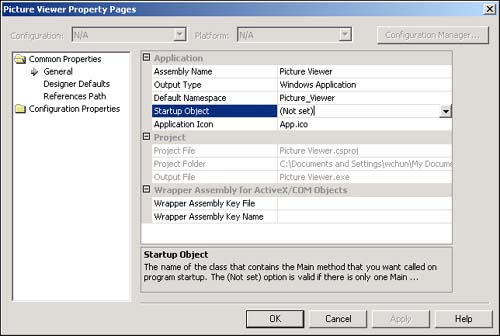
The Tree View control on the left side of the dialog box is used to display a property page (see Figure 2.21). When you first open the dialog box, the General page is visible. On this page, the setting you'll need to worry about most is the Startup Object property. The Startup Object setting determines the name of the class that contains the Main() method that you want called on program startup. The (Not Set) option, as shown in Figure 2.21, is valid if only one Main() method exists in your application.
Figure 2.21. Project properties let you tailor aspects of the project as a whole.
The Output Type option determines the type of compiled component defined by this source project. When you create a new project, you select the type of project to create (such as Windows Application), so this field is always filled in. At times, you might have to change this setting after the project has been created, and this is the place to do so.
Notice that the project folder, project filename, and output name are displayed on this page as well. If you work with a lot of projects, you may find this information valuable , and this is certainly the easiest spot to obtain it.
| | The output name determines the filename created when you build a distributable component. Distributing applications is discussed in Hour 22. |
As you work through the hours in this book, I'll refer to the Project Properties dialog box as necessary, explaining pages and items in context with other material.
Adding and Removing Project Files
When you first start C# and create a new Windows Application project, C# creates the project with a single form. You're not limited to having one form in a project, however; you can create new forms or add existing forms to your project at will. You can also create and add code files and classes, as well as other types of objects.
You can add a new or existing object to your project in one of three ways:
-
Choose the appropriate menu item from the Project menu.
-
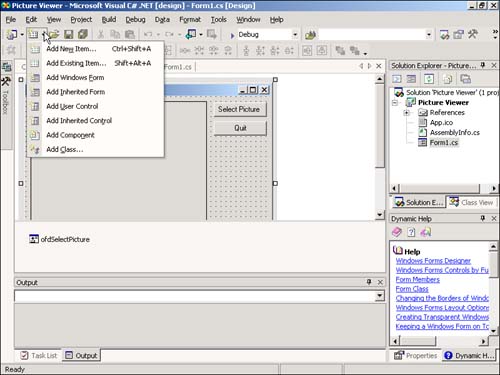
Click the small drop-down arrow that is part of the Add New Item button on the Standard toolbar, and then choose the object type from the drop-down list that is displayed (see Figure 2.22).
Figure 2.22. This tool button is one of three ways to add objects to a project.
-
Right-click the project name in the Solution Explorer window, and then choose Add from the shortcut menu to access a submenu from which you can select object types.
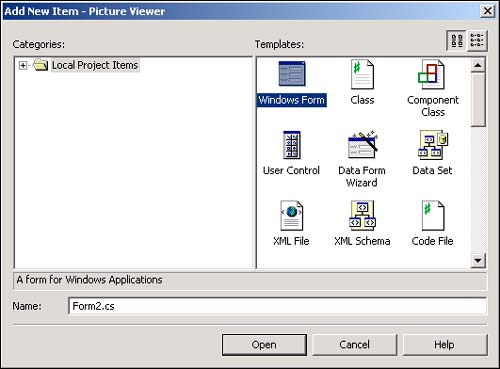
When you select Add ObjectType from any of these menus , a dialog box appears, showing you the objects that can be added to the project. Your chosen item is selected by default (see Figure 2.23). Simply name the object and click Open to create a new object of the selected type. To create an object of a different type, click the type to select it, name it, and then click Open.
Figure 2.23. Regardless of the menu option you select, you can add any type of object you want using this dialog box.
Adding new forms and modules to your project is easy, and you can add as many as you like. You'll come to rely more heavily on the Solution Explorer to manage all the objects in the project as the project becomes more complex.
Although it won't happen as often as adding project files, you may sometimes need to remove an object from a project. Removing objects from your project is even easier than adding them. To remove an object, simply right-click the object in the Solution Explorer window and select Exclude from Project. This removes the object from the file but does not delete the source file from the disk. Selecting Delete, on the other hand, removes the file from the project and deletes it from the disk. Don't select Delete unless you want to totally destroy the file and you're sure that you'll never need it again in the future.
| Top |
EAN: 2147483647
Pages: 253