Using the Open File Dialog and Save File Dialog Controls
Using the Open File Dialog and Save File Dialog Controls
In Hour 1, "A C# Programming Tour," you used the Open File Dialog control to enable a user to browse for pictures to display in your Picture Viewer program. In this section, you'll move beyond those basics to learn important details about working with the Open File Dialog control, as well as its sister control, the Save File Dialog.
You're going to build a project to illustrate most of the file-manipulation concepts discussed in this hour. Before continuing, create a new Windows Application titled Manipulating Files. Change the name of the default form to fclsManipulatingFiles, set its Text to Manipulating Files, and then set the entry point of the project to fclsManipulatingFiles. Add a new text box to the form and set its properties as shown in the following table:
| Property | Value |
|---|---|
| Name | txtSource |
| Location | 95,8 |
| Size | 184,20 |
| Text | ( make blank ) |
Using the Open File Dialog Control
The Open File Dialog control is used to display a dialog box that enables the user to browse and select a file (see Figure 19.1). It's important to note that usually the Open File Dialog doesn't actually open a file, but it allows a user to select a file that is then opened by code within the application.
Figure 19.1. The Open File dialog box is used to browse and select files.
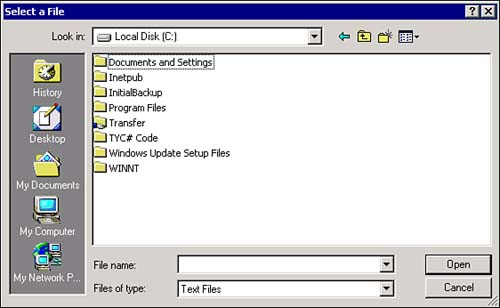
Add a new Open File Dialog to your project now by double-clicking the OpenFileDialog item in the toolbox. The Open File Dialog doesn't have an interface per se, so it appears in the area below the form rather than on it. For the user to browse for files, you have to manipulate the Open File Dialog using its properties and methods .
You're going to add a button to the form that, when clicked, allows a user to locate and select a file. If a user selects a file, the filename will be placed in the text box you've created. Go ahead and add a button to the form now, and set its properties as follows :
| Property | Value |
|---|---|
| Name | btnOpenFile |
| Location | 8,8 |
| Size | 80,23 |
| Text | Source |
Next, double-click the button and add the following code to its Click event:
openFileDialog1.InitialDirectory = @"C:\"; openFileDialog1.Title = "Select a File";
The first statement specifies the directory to display when the dialog box is first shown. If you don't specify a directory for the InitialDirectory property, the active system directory is used (for example, the last directory browsed to with a different Open File dialog box).
The Title property of the Open File Dialog determines the text displayed in the title bar of the Open File dialog box. If you don't specify text for the Title property, C# displays the word Open in the title bar.
Different types of files have different extensions. The Filter property determines what types of files appear in the Open File dialog box (refer to Figure 19.1). A filter is specified in the following format:
Description *. extension
The text that appears before the pipe symbol ( ) is the descriptive text of the file type to filter on, whereas the text after the pipe symbol is the pattern used to filter files. For example, to display only Windows bitmap files, you could use a filter such as the following:
control. Filter = "Windows Bitmaps*.bmp"; You can specify more than one filter type. To do this, add a pipe symbol ( ) between the filters, like this:
control. Filter = "Windows Bitmaps*.bmpJPEG Files*.jpg"; You're going to restrict your Open File dialog box to show only text files, so enter the following statement in your btnOpenFile_Click code:
openFileDialog1.Filter = "Text Files*.txt";
When you have more than one filter, you can specify which filter appears selected by default using the FilterIndex property. Although you've specified only one filter type in this example, it's still a good idea to designate the default filter, so add this statement to your code:
openFileDialog1.FilterIndex = 1;
Finally, you need to show the Open File dialog box and take action based on whether the user selects a file. The ShowDialog() method of the Open File Dialog control acts much like the method of forms by the same name, returning a result that indicates the user's selection on the dialog box. Enter the following statements into your procedure:
if (openFileDialog1.ShowDialog() != DialogResult.Cancel) txtSource.Text = openFileDialog1.FileName; else txtSource.Text = "";
This code just places the selected filename into the text box txtSource. If the user clicks Cancel, the contents of the text box are cleared.
Press F5 to run the project and click the button. You'll get the same dialog box shown in Figure 19.1 (with different files and directories, of course). Select a text file, click Open, and C# places the name of the file into the text box.
| | By default, the Open File Dialog won't allow the user to enter a filename that doesn't exist. You can override this behavior by setting the CheckFileExists property of the Open File Dialog to false. |
 | The Open File Dialog control has the capability to allow the user to select multiple files. It's rare that you need to do this (I don't recall ever needing this capability in one of my projects), so I won't go into the details here. If you're interested, take a look at the Multiselect property of the Open File Dialog in the Help text. |
The Open File Dialog control makes allowing a user to browse and select a file almost trivial. Without this code, you would have to write an amazing amount of very difficult code and would still probably not come up with all the functionality supported by this control.
Using the Save File Dialog Control
The Save File Dialog control is very similar to the Open File Dialog control, but it is used to allow a user to browse directories and specify a file to save, rather than open. Again, it's important to note that the Save File Dialog doesn't actually save a file, it is used to enable a user to specify a file to save; you'll have to write code to do something with the filename returned by the control.
You're going to use the Save File Dialog to let the user specify a filename. This filename will be the target of various file operations you'll learn about later in this hour. Create a new text box on your form and set its properties as follows:
| Property | Value |
|---|---|
| Name | txtDestination |
| Location | 95,40 |
| Size | 184,20 |
| Text | ( make blank ) |
You're now going to create a button that, when clicked, enables the user to specify a filename to save a file. Add a new button to the form and set its properties as shown in the following table:
| Property | Value |
|---|---|
| Name | btnSaveFile |
| Location | 8,40 |
| Size | 80,23 |
| Text | Destination |
Of course, none of this will work without adding a Save File dialog box. Double-click the SaveFileDialog item in the toolbox to add a new control to the project.
Next, double-click the new button (btnSaveFile) and add the following code to its Click event:
saveFileDialog1.Title = "Specify Destination Filename"; saveFileDialog1.Filter = "Text Files*.txt"; saveFileDialog1.FilterIndex = 1; saveFileDialog1.OverwritePrompt = true;
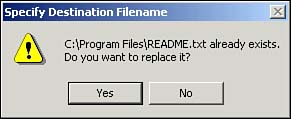
The first three statements set properties that are identical to those of the Open File Dialog. The OverwritePrompt property, however, is unique to the Save File Dialog. When this property is set to true, C# asks users to confirm their selections when they choose a file that already exists, as shown in Figure 19.2. I highly recommend that you prompt the user about replacing files by ensuring the OverwritePrompt property is set to true.
Figure 19.2. It's a good idea to get confirmation before replacing an existing file.
| | If you want the Save File dialog box to prompt users when the file they specify doesn't exist, set the CreatePrompt property of the Save File Dialog control to true. |
The last bit of code you need to add places the selected filename in the txtDestination text box. Enter the code as shown here:
if (saveFileDialog1.ShowDialog() != DialogResult.Cancel) txtDestination.Text = saveFileDialog1.FileName;
Press F5 to run the project. Then click each of the buttons and select a file. When you're satisfied that your selections are being sent to the appropriate text box, stop the project and save your work. If your selected filenames aren't being sent to the proper text box, verify that your code is correct.
The Open File Dialog and Save File Dialog controls are very similar in their design and appearance, but each serves a specific purpose. Throughout the rest of this hour, you'll be using the interface you've just created.
| Top |
EAN: 2147483647
Pages: 253