Section 8.1. Installation
8.1. InstallationIn addition to calculating the SystemCenterReporting database starting size, you must also choose the configuration of SQL 2000 Reporting Services and install it. For the scope of this chapter, one server will host all of the MOM database roles. Specifically, homemomserver3 will be the database and reporting server.
SQL Reporting services come in four versions : standard for an all-in-one machine deployment, enterprise for large-scale deployment or when all features are required, developer for authoring reports, and an evaluation edition. The evaluation and developer editions cannot be licensed for production use, so don't even consider those in your planning. In addition to providing support for a scalable web farm solution, the enterprise edition has the ability to generate reports and send them to various destinations (e.g., email and file shares) in varying formats based on address entries that you create and maintain in SQL. This is called a data-driven subscription. For this chapter, the standard edition of SQL Reporting is used (this can install on SQL 2000 Developer, Standard, or Enterprise) and all examples will be based on it. Fortunately, there is only one version of MOM 2005 reporting to install on top of SQL Reporting, so there is no decision to be made there. 8.1.1. SQL 2000 Reporting ServicesAll of the services necessary to support MOM Reporting will be installed on one dedicated server. This server will host both the ReportServer and SystemCenterReporting databases. Since this server will also host the Reports web site, IIS 6.0 is installed with ASP.NET support.
Once SQL 2000 is installed and patched to SP3A, you can begin the SRS installation. Surprisingly enough, the SRS installation doesn't begin with the typical welcome page, so don't be thrown off by that. It begins with the end-user license agreement (EULA) and then proceeds through a component update and prerequisite checker for pages two and three. Page four then is the expected welcome page. During the prerequisite check, if Visual Studio .NET 2003 has not been installed on the reporting server (it does not have to be), Setup will display a warning telling you that it is not present, as shown in Figure 8-1. Figure 8-1. SQL Reporting Services install prerequisite checker warning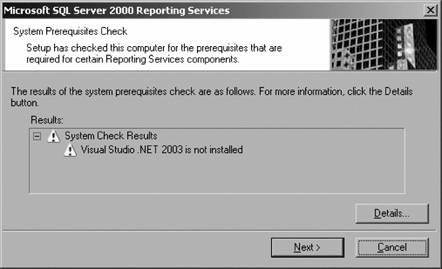 This warning can be safely ignored. Visual Studio .NET 2003 is used to author and alter reports and is, therefore, not necessary on the production reporting server. Instead, it is better to install the SRS report designer and other client components on a workstation that already has Visual Studio .NET 2003 installed. When this is done, a report project wizard is made available in Visual Studio. As a MOM administrator, you shouldn't have to create reports; the reports that come with the management packs have all been predefined and you will only need to import them. It is helpful, though, to understand the three components of a report:
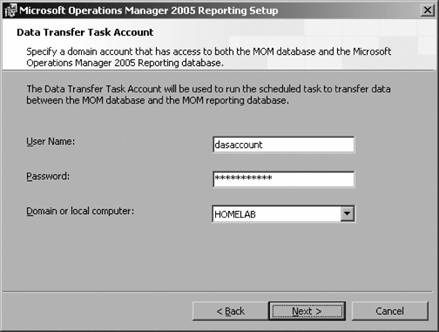
All three components can then be wrapped up into a report definition language file (.rdl) and imported directly into the ReportServer database using the Report Manager, or placed into XML format, as has been done for the MOM management pack reports. Report definitions that are in XML format need to be imported using the management pack import/export wizard or the rptutil.exe tool. Following the welcome and registration pages is the component selection page (see Figure 8-2). Figure 8-2. SRS component installation for an all-in-one configuration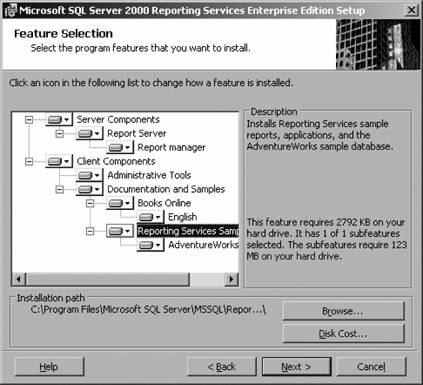 The SRS installation consists of server components and client components. The server components are the report server services and the Report Manager, which is the reporting web site. The client components include the report designer (not pictured here because Visual Studio is not installed), administrative tools, and the online books and samples. For this installation everything but the report designer will be installed. On the next page you are prompted for the first of two sets of credentials. This first set is used to run the SRS service on the reporting machine (in this case homemomserver3). In Figure 8-3, you have the option to use the network service account (because this is on Windows Server 2003), the local system account, or a domain service account. For this example, a domain service account was created (SRSSA) and given local administrator rights on homemomserver3. Also, you can (and should) configure the service to start automatically. Figure 8-3. Selecting the credentials that the reporting service will run as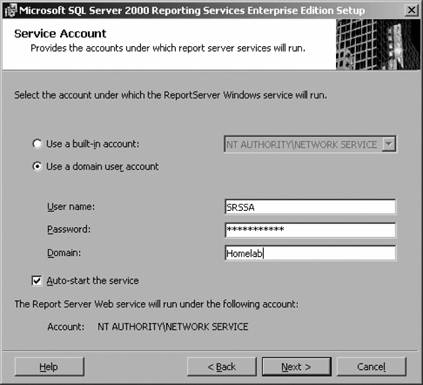 The next page (see Figure 8-4) allows you to change the default configuration for the virtual directories for report server, to redirect browsing to the default web sites, and to require SSL connections. Because this will be a dedicated server, the default values for the virtual directories are unchanged. In addition, because this server is not exposed to the Internet, SSL encryption will not be required. On the next page, you identify the server that will house the report server database, the name of the database, and the credentials that the report service will use to connect to the report server database. In Figure 8-5, the local SQL Server instance has been accepted as well as the default database name. For the credentials used to connect to the database, the previously created homelab\dasaccount is specified. There is only one account for all database access across all of the MOM servers. Figure 8-4. Configuring virtual directories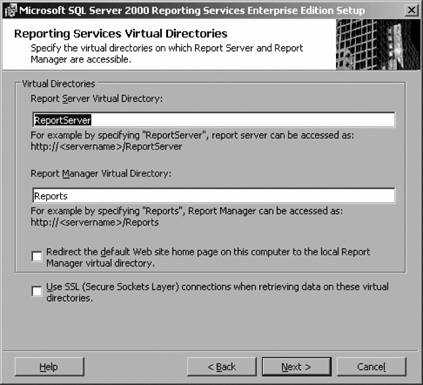 Figure 8-5. Specifying the SQL instance, the database name, and the credentials for the report sever database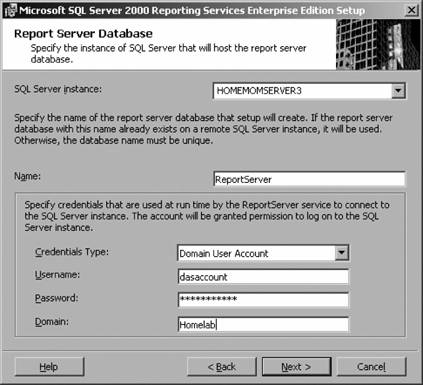 On the next page, you designate the SMTP server to be used for forwarding subscribed reports as well as the From address. This can be any server that is running SMTP and is configured to perform SMTP relay. Exchange servers can do this just fine. For this all-in-one installation, the SMTP component of IIS on homemomserver3 is installed (the reporting server) and the From address was set to reportmaster@homelab.lab. The remaining pages cover choices on licensing (per seat or per processor) and the usual Ready to Install and Completed Successfully pages. Once setup completes successfully, launch your browser and open http://<servername>/reports to confirm that the report manager is accessible. Since connectivity is just being tested, there won't be any reports or folders here yet. Figure 8-6 shows the Report Manager page on homemomserver3 at the end of SRS installation. Figure 8-6. The empty, but functioning, reporting services site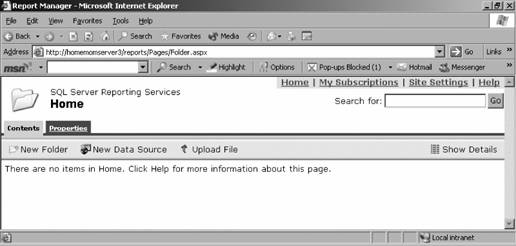 At this point, don't forget to install SRS SP1 on your reporting server. After installing SP1, you can confirm that the patch applied correctly by looking at the SRS version number. To see this, browse to /reportserver">http://<servername>/reportserver. If the upgrade was applied successfully, version number 8.00.878.00 will be displayed. If not, the RTM version number 8.00.0743.00 is displayed. 8.1.2. MOM 2005 ReportingThe installation process instantiates the SystemCenterReporting database and creates the necessary links between the OnePoint, SystemCenterReporting, and Report Server databases. Because it touches two machines (at a minimum) and three different databases, you should perform the install using a domain administrator account. You will have to provide several pieces of information for the setup process to complete successfully. The steps in the installation process are summarized in the following list.
Upon successful completion of the setup, browse to the Report Manager Home page (/reports">http://<servername>/reports) to confirm that the Microsoft Operations Manager Reporting folder and the SCDW data source objects have been created. The Report Manager page should now look like Figure 8-10. Figure 8-10. The SQL Reporting Services Report Manager Home page after successful installation of MOM 2005 Reporting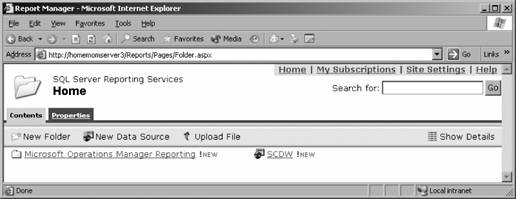 |


EAN: 2147483647
Pages: 107