Strongly Typed DataSet Classes Defined
| for RuBoard |
Strongly Typed DataSet Classes Defined
| | Implementation inheritance, or inheriting from a class and extending and reusing the code in its members , is one of the key strengths of the common language runtime and of the languages it supports, as mentioned on Day 1, "ADO.NET in Perspective." Not only does it promote reuse by allowing developers to extend the existing implementation of a class, it also allows you to program polymorphically by creating methods that accept arguments of the base class but that can be used with any of the derived classes. As a result, using implementation inheritance is a natural way to design classes that implement specific behavior but rely on a core set of members that can be coded once in a base class. |
Which Inheritance Should I Use?As mentioned on Day 1, in addition to implementation inheritance, the common language runtime also includes the concept of interface inheritance, both of which promote the writing of polymorphic code. Because both are now available, you need to decide which to use when designing your applications. Basically, implementation inheritance should be used when the derived class follows an "is a" relationship with the base class. For example, an employee "is a" person and so the behavior (implementation of the members) of the person class is probably suitable to be reused in the employee class. The "is a" rule certainly holds for a custom DataSet that certainly "is a" DataSet . On the other hand, interface inheritance should be used when multiple classes need to expose the same semantics but implement them in different ways. For example, ADO.NET includes the IDataAdapter interface that can be implemented by different .NET Data Providers to provide a consistent set of functionality, but that might be implemented very differently. This is obvious when you consider that one data adapter may communicate with SQL Server in its Fill method while the other communicates with a proprietary hierarchical file system. |
When you think about it, the DataSet fits perfectly into this pattern because an instance of DataSet simply reflects a particular set of data that has a particular structure in terms of its table, columns , relationships, and data types. Further, a DataSet has core functionality ( GetChanges , AcceptChanges , Merge , et al.) that is best written once and called upon in any instance of a DataSet .
| | In this section, you'll learn about the purpose and goals of strongly typed DataSet classes, how to create them, and how they can be versioned and shared between projects. Simply put, a strongly typed DataSet is a derived DataSet class that exposes the tables, rows, and columns in the DataSet with specific types rather than the standard DataTable , DataRow , and DataColumn types. In addition, a strongly typed DataSet exposes columns contained in a table as properties such as Title , Author , and Price . |
Purpose and Goals
Historically, one of the problems that developers have run into again and again is mapping the rows and columns in tables of a relational database or other data store to native data structures (classes, arrays, structures, or user -defined types) exposed by their programming language of choice. In the past, this has entailed writing custom code to read and write the database data to and from the data structures. Not only did this require more coding, but it also brought with it more overhead as additional objects and collections of objects had to be created and managed. In addition, some languages ”such as VBScript ”used in prior versions of ASP didn't even support the constructs such as classes necessary to create a mapping layer.
Note
The mapping of database data to an object model in VB 6 and prior versions was especially inefficient because scores of COM objects were often created. As a result, different techniques were created to realize the benefits of an object-based approach (as discussed later today), while still maintaining performance. I advocated one technique, the Lightweight Business Object Model (LBOM), in Chapter 15 of my book Pure Visual Basic .
Of course, the primary reason developers strive to create a mapping layer in the first place is to be able to work with the data directly rather than through an abstracted construct such as a Recordset . In addition, "objectifying" the data reduces programming errors because the class, structure, or user-defined type directly exposes the column information in a strongly typed field or property rather than as a generic item in a collection. Not only does this reduce runtime and logic errors by giving developers more visibility to the data, when coupled with the IntelliSense feature of the VS .NET IDE, it also makes them more productive by reducing the guesswork involved in determining the names of columns and their data types. For example, the following code snippet from yesterday fills the books DataSet and accesses the Description column of the first row:
books = new DataSet("ComputeBooksTitles"); da.Fill(books, "Titles"); DataRow title = books.Tables["Titles"].Rows[0]; title["Description"] = "This book is too long"; With a strongly typed DataSet , the code snippet could be rewritten as follows:
books = new BooksDs(); da.Fill(books); TitlesRow title = books.Titles.Rows[0]; title.Description = "This book is too long";
In ADO.NET, the need to write custom code to populate and synchronize data between a data provider and a class has been alleviated by providing a wizard that can create a strongly typed DataSet , like the BooksDs object shown in the previous code snippet, based on an XML Schema Definition (XSD). Simply put, XSD is an XML grammar that can be used to define the structure of an XML document. It so happens, as you'll learn tomorrow, that the structure of a DataSet is also defined by an XSD. In fact, the XSD can be created graphically from scratch or directly from a database connection in the Server Explorer window.
Note
As mentioned briefly on Day 1, the common language runtime includes a type checker that ensures that variables are accessed only in a type-safe manner, so that the common language runtime can allocate the proper amount of memory for the object and so that a variable can't point to memory it's not supposed to. In that sense, all common language runtime languages are strongly typed. In fact, in the past, VB wasn't particularly strongly typed and frequently coerced types in assignment statements and parameter passing. Even though VB .NET still supports automatic type conversion, it also includes a new level of type safety with the Option Strict statement. Turning Option Strict on forces VB .NET developers to explicitly do the versions using the CType function or the methods of the Convert class. VC# .NET is always strongly typed and so casts are required.
Creating and Populating
To use a strongly typed DataSet , you first must create it. In this section, we'll look at several techniques you can use to create the DataSet and then discuss how it can be populated and manipulated in code.
Note
The examples in this section assume that you have a VC# .NET console application project open if you want to follow along.
Creating the DataSet
The easiest way to create a strongly typed DataSet involves using the graphical designer inherent in VS .NET. To activate the designer, right-click on the project and select Add New Item. The Add New Item dialog then allows you to select from the list of templates grouped into categories that you can explore under the Local Project Items node on the left side of the dialog, as shown in Figure 6.1. You'll find the DataSet under the Data group .
Figure 6.1. The Add New Item dialog. This dialog adds a new DataSet to the current project.
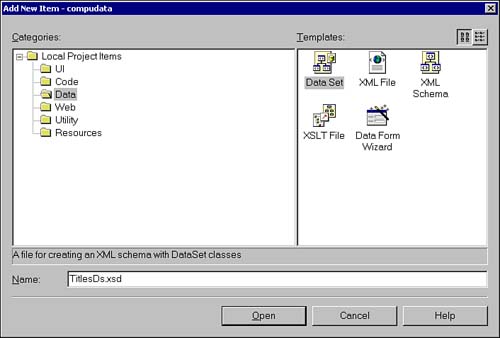
In this case, give the DataSet the name TitlesDs.xsd and click Open. The design surface then appears, ready for you to graphically create the structure of the DataSet . From this point, you can either use the Toolbox to drag and drop building blocks of an XSD schema onto the design surface, or use the Server Explorer to drag and drop database tables onto the designer. Obviously, for most developers, it will be easier to use the latter method because it doesn't require knowledge of XSD. In this way, you can at least jump-start the creation of the XSD and edit it from there.
Tip
Alternatively, if you already have an XSD schema that you received from a trading partner or that you built with a third-party tool such as XML Spy, you can import it into VS .NET by selecting Add Existing Item after right-clicking on the project. The schema will then be loaded and graphically displayed in the designer. When you do so, you have the option of adding five annotations ( typedName , typedPlural , typedParent , typedChildren , and nullValue ) that the code generator will use to customize the names of the classes generated. For more information on these annotations, see the "Using Annotations with a Typed DataSet" topic in the online documentation.
To drag-and-drop tables, you'll need to create a data connection as described on Day 2, "Getting Started." When the data connection to the ComputeBooks database is established, drag and drop the Titles and Reviews tables onto the designer surface. You'll notice that the tables include all the columns with their correct data types and primary key identified and are mapped to elements in the XSD schema. Not surprisingly, each table will also map to a DataTable in the generated DataSet . From here, you can edit the list of columns in the DataSet in order to change their names or add and remove columns. In this case, we don't need all the columns of the Titles table, so you can delete the Cover , CatID , and Publisher columns and add the CategoryName and PubName columns with a data type of string .
Finally, you need to add a relationship between the Titles and Reviews table by right-clicking on the Reviews element and selecting Add, New Relation, just as was done on Day 2. In this case, select Titles as the parent element and Reviews as the child element. Both the fields should be set to ISBN . The properties at the bottom of the dialog should be set to have an update rule of None , a delete rule of Cascade , and an accept/reject rule of Cascade . These properties map directly to the properties discussed on Day 4, "DataSet Internals." As you'll recall from Day 4, creating a DataRelation object as we're doing here implies creating a ForeignKeyConstraint , but the reverse isn't true. Because we want to be able to traverse the relationship, leave the Create foreign key constraint only checkbox blank.
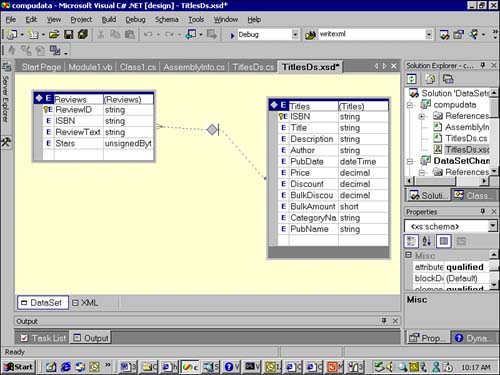
After the structure of the DataSet has been established, you can right-click on it and select Preview DataSet to view the objects that will make up the DataSet and their properties. Although you can't edit the properties in this dialog, you can edit some of them (such as Namespace , Prefix , and Version ) in the properties window. In this case, change Namespace to http://www.compubooks.com/TitlesDs and Version to "1.0." The end result is the designer shown in Figure 6.2.
Figure 6.2. The TitlesDs DataSet . This figure shows the designer surface of TitlesDs after it has been edited.
Tip
To view the XML that makes up the XSD, click on the XML pane attached to the bottom of the design surface. Note that you can also edit the schema directly in this pane, and it even supports IntelliSense to make it easier to code the XML.
You'll notice from Figure 6.2 that the diagram denotes the fact that the relationship is a one-to-many relationship between Titles and Reviews , where one title may be associated with many reviews. Also, the designer doesn't point to the columns being related (in this case, ISBN in both tables) but simply connects the tables as a whole, thereby making it appear as if perhaps ISBN was related to Discount .
If you right-click on the TitlesDs.xsd file in the Solution Explorer, you'll notice that the Generate DataSet option is checked. This implies that a strongly typed DataSet has already been created and is being constantly updated as changes are made to the graphical representation in the designer. To view the DataSet class, click the Show All Files icon in the toolbar of the Solution Explorer window. Doing so allows you to drill down on the TitlesDs.xsd file to reveal the TitlesDs.cs and TitlesDs.xsx files. The .cs file holds the code generated by the wizard that includes the class derived from DataSet , whereas the .xsx file is an XML document that holds layout information for the components added to the designer surface.
Use the Command LineAlternatively, you can generate a strongly typed DataSet using the command-line Xml Schemas/DataTypes support utility (XSD.exe). Given an XSD schema, this utility supports the /dataset or /d option to generate a subclassed DataSet . For example, if you already had a schema generated in XML Spy called TitlesDs.xsd, you could create a strongly typed C# DataSet in the TitlesDs.cs file with the following command: XSD.exe TitlesDs.xsd /dataset /l:CS /namespace:Computebooks.Data In this case, the /namespace option instructed the code generator to place the new class in the ComputeBooks.Data namespace. The newly created .cs file can then be added to your project using the Add Existing Item menu option. To run the command-line utilities that ship with VS .NET, open a command window using the Visual Studio .NET Command Prompt icon in the Visual Studio .NET Tools program group under Microsoft Visual Studio .NET. Both the graphical and command-line tools rely on the TypedDataSetGenerator class in the System.Data namespace to do their work. |
By double-clicking on the TitlesDs.cs file, you can examine the code that was generated. At the highest level, the source code file contains the classes shown in Table 6.1.
Table 6.1. Classes Generated in the TitlesDs.cs Source Code File
| Class | Description |
|---|---|
| TitlesDs | Derived from DataSet and represents the highest-level class. |
| ReviewsDataTable | A child class of TitlesDs and derived from DataTable . Used to hold the data from the Reviews table and exposed as the Reviews property of the TitlesDs class. |
| ReviewsRow | A child class of TitlesDs and derived from DataRow . Exposes strongly typed properties for each of the columns in the Reviews table along with the TitlesRow that is its parent. |
| ReviewsRowChangeEvent | A child class of TitlesDs and derived from EventArgs . Used to hold event state information such as the ReviewsRow the event was fired on and passed to events of the ReviewsDataTable . |
| TitlesDataTable | A child class of TitlesDs and derived from DataTable . Used to hold the data from the Titles table and exposed as the Titles property of the TitlesDs class. |
| TitlesRow | A child class of TitlesDs and derived from DataRow . Exposes strongly typed properties for each of the columns in the Titles table along with a method to retrieve an array of ReviewsRow objects that are its children. |
| TitlesRowChangeEvent | A child class of TitlesDs and derived from EventArgs . Used to hold event state information such as the TitlesRow the event was fired on and passed to events of the TitlesDataTable . |
As you can see from Table 6.1, the generated code implements all aspects of a DataSet as you learned on Day 4, but does so using classes derived from the base ADO.NET classes DataSet , DataTable , and DataRow and that reflect the actual table and column information from the database. You can also view the structure of the TitlesDs class by switching to the Class View in the Solution Explorer and drilling down on the namespace in which the class exists. By default, the DataSet will exist in the global namespace for the project, although that can be easily changed by editing the namespace declaration in the source file. In this case, we would want to change the namespace to ComputeBooks.Data to reflect the fact that the class is owned by the ComputeBooks organization and falls in the realm of the data for the organization. All the strongly typed DataSet classes and data access classes would likewise be grouped together in this namespace.
Tip
If you want the code you write to conform to the naming and style guidelines that Microsoft used when developing the Services Framework, you should follow the design guidelines included in the online documentation. Search for "design guidelines for class library developers" in the index, and you'll find a whole host of topics from naming conventions to error handling guidelines to common design patterns used in the Framework.
By examining the generated code, you'll notice several key features ”four of which we'll discuss here ”that make the TitlesDs DataSet a strongly typed DataSet .
First, you'll notice that the TitlesDs class exposes a property for each DataTable , like so:
public ReviewsDataTable Reviews { get { return this.tableReviews; } } public TitlesDataTable Titles { get { return this.tableTitles; } } | | In both cases, the property is read-only and returns a private instance variable instantiated in the private InitClass method called from the constructor of the class. This is what enables developers using this code to avoid having to manipulate the DataTableCollection directly. |
Note
The use of the InitClass method called from the constructor to initialize each class, and use of the InitVars method to ensure that private variables are initialized when the class has been instantiated, are two common features you'll find for the classes generated by the wizard.
Second, you'll notice that the ReviewsRow and TitlesRow classes contain properties that return a strongly typed value for each column, as shown in Listing 6.1 for the ReviewsRow class.
Listing 6.1 The ReviewsRow class. This class exposes the columns of the table as properties that map back to the underlying ReviewsDataTable .
public class ReviewsRow : DataRow { private ReviewsDataTable tableReviews; internal ReviewsRow(DataRowBuilder rb) : base(rb) { this.tableReviews = ((ReviewsDataTable)(this.Table)); } public System.Guid ReviewID { get { return ((System.Guid)(this[this.tableReviews.ReviewIDColumn])); } set { this[this.tableReviews.ReviewIDColumn] = value; } } public string ISBN { get { return ((string)(this[this.tableReviews.ISBNColumn])); } set { this[this.tableReviews.ISBNColumn] = value; } } public string ReviewText { get { return ((string)(this[this.tableReviews.ReviewTextColumn])); } set { this[this.tableReviews.ReviewTextColumn] = value; } } public System.Byte Stars { get { return ((System.Byte)(this[this.tableReviews.StarsColumn])); } set { this[this.tableReviews.StarsColumn] = value; } } public TitlesRow TitlesRow { get { return ((TitlesRow)(this.GetParentRow( this.Table.ParentRelations["TitlesReviews"]))); } set { this.SetParentRow(value, this.Table.ParentRelations["TitlesReviews"]); } } } | | You'll notice from Listing 6.1 that the properties reference strongly typed DataColumn objects exposed as properties by the ReviewsDataTable class. These properties simply get and set data in the underlying ReviewsDataTable object exposed through the tableReviews variable. In addition, Listing 6.1 shows that the generated code automatically creates a property that references the parent TitlesRow defined by the data relation you created in the graphical designer. By looking at the TitlesRow class, you'll also see that it includes a method, GetReviewsRows , which returns an array of ReviewsRow objects that correspond to its child rows identified in the DataRelation . |
Third, the generated code includes strongly typed methods that can be used to add rows to the tables. For example, the ReviewsDataTable class includes a NewReviewsRow method and an overloaded AddReviewsRow method that can be used together to create a new row and add it to the DataTable as in Listing 6.2.
Listing 6.2 Adding a new row. These methods can be used to add a new ReviewsRow to the ReviewsDataTable and show how strongly typed methods are implemented.
public ReviewsRow NewReviewsRow() { return ((ReviewsRow)(this.NewRow())); } public void AddReviewsRow(ReviewsRow row) { this.Rows.Add(row); } public ReviewsRow AddReviewsRow(System.Guid ReviewID, TitlesRow parentTitlesRowByTitlesReviews, string ReviewText, System.Byte Stars) { ReviewsRow rowReviewsRow =((ReviewsRow)(this.NewRow())); rowReviewsRow.ItemArray = new object[] { ReviewID, parentTitlesRowByTitlesReviews[0], ReviewText, Stars} ; this.Rows.Add(rowReviewsRow); return rowReviewsRow; } | | In Listing 6.2, the NewReviewsRow method simply creates a new row by calling the base class implementation of NewRow and then casts it to the type ReviewsRow . The first AddReviewsRow method accepts a ReviewsRow object and simply adds it to the collection; the second includes arguments for each of the properties of the row, including the parent TitlesRow . |
Finally, each class created for a table, TitlesDataTable and ReviewsDataTable , contains a method that finds a particular row by its primary key column. For example, the ReviewsDataTable contains the FindByReviewID method that uses the Find method of the DataRowCollection class as discussed on Day 3, "Working with DataSets":
public ReviewsRow FindByReviewID(System.Guid ReviewID) { return ((ReviewsRow)(this.Rows.Find(new object[] { ReviewID} ))); } The method then returns the found row, casting it to the ReviewsRow type.
Populating the DataSet
Now that the DataSet has been created and added to the project, you can use it either programmatically or graphically. For example, you can drag and drop it on a Web Form or other designer surface as you did on Day 2 and then associate it with a data adapter through the Data Adapter Configuration Wizard.
However, before doing so you need to consider what the code at the database server might be used to populate the DataSet . In the case of TitlesDs , remember that we didn't simply accept the default columns when we dropped the tables onto the design surface. Because we edited the column list of the Titles table, we need to make sure that we write SQL that is true to that list.
As we'll cover in more detail on Day 10, "Working with Commands," when using SQL Server, we would typically use stored procedures because of their performance and security. So, to populate the DataSet , we'll use a stored procedure that includes a SELECT statement to retrieve the data for the Titles table and then one to retrieve the Reviews , as shown in Listing 6.3.
Listing 6.3 The usp_GetTitlesReviews stored procedure. This SQL Server stored procedure retrieves data from the Titles and Reviews tables.
CREATE PROCEDURE usp_GetTitlesReviews @publisher nchar(5) = NULL AS IF @publisher IS NULL BEGIN SELECT ISBN, Title, a.Description, Author, PubDate, Price, Discount, BulkDiscount, BulkAmount, b.Description As CategoryName, c.Name As PubName FROM Titles a JOIN Categories b ON a.CatID = b.CatID JOIN Publishers c ON a.Publisher = c.PubCode SELECT ReviewID, ISBN, ReviewText, Stars FROM Reviews END ELSE BEGIN SELECT ISBN, Title, a.Description, Author, PubDate, Price, Discount, BulkDiscount, BulkAmount, b.Description As CategoryName, c.Name As PubName FROM Titles a JOIN Categories b ON a.CatID = b.CatID JOIN Publishers c ON a.Publisher = c.PubCode WHERE a.Publisher = @publisher SELECT ReviewID, a.ISBN, ReviewText, Stars FROM Reviews a JOIN Titles b ON a.ISBN = b.ISBN WHERE b.Publisher = @publisher END
| | The interesting thing to note in Listing 6.3 is that the publisher parameter is effectively optional because the procedure includes an IF statement to handle the case where the parameter isn't passed or is NULL . |
Note
Alert readers will have no doubt noticed that if this stored procedure needed to include several optional parameters in the WHERE clause, the Transact-SQL in Listing 6.3 would grow in complexity. To view a more sophisticated stored procedure that handles multiple arguments, see the usp_GetTitles stored procedure that is installed with the ComputeBooks database and that you used on Day 3.
In addition, you'll see that the SELECT statement that returns data from the Titles table uses JOIN clauses to get the Description column from the Categories table and the Name column from the Publishers table, and aliases them to the CategoryName and PubName columns, respectively, as used in the DataSet . Although the DataSet could have also included tables to hold the Categories and Publishers data separately, it makes more sense to use JOIN clauses to return just the descriptive information if the tables are simply lookup tables. In other words, because the DataSet isn't designed to allow editing of the Categories or Publishers tables, it's less complex and more efficient to directly incorporate the data that you want to include in the TitlesRow through a table join.
It should also be noted that the procedure returns two result sets, one for each table in the DataSet .
The usp_GetTitlesReviews stored procedure can then be used to populate the TitlesDs DataSet . The code in Listing 6.4 populates the DataSet and then manipulates its data using its exposed types.
Listing 6.4 Populating the TitlesDs DataSet from the usp_GetTitlesReview stored procedure. This listing uses a SqlDataAdapter to populate TitlesDs and access its data.
SqlConnection con = new SqlConnection(connect); SqlDataAdapter da = new SqlDataAdapter ("usp_GetTitlesReviews", con); da.SelectCommand.CommandType = CommandType.StoredProcedure; TitlesDs books = new TitlesDs(); books.EnforceConstraints = false; da.MissingMappingAction = MissingMappingAction.Passthrough; da.TableMappings.Add("Table","Reviews"); da.TableMappings.Add("Table1","Titles"); da.Fill(books); books.EnforceConstraints = true; TitlesDs.TitlesRow titleRow; titleRow = books.Titles.FindByISBN("06720002X"); if (titleRow != null) { string bookTitle = titleRow.Title; string author = titleRow.Author; TitlesDs.ReviewsRow reviewRow = books.Reviews.AddReviewsRow( System.Guid.NewGuid(),titleRow,"This was a pretty good book",4); reviewRow.AcceptChanges(); } | | The code in Listing 6.4 uses SqlConnection and SqlDataAdapter objects to connect to the SQL Server and to encapsulate the call to the stored procedure. When the books object is instantiated, the constructor of the TitlesDs class executes and creates the tables and relation that are exposed through its properties. As a result, before the Fill method is even called, the DataSet contains two empty tables connected by a data relation with all the columns fully defined. The EnforceConstraints property of the DataSet is then set to False to ensure that the foreign key constraint isn't activated in the event that the Reviews table is loaded first. |
Tip
Of course, the code in Listing 6.4 would need to be in a source code file with the using ComputeBooks.Data; statement at the top and you would need to use the System.Data and System.Data.SqlClient namespaces.
The next three lines of code dealing with the MissingMappingAction and TableMappings collection will be discussed in more detail on Day 12, "Using Data Adapters." For now, it suffices to say that the MissingMappingAction determines what happens when the columns from the database table encounter columns in an existing DataTable . The TableMappings are used to map the result sets returned from the stored procedure to the tables in the DataSet .
The DataSet is then populated with the Fill method, which executes the stored procedure. After the data is loaded, the EnforceConstraints property is set to true to enable the foreign key constraint. At this point, if the Reviews table contains any rows that don't match a row in the Titles table, a ConstraintException will be thrown.
To access an individual row in the TitlesDataTable , the listing then uses a variable of type TitlesRow to return the row from the FindByISBN method of the TitlesDataTable class. If the row is found, the Title and Author properties will return the name of the book and its author or authors. Finally, the AddReviewRows method of the ReviewsRow class is used to add a new review to the title that was found. Note that the primary key of the Reviews table is a GUID, so the NewGuid method of the Guid structure is used to generate the value. The AcceptChanges method of the new row is then called to set the row state to Unchanged .
Versioning and Sharing
In software development, any time you create an explicit construct to use in favor of an abstracted one in order to increase developer productivity ”for example, by making it simpler and less error-prone to access data ”you introduce a new dependency that you must manage. This is true of strongly typed classes such as the DataSet as well. However, the runtime characteristics of the common language runtime make it relatively easy to share and version a class such as TitlesDs both on a single machine and among developers in an organization.
First, because the TitlesDs class and any other strongly typed DataSet classes you create might be used in multiple projects, you should consider factoring them into their own assembly. As mentioned on Day 1, an assembly is the unit of versioning, deployment, and security in the .NET Framework. By placing all the strongly typed DataSet classes and perhaps even data access classes used to populate them in a single assembly, you can version and deploy them as a single unit. To do so, simply open a new Class Library project in VS .NET and add all the source files that define the DataSet classes you want to include.
To create a version number for the assembly, edit the AssemblyVersion attribute defined in the AssemblyInfo.cs (or .vb) file in the VS .NET project. By default, the attribute will be set to "1.0.*", which will automatically increment the last two parts of the version number referred to as the revision and build numbers each time the project is compiled. As long as the first two parts of the version number ”the major and minor build numbers ” remain the same, by convention the assembly is said to be compatible with other versions of the same assembly.
| | As a result you should change only the major and minor versions when changes in types within the assembly will cause errors to be generated in a client application using the assembly. However, absent a binding policy, if you deploy a new version of the assembly to the application directory of a client (referred to as a private assembly ), the common language runtime's class loader will find it, load it, and attempt to use it. If you've renamed types in the assembly or deleted types that the client is relying on, you might encounter a TypeLoadException or other exception that your client code would have to handle. |
Tip
Although beyond the scope of this book, a client application also uses its application configuration file to check for the presence of a binding policy that determines which version of an assembly to load. As a result, an administrator can specify that a certain client application can bind with only a particular version of an assembly. Application configuration files can be built using the Microsoft .NET Framework Configuration icon in the Administrative Tools group.
In the case of strongly typed DataSet classes, you would want to deploy a new version if the data requirements of the application change and you need to add or remove columns from the DataSet . To minimize the amount of rework you would have to do in this event, you should avoid placing custom code in the generated class if possible. That way, you can make your changes in the graphical designer and regenerate the DataSet without having to write any new code. Although it might be tempting to add custom methods to the DataSet class to populate it and synchronize it with a data store, this is the primary reason you should create a separate data access class. Doing so allows you to modify either without touching the code for the other.
As part of the compilation process, you can optionally compile your assembly with a strong name using the AssemblyKeyFile attribute. Adding a strong name enables your assembly to be placed in the Global Assembly Cache (GAC) so that it's accessible machinewide. To ensure that all .NET code (managed code) running on the machine can use the new assembly version if its binding policy allows, you should place it in the assembly cache.
Note
In fact, even if a particular client application relies on a specific version of your assembly, you can still accommodate it by adding multiple versions of the assembly to the GAC.
When you compile the project, the resulting DLL will be your assembly, complete with a manifest that describes its types and its dependencies on other types, such as those in the System.Data namespace.
Tip
If your development team authors classes in multiple languages, for example, by creating one DataSet in VB and another in C#, you can't include both source files in a VS .NET project. However, you can compile them individually into .NET modules using the appropriate command-line compiler and then create a multi-file assembly using the Assembly Linker (AL.exe) command-line utility. See the online help for details.
In addition to deploying DataSet classes in an assembly, you need to consider possible changes to the underlying database from which the DataSet typically receives its data. As you'll learn on Day 12, the MissingMappingAction and MissingSchemaAction properties of the data adapter are used to specify how the data adapter responds when the data from the data store conflicts with the structure of the DataSet . For now, suffice it to say that using the MissingMappingAction.Passthrough value enables new columns added to the result set retrieved by the data adapter to be appended to the existing column list in the DataTable objects. In other words, adding a column to the SELECT statement in a stored procedure doesn't necessarily break the code in Listing 6.4. However, as is obvious, the new column won't be able to be referenced with a strongly typed property but will be accessible via the Columns collection of the DataTable object and the Item and Item array properties of the DataRow object.
| for RuBoard |
EAN: 2147483647
Pages: 158