Using Session Variables for Authentication
| An effective and straightforward method for handling the mechanics of user logins is outlined in the following section. Basically, the strategy is to turn on ColdFusion's session-management features, which you learned about in Chapter 20, "Working with Sessions," and use session variables to track whether each user has logged in. There are many ways to go about this, but it can be as simple as setting a single variable in the SESSION scope after a user logs in. NOTE Before you can use the SESSION scope in your applications, you need to enable it using the Application.cfc file.
Checking and Maintaining Login StatusFor instance, assume for the moment that the user has just filled out a user name/password form (more on that later), and you have verified that the user name and password are correct. You could then use a line such as the following to remember that the user is logged in: <cfset SESSION.isLoggedIn = "Yes"> As you learned in the last chapter, the isLoggedIn variable is tracked for the rest of the user's visit (until their session times out). From this point forward, if you wanted to ensure that the user was logged in before they were shown something, all you would need to do would be to check for the presence of the variable: <cfif not isDefined("SESSION.isLoggedIn")> Sorry, you don't have permission to look at that. <cfabort> </cfif> And with that, you have modest security. Clearly, this isn't final code yet, but that really is the basic idea. A user won't be able to get past the second snippet unless their session has already encountered the first. The rest of the examples in this chapter are just expanded variations on these two code snippets. So, all you have to do is put these two lines in the correct places. The first line must be wrapped within whatever code validates a user's password (probably by checking in some type of database table), and the second line must be put on whatever pages you need to protect. Restricting Access to Your ApplicationAssume for the moment that you want to require your users to log in as soon as they enter your application. You could put a login form on your application's front page or home page, but what if a user doesn't go through that page for whatever reason? For instance, if they use a bookmark or type the URL for some other page, they would bypass your login screen. You must figure out a way to ensure that the user gets prompted for a password on the first page request for each session, regardless of which page they are actually asking for. A great solution is to use the special Application.cfc file set aside by ColdFusion's Web application framework, which you learned about in Chapter 19, "Introducing the Web Application Framework." You will recall that if you create a template called Application.cfc, it automatically is included before each page request. This means you could put some code in Application.cfc to see whether the SESSION scope is holding an isLoggedIn value, as discussed previously. If it's not holding a value, the user must be presented with a login form. If it is holding a value, the user has already logged in during the current session. With that in mind, take a look at the Application.cfc file shown in Listing 21.1. Make sure to save this listing as Application.cfc, not Application1.cfc. Listing 21.1. Application1.cfcSending a User to a Login Page <!--- Filename: Application.cfc Created by: Raymond Camden (ray@camdenfamily.com) Please Note Executes for every page request ---> <cfcomponent output="false"> <!--- Name the application. ---> <cfset this.name="OrangeWhipSite"> <!--- Turn on session management. ---> <cfset this.sessionManagement=true> <cffunction name="onApplicationStart" output="false" returnType="void"> <!--- Any variables set here can be used by all our pages ---> <cfset APPLICATION.dataSource = "ows"> <cfset APPLICATION.companyName = "Orange Whip Studios"> </cffunction> <cffunction name="onRequestStart" output="false" returnType="void"> <!--- If user isn't logged in, force them to now ---> <cfif not isDefined("SESSION.auth.isLoggedIn")> <!--- If the user is now submitting "Login" form, ---> <!--- Include "Login Check" code to validate user ---> <cfif isDefined("FORM.UserLogin")> <cfinclude template="loginCheck.cfm"> </cfif> <cfinclude template="loginForm.cfm"> <cfabort> </cfif> </cffunction> </cfcomponent> First, the application is named using the This scope. Then sessionManagement is turned on. Don't forget that sessions are not enabled by default. The first method in the Application.cfc file, onApplicationStart, will run when the application starts up, or when the first user hits the site. Two application variables are set. These will be used later on in other code listings. The onRequestStart method will run before every request. An isDefined() test is used to check whether the isLoggedIn value is present. If it's not, a <cfinclude> tag is used to include the template called LoginForm.cfm, which presents a login screen to the user. Note that a <cfabort> tag is placed directly after the <cfinclude> so that nothing further is presented. The net effect is that all pages in your application have now been locked down and will never appear until you create code that sets the SESSION.auth.isLoggedIn value. NOTE Soon, you will see how the Auth structure can be used to hold other values relevant to the user's login status. If you don't need to track any additional information along with the login status, you could use a variable named SESSION.IsLoggedIn instead of SESSION.Auth.IsLoggedIn. However, it's not much extra work to add the Auth structure, and it gives you some extra flexibility. Creating a Login PageThe next step is to create a login page, where the user can enter their user name and password. The code in Listing 21.1 is a simple example. This code still doesn't actually do anything when submitted, but it's helpful to see that most login pages are built with ordinary <form> or <cfform> code. Nearly all login pages are some variation of this skeleton. Figure 21.2 shows what the form will look like to a user. Figure 21.2. Users are forced to log in before they can access sensitive information in this application.
NOTE Use type="password" wherever you ask your users to type a password, as shown in Listing 21.2. That way, as the user types, their password will be masked so that someone looking over their shoulder can't see their password. Listing 21.2. LoginForm.cfmA Basic Login Page <!--- Filename: LoginForm.cfm Created by: Nate Weiss (NMW) Purpose: Presented whenever a user has not logged in yet Please Note Included by Application.cfc ---> <!--- If the user is now submitting "Login" form, ---> <!--- Include "Login Check" code to validate user ---> <cfif isDefined("FORM.UserLogin")> <cfinclude template="LoginCheck.cfm"> </cfif> <html> <head> <title>Please Log In</title> </head> <!--- Place cursor in "User Name" field when page loads---> <body onLoad="document.LoginForm.userLogin.focus();"> <!--- Start our Login Form ---> <cfform action="#CGI.script_name#?#CGI.query_string#" name="LoginForm" method="post"> <!--- Make the UserLogin and UserPassword fields required ---> <input type="hidden" name="userLogin_required"> <input type="hidden" name="userPassword_required"> <!--- Use an HTML table for simple formatting ---> <table border="0"> <tr><th colspan="2" bgcolor="silver">Please Log In</th></tr> <tr> <th>Username:</th> <td> <!--- Text field for "User Name" ---> <cfinput type="text" name="userLogin" size="20" value="" maxlength="100" required="Yes" message="Please type your Username first."> </td> </tr><tr> <th>Password:</th> <td> <!--- Text field for Password ---> <cfinput type="password" name="userPassword" size="12" value="" maxlength="100" required="Yes" message="Please type your Password first."> <!--- Submit Button that reads "Enter" ---> <input type="Submit" value="Enter"> </td> </tr> </table> </cfform> </body> </html> NOTE In general, users won't be visiting LoginForm.cfm directly. Instead, the code in Listing 21.2 is included by the <cfif> test performed in the Application.cfc page (Listing 21.1) the first time the user accesses some other page in the application (such as the OrderHistory.cfm template shown in Listing 21.4). Please note that this form's action attribute is set to #CGI.script_name#. The special CGI.script_name variable always holds the relative URL to the currently executing ColdFusion template. So, for example, if the user is being presented with the login form after requesting a template called HomePage.cfm, this form will rerequest that same page when submitted. In other words, this form always submits back to the URL of the page on which it is appearing. Along with the current script, we also append the current query string, using CGI.query_string. This ensures that if the person requested HomePage.cfm?id=5, the portion after the question mark, known as the query string, will also be included when we submit the form. TIP Using CGI.script_name and CGI.query_string can come in handy any time your code needs to be capable of reloading or resubmitting the currently executing template.
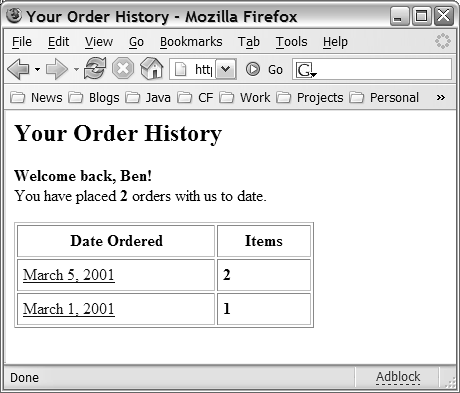
When the form is actually submitted, the FORM.userLogin value will exist, indicating that the user has typed a user name and password that should be checked for accuracy. As a result, the <cfinclude> tag fires, and includes the password-validation code in the LoginCheck.cfm template (see Listing 21.3). The Text and Password fields on this form use the required and message client-side validation attributes provided by <cfinput> and <cfform>. The two hidden fields add server-side validation. See Chapter 13, "Form Data Validation," if you need to review these form field validation techniques. NOTE This template's <body> tag has JavaScript code in its onLoad attribute, which causes the cursor to be placed in the userLogin field when the page loads. You must consult a different reference for a full discussion of JavaScript, but you can use this same basic technique to cause any form element to have focus when a page first loads. TIP JavaScript is case sensitive, so the onLoad code must be capitalized correctly; otherwise, scripting-error messages will pop up in the browser. Of course, you can just leave out the onLoad code altogether if you want. Verifying the Login Name and PasswordListing 21.3 provides simple code for your LoginCheck.cfm template. This is the template that will be included when the user attempts to gain access by submitting the login form from Listing 21.2. The most important line in this template is the <cfset> line that sets the SESSION.auth.isLoggedIn variable to Yes. After this value is set for the session, the isDefined() test in the Application.cfc file (refer to Listing 21.1) will succeed and the user will be able to view pages normally. Listing 21.3. LoginCheck.cfmGranting Access<!--- Filename: LoginCheck.cfm Created by: Nate Weiss (NMW) Purpose: Validates a user's password entries Please Note Included by LoginForm.cfm ---> <!--- Make sure we have Login name and Password ---> <cfparam name="FORM.userLogin" type="string"> <cfparam name="FORM.userPassword" type="string"> <!--- Find record with this Username/Password ---> <!--- If no rows returned, password not valid ---> <cfquery name="getUser" datasource="#APPLICATION.dataSource#"> SELECT ContactID, FirstName FROM Contacts WHERE UserLogin = '#FORM.UserLogin#' AND UserPassword = '#FORM.UserPassword#' </cfquery> <!--- If the username and password are correct ---> <cfif getUser.recordCount eq 1> <!--- Remember user's logged-in status, plus ---> <!--- ContactID and First Name, in structure ---> <cfset SESSION.auth = structNew()> <cfset SESSION.auth.isLoggedIn = "Yes"> <cfset SESSION.auth.contactID = getUser.contactID> <cfset SESSION.auth.firstName = getUser.firstName> <!--- Now that user is logged in, send them ---> <!--- to whatever page makes sense to start ---> <cflocation url="#CGI.script_name#?#CGI.query_string#"> </cfif> TIP The query in this template can be adapted or replaced with any type of database or lookup procedure you need. For instance, rather than looking in a database table, you could query an LDAP server to get the user's first name. NOTE For more information about LDAP, see the <cfldap> tag in Appendix B, or consult our companion volume, Advanced Macromedia ColdFusion MX 7 Application Development. First, the two <cfparam> tags ensure that the login name and password are indeed available as form fields, which they should be unless a user has somehow been directed to this page in error. Next, a simple <cfquery> tag attempts to retrieve a record from the Contacts table where the UserLogin and UserPassword columns match the user name and password that were entered in the login form. If this query returns a record, the user has, by definition, entered a valid user name and password and thus should be considered logged in. Assume for the moment that the user name and password are correct. The value of getUser.recordCount is therefore 1, so the code inside the <cfif> block executes. A new structure called auth is created in the SESSION scope, and three values are placed within the new structure. The most important of the three is the isLoggedIn value, which is used here basically in the same way that was outlined in the original code snippets near the beginning of this chapter. The user's unique ID number (their contactID) is also placed in the SESSION.auth structure, as is their first name. The idea here is to populate the SESSION.auth structure with whatever information is pertinent to the fact that the user has indeed been authenticated. Therefore, any little bits of information that might be helpful to have later in the user's session can be saved in the auth structure now. TIP By keeping the SESSION.auth.FirstName value, for instance, you will be able to display the user's first name on any page, which will give your application a friendly, personalized feel. And, by keeping the SESSION.auth.contactID value, you will be able to run queries against the database based on the user's authenticated ID number. Finally, the <cflocation> tag is used to redirect the user to the current value of CGI.script_name and CGI.query_string. Because CGI.script_name and CGI.query_string were also used for the action of the login form, this value will still reflect the page the user was originally looking for, before the login form appeared. The browser will respond by rerequesting the original page with the same query string. This time, the SESSION.auth.isLoggedIn test in Application.cfc (refer to Listing 21.1) won't <cfinclude> the login form, and the user will thus be allowed to see the content they originally were looking for. NOTE The underlying assumption here is that no two users can have the same UserLogin and UserPassword. You must ensure that this rule is enforced in your application. For instance, when a user first chooses (or is assigned) their user name and password, there needs to be a check in place to ensure that nobody else already has them. Personalizing Based on LoginAfter Listings 21.121.3 are in place, the SESSION.auth structure is guaranteed to exist for all your application's pages. What's more, the user's unique ID and first name will be available as SESSION.auth.contactID and SESSION.auth.firstName, respectively. This makes providing users with personalized pages, such as Manage My Account or My Order History, easy. Listing 21.4 shows a template called OrderHistory.cfm, which lets a user review the merchandise orders they have placed in the past. Because the authenticated contactID is readily available, doing this in a reasonably secure fashion is easy. In most respects, this is just a data-display template, the likes of which you learned about in Chapter 10, "Creating Data-Driven Pages." The only new concept here is the notion of using authenticated identification information from the SESSION scope (in this case, the contactID). Listing 21.4. OrderHistory.cfmPersonalizing Based on Login<!--- Filename: OrderHistory.cfm Created by: Nate Weiss (NMW) Purpose: Displays a user's order history ---> <!--- Retrieve user's orders, based on ContactID ---> <cfquery name="getOrders" datasource="#APPLICATION.dataSource#"> SELECT OrderID, OrderDate, (SELECT Count(*) FROM MerchandiseOrdersItems oi WHERE oi.OrderID = o.OrderID) AS ItemCount FROM MerchandiseOrders o WHERE ContactID = #SESSION.auth.contactID# ORDER BY OrderDate DESC </cfquery> <html> <head> <title>Your Order History</title> </head> <body> <!--- Personalized message at top of page---> <cfoutput> <h2>Your Order History</h2> <p><strong>Welcome back, #SESSION.auth.firstName#!</strong><br> You have placed <strong>#getOrders.recordCount#</strong> orders with us to date.</p> </cfoutput> <!--- Display orders in a simple HTML table ---> <table border="1" width="300" cellpadding="5" cellspacing="2"> <!--- Column headers ---> <tr> <th>Date Ordered</th> <th>Items</th> </tr> <!--- Display each order as a table row ---> <cfoutput query="getOrders"> <tr> <td> <a href="OrderHistory.cfm?OrderID=#OrderID#"> #dateFormat(orderDate, "mmmm d, yyyy")# </a> </td> <td> <strong>#itemCount#</strong> </td> </tr> </cfoutput> </table> </body> </html> First, a fairly ordinary <cfquery> tag is used to retrieve information about the orders the user has placed. Because the user's authenticated contactID is being used in the WHERE clause, you can be certain that you will be retrieving the order information appropriate only for this user. Next, a personalized message is displayed to the user, including their first name. Then the order records are displayed using an ordinary <cfoutput query> block. The order records are displayed in a simple tabular format using simple HTML table formatting. Figure 21.3 shows what the results will look like for the end user. Figure 21.3. After a user's identification information is authenticated, providing a personalized experience is easy.
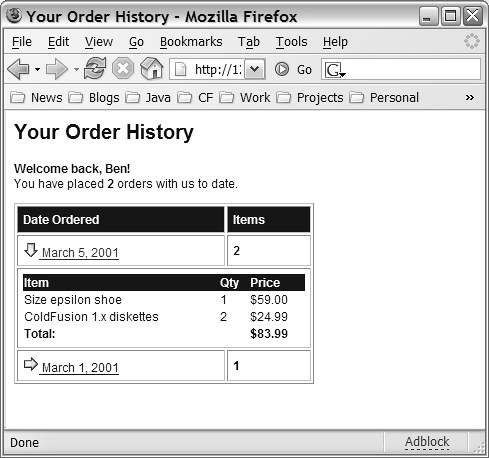
Being Careful with Passed ParametersWhen you are dealing with sensitive information, such as account or purchase histories, you need to be more careful when passing parameters from page to page. It's easy to let yourself feel that your work is done after you force your users to log in. Of course, forcing them to log in is an important step, but your code still needs to check things internally before it exposes sensitive data. Recognizing the ProblemHere's a scenario that illustrates a potential vulnerability. After putting together the OrderHistory.cfm template shown in Listing 21.4, you realize that people will need to be able to see the details of each order, such as the individual items purchased. You decide to allow the user to click in each order's Order Date column to see the details of that order. You decide, sensibly, to turn each order's date into a link that passes the desired order's ID number as a URL parameter. So, you decide to change this: #dateFormat(orderDate, "mmmm d, yyyy")# to this: <a href="OrderHistory.cfm?OrderID=#OrderID#"> #dateFormat(OrderDate, "mmmm d, yyyy")# </a> This is fine. When the user clicks the link, the same template is executedthis time with the desired order number available as URL.OrderID. You just need to add an isDefined() check to see whether the URL parameter exists, and if so, run a second query to obtain the detail records (item name, price, and quantity) for the desired order. After a bit of thought, you come up with the following: <cfif isDefined("URL.orderID")> <cfquery name="getDetail" datasource="#APPLICATION.dataSource#"> SELECT m.MerchName, oi.ItemPrice, oi.OrderQty FROM Merchandise m, MerchandiseOrdersItems oi WHERE m.MerchID = oi.ItemID AND oi.OrderID = #URL.orderID# </cfquery> </cfif> The problem with this code is that it doesn't ensure that the order number passed in the URL indeed belongs to the user. After the user notices that the order number is being passed in the URL, they might try to play around with the passed parameters just to, ahem, see what happens. And, indeed, if the user changes the ?orderID=5 part of the URL to, say, ?orderID=10, they will be able to see the details of some other person's order. Depending on what type of application you are building, this kind of vulnerability could be a huge problem. Checking Passed ParametersThe problem is relatively easy to solve. You just need to ensure that, whenever you retrieve sensitive information based on a URL or FORM parameter, you somehow verify that the parameter is one the user has the right to request. In this case, you must ensure that the URL.OrderID value is associated with the user's ID number, SESSION.auth.contactID. In this application, the easiest policy to enforce is probably ensuring that each query involves the SESSION.auth.contactID value somewhere in its WHERE clause. Therefore, to turn the unsafe query shown previously into a safe one, you would add another subquery or inner join to the query, so the Orders table is directly involved. After the Orders table is involved, the query can include a check against its ContactID column. A safe version of the snippet shown previously would be the following, which adds a subquery at the end to ensure the OrderID is a legitimate one for the current user: <cfif isDefined("URL.orderID")> <cfquery name="getDetail" datasource="#APPLICATION.dataSource#"> SELECT m.MerchName, oi.ItemPrice, oi.OrderQty FROM Merchandise m, MerchandiseOrdersItems oi WHERE m.MerchID = oi.ItemID AND oi.OrderID = #URL.orderID# AND oi.OrderID IN (SELECT o.OrderID FROM MerchandiseOrders o WHERE o.ContactID = #SESSION.auth.contactID#) </cfquery> </cfif> Another way to phrase the query, using an additional join, would be <cfif isDefined("URL.orderID")> <cfquery name="getDetail" datasource="#APPLICTION.dataSource#"> SELECT m.MerchName, m.MerchPrice, oi.ItemPrice, oi.OrderQty FROM (Merchandise m INNER JOIN MerchandiseOrdersItems oi ON m.MerchID = oi.ItemID) INNER JOIN MerchandiseOrders o ON o.OrderID = oi.OrderID WHERE o.ContactID = #SESSION.auth.contactID# AND oi.OrderID = #URL.orderID# </cfquery> </cfif> With either of these snippets, it doesn't matter if the user alters the orderID in the URL. Because the contactID is now part of the query's WHERE criteria, it will return zero records if the requested orderID isn't consistent with the session's authenticated ContactID. Thus, the user will never be able to view any orders but their own. Putting It Together and Getting InteractiveThe OrderHistory2.cfm template shown in Listing 21.5 builds on the previous version (refer to Listing 21.4) by adding the ability for the user to view details about each order. The code is a bit longer, but there really aren't any big surprises here. The main additions display the detail information. Some formatting has also been applied to make the template look nicer when displayed to the user. Listing 21.5. OrderHistory2.cfmProviding Details About Orders <!--- Filename: OrderHistory2.cfm Created by: Nate Weiss (NMW) Purpose: Displays a user's order history ---> <!--- Retrieve user's orders, based on ContactID ---> <cfquery name="getOrders" datasource="#APPLICATION.dataSource#"> SELECT OrderID, OrderDate, (SELECT Count(*) FROM MerchandiseOrdersItems oi WHERE oi.OrderID = o.OrderID) AS ItemCount FROM MerchandiseOrders o WHERE ContactID = #SESSION.auth.contactID# ORDER BY OrderDate DESC </cfquery> <!--- Determine if a numeric OrderID was passed in URL ---> <cfset showDetail = isDefined("URL.orderID") and isNumeric(URL.orderID)> <!--- If an OrderID was passed, get details for the order ---> <!--- Query must check against ContactID for security ---> <cfif showDetail> <cfquery name="getDetail" datasource="#APPLICATION.dataSource#"> SELECT m.MerchName, oi.ItemPrice, oi.OrderQty FROM Merchandise m, MerchandiseOrdersItems oi WHERE m.MerchID = oi.ItemID AND oi.OrderID = #URL.orderID# AND oi.OrderID IN (SELECT o.OrderID FROM MerchandiseOrders o WHERE o.ContactID = #SESSION.auth.contactID#) </cfquery> <!--- If no Detail records, don't show detail ---> <!--- User may be trying to "hack" URL parameters ---> <cfif getDetail.recordCount eq 0> <cfset showDetail = False> </cfif> </cfif> <html> <head> <title>Your Order History</title> <!--- Apply some simple CSS style formatting ---> <style type="text/css"> BODY {font-family:sans-serif;font-size:12px;color:navy} H2 {font-size:20px} TH {font-family:sans-serif;font-size:12px;color:white; background:MediumBlue;text-align:left} TD {font-family:sans-serif;font-size:12px} </style> </head> <body> <!--- Personalized message at top of page---> <cfoutput> <h2>Your Order History</h2> <p><strong>Welcome back, #SESSION.auth.firstName#!</strong><br> You have placed <strong>#getOrders.recordCount#</strong> orders with us to date.</p> </cfoutput> <!--- Display orders in a simple HTML table ---> <table border="1" width="300" cellpadding="5" cellspacing="2"> <!--- Column headers ---> <tr> <th>Date Ordered</th> <th>Items</th> </tr> <!--- Display each order as a table row ---> <cfoutput query="getOrders"> <!--- Determine whether to show details for this order ---> <!--- Show Down arrow if expanded, otherwise Right ---> <cfset isExpanded = showDetail and (getOrders.OrderID eq URL.orderID)> <cfset arrowIcon = iif(isExpanded, "'ArrowDown.gif'", "'ArrowRight.gif'")> <tr> <td> <!--- Link to show order details, with arrow icon ---> <a href="OrderHistory2.cfm?OrderID=#orderID#"> <img src="/books/2/448/1/html/2/../images/#ArrowIcon#" width="16" height="16" border="0"> #dateFormat(orderDate, "mmmm d, yyyy")# </a> </td> <td> <strong>#itemCount#</strong> </td> </tr> <!--- Show details for this order, if appropriate ---> <cfif isExpanded> <cfset orderTotal = 0> <tr> <td colspan="2"> <!--- Show details within nested table ---> <table width="100%" cellspacing="0" border="0"> <!--- Nested table's column headers ---> <tr> <th>Item</th><th>Qty</th><th>Price</th> </tr> <!--- Show each ordered item as a table row ---> <cfloop query="getDetail"> <cfset orderTotal = orderTotal + itemPrice> <tr> <td>#merchName#</td> <td>#orderQty#</td> <td>#dollarFormat(itemPrice)#</td> </tr> </cfloop> <!--- Last row in nested table for total ---> <tr> <td colspan="2"><b>Total:</b></td> <td><strong>#dollarFormat(orderTotal)#</strong></td> </tr> </table> </td> </tr> </cfif> </cfoutput> </table> </body> </html> The first <cfquery> is unchanged from Listing 21.4. Next, a Boolean variable called showDetail is created. Its value is true if a number is passed as URL.orderID. In that case, the second <cfquery> (which was shown in the code snippet before the listing) executes and returns only detail records for the session's contactID. The <cfif> test after the query resets showDetail to False if the second query fails to return any records. The remainder of the code can rely on showDetail being true only if a legitimate orderID was passed in the URL. Two <cfset> tags have been added at the top of the main <cfoutput> block to determine whether the orderID of the order currently being output is the same as the orderID passed in the URL. If so, the isExpanded variable is set to true. Additionally, an arrowIcon variable is created, which is used to display an open or closed icon to indicate whether each order record is expanded. If the current order is the one the user has asked for details about, isExpanded is true and arrowIcon is set to show the ArrowDown.gif image. If not, the ArrowRight.gif image is shown instead. The appropriate arrow is displayed using an <img> tag a few lines later. At the end of the template is a large <cfif> block, which causes order details to be shown if isExpanded is true. If so, an additional row is added to the main HTML table, with a colspan of 2 so that the new row has just one cell spanning the Date Ordered and Items columns. Within the new cell, another, nested <table> is added, which shows one row for each record in the getdetail query via a <cfloop> block. As each detail row is output, the orderTotal variable is incremented by the price of each item. Therefore, by the time the <cfloop> is finished, orderTotal will indeed contain the total amount the customer paid. The total is displayed as the last row of the nested table. The result is a pleasant-looking interface in which the user can quickly see the details for each order. At first, only the order dates and item counts are displayed (as shown previously in Figure 21.3), with an arrow pointing to the right to indicate that the order isn't expanded. If the user clicks the arrow or the order date, the page is reloaded, now with the arrow pointing down and the order details nested under the date. Figure 21.4 shows the results. Figure 21.4. With a little bit of caution, you can safely provide an interactive interface for sensitive information.
NOTE A <style> block is included in the <head> section of this listing to apply some CSS-based formatting. All type on the page will be shown in a blue, sans serif font (usually Arial or Helvetica, depending on the operating system), except for <th> cells, which will be shown with white type on a blue background. Consult a CSS reference for details. Other ScenariosThis chapter has outlined a practical way to force a user to log in to your application and to show them only the appropriate information. Of course, your actual needs are likely to vary somewhat from what has been discussed here. Here are a couple of other scenarios that are commonly encountered, with suggestions about how to tackle them. Delaying the Login Until NecessaryThe examples in this chapter assume that the entire application needs to be secured and that each user should be forced to log in when they first visit any of your application's pages. If, however, only a few pages need to be secured here and there, you might want to delay the login step until the user actually requests something of a sensitive nature. For instance, it might be that the user doesn't need to log in unless they try to visit pages such as Manage My Account or My Order History. For all other pages, no security measures are necessary. To get this effect, you could move the isDefined("SESSION.auth.isLoggedIn") check from Application.cfc (refer to Listing 21.1) to a new template called ForceUserLogin.cfm. Then, at the top of any page that requires a password, you could put a <cfinclude> tag with a template= "ForceLogin.cfm" attribute. This is a simple but effective way to enforce application security only where it's needed. Implementing Different Access LevelsThis chapter has focused on the problems of forcing users to log in and using the login information to safely provide sensitive information. Once logged in, each user is treated equally in this chapter's examples. Each user simply has the right to see their own data. If you are building a complex application that needs to allow certain users to do more than others, you might need to create some type of access right or permission or user level. This need is most commonly encountered in intranet applications, in which executives need to be able to view report pages that most employees cannot see, or in which only certain high-level managers can review the performance files of other employees. Maybe all you need is to add another column somewhere to tell you which type of user each person is. For the Orange Whip Studios example, this might mean adding a new Yes/No column called IsPrivileged to the Contacts table. The idea is that if this column is set to true, the user should get access to certain special things that others don't have. Then, in LoginCheck.cfm (refer to Listing 21.3), select this new column along with the ContactID and FirstName columns in the <cfquery>, and add a line that saves the isPrivileged value in the SESSION.auth structure, such as this: <cfset SESSION.auth.isPrivileged = getUser.IsPrivileged> TIP For an intranet application, you might use a column called IsSupervisor or IsAdministrator instead of IsPrivileged. Now, whenever you need to determine whether something that requires special privileges should be shown, you could use a simple <cfif> test, such as <cfif SESSION.auth.isPrivileged> <a href="SalesData.cfm">Sacred Sales Data</a> </cfif> Or, instead of a simple Yes/No column, you might have a numeric column named UserLevel and save it in the SESSION.auth structure in LoginCheck.cfm. This would give you an easy way to set up various access levels, where 1 might be used for normal employees, 2 for supervisors, 3 for managers, 4 for executives, and 100 for developers. So, if only security level 3 and above should be able to view a page, you could use something similar to this: <cfif SESSION.auth.userLevel lt 3> Access denied! <cfabort> </cfif> Access Rights, Users, and GroupsDepending on the application, you may need something more sophisticated than what is suggested in the previous code snippets. If so, you might consider creating database tables to represent some notion of access rights, users, and groups. A typical implementation would establish a many-to-many relationship between users and groups, so that a user can be in more than one group, and each group have any number of users. In addition, a one-to-many relationship generally would exist between groups and access rights. Tables with names such as GroupsUsers and GroupsRights would maintain the relationships. After the tables were in place, you could adapt the code examples in this chapter to enforce the rules established by the tables. For instance, assuming that you had a table called Rights, which had columns named RightID and RightName, you might put a query similar to the following after the GetUser query in LoginCheck.cfm (refer to Listing 21.3): <!--- Find what rights user has from group membership ---> <cfquery name="getRights" datasource="#APPLICATION.dataSource#"> SELECT r.RightName FROM Rights r, GroupsContacts gu, GroupsRights gr WHERE r.RightID = gr.RightID AND gu.GroupID = gr.GroupID AND gu.ContactID = #SESSION.auth.contactID# </cfquery> <!--- Save comma-separated list of rights in SESSION ---> <cfset SESSION.auth.rightsList = valueList(getRights.RightName)> Now, SESSION.auth.rightsList would be a list of string values that represented the rights the user should be granted. The user is being granted these rights because the rights have been granted to the groups they are in. After the previous code is in place, code such as the following could be used to find out whether a particular user is allowed to do something, based on the rights they have actually been granted: <cfif listFind(SESSION.auth.rightsList, "SalesAdmin"> <a href="SalesData.cfm">Sacred Sales Data</a> </cfif> or <cfif not listFind(SESSION.auth.rightsList, "SellCompany"> Access denied. <cfabort> </cfif> NOTE The <cflogin> framework discussed in the next section provides the IsUserInRole() function, which is a similar way to implement security based on groups or rights. In particular, the OrderHistory4.cfm template shown in Listing 21.9 uses this function to provide different levels of access to different users. Using ColdFusion's <cflogin> FrameworkSo far, this chapter has presented a simple session-based method for securing and personalizing an application, built on user names and passwords. Using the preceding examples as a foundation, you can easily create your own custom security framework. For the purposes of this section, let's call this type of security a homegrown security framework. With ColdFusion, you also have the option of using a security framework that ships as part of the CFML language itself. This new framework includes a few tags; most important is the <cflogin> tag, which you will learn about in this section. The ColdFusion documentation refers to the new framework as user security. For clarity, let's call it the <cflogin> framework. Because the <cflogin> framework boasts tight integration with the rest of the CFML language, you may want to use it to provide security for some applications. That said, you may want to stick to a homegrown approach for flexibility. In either case, you will probably end up writing approximately the same amount of code. Table 21.1 shows some of the advantages and disadvantages of the <cflogin> framework versus a homegrown framework.
NOTE One key advantage of the <cflogin> framework is its integration with the ColdFusion Components (CFC) system, which you will learn about soon.
Tags and Functions Provided by the <cflogin> FrameworkThe <cflogin> framework currently includes five CFML tags and functions, as shown in Table 21.2. You will see how these tags work together in a moment. For now, all you need is a quick sense of the tags and functions involved.
Using <cflogin> and <cfloginuser>The first thing you need to do is add the <cflogin> and <cfloginuser> tags to whatever parts of your application you want to protect. To keep things nice and clean, the examples in this chapter keep the <cflogin> and <cfloginuser> code in a separate ColdFusion template called ForceUserLogin.cfm (Listing 21.6). Once a template like this is in place, you just need to include it via <cfinclude> from any Cold Fusion page that you want to password-protect. To protect an entire application, just place the <cfinclude> into your Application.cfc template. Since it automatically executes for every page request, the <cflogin> and related tags will be automatically protecting all of your application's pages. Listing 21.6. ForceUserLogin.cfmUsing the <cflogin> Framework <!--- Filename: ForceUserLogin.cfm Created by: Nate Weiss (NMW) Purpose: Requires each user to log in Please Note Included by Application.cfc ---> <!--- Force the user to log in ---> <!--- *** This code only executes if the user has not logged in yet! *** ---> <!--- Once the user is logged in via <cfloginuser>, this code is skipped ---> <cflogin> <!--- If the user hasn't gotten the login form yet, display it ---> <cfif not (isDefined("FORM.userLogin") and isDefined("FORM.userPassword"))> <cfinclude template="UserLoginForm.cfm"> <cfabort> <!--- Otherwise, the user is submitting the login form ---> <!--- This code decides whether the username and password are valid ---> <cfelse> <!--- Find record with this Username/Password ---> <!--- If no rows returned, password not valid ---> <cfquery name="getUser" datasource="#APPLICATION.dataSource#"> SELECT ContactID, FirstName, UserRoleName FROM Contacts LEFT OUTER JOIN UserRoles ON Contacts.UserRoleID = UserRoles.UserRoleID WHERE UserLogin = '#FORM.UserLogin#' AND UserPassword = '#FORM.UserPassword#' </cfquery> <!--- If the username and password are correct... ---> <cfif getUser.recordCount eq 1> <!--- Tell ColdFusion to consider the user "logged in" ---> <!--- For the NAME attribute, we will provide the user's ---> <!--- ContactID number and first name, separated by commas ---> <!--- Later, we can access the NAME value via GetAuthUser() ---> <cfloginuser name="#getUser.ContactID#,#getUser.FirstName#" password="#FORM.userPassword#" roles="#getUser.userRoleName#"> <!--- Otherwise, re-prompt for a valid username and password ---> <cfelse> Sorry, that username and password are not recognized. Please try again. <cfinclude template="UserLoginForm.cfm"> <cfabort> </cfif> </cfif> </cflogin> NOTE This template is very similar conceptually to the homegrown LoginCheck.cfm template discussed earlier (see Listing 21.3). The logic still centers around the getUser query, which checks the user name and password that have been provided. It just remembers each user's login status using <cflogin> and <cfloginuser>, rather than the homegrown SESSION.auth structure. NOTE Whenever Listing 21.6 needs to display a login form to the user, it does so by including UserLoginForm.cfm with a <cfinclude> tag. This login form is nearly identical to the one shown earlier in Listing 21.2; the main difference is that it takes advantage of two user-defined functions to preserve any URL and FORM variables that might be provided before the login form is encountered. The actual code for this version of the login form is included on the CD-ROM for this book; it is also discussed in Chapter 22, "Building User-Defined Functions." The first thing to note is the pair of <cflogin> tags. In most cases, the <cflogin> tag can be used with no attributes to simply declare that a login is necessary (see the notes before Table 21.3 for information about <cflogin>'s optional attributes). It is up to the code inside the <cflogin> tag to do the work of collecting a user name and password, or forcing the user to log in. If they have already logged in, the code within the <cflogin> block is skipped completely. The <cflogin> code executes only if the user has yet to log in.
At the top of the <cflogin> block, a simple <cfif> test sees whether form fields named userLogin and userPassword have been provided. In other words, has the user been presented with a login form? If not, the login form is presented via a <cfinclude> tag. Note that the <cfabort> tag is needed to make sure that execution stops once the form is displayed. Therefore, the code beginning with <cfelse> executes only if the user has not yet successfully logged in and is currently attempting to log in with the login form. First, a simple <cfquery> tag is used to validate the user name and password. This is almost the same as the query used in Listing 21.3. The only difference is that this query also retrieves the name of the user's security role from the UserRoles table. NOTE For this example application, the security role is conceptually similar to that of a user group in an operating system; you can use the role to determine which users have access to what. For instance, those in the Admin security role might be able to do things other users cannot. You'll see how this works in the OrderHistory4.cfm template, later in this chapter. TIP You don't have to use database queries to validate users' credentials and retrieve their information. For instance, if you are storing this type of user information in an LDAP data store (such as one of the iPlanet server products, or Microsoft's Windows 2000, XP, or .NET systems), you could use the <cfldap> tag instead of <cfquery> to validate the user's security data. The ColdFusion documentation includes an example of using <cfldap> together with <cflogin> and <cfloginuser> in such a way. If the user name and password are valid, the <cfloginuser> tag tells ColdFusion that the user should now be considered logged in. If not, the login form is redisplayed. Table 21.3 shows the attributes <cfloginuser> supports. Take a look at how <cfloginuser> is used in Listing 21.6. The purpose of the name attribute is to pass a value to ColdFusion that identifies the user in some way. The actual value of name can be whatever you want; ColdFusion retains the value for as long as the user is logged in. At any time, you can use the getAuthUser() function to retrieve the value you passed to name. Because the various pages in the application need to have the user's ContactID and first name handy, they are passed to name as a simple comma-separated list. NOTE Behind the scenes, the <cflogin> framework sets a cookie on the browser machine to remember that a user has been logged in. The cookie's name will start with CFAUTHORIZATION. The <cflogin> tag supports two optional attributes that control how that cookie is set. The cookieDomain attribute allows you to share the authorization cookie between servers in the same domain; it works like the domain attribute of the <cfcookie> tag (as discussed in Chapter 20). The applicationToken attribute can be used to share a user's login state among several applications; normally, this attribute defaults to the current application's name (which means that all pages that use the same name in their This scope from the Application.cfc file will share login information), but if you provide a different value, all <cflogin> blocks that use the same applicationToken will share the login information (creating a "single sign on" effect). See Appendix B for a complete list of <cflogin> attributes. TIP The <cflogin> tag supports an optional idleTimeout attribute, which you can use to control how long a user remains logged in between page requests. The default value is 1800 seconds (30 minutes). If you want users to be considered logged out after just 5 minutes of inactivity, use idleTimeout="300". See Appendix B for a complete list of <cflogin> attributes. The other values passed to <cfloginuser> are straightforward. The password that the user entered is supplied to the password attribute, and the name of the role to which the user is assigned is passed as the roles. Later, any page in the application will be able to test whether the currently logged-in user is a member of a particular role with the isUserInRole() function. NOTE It is up to you to ensure that each possible combination of name and password is unique (this is almost always the case anyway; an application should never allow two users to have the same user name and password). The best practice would be to make sure that some kind of unique identifier (such as the ContactID) be used as part of the name, just to make sure that ColdFusion understands how to distinguish your users from one another. NOTE The way the Orange Whip Studios example database is designed, each user will always have only one role (or associated group). That is, they can be assigned to the Admin role or the Marketing role, but not both. If your application needed to let users be in multiple roles or groups, you would likely have an additional database table with a row for each combination of ContactID and UserRoleID. Then, before your <cfloginuser> tag, you might have a query called getUserRoles that retrieved the appropriate list of role names from the database. You would then use the valueList() function to supply this query's records to the roles attribute as a comma-separated list; for instance: roles="#valueList(getUserRoles.userRoleName)#". Now that the code to force the user to log in is in place, it just needs to be pressed into service via <cfinclude>. You could either place the <cfinclude> at the top of each ColdFusion page that you wanted to protect, or you can just place it in Application.cfc to protect all your application's templates. Listing 21.7 shows such an Application.cfc file. Listing 21.7. Application2.cfcLogging with <cflogin> Framework<!--- Filename: Application.cfc Created by: Raymond Camden (ray@camdenfamily.com) Please Note Executes for every page request ---> <cfcomponent output="false"> <!--- Name the application. ---> <cfset this.name="OrangeWhipSite"> <!--- Turn on session management. ---> <cfset this.sessionManagement=true> <cffunction name="onApplicationStart" output="false" returnType="void"> <!--- Any variables set here can be used by all our pages ---> <cfset APPLICATION.dataSource = "ows"> <cfset APPLICATION.companyName = "Orange Whip Studios"> </cffunction> <cffunction name="onRequestStart" output="false" returnType="void"> <cfinclude template="ForceUserLogin.cfm"> </cffunction> </cfcomponent> Using getAuthUser() in Your Application PagesOnce you save Listing 21.7 as a file named Application.cfc, users will be forced to log in whenever they visit any of the pages in that folder (or its subfolders). However, the order history pages that were created above will no longer work, since they rely on the SESSION.auth variables populated by the homegrown login framework. A few changes must be made to allow the order history pages with the <cflogin> framework. Basically, this just means referring to the value returned by getAuthUser() to get the user's ID and first name, rather than using SESSION.auth.contactID and SESSION.auth.firstName. Listing 21.8 shows the new version of the order history template. Listing 21.8. OrderHistory3.cfmUsing getAuthUser() <!--- Filename: OrderHistory3.cfm Created by: Nate Weiss (NMW) Purpose: Displays a user's order history ---> <html> <head> <title>Order History</title> <!--- Apply some simple CSS style formatting ---> <style type="text/css"> BODY {font-family:sans-serif;font-size:12px;color:navy} H2 {font-size:20px} TH {font-family:sans-serif;font-size:12px;color:white; background:MediumBlue;text-align:left} TD {font-family:sans-serif;font-size:12px} </style> </head> <body> <!--- getAuthUser() returns whatever was supplied to the name ---> <!--- attribute of the <cflogin> tag when the user logged in. ---> <!--- We provided user's ID and first name, separated by ---> <!--- commas; we can use list functions to get them back. ---> <cfset contactID = listFirst(getAuthUser())> <cfset contactName = listRest(getAuthUser())> <!--- Personalized message at top of page---> <cfoutput> <h2>YourOrder History</h2> <p><strong>Welcome back, #contactName#!</strong><br> </cfoutput> <!--- Retrieve user's orders, based on ContactID ---> <cfquery name="getOrders" datasource="#APPLICATION.dataSource#"> SELECT OrderID, OrderDate, (SELECT Count(*) FROM MerchandiseOrdersItems oi WHERE oi.OrderID = o.OrderID) AS ItemCount FROM MerchandiseOrders o WHERE ContactID = #contactID# ORDER BY OrderDate DESC </cfquery> <!--- Determine if a numeric OrderID was passed in URL ---> <cfset showDetail = isDefined("URL.orderID") and isNumeric(URL.orderID)> <!--- If an OrderID was passed, get details for the order ---> <!--- Query must check against ContactID for security ---> <cfif showDetail> <cfquery name="getDetail" datasource="#APPLICATION.dataSource#"> SELECT m.MerchName, oi.ItemPrice, oi.OrderQty FROM Merchandise m, MerchandiseOrdersItems oi WHERE m.MerchID = oi.ItemID AND oi.OrderID = #URL.orderID# AND oi.OrderID IN (SELECT o.OrderID FROM MerchandiseOrders o WHERE o.ContactID = #contactID#) </cfquery> <!--- If no Detail records, don't show detail ---> <!--- User may be trying to "hack" URL parameters ---> <cfif getDetail.recordCount eq 0> <cfset showDetail = False> </cfif> </cfif> <cfif getOrders.recordCount eq 0> <p>No orders placed to date.<br> <cfelse> <cfoutput> <p>Orders placed to date: <strong>#getOrders.recordCount#</strong><br> </cfoutput> <!--- Display orders in a simple HTML table ---> <table border="1" width="300" cellpadding="5" cellspacing="2"> <!--- Column headers ---> <tr> <th>Date Ordered</th> <th>Items</th> </tr> <!--- Display each order as a table row ---> <cfoutput query="getOrders"> <!--- Determine whether to show details for this order ---> <!--- Show Down arrow if expanded, otherwise Right ---> <cfset isExpanded = showDetail and (getOrders.OrderID eq URL.orderID)> <cfset arrowIcon = iif(isExpanded, "'ArrowDown.gif'", "'ArrowRight.gif'")> <tr> <td> <!--- Link to show order details, with arrow icon ---> <a href="OrderHistory3.cfm?OrderID=#orderID#"> <img src="/books/2/448/1/html/2/../images/#ArrowIcon#" width="16" height="16" border="0"> #dateFormat(orderDate, "mmmm d, yyyy")# </a> </td> <td> <strong>#ItemCount#</strong> </td> </tr> <!--- Show details for this order, if appropriate ---> <cfif isExpanded> <cfset orderTotal = 0> <tr> <td colspan="2"> <!--- Show details within nested table ---> <table width="100%" cellspacing="0" border="0"> <!--- Nested table's column headers ---> <tr> <th>Item</th><th>Qty</th><th>Price</th> </tr> <!--- Show each ordered item as a table row ---> <cfloop query="getDetail"> <cfset orderTotal = orderTotal + itemPrice> <tr> <td>#merchName#</td> <td>#orderQty#</td> <td>#dollarFormat(itemPrice)#</td> </tr> </cfloop> <!--- Last row in nested table for total ---> <tr> <td colspan="2"><strong>Total:</strong></td> <td><strong>#dollarFormat(orderTotal)#</strong></td> </tr> </table> </td> </tr> </cfif> </cfoutput> </table> </cfif> </body> </html> As noted earlier, getAuthUser() always returns whatever value was provided to the name attribute of the <cfloginuser> tag at the time of login. The examples in this chapter provide the user's ID and first name to name as a comma-separated list. Therefore, the current user's ID and name can easily be retrieved with the listFirst() and listRest() functions, respectively. Two <cfset> tags near the top of Listing 21.8 use these functions to set two simple variables called contactID and contactName. The rest of the code is essentially identical to the previous version of the template (refer to Listing 21.5). The only change is the fact that contactID is used instead of SESSION.auth.contactID, and contactName is used instead of SESSION.auth.firstName. Using Roles to Dynamically Restrict FunctionalitySo far, the examples in this chapter provide the same level of access for each person. That is, each user is allowed access to the same type of information. ColdFusion's <cflogin> framework also provides a simple way for you to create applications in which different people have different levels of access. The idea is for your code to make decisions about what to show each user based on the person's role (or roles) in the application. NOTE For the purposes of this discussion, consider the word "role" to be synonymous with group, right, or privilege. The example application for this book thinks of roles as groups. That is, each contact is a member of a role called Admin or User or the like. Those role names sound a lot like group names. Other ColdFusion applications might have role names that sound more like privileges; for instance, MayReviewAccountHistory or MayCancelOrders. Use the concept of a role in whatever way makes sense for your application. How exactly you view a role is up to you. Back in Listing 21.6, the name of the role assigned to the current user was supplied to the roles attribute of the <cfloginuser> tag. As a result, ColdFusion always knows which users belong to which roles. Elsewhere, the isUserInRole() function can be used to determine whether the user is a member of a particular role. For instance, if you want to display some kind of link, option, or information for members of the Admin role but not for other users, the following <cfif> test would do the trick: <cfif isUserInRole("Admin")> <!--- special information or options here ---> </cfif> Listing 21.9 is one more version of the order history template. This version uses the isUserInRole() function to determine whether the user is a member of the Admin role. If so, the user is given the ability to view any customer's order history, via a drop-down list. If the user is an ordinary visitor (not a member of Admin), then they only have access to their own order history. Listing 21.9. OrderHistory4.cfmUsing isUserInRole() to Restrict Access <!--- Filename: OrderHistory4.cfm Created by: Nate Weiss (NMW) Purpose: Displays a user's order history ---> <html> <head> <title>Order History</title> <!--- Apply some simple CSS style formatting ---> <style type="text/css"> BODY {font-family:sans-serif;font-size:12px;color:navy} H2 {font-size:20px} TH {font-family:sans-serif;font-size:12px;color:white; background:MediumBlue;text-align:left} TD {font-family:sans-serif;font-size:12px} </style> </head> <body> <!--- getAuthUser() returns whatever was supplied to the NAME ---> <!--- attribute of the <cflogin> tag when the user logged in. ---> <!--- We provided user's ID and first name, separated by ---> <!--- commas; we can use list functions to get them back. ---> <cfset contactID = listFirst(getAuthUser())> <cfset contactName = listRest(getAuthUser())> <!--- If current user is an administrator, allow user ---> <!--- to choose which contact to show order history for ---> <cfif isUserInRole("Admin")> <!--- This session variable tracks which contact to show history for ---> <!--- By default, assume the user should be viewing their own records ---> <cfparam name="SESSION.orderHistorySelectedUser" default="#contactID#"> <!--- If user is currently choosing a different contact from list ---> <cfif isDefined("FORM.selectedUser")> <cfset SESSION.orderHistorySelectedUser = FORM.selectedUser> </cfif> <!--- For rest of template, use selected contact's ID in queries ---> <cfset showHistoryForContactID = SESSION.orderHistorySelectedUser> <!--- Simple HTML form, to allow user to choose ---> <!--- which contact to show order history for ---> <cfform action="#CGI.SCRIPT_NAME#" method="POST"> <h2>Order History</h2> Customer: <!--- Get a list of all contacts, for display in drop-down list ---> <cfquery datasource="#APPLICATION.dataSource#" name="getUsers"> SELECT ContactID, LastName + ', ' + FirstName AS FullName FROM Contacts ORDER BY LastName, FirstName </cfquery> <!--- Drop-down list of contacts ---> <cfselect name="selectedUser" selected="#SESSION.orderHistorySelectedUser#" query="getUsers" display="FullName" value="ContactID"></cfselect> <!--- Submit button, for user to choose a different contact ---> <input type="Submit" value="Go"> </cfform> <!--- Normal users can view only their own order history ---> <cfelse> <cfset showHistoryForContactID = contactID> <!--- Personalized message at top of page---> <cfoutput> <h2>YourOrder History</h2> <p><strong>Welcome back, #contactName#!</strong><br> </cfoutput> </cfif> <!--- Retrieve user's orders, based on ContactID ---> <cfquery name="getOrders" datasource="#APPLICATION.dataSource#"> SELECT OrderID, OrderDate, (SELECT Count(*) FROM MerchandiseOrdersItems oi WHERE oi.OrderID = o.OrderID) AS ItemCount FROM MerchandiseOrders o WHERE ContactID = #showHistoryForContactID# ORDER BY OrderDate DESC </cfquery> <!--- Determine if a numeric OrderID was passed in URL ---> <cfset showDetail = isDefined("URL.orderID") and isNumeric(URL.orderID)> <!--- If an OrderID was passed, get details for the order ---> <!--- Query must check against ContactID for security ---> <cfif showDetail> <cfquery name="getDetail" datasource="#APPLICATION.dataSource#"> SELECT m.MerchName, oi.ItemPrice, oi.OrderQty FROM Merchandise m, MerchandiseOrdersItems oi WHERE m.MerchID = oi.ItemID AND oi.OrderID = #URL.orderID# AND oi.OrderID IN (SELECT o.OrderID FROM MerchandiseOrders o WHERE o.ContactID = #showHistoryForContactID#) </cfquery> <!--- If no Detail records, don't show detail ---> <!--- User may be trying to "hack" URL parameters ---> <cfif getDetail.recordCount eq 0> <cfset showDetail = False> </cfif> </cfif> <cfif getOrders.recordCount eq 0> <p>No orders placed to date.<br> <cfelse> <cfoutput> <p>Orders placed to date: <strong>#getOrders.recordCount#</strong><br> </cfoutput> <!--- Display orders in a simple HTML table ---> <table border="1" width="300" cellpadding="5" cellspacing="2"> <!--- Column headers ---> <tr> <th>Date Ordered</th> <th>Items</th> </tr> <!--- Display each order as a table row ---> <cfoutput query="getOrders"> <!--- Determine whether to show details for this order ---> <!--- Show Down arrow if expanded, otherwise Right ---> <cfset isExpanded = showDetail and (getOrders.OrderID eq URL.orderID)> <cfset arrowIcon = iif(isExpanded, "'ArrowDown.gif'", "'ArrowRight.gif'")> <tr> <td> <!--- Link to show order details, with arrow icon ---> <a href="OrderHistory4.cfm?orderID=#OrderID#"> <img src="/books/2/448/1/html/2/../images/#arrowIcon#" width="16" height="16" border="0"> #dateFormat(OrderDate, "mmmm d, yyyy")# </a> </td> <td> <strong>#ItemCount#</strong> </td> </tr> <!--- Show details for this order, if appropriate ---> <cfif isExpanded> <cfset orderTotal = 0> <tr> <td colspan="2"> <!--- Show details within nested table ---> <table width="100%" cellspacing="0" border="0"> <!--- Nested table's column headers ---> <tr> <th>Item</th><th>Qty</th><th>Price</th> </tr> <!--- Show each ordered item as a table row ---> <cfloop query="getDetail"> <cfset orderTotal = orderTotal + itemPrice> <tr> <td>#MerchName#</td> <td>#OrderQty#</td> <td>#dollarFormat(ItemPrice)#</td> </tr> </cfloop> <!--- Last row in nested table for total ---> <tr> <td colspan="2"><strong>Total:</strong></td> <td><strong>#dollarFormat(orderTotal)#</strong></td> </tr> </table> </td> </tr> </cfif> </cfoutput> </table> </cfif> </body> </html> As you can see, the isUserInRole() function is used to determine whether the user is an administrator. If so, the <cfselect> tag is used to provide the user with a drop-down list of everyone from the Contacts table. The SESSION.orderHistorySelectedUser variable is used to track the user's current drop-down selection; this is very similar conceptually to the way the CLIENT.lastSearch variable was used in the SearchForm.cfm examples in Chapter 20. Another variable, called showHistoryForContactID, is created to hold the current value of SESSION.orderHistorySelectedUser. If, on the other hand, the user isn't an administrator, the value of showHistoryForContactID is simply set to their own contact ID number. In other words, after the large <cfif> block at the top of this listing is finished, showHistoryForContactID always holds the appropriate ID number with which to retrieve the order history. The rest of the code is very similar to that in the earlier versions of the template in this chapter; it just uses showHistoryForContactID in the WHERE parts of its queries to make sure the user sees the appropriate order history records. Figure 21.5 shows the results for users who log in as administrators (you can log in with username Ben and password Forta to see these results). All other users will continue to see the interface shown in Figure 21.4. Figure 21.5. The concept of user roles can be used to expose whatever functionality is appropriate for each one.
|
 See Chapter 19 for details.
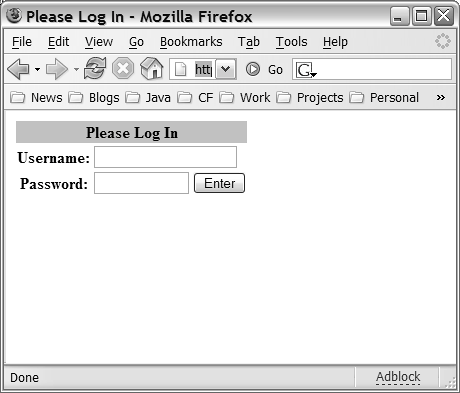

EAN: N/A
Pages: 282