Flash Development
| FlashFusion knows that developing the Flash UI for the application will be more complicated than the back-end programming. This is largely due to the functionality required for the end user and for allowing Flash components to interact with each other. Although Flash ships with many functional components, there will still be a great deal of code needed to create a highly usable application. Along with the built-in components, FlashFusion will download the Flash UI Components Set 2 from the Macromedia Exchange for Flash.
Flash also ships with several built-in components that will aid in the application's development. These components will help speed up the development process as well as provide a very functional interface for the client. Getting StartedWith the ColdFusion components already in place, it will be easier to build the interfaces and code in which Flash can communicate with the server. Before any coding takes place, FlashFusion will establish a GUI for the application and get approval from Simpleton. This will consist of dragging and dropping components on the stage as well as adding custom elements to create a unique look and feel. Before the layout process begins, be sure to get a feel for which components will handle certain tasks. Since Simpleton has provided the specs on how the application will function, FlashFusion has enough information to determine which components will be used. It's always a good idea to understand how the user will interact with the application in order to employ the proper components to accommodate this. FlashFusion has provided the following information that goes into detail about which components will be used and how they will function within the application. ComponentsThe components listed in this section are provided by Macromedia as extensions to the Flash integrated development environment (IDE). Once the components are pulled from the library onto the stage, immediate functionality is at the developer's fingertips. This exists in properties and methods that can be called to dynamically change the components' appearance and functionality.
ListBoxThe ListBox component in the Flash movie (MailClient.fla) is assigned the instance name messageList_mc. Instance names are defined to provide a way for ActionScript code to access methods and properties of the clip.
The ListBox component will serve as a means for displaying email messages for the current user. The user will be able to scroll through the messages and select a specific message for reading. The message contents will then be displayed below the ListBox component in a dynamic text field. The user will also be able to select single or multiple messages and click the arrow buttons to move the messages to a specific folder. This will allow the user to organize email messages in a manner that best suits her needs. Several properties and methods are accessible to the developer when controlling the ListBox component. It also provides functionality to scroll through the messages using the up and down arrow keys. Also, multiple messages can be selected via Ctrl-clicking (Windows) or Option-clicking (Macintosh) and then Shift-clicking. ScrollBarThe ScrollBar component doesn't need an instance name since its main task is to control the dynamic text field messageContents. When the ScrollBar is placed on the stage, all that's necessary is to set a target text field for the component. This is set in the Properties panel when the component is selected. Once the target has been set, the ScrollBar takes immediate control of the dynamic text box. If the text listed in the field extends beyond the height of the viewable area, the ScrollBar is triggered and becomes active. The height of the ScrollBar also dynamically scales to the amount of text in the field.
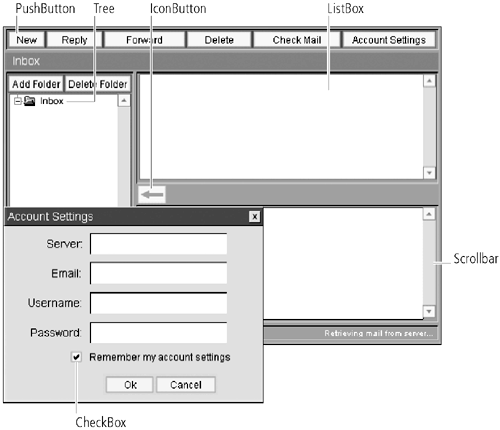
Creating a scroll bar in Flash can be very time-consuming. Instead of reinventing the wheel each time, it's a good idea to use the ScrollBar component when necessary. This applies to all components that can be reused without having to start from scratch. It will save time and frustration in the long run and will help improve development efforts. PushButtonThe PushButton component serves as a way to confirm a user action and handle a task when clicked. A click handler can be specified as a parameter for the component. A click handler is a predefined method that is called once the button has been released. This will be very handy in the email application when checking, sending, forwarding, and deleting email. The PushButton, along with most components, has a handy method called setEnabled. If this is set to false, the button will be disabled, and it will be accessible if set to true. A good example of when to use this is when an email is being sent. The send button can be disabled after sending the message until the next message is sent. This will prevent the user from accidentally double-clicking the send button and sending two copies of the message. CheckBoxThe CheckBox component comes in handy when you need to grab a yes or no answer from the user. In this application it will handle such tasks as asking users if they want their information stored to the local machine. Change handlers can also be specified for CheckBox components that are triggered whenever the selection is clicked on or off. Also, an initial value can be specified for the component to be set as the default when the application is launched. TreeThe Tree component (found in Flash UI Components Set 2) used in this application is given the instance name folderList_mc. It displays information based on a parent-child relationship, similar to the way Windows Explorer is organized. Each element of the tree is considered a node, and the top-level node is considered the root node. Each node will correspond to email folders in the application. This will be handy when specifying the Inbox folder, which will be the parent of all subfolders created beneath it. The subfolders will be created by the user and employed to organize email messages. A click handler can also be specified for the Tree component. In this application the method will be used to gather the email messages related to a specific folder. When the user selects a certain folder, the contents will be displayed in the ListBox component. MessageBoxThe MessageBox component (also found in Flash UI Components Set 2) will simply be used to display a dialog box to the user. This will be handy for displaying confirmation and error messages. It will appear throughout the application when prompting the user to enter his account information or asking the user if he would like to delete the selected folder. IconButtonThe IconButton component (in Flash UI Components Set 2) is very similar to the PushButton component except that an image can be placed on the button. This will be used for creating a button with which the user can select certain messages to be moved from the Inbox to a specific subfolder. The IconButton still uses a click-handler event to perform a task when the button is clicked. The components detailed in this section have been put into place for the email application. These components alone have saved FlashFusion weeks of development time by providing out-of-the-box functionality without having to create and code their own. Now that the GUI for the email client is ready, it's time to take an in-depth look at the ActionScript (AS) code. The AS code will bring the components to life and allow them to communicate with each other, as well as the server. Figure III-3.4 shows the components of the email application. Figure III-3.4. Components of the email application.
ActionScriptThe ActionScript code resides in frame 1 and the top layer (labeled AS) of MailClient.fla. Most of the ActionScript for the entire application resides in this frame. It's generally a good practice to keep code centralized so that it's not necessary to look throughout the entire application for code snippets. Although this can't always be achieved, FlashFusion will make the best possible effort to do so. The ActionScript code in the email application will handle such tasks as:
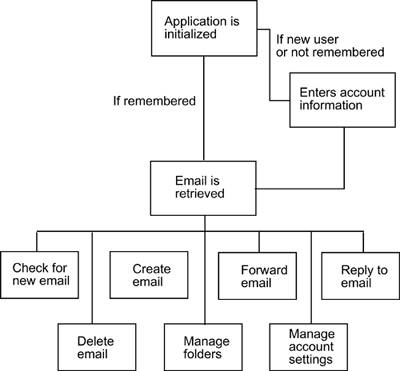
There are also a few variables and functions residing in other movie clips that we'll look into later. For now, the key to understanding the Flash movie is the order of events, along with the code that handles these events. Here is a basic list of events that the user will carry out:
Figure III-3.5 shows a simplified view of the event process. Figure III-3.5. Simplified view of the event process.
The Necessary ClassesBefore the application can be initialized and before any code is written, the necessary Flash Remoting classes need to be included. These include files are part of the Flash Remoting install and are compiled into the Flash movie when it's exported. Listing 3.6 shows the necessary to include the classes. Listing 3.6#include"NetServices.as" #include"NetDebug.as" #include"DataGlue.as" Several methods of these classes will be referenced throughout the application. It's not necessary to understand the code in these classes; it's more important to know what they do and where to use them (Table III-3.1).
Initializing the ApplicationBefore any action takes place within the application, it first has to be initialized. Initialization usually consists of setting some default variables, checking to see if certain data exists, displaying set-up screens, and so on. To kick-start the application, the init method is called. An inited variable is used to call the init method and then is set to true so that the application will not be initialized again (Listing 3.7). If the Web browser is refreshed or the user leaves the application and comes back, the init method will fire again. Listing 3.7 //onlycallthisoncesinceinitedwill //benullinitiallyandsettotruewhen if(inited==null){ //theinitmethodfires init(); } //methodtoinitializetheapplication functioninit(){ //uncommentthefollowingtoresetallstoreddata //clearAll(); inited=true; //setthegatewayURLvariable gwURL="http://127.0.0.1:8100/flashservices/gateway"; //initializethesharedobjects //maildatasharedobject mail_so=sharedObject.getLocal("MailData"); mail_so.data.mail_obj=newObject(); //accountsettingssharedobject account_so=SharedObject.getLocal("AccountSettings"); //folderlistsharedobject treeData_so=SharedObject.getLocal("TreeData"); if(account_so.data.mailServer==undefined){ accountSetup(); }else{ login_obj=newObject(); login_obj.mailServer=account_so.data.mailServer; login_obj.emailAddress=account_so.data.emailAddress; login_obj.username=account_so.data.username; login_obj.password=account_so.data.password; checkMail(); } //Createorretrievethesharedobjectdataforthefolderlist //buildthetreenodes if(treeData_so.data.folders!=undefined){ folderTree_mc.setSize(150,280); folderTree_mc.setRootNode(newFTreeNode("Inbox") setIsBranch(false)); vari=1; while(i<treeData_so.data.folders.length){ folderTree_mc.addNode(folderTree_mc.getRootNode(), newFTreeNode(treeData_so.data.folders[i])); i++; } folderTree_mc.getRootNode().setIsOpen(true); folderTree_mc.refresh(); } //setintervalcode,needswork //setInterval(checkMail,10000); } The Flash Gateway URL is set and will be referenced once everything is in place and the checkMail method is called. The URL points to localhost for testing purposes and will need to be changed once it's taken to a production environment. For security reasons, this URL must be the domain name or IP address of the server hosting the application.
The init method then creates shared objects that will be used to access information on the client's machine, if any. These shared objects perform the following tasks (Table III-3.2):
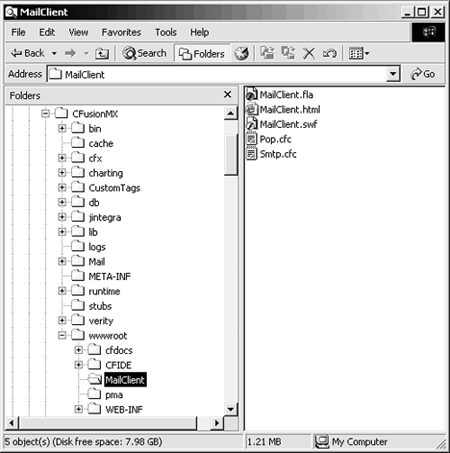
The AccountSettings shared object is then accessed to see whether it is valid. If the shared object does not exist, then the accountSetup method is called. This will prompt the user to enter her account information and will save the information to the shared object. The TreeData shared object is then accessed; it stores a list of folders as well as message IDs that correspond with those folders. The procedure of sorting emails into folders will come later, when the user has logged in and the emails have been pulled into Flash. If the AccountSettings shared object does not exist, the accountSetup method is called and this is where the user will specify her account information. If the shared object does exist, a mail object is created and the checkMail method is called. The mail object stores such information as mail-server address, email address, username, and password. The next part of the init method builds the folder list for display in the Tree component. This component has been assigned an instance name of folderTree_mc. Different methods are called to dynamically set the size of the component as well as to populate it with the folder data from the shared object TreeData. If no folders exist, only the Inbox folder will be displayed. Shared objects are new to Flash MX and allow developers to store information on the client's computer and retrieve it later. They can be thought of as Flash cookies except with a lot more capabilities. Account SettingsIf the user is new or did not want his information saved, he will be prompted to enter his account information. This is detected by seeing if the mailServer address exists once the shared object is called. If it doesn't, then the accountSetup method is called. The accountSetup method can be seen in Listing 3.8. Listing 3.8 functionaccountSetup(){ status="AccountSetup"; accountSettings.gotoAndStop(2); if(account_so.data.mailServer==undefined){ accountSettings.mailServer=""; accountSettings.emailAddress=""; accountSettings.userName=""; accountSettings.password=""; }else{ accountSettings.mailServer=account_so.data.mailServer; accountSettings.emailAddress= account_so.data.emailAddress; accountSettings.userName=account_so.data.username; accountSettings.password=account_so.data.password; } } This method can be called in one of two ways in the application: during initialization or if the Account Settings button is clicked. Either way, the accountSettings_mc movie clip is called; it displays the Setup dialog box. This movie clip is a custom component that has been developed for the email application. Within this component the user has the option to either proceed or cancel out of the menu. The OK and Cancel buttons have click handlers that exist in frame 1 of this sub-clip. The corresponding method is called, depending on which button is clicked. If OK is clicked and the "Remember my account settings" checkbox is selected, then the user's account information is saved to the local computer. The checkMail method is then called. If the Cancel button is clicked, nothing happens and the movie clip is sent back to frame 1 (Listing 3.9). Listing 3.9 functionok(){ //ifthecheckboxisselected //setthesharedobjectsowecanretaintheirmailsettings varaccount_so=SharedObject.getLocal("AccountSettings"); if(remember.getValue()){ account_so.data.mailServer=this.mailServer; account_so.data.emailAddress=this.emailAddress; account_so.data.username=this.username; account_so.data.password=this.password; _parent.login_obj=newObject(); _parent.login_obj.mailServer= account_so.data.mailServer; _parent.login_obj.emailAddress= account_so.data.emailAddress; _parent.login_obj.username=account_so.data.username; _parent.login_obj.password=account_so.data.password; //resettheaccountsettings }else{ _parent.login_obj=newObject(); _parent.login_obj.mailServer=this.mailServer; _parent.login_obj.emailAddress=this.emailAddress; _parent.login_obj.username=this.username; _parent.login_obj.password=this.password; _parent.clearAccountSettings(); ; } _parent.checkMail() //we'redonesogotoframe1 this.gotoAndStop(1); } By default the "remember" CheckBox component is set to true (checked). This is done through the Parameters tab of the Properties panel. If the user accepts this selection, his account information will be stored locally to the account_so shared object. The next time he accesses the application, he won't have to log in and his email will be pulled in automatically. If the user doesn't want to have his information stored, a temporary log-in object will be created and will exist for the current session. Also, the clearAccountSettings method will be called; this resets the shared object if it already exists. Finally, the checkMail method, which will query the server for email messages, is called. If the user decides to click the Cancel button, the movie clip is sent to frame 1 and will appear as hidden on the stage. Checking MailThe checkMail method is the first means of communication the mail client will have with the server. This method is called when the user initially logs in to the email application and also when the Check Mail button is clicked. The code for the checkMail method can be viewed in Listing 3.10. Listing 3.10 //methodtoretrieveemailresultsfromtheserver functioncheckMail(){ //displaythestatusmessage status="Retrievingmailfromserver..."; //settheactiontogetallmessagesfromtheserver login_obj.action="getAll"; //setthedefaultgatewayURLusingthegwURLspecifiedinthe initmethod NetServices.setDefaultGatewayURL(gwURL); //establishtheconnectionwiththeFlashGateway gw=NetServices.createGatewayConnection(); //createtheserviceobjectthatreferencesthepopCFC popService=gw.getService("MailClient.Pop",this); //invokethegetMessagesmethodoftheCFC popService.getMessages(login_obj); } Initially a status message letting the user know that email is being retrieved from the server is displayed. The log-in object's action is then set to getAll, which will tell the CFC to grab all messages from the server. The next few lines of code are new to Flash MX and make reference to the NetServices class that is part of Flash Remoting. A default Gateway URL is set using the gwURL variable that is defined when the application is initialized. The Gateway connection is then created, and the getService method is used to create an object that points to the Pop.cfc template. The "MailClient.Pop" reference is in relation to the root directory of the Web server in this case, /wwwroot/MailClient/Pop.cfc.
Figure III-3.6 shows the directory structure for the application. Figure III-3.6. Directory structure for email application.
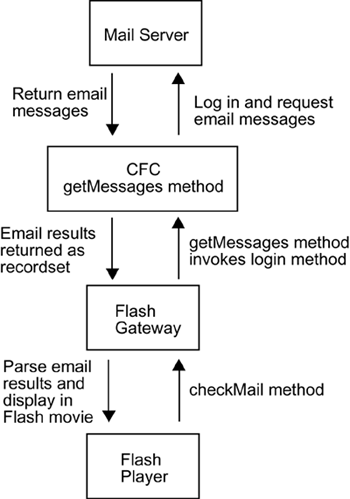
Now that the service object has been created, the getMessages method can be called and passed the log-in object. The log-in object will be passed through the Flash Gateway to CF. The server will pass the email results through the Gateway back to Flash. Since the email recordset will be sent back to Flash, the getMessages_Result method will need to be declared and ready to handle the results. Figure III-3.7 displays the communication process between Flash, ColdFusion, and the mail server. Figure III-3.7. Communication process between Flash and the mail server.
Handling MailThe getMessages_Result method will be responsible for handling the email from the server, parsing through it, and placing it in the ListBox component. The data from the server will actually come as a Recordset object and will be accessible using the data-access methods. Listing 3.11 shows the result method that handles the email recordset Listing 3.11 functiongetMessages_Result(record){ varlen=record.getLength(); status=len+"emailmessages"; if(len==0){ //setstatusmessage status="Noemailmessages"; }else{ vari=0; varj=0; vartemp_array=newArray(); while(i<len){ varpointer=record.getItemAt(i); //while(j<treeData_so.data.uids.length){ //if(treeData_so.data.uids[j]!= mail_so.data.mail_obj[pointer.uid].uid){ mail_so.data.mail_obj[pointer.uid]={uid:pointer.uid, body:pointer.body,subject:pointer.subject,label:pointer. replyto+"|"+pointer.subject+"|"+pointer.date}; //} //j++; //} i++; } DataGlue.bindFormatFunction(messageList_mc,record, getMessagesFormat); messageList_mc.setSelectedIndex(0); } } A status message will be displayed, letting the user know how many email messages are on the server. The number of emails can be retrieved by accessing the getLength method of the Recordset class. This method will return the number of records in the Recordset object which is synonymous with the total number of email messages. If the length is zero, then there are no messages and a status message is displayed. If messages do exist, the recordset is looped through and each message is accessed using the getItemAt method. A mail object is created and stored in the MailData shared object that was created during initialization of the application. The mail object stores the unique ID (UID), body, subject, and label of the message. The UIDs will be used in various methods to access the contents of email messages. The label in the mail object will be used when displaying the messages in the ListBox component; this is what the user will see. After looping through the messages and creating the mail object, the bindFormatFunction method of the DataGlue class is called. This will be used to populate the ListBox with the email messages. The bindFormatFunction method takes three arguments, which are:
In this case, the method that will format the recordset is getMessagesFormat, which can be seen in Listing 3.12. Listing 3.12 functiongetMessagesFormat(record){ vartheLabel=record.replyto+"|"+record.subject+"|"+ record.date; vartheData=record.uid; return{label:theLabel,data:theData}; } This method will format each record and return it for display in the ListBox component. Once the ListBox has been populated with messages, the setSelectedIndex method is called. This method requires an integer to be passed to it that specifies which item to select in the ListBox. By default, the first item will be selected and is referenced at position zero. Each time the user checks her email, this process will take place. Reading MessagesNow that the ListBox has been populated, there should be a way to view the email contents when a message is selected. Each time an item is selected in the ListBox, a click-handler method that performs some sort of action is called. In this case the click handler is getMessage. The code can be viewed in Listing 3.13. Listing 3.13 functiongetMessage(){ if(messageList_mc.getSelectedIndices()==undefined){ mcReply.setEnabled(false); mcForward.setEnabled(false); mcDelete.setEnabled(false); moveButton.setEnabled(false); messageContents.text=""; }else{ mcReply.setEnabled(true); mcForward.setEnabled(true); mcDelete.setEnabled(true); moveButton.setEnabled(true); messageContents.text=""; messageContents.htmlText=mail_so.data.mail_obj [messageList_mc.getValue()].body; } } If there are no messages selected, then the method disables the reply, forward, and delete buttons. This will prevent any user error by making these buttons inactive. If a message is selected, then its contents are pulled from the mail shared object, using the UID of the message, and placed into the dynamic text field labeled messageContents.
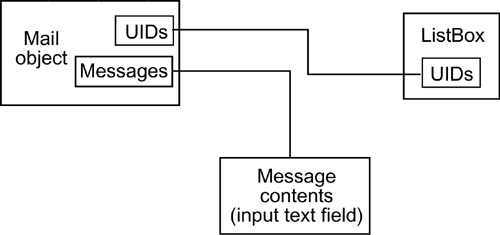
The Reply, Forward, and Delete buttons are then enabled so that the user can perform one of these actions with the selected email message. Sending EmailA custom message-box component will be used to handle creating, forwarding, and replying to email messages. This component is assigned the instance name messageClip and contains input text fields that will gather the necessary information for sending an email. The three methods that will be used to activate the message box are newMessage, replyMessage, and forwardMessage. Each method performs a similar function by displaying the message box and allowing the user to send an email message. The method accessed will determine if any fields will be automatically populated for the user. For instance, if the Reply button is clicked, the message box will automatically fill out the email's to, subject, and message fields. If the Forward button is clicked, all fields except the to field will be filled out. Since all of this information is stored in the mail shared object, the UID can be used to populate the necessary fields in the message box. Figure III-3.8 shows a diagram of the process. Figure III-3.8. Relationship between the mail shared object and Flash components.
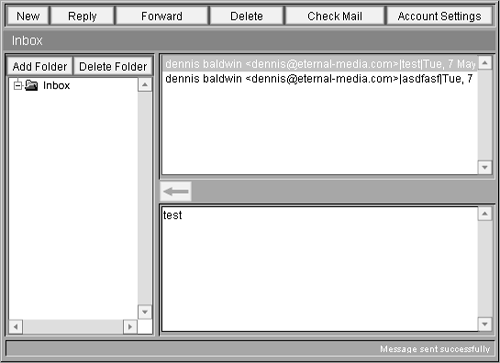
These methods also disable the ListBox component so that another email message cannot accidentally be selected while composing, replying, or forwarding a message. Once the user is ready to send the email, the Send button can be clicked and the sendMessage method is called. This is defined in frame 1 of the message box. Listing 3.14 functionsendMessage(){ varo=newObject(); o.from=_parent.account_so.data.emailAddress; o.to=this.to; o.cc=this.cc; o.subject=this.subject; o.message=this.message.text; o.mailServer=_parent.account_so.data.mailServer; varsmtpService=_parent.gw.getService("MailClient.Smtp", this); smtpService.send(o); } A new object is created that basically will store the email contents and will be passed through the Flash Gateway to the server. The send method of the Smtp CFC is invoked, and the object is passed to it. Assuming that the message is sent successfully, the result comes back to sendMessage_Result. The ListBox component is then enabled, and a status message displays on the interface to let the user know the message was sent successfully. The message box is then sent to frame 1, where the pop-up window will no longer display. Figure III-3.9 shows the status message after the message was sent successfully. Figure III-3.9. Status message after email is sent.
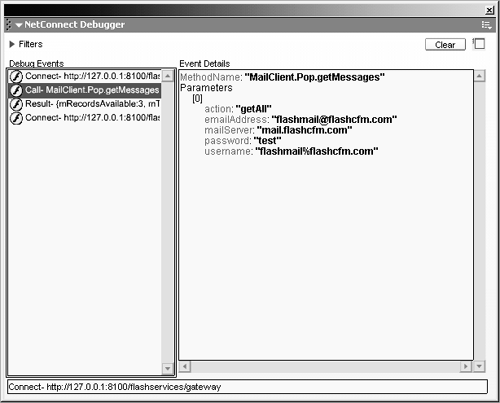
The process of sending and receiving messages is complete, but the user still needs a way to add and delete email folders. Managing FoldersAnother custom message box will be created to manage email folders. This component is assigned an instance name of folderSettings_mc. Whenever the "Add Folder" or "Delete Folder" button is clicked, the click handler folderSettings is called. This method will be used to trigger the folderSettings_mc and display the appropriate message (Listing 3.15). Listing 3.15 functionfolderSettings(component){ //getthenameofbuttonpushed varname=component._name; if(name=="addFolder"){ folderSettings_mc.title="AddFolder"; folderSettings_mc.gotoAndStop("add"); //displaythedeletefolderdialogonlyiftheInboxnodeisnot selected //andasubfolderisselected }elseif(name=="deleteFolder"&& folderTree_mc.getSelectedNode().getLabel()!="Inbox"&& folderTree_mc.getSelectedNode()){ folderSettings_mc.title="DeleteFolder"; folderSettings_mc.gotoAndStop("delete"); } } A reference to the PushButton component object is passed into this method and is used to determine which button the user clicks. If the "addFolder" component is clicked, the "folderSettings_mc" component is directed to the "add" frame. The user can then specify a new folder to be added. The folders are sorted and stored alphabetically when they are added, to enhance usability. If the "deleteFolder" component is clicked, the folderSettings method checks to see that a folder is selected in the Tree component. If so, the folderSettings_mc movie clip is directed to the delete frame, where a confirmation message is displayed. Frame 1 of the folderSettings_mc component contains the necessary methods to handle adding and deleting email folders. These folders are stored in the TreeData shared object, so the user doesn't have to create a new folder list each time he accesses the application. Moving Email MessagesNow that the user has the ability to add and delete folders, there should be a way to move these messages from the Inbox into these folders. An IconButton component is used to display a button with a custom icon. The icon in this case is an arrow pointing to the folder tree. The arrow_mc movie clip, stored in the library, is specified as the icon image for the button. The reference to this clip is defined in the Parameters tab of the Properties panel. When the button is clicked, the moveEmail click handler is called (Listing 3.16). Listing 3.16 functionmoveEmail(){ //settheselectedfoldertotheselected_itemsvariable varselected_items=messageList_mc.getSelectedItems(); //ifafolderisselecteddothis if(selected_items){ folderSettings_mc.gotoAndStop("move"); folderSettings_mc.title="SelectaFolder"; } } This method first checks to see if one or more email messages have been selected from the ListBox. If so, the folderSettings_mc component is called again and sent to the move frame. A ListBox displays and is populated with the folder list from the local system (stored in the TreeData shared object). The user can then select a folder name and click the Move button to place the selected emails in this folder. The moveEmail method is called; this resides in frame 1 of the movie clip and places the UID of the message in the TreeData shared object. The array of UIDs is structured so that the index of the UID in the array corresponds to the index in the folder array. This will allow the correct messages to be displayed when a certain folder is selected from the Tree component. Displaying Emails in FoldersEverything is in place to handle the display of emails that have been moved to certain folders. This all resides in the TreeData shared object and is just a matter of writing the proper logic to access the email messages. Whenever a folder is selected from the Tree component, the getFolderMessages method is invoked. This method is responsible for detecting which folder is currently selected and looping through the TreeData shared object. During the loop, the UIDs for the selected mail folder will be compared with the MailData shared object, which stores all email messages for the current user. If the messages match, the ListBox is populated with the messages for the specific folder. This process is repeated each time a selection from the tree folder is made. DebuggingNow that the application is fully functional, it's time to test and see if any problems occur. FlashFusion thinks the main potential issue is the communication process between Flash and the server. Since this process is somewhat invisible to the developer, the NetDebug class will be used to provide a visual means of viewing the communication process. The NetConnect Debugger is available to use when the NetDebug class is included in the ActionScript code. This is used within the Flash integrated development environment (IDE) and can be found under Window > NetConnect Debugger. Figure III-3.10 shows the debugger in action. Figure III-3.10. FiguScreen shot of debugger displaying service call and parameters passed to CF.
The debugger displays information such as service calls made to the server, as well as parameters being sent from Flash to ColdFusion. This is very helpful in determining if a parameter is missing or incorrect and is causing the error. If any error message is received, the debugger will display the information. Any results passed from the server to Flash are exposed and shown in the debugger. ConclusionThe email application has been developed in accordance with Simpleton's specifications. FlashFusion has thoroughly tested and debugged it. Now that everything is in complete working order, FlashFusion is ready to demonstrate the email client to the Simpleton executives. |
EAN: 2147483647
Pages: 114
 NOTE To find out more about the properties and methods of components, be sure to view the ActionScript Dictionary under "F." To access the dictionary within Flash, go to Help > ActionScript Dictionary. All components start with the letter "F" (ie FcheckBox).