Performing Disk Maintenance Tasks
Disk drive performance plays a major role in the operation of a computer. To keep a computer running Windows XP Professional operating well, administrators need to regularly perform several maintenance tasks. These tasks include:
-
Using the chkdsk to scan the file system and to look for bad sectors on the disk drive
-
Using the Disk Defragmenter utility to defragment disk drives
-
Using the Disk Cleanup utility to free up disk space by removing unnecessary files and uninstalling Windows components and applications that are no longer needed
Each of these tasks is discussed further in the sections that follow.
Maintaining Disk Integrity
Administrators can monitor and even repair the integrity of disk drives on a computer running Windows XP Professional using the Check Disk or chkdsk utility. The chkdsk utility performs a number of operations, including:
-
Checking file system integrity and correcting errors
-
Scanning for bad sectors and either repairing them or marking them as damaged
-
Attempting to recover lost data
| Note | In addition to hard disk drives, the chkdsk utility can be used to scan removable disk drives and floppy disks. |
In order for chkdsk to run, there must be no open files on the computer, and chkdsk must be able to place the specified disk drive into a locked state. If it cannot lock the drive, chkdsk will instead display a pop-up dialog asking for permission to run the next time the computer is started.
Running chkdsk from the Desktop
The chkdsk utility can be run from the Windows desktop as well as from the Windows XP command prompt. The following procedure outlines the steps involved in running the chkdsk utility from the Windows XP desktop.
-
Start chkdsk by clicking on Start and then My Computer. The My Computer dialog opens.
-
Right-click on a hard disk drive and then select Properties. The Properties dialog for the selected hard disk drive appears.
-
Select the Tools property sheet, as shown in Figure 11.12.
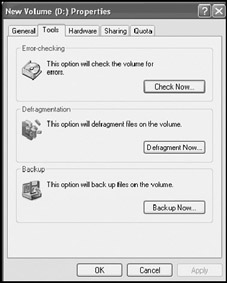
Figure 11.12: Disk management tools can be found on the Tools property sheet of the selected driver's Properties dialog -
Click on Check Now in the Error-checking section. The Check Disk dialog appears, as shown in Figure 11.13.
The following options are available:
-
Automatically fix file system errors
-
Scan for and attempt to recover bad sectors
Leave both options clear to perform an analysis of the disk drive, or select one or both options to scan and repair errors, and then click on Start.
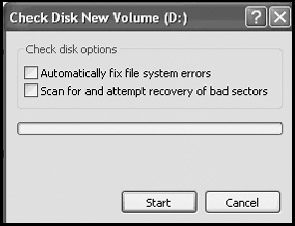
Figure 11.13: The chkdsk utility can perform a scan of the file system and check the disk for bad sectors -
-
All files on the drive must be closed for the scan to run; otherwise, the dialog shown in Figure 11.14 will appear, asking for permission to run the next time the computer is started.
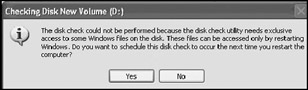
Figure 11.14: If files are open on the selected drive, chkdsk cannot run and will offer to schedule its execution at the next startup of the computer -
Click on Yes to schedule chkdsk execution the next time the computer starts or click No to cancel chkdsk execution.
-
If chkdsk is able to run, it will display its results upon completion.
During its execution, chkdsk may discover some bad sectors and will attempt to recover any data stored in them. In addition, as chkdsk runs, it may cause some data loss as it makes corrections to the file system. When either of these two situations occur, chkdsk attempts to prevent data loss by saving these files to the root of the drive on which it was run. The files are named File xxx.chk. These files can be opened to see if they contain any data that needs to be saved.
Running chkdsk from the Windows XP Command Prompt
The chkdsk utility can also be started from the Windows XP command prompt or by clicking on Start, selecting Run, and typing chkdsk drive_letter: For example, the following statement tells chkdsk to perform an analysis of the specified disk drive.
chkdsk c:
The chkdsk command supports a number of optional parameters. One such parameter is /f, which tells chkdsk to look for and fix errors during the scan. Add /r to tell chkdsk to perform a physical analysis of the drive and to locate bad sectors and attempt to recover any lost data. The /r parameter also implicitly implies the execution of the /f parameter. The chkdsk command supports a number of other parameters. For more information on the syntax of the chkdsk command, refer to Appendix A, "Windows XP Command Reference."
| Note | A special version of the chkdsk command can also be run from the Windows XP recovery console. Type chkdsk drive_letter: to perform an analysis of the specified disk drive. In addition, this version of chkdsk only supports two optional parameters, as listed below.
Information on the recovery console and its use is provided in Appendix B, "Troubleshooting System Startup." |
Disk Defragmenter
Windows XP Professional always tries to store files in contiguous locations on the computer's hard disk drive. However, as hard disk drives become full, this may not be possible. As a result, the operating system begins to break up or fragment files into smaller pieces and stores each fragment in a different location on the hard disk drive. Fragmentation slows down both file storage and retrieval.
Administrators can use two tools for defragmenting hard disk drives as shown below:
-
Disk Defragmenter.An MMC (Microsoft Management Console) snap-in or extension that provides point-and-click control over the defragmentation process
-
Defrag.exe.A Windows XP command-line version of Disk Defragmenter
Using the Disk Defragmenter Snap-In
The following procedure outlines the steps involved in using Disk Defragmenter.
-
Click on Start and My Computer. The My Computer folder appears.
-
Right-click on one of the computer's hard disk drives and select Properties. The Properties dialog for that hard disk drive opens.
-
Select the Tools property sheet.
-
Click on Defragment Now. An MMC console containing the Disk Defragmenter snap-in appears, as shown in Figure 11.15.
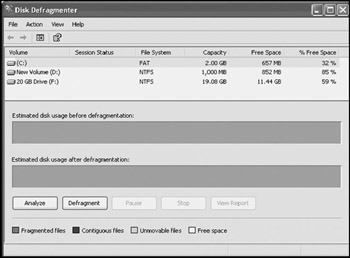
Figure 11.15: Defragmenting a hard disk drive -
Select a hard disk drive and then click on Analyze to perform an analysis of the drive, which will be graphically displayed in the Estimated disk usage before defragmentation bar using the following color scheme:
-
Red.Represents the amount of disk fragmentation
-
Blue.Represents the number of files stored in contiguous disk space
-
Green.Represents systems files that cannot be moved
-
White.Represents the amount of unused disk space
-
-
Based on its analysis, the Disk Defragmenter snap-in may suggest defragmenting the hard disk drive, as shown in Figure 11.16.
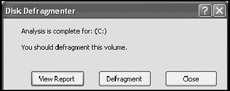
Figure 11.16: The Disk Defragmenter snap-in recommends defragmenting the hard disk drive -
Click on View Report for a detailed analysis report, as shown in Figure 11.17.
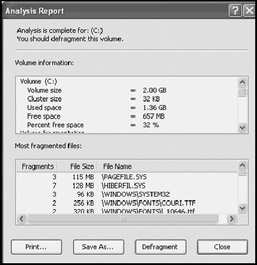
Figure 11.17: The Disk Defragmenter snap-in can provide a detailed text report of its analysis of the hard disk drive -
The report can be printed or saved as necessary. Click on Close to return to the Disk Defragmenter snap-in.
-
Click on Defragment to defragment the hard disk drive.
-
During execution, the Pause and Stop buttons can be used to halt and resume the defragmentation process.
-
A pop-up dialog will appear when the defragmentation process is complete. Click View Report to view the defragmentation report and then click on Close to return to the Disk Defragmenter snap-in.
-
Close the MMC.
Using Defrag.exe
Administrators can use the defrag.exe command to defragment hard disk drives from the Windows command prompt or from within scripts. The defrag.exe command accepts a number of parameters including:
-
/a.Performs an analysis of the specified hard disk drive.
-
/f.The defragmentation process requires 15 percent free disk space on the drive to be defragged in order to run. Specifying this parameter forces the defragmentation process to run regardless of the amount of available free space.
| Tip | Consider scheduling the execution of the Disk Cleanup utility prior to the execution of the defrag command to help ensure as much free space as possible is available on the hard disk drive. |
The following procedure describes how to use the defrag command from the Windows XP command prompt.
-
Click on Start/Programs/Accessories and then Command Prompt.
-
Type defrag drive_letter: /a and press Enter to perform an analysis of the disk drive.
-
Type defrag drive_letter: /f and press Enter to perform a defragmentation of the disk drive.
Scheduling Disk Defragmentation
The problem with running the Disk Defragmenter utility is that it makes doing anything else with the computer almost impossible until it has completed running. To make things more convenient for users, administrators can use the defrag command to create an automated execution schedule that defrags the hard disk drive when the user is not using the computer.
The following procedure can be used to defrag the hard disk drive on a scheduled basis.
-
Click on Start/All Programs/Accessories/System Tools and then Scheduled Tasks. The Scheduled Tasks folder appears.
-
Double-click on the Add Scheduled Task icon. The Scheduled Task Wizard starts.
-
Click on Next.
-
A list of Windows XP applications appears. Click on Browse and locate the defrage.exe command, which is located in \Windows\System32, and click on Open.
-
Select a type of schedule and click on Next.
-
Configure the selected schedule when prompted and click on Next.
-
Type the username and password of a user account with administrative privileges and click on Next.
-
Select Open advanced properties for this task when I click Finish. Click on Finish.
-
The Defrag dialog appears. Append x: /f (where x is a drive letter) to the end of the command listed in the Run field, as demonstrated in Figure 11.18.
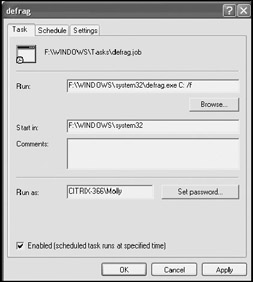
Figure 11.18: Scheduling the defragmentation of a hard disk drive -
Click on OK to close the Defrag dialog.
-
Close the Scheduled Tasks Folder.
| Note | Another way to schedule the execution of the defrag.exe command is to open Notepad and type defrag C: /f and then save the file with a .bat file extension. This creates a script file. The Scheduled Task Wizard can then be used to schedule the execution of this task. More information on the development of scripts is available in Chapter 14, "Shell Scripting and the WSH." |
Removing Temporary Files to Free Up Additional Space
Many applications create temporary files during their execution. Sometimes applications fail to delete these files when they are done. In some cases, temporary files may be left behind because an application experiences an error and terminates unexpectedly. Temporary files can also be left dangling when the Task Manager utility is used to forcefully terminate an application or process.
As a hard disk begins to fill up, its performance slows. Removing unnecessary files from the computer therefore not only will free up additional disk space, but also may improve the computer's performance. Windows XP Professional supplies administrators with the Disk Cleanup utility as the tool for freeing up disk space and removing unnecessary temporary files. It is capable of removing any of the following:
-
Files stored in temporary Windows folders
-
Temporary Internet files
-
Files located in the Windows XP Recycle Bin
-
Java applets and ActiveX controls downloaded from the Internet
In addition, Disk Cleanup can assist in the removal of Windows XP components and other applications that are no longer being used. Disk Cleanup can also remove old checkpoints used by the System Restore utility.
Disk Cleanup can be run from the Windows desktop or command prompt. The unfortunate thing about Disk Cleanup is that it makes working with the computer almost impossible while it is running. Fortunately, administrators can set it up to run as an automated process that executes after business hours.
Running Disk Cleanup from the Windows Desktop
Running Disk Cleanup from the command prompt can be inconvenient because it makes doing anything else on the computer while it is running just about impossible. It is best to schedule its execution for a period of time when the user will not be using the computer. However, some situations require the immediate execution of this utility. For example, the administrator may find that while preparing to install an application on a user's computer, the computer disk drive is low on space, and to get the application installed, Disk Cleanup needs to be run.
The following procedures outlines the steps involved in running Disk Cleanup from the Windows XP desktop.
-
Click on Start/All Programs/Accessories/System Tools and then select Disk Cleanup. The Select Drive dialog appears, as shown in Figure 11.19.
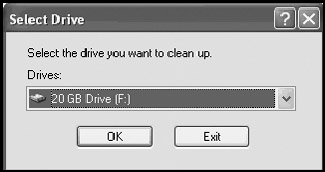
Figure 11.19: Select the disk drive that Disk Cleanup is to clean -
Select a disk drive from the Drives drop-down list and click on OK.
-
Disk Cleanup scans the computer and performs an analysis of the disk drive. Depending on the size of the drive and the number of files on it, this scan may run quickly or take several minutes to complete. Once the scan is complete, the dialog shown in Figure 11.20 is displayed.
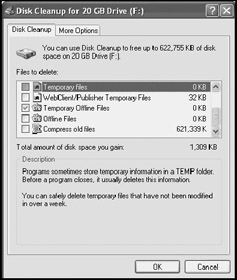
Figure 11.20: Select the types of files that Disk Cleanup should remove from the computer -
The Files to delete section displays a list of file types that can be deleted as well as the amount of space that can be recovered. To learn more about a particular category of files, select it from the list and an explanation will appear in the Description section.
-
The Description section also displays a button whose function varies based on the currently selected category of files. For most categories, this button is labeled View files and clicking on it displays a listing of all the files in that category that will be removed. However, if the Compress old files category is selected, the button's label is changed to Options, and clicking on it opens the Compress Old Files dialog, as shown in Figure 11.21. Change the default value of 50 days if desired and click on OK.

Figure 11.21: Configuring Disk Cleanup to compress files that are older than a specified age -
Click on the More Options property sheet to display a list of additional options, as shown in Figure 11.22.
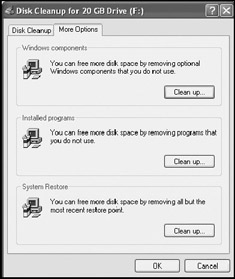
Figure 11.22: Disk Cleanup can be used to access the components of the Add/Remove Programs utility that allows administrators to uninstall Windows components or applications -
Click on the Clean up button in the Windows components section to open the Windows Components Wizard, which will then display a list of installed Windows components and assist in uninstalling them. To uninstall a Windows Component, select it, click on Next, and follow the instructions that are presented.
-
Click on the Clean up button in the Installed programs section to open the main Add/Remove Program dialog, where a list of applications that can be uninstalled is displayed. To uninstall an application, select it and then click on its Remove or Change/Remove button and follow the instructions that are presented.
-
Click on the Clean up button in the System Restore section to delete all but the most recent checkpoint. Click on Yes when prompted for confirmation.
-
Click on OK when returned to the Disk Cleanup dialog.
Running Disk Cleanup from the Windows XP Command Prompt
Disk Cleanup can be run from the Windows Run dialog or from the Windows XP command prompt. Use the following procedure to run it using the Run dialog or the Windows XP command prompt.
-
To run Disk Cleanup from the Run dialog, click on Start and then Run. The Run dialog appears. Type cleanmgr and click on OK.
-
To run Disk Cleanup from the Windows XP command prompt, click on Start/All Programs/Accessories and the Command Prompt. Type cleanmgr and press the Enter key.
-
The Select Drive dialog appears. From this point on, Disk Cleanup is operated just the same as if it were started from the Windows XP desktop.
Scheduling the Execution of Disk Cleanup
The problem with running the Disk Cleanup utility it that it makes doing anything else with the computer almost impossible until it has completed running. Fortunately, using the command line version of Disk Cleanup, administrators can set an automated execution schedule to allow the utility to run when the user is not using the computer.
Setting up an automated execution schedule for the Disk Cleanup utility is a two-step process. In the first step, specify a list of files that are to be removed from the computer on a scheduled basis. The second step is to set up the execution of a scheduled task that will run the Disk Cleanup utility.
The following procedure outlines the steps involved in specifying a list of files that are to be regularly removed from the computer by the Disk Cleanup utility.
-
Click on Start and then Run. The Run dialog appears.
-
Type cleanmgr /sageset:1 and click on OK.
-
The Disk Cleanup dialog appears. Select the files that should be regularly removed from the computer and then click on OK. Windows XP saves the list of selected files for future reference.
| Tip | By repeating the above procedure again and specifying a different sageset number administrators can create additional scheduled Disk Cleanup tasks. For example, by typing cleanmgr/sageset:2 and then selecting a different set of files, administrators can schedule the removal of the second set of files for a different time. |
Once the above procedure has been completed, the Disk Cleanup utility can be scheduled, as demonstrated by the following procedure.
-
Click on Start/All Programs/Accessories/System Tools and then Scheduled Tasks. The Scheduled Tasks folder appears.
-
Double-click on the Add Scheduled Task icon. The Scheduled Tasks Wizard starts.
-
Click on Next.
-
A list of Windows XP applications appears. Select Disk Cleanup and click on Next.
-
Select a type of schedule and click on Next.
-
Configure the selected schedule when prompted and click on Next.
-
Type the username and password of a user account with administrative privileges and click on Next.
-
Select the Open advanced properties for this task when I click Finish option and click on Finish.
-
The Disk Cleanup dialog appears. Append sagerun:1 to the end of the command listed in the Run field, as demonstrated in Figure 11.23.
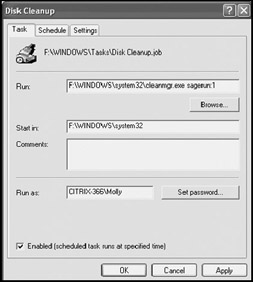
Figure 11.23: Configuring the scheduled task to use the previously specified list of files when running Disk Cleanup -
Click on OK to close the Disk Cleanup dialog.
-
Close the Scheduled Tasks Folder.
| Note | For more information on how to set up scheduled tasks, refer to "Scheduling Application Execution" in Chapter 4, "Application Management." |
EAN: 2147483647
Pages: 358