Configuring the On-Screen Keyboard
The On-Screen Keyboard application is designed to assist users who have problems working with a keyboard by allowing them to use an on-screen keyboard, shown in Figure 8.6, that can be controlled by the mouse.
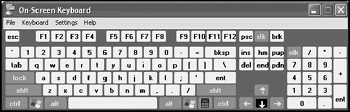
Figure 8.6: The On-Screen Keyboard lets users use their mouse to enter keyboard input
The following procedure outlines the steps involved in setting up the On-Screen Keyboard application.
-
Click on Start/All Programs/Accessories/Accessibility and then select On-Screen Keyboard. Two On-Screen Keyboard dialogs appear. One displays a graphical keyboard, and the other displays an introductory message.
-
The introductory messages states that the On-Screen Keyboard only provides a minimum level of functionality for mobility-impaired users and advises that third-party applications may be required to support some users. Click on OK to close this dialog.
-
By default, the graphical On-Screen Keyboard is displayed as an enhanced keyboard with a regular keyboard layout with 101 keys. To change this configuration, click on the Keyboard menu and select from the following options:
-
Enhanced Keyboard
-
Standard Keyboard
-
Regular Layout
-
Block Layout
-
101 keys
-
102 keys
-
106 keys
-
-
By default, the On-Screen Keyboard is configured to prevent itself from being overlaid by other applications. This setting can be disabled and enabled by clicking on the Settings menu and selecting the Always on Top option.
-
By default, the On-Screen Keyboard does not provide any notification when a keyboard key is clicked. An optional mechanical click sound can be enabled or disabled by clicking on the Settings menu and selecting the Use Click Sound option.
-
To control how keyboard keystrokes are performed, select the Typing Mode option on the Settings menu. This displays the Typing Mode dialog shown in Figure 8.7. The available settings are:
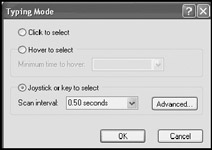
Figure 8.7: Specify what constitutes a keyboard stroke-
Click to select. Creates a keystroke when the user moves the pointer over a key and clicks on the mouse button.
-
Hover to select. Creates a keystroke when the user moves the pointer over a key for a specific period of time.
-
Joystick or key to select. Creates keystrokes at timed intervals, allowing the user to select a key using a joystick or keyboard key. Selecting this option enables the Advanced button. When the Advanced button is clicked, it displays the Scanning Options dialog, where the type of joystick port can be selected. In addition, a key that can be used to initiate a scanning interval can be selected.
Select the appropriate settings and click on OK to close the Typing Mode dialog.
-
-
By default, the On-Screen Keyboard displays characters using the Microsoft San Serif font with a bold font style and a font size of 8. By clicking on the Font option on the Settings menu, different font settings can be specified.
-
To exit the On-Screen Keyboard and save the new settings, click on File and select Exit.
EAN: 2147483647
Pages: 358