Configuring the Windows XP Display
The Windows XP Display Properties dialog is organized into five property sheets, each of which configures a related collection of display options and performs specific display-related tasks. These property sheets include:
-
Themes.A stored collection of colors, icons, sounds, fonts, and a screen saver and desktop background that can be applied to Windows XP Professional
-
Desktop.Provides the ability to select from different desktop backgrounds and to configure the display of desktop icons and Web content
-
Screen Saver.Provides the ability to enable a desktop screen saver and to add password protection to the screen saver, as well as the ability to configure monitor power settings
-
Appearance.Provides the ability to configures window, button, color, and font settings
-
Settings.Provides control over screen resolution and color setting as well as the ability to manage video adapter and monitor property settings
Applying Desktop Themes
The Themes property sheet on the Windows XP Display Properties dialog provides the ability to select a theme. A theme is a collection of configuration settings that affect the overall appearance of Windows XP Professional. These settings include:
-
Colors used to display windows
-
Appearance of Windows icons
-
Sounds played when specific events occur
-
Style and size of fonts
-
Desktop background
-
Screen saver
The following procedure outlines the steps involved in selecting a Windows theme.
-
Right-click on the Windows XP Desktop in a clear area and select Properties. The Display Properties dialog appears.
-
Select the Themes property sheet, as shown in Figure 7.2.
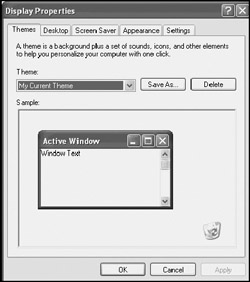
Figure 7.2: Selecting a desktop theme -
Select a theme from the Theme drop-down list. The selected theme will be displayed in the Sample section of the Themes dialog for review.
-
Click on OK.
Table 7.1 lists the entries that are available by default in the Theme drop-down list.
| Theme | Description |
|---|---|
| | |
| My Current Theme | The current configuration of icons, colors, fonts, and sounds |
| Windows XP | The default Windows XP theme |
| Windows Classic | A theme that provides Windows XP with the look and feel of previous Windows operating systems |
| More themes online | A link to the Microsoft Plus! for Windows XP Web page where additional themes can be downloaded and saved on the computer |
| Browse | Displays the Open Theme dialog, which can be used to locate and install other theme files |
Windows XP Professional also allows for the creation of custom themes. To create a custom theme, simply make any desired changes to the Windows XP desktop using the property sheets on the Display Properties dialog and then click on Save As on the Themes property sheet. Type a descriptive name for the new theme and click on Save. The new theme will be saved and displayed as an option in the Theme drop-down list.
| Note | Themes are stored as files with a .theme file extension. By default, Windows XP stores themes in \Windows\Resources\Themes. When a user saves his or her own custom theme, it is stored by default in the user's My Documents folder. |
Similarly, themes can be deleted by selecting them from the drop-down list and clicking on Delete.
Customizing the Windows XP Desktop
The Desktop property sheet on the Windows XP Display Properties dialog, shown in Figure 7.3, provides the ability to select a desktop background. Windows XP Professional provides a large collection of backgrounds to choose from. As each is selected, a preview is displayed in the top portion of the Desktop property sheet.
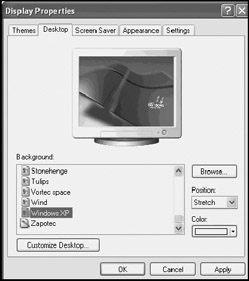
Figure 7.3: Configuring the Windows XP desktop background
Desktop images can be applied to the desktop in three different ways by clicking on the Position drop-down list and selecting one of the following options.
-
Center.Centers the image in the middle of the Windows XP desktop
-
Tile.Copies or tiles the image as many times as possible on the Windows XP desktop
-
Stretch.Stretches the image, if necessary, until it fills the entire Windows XP desktop
In addition to the predefined collection of Windows desktop images, any image saved to the user's My Pictures folder can be used as a background picture. To use an image stored in this folder, click on the Browse button. The My Pictures folder opens. Select an image and click on Open.
In addition to these background images, Windows XP can display a desktop color instead of a background image. To display a background color, select the None entry in the Background list and then click on the Color drop-down list. A list of 20 predefined background colors is displayed. Select a color to use it as the desktop background.
At the bottom of the Color drop-down list is a button that opens the Color dialog, shown in Figure 7.4, which allows a custom color to be configured and selected.
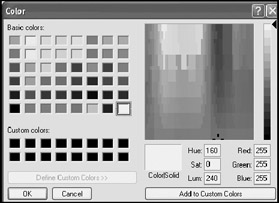
Figure 7.4: Selecting a custom background color
Configuring and Maintaining Desktop Shortcuts
The Customize Desktop button at the bottom of the Desktop property sheet opens the Desktop Items dialog, which consists of two Properties sheets. The General property sheet provides the ability to configure special desktop shortcuts as well as the icons that represent them. In addition, this property sheet provides the ability to configure the Desktop Cleanup Wizard and to run the wizard manually. This wizard assists the user by automatically moving any unused desktop shortcuts to a special folder on the Windows XP desktop. Detailed instructions on how to configure the options found on this property sheet are available later in this chapter in "Working with Special Shortcuts" and "Working with the Desktop Cleanup Wizard."
Adding Web Content to the Windows XP Desktop
The second property sheet on the Desktop Items dialog is the Web property sheet as shown in Figure 7.5. This property sheet provides the ability to use a Web page as the desktop background.
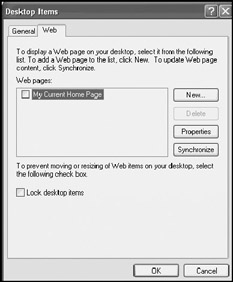
Figure 7.5: Adding Web content to the Windows XP desktop
The Web pages section provides a list of Web pages previously used as desktop backgrounds. The My Current Home Page entry can be selected to choose the user's current home page as the desktop background. Select an entry from this list to reapply it.
The following procedure outlines the steps involved in specifying a Web page as the desktop background.
-
Click on New. The New Desktop Item wizard starts, as shown in Figure 7.6.
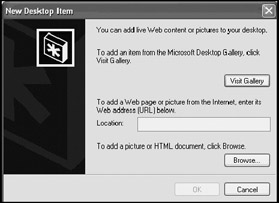
Figure 7.6: Specifying a Web page to be used as the desktop's background -
There are three ways to specify a Web page, as shown below:
-
Click on Visit Gallery to add an item from the Microsoft Desktop Gallery
-
Type a URL in the Location field
-
Click on Browse and specify the location of an HTML page stored on the computer or local area network.
-
-
Once a Web page has been specified, click on OK.
To delete a Web page from the Web pages list, select it and click on Delete. To view and configure the properties associated with a Web page, select it and click on Properties. Click on Synchronize to force an immediate resynchronization of the content of the desktop with its associated Web page. Select the Lock desktop items option at the bottom of the Web property sheet to lock all Web content in place and prevent it from accidentally being moved.
Configuring Web Page Properties for Desktop Backgrounds
The Properties dialog associated with a desktop background Web page displays information about the Web page. It provides the ability to configure a schedule for synchronizing the desktop's content and to specify whether any links located on the desktop should be automatically downloaded. The following procedure outlines the steps involved in accessing the properties associated with a desktop background Web page.
-
Right-click on the Windows XP desktop and select Properties. The Display Properties dialog appears.
-
Select the Desktop property sheet.
-
Click on Customize Desktop.
-
Select the Web property sheet.
-
Select a Web page from the Web pages list and click on Properties. The Web page's Properties dialog appears.
The Web page's Properties dialog is organized into three property sheets. The Web Documents property sheet, shown in Figure 7.7, displays information about the Web page and has just one configurable option. The Make this page available offline option is selected by default to ensure that the Web page can display information from this Web page even when the computer is not connected to the Internet.
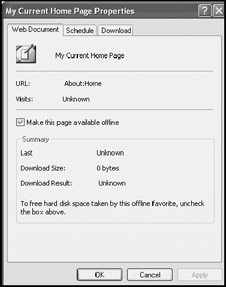
Figure 7.7: Viewing Web Document properties
The Schedule property sheet, shown in Figure 7.8, contains the following pair of options, which determine when content on the desktop is synchronized with the Web page.
-
Only when I choose Synchronize from the Tools menu
-
Using the following schedule(s)
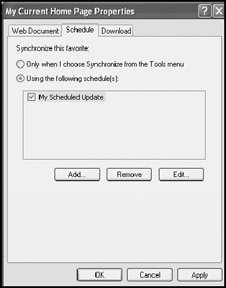
Figure 7.8: Specifying when Windows XP should synchronize the desktop content with the Web page
Selecting the second option opens the New Schedule dialog, as shown in Figure 7.9. It allows specification of the interval (in days) and the time that Windows XP should synchronize desktop content with the Web page. Type a descriptive name for the schedule and, optionally, select the option to allow Windows XP to connect to the Internet if it is not already connected. Click on OK. Additional schedules can be set up, edited, or removed as necessary.
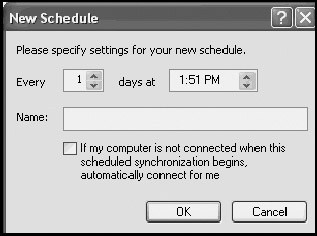
Figure 7.9: Setting up a synchronization schedule
The Download property sheet, shown in Figure 7.10, provides the ability to specify how many links deep into the Web page Windows XP should download contents. This includes the ability to download links outside of the Web site and to limit the amount of disk space that can be used to store Web page content. Clicking on the Advanced button opens the Advanced Download Options dialog, shown in Figure 7.11, which is used to specify what contents from the Web page are downloaded.
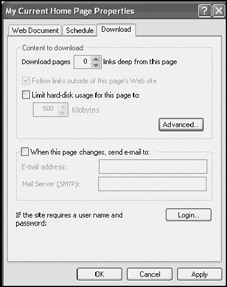
Figure 7.10: Determining how many links deep to download for the specified Web page
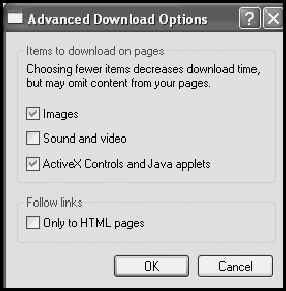
Figure 7.11: Specifying the types of content to download
The Download property sheet can also be used to send a notification e-mail to an e-mail address or mail server whenever the content on the Web page changes.
If the Web site requires that a username and password be provided in order to gain access, click on Login. This displays the Login Options dialog shown in Figure 7.12.
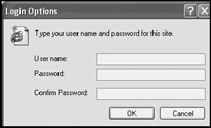
Figure 7.12: Provide the username and password required to gain access to the Web
Setting Up a Screen Saver
Screen savers are programs that become active after a specified period of user inactivity. They were originally designed to prevent monitor burn-in, which used to occur on older monitors when the same image was displayed for long periods of time. Newer monitor technology has eliminated the burn-in issue, but screen savers still remain popular. Users often enjoy looking at them and may consider them to be art or entertainment. Administrators have an entirely different use for them; they use screen savers as an additional form of security.
By applying a password to a screen saver, the administrator forces users to reauthenticate to Windows XP when they return and want to resume work. By locking the computer in this manner, it becomes more difficult for passersby to steal access to a user's computer, thus helping to protect personal and corporate data.
Windows XP Professional ships with a large collection of screen savers. Unfortunately, the screen savers that generally attract most users are the 3D ones. The bad thing about these screen savers is that they are graphically intensive and consume a great deal of memory and processor time when they execute. In fact, these screen savers can consume up to 100 percent of all available processor resources. This also causes the computer to consume additional power. If the computer shares its disk space or printer with other computers on a network, these screen savers slow down the computer's ability to service network requests. In addition, any batch processing normally performed when the user is not using the computer takes longer to run. So unless the computer is completely idle when a local user is not using it, it is best to avoid using the 3D screen savers.
The following procedure outlines the steps involved in setting up a Windows XP screen saver.
-
Right-click on the Windows XP desktop and select Properties. The Display Properties dialog appears.
-
Select the Screen Saver property sheet, as shown in Figure 7.13.
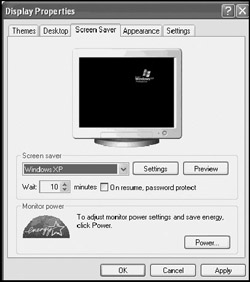
Figure 7.13: Setting up a Windows XP screen saver -
Select a screen saver from the drop-down list in the Screen saver section. A preview of the screen saver will be displayed in the graphic monitor at the top of the Screen Saver property sheet.
-
Enter a value in the Wait field to specify the number of minutes of inactivity that must pass before the screen saver begins executing.
-
Select the On resume, password protect option to enable password protection.
-
Some screen savers have settings that control their execution. If the Settings button is enabled, click on it, as demonstrated in Figure 7.14.
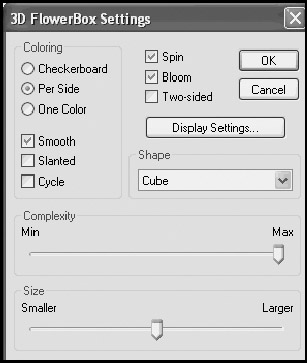
Figure 7.14: Some screen savers have settings that can be configured to specify their behavior -
Configure these settings as desired on click on OK.
Tip If the Screen Saver Settings dialog displays an entry for complexity or other similar options, changing these settings to a lower value may reduce memory and CPU usage.
-
Click on Preview to see how the screen saver will appear when run and then press any key to return to the Screen Saver property sheet.
-
Click on OK.
The Power button at the bottom of the Screen Saver property sheet displays the Power Options Properties dialog, where power schemes, alarms, and other energy saver settings can be configured.
| Note | For information about how to work with the energy saver settings found on the Power Options Properties dialog, refer to "Power Management" in Chapter 13, "Performance Tuning." |
Configuring Appearance Options
The Appearance property sheet on the Windows XP Display Properties dialog, shown in Figure 7.15, provides the ability to select appearance settings that control the way the following display elements look:
-
Windows
-
Buttons
-
Colors
-
Fonts
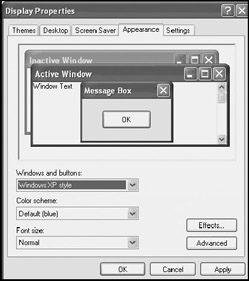
Figure 7.15: Specifying the appearance of Windows, buttons, colors, and fonts
The following procedure outlines the steps involved in configuring appearance settings.
-
Right-click on the Windows XP desktop and select Properties. The Display Properties dialog appears.
-
Select the Appearance property sheet.
-
Use the Windows and buttons drop-down list to specify the appearance of Windows and buttons.
-
Use the Color scheme drop-down list to specify the collection of colors to be used when displaying Windows and buttons.
-
Use the Font size drop-down list to specify the font size to be displayed on Windows and buttons.
-
As each option is selected from one of the drop-down lists, a preview is displayed in the top portion of the Desktop property sheet, providing an indication of the selection's affect on the way things will appear in Windows XP. Once the appearance has been set as desired, click on OK.
The Appearance property sheet also provides links to two additional dialogs where appearance effects and other advanced settings are administered.
| Note | Each additional effect that is configured consumes additional memory and processor performance. Turning off some of the available effects may improve performance, especially on a computer with limited resources. |
The following procedure outlines the steps involved in configuring appearance effects.
-
Right-click on the Windows XP desktop and select Properties. The Display Properties dialog appears.
-
Select the Appearance property sheet.
-
Click on the Effects button located in the lower right-hand portion of the Appearance property sheet. The Effects dialog opens as shown in Figure 7.16.
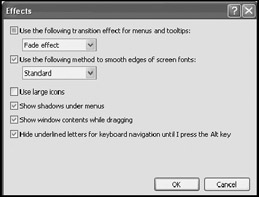
Figure 7.16: Specify Windows visual effects -
The following effects options can be enabled or disabled:
-
Use the following transition effect for menus and ToolTips
-
Use the following method to smooth edges of screen fonts
-
Use large icons
-
Show shadows under menus
-
Show window contents while dragging
-
Hide underlined letters for keyboard navigation until I press the Alt key
The options available for the transition effect for menus and ToolTips include Fade Effect or Scroll Effect. The available options for smoothing the edges of screen fonts are Standard and Clear Type.
Select the desired options and click on OK to close the Effects dialog.
-
-
Click on OK to close the Display Properties dialog.
| Note | Clear Type is a display technology that triples the horizontal resolution on LCD screens with a digital interface making it easier to view. It is not intended for use on CRTs. |
The following procedure outlines the steps involved in configuring advanced appearance settings.
-
Right-click on the Windows XP desktop and select Properties. The Display Properties dialog appears.
-
Select the Appearance property sheet.
-
Click on the Advanced button located in the lower right-hand portion of the Appearance property sheet. The Advanced Appearance dialog appears, as shown in Figure 7.17.
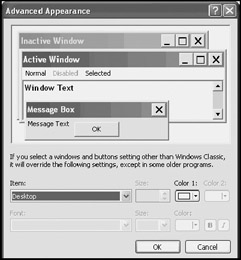
Figure 7.17: Setting advanced appearance settings -
Select a specific Windows item from the Item drop-down list. The entry fields to the right and underneath the selected item are enabled or disabled based on how they apply to the selected item. Change the configuration settings as allowed for the item. Changes made to the selected item are reflected in the graphic displayed in the upper half of the dialog, demonstrating the effects caused by the configuration change.
-
Repeat step 4 to configure as many Windows items as necessary.
-
Click on OK to close the Advanced Appearance dialog.
-
Click on OK to close the Display Properties dialog.
Setting Resolution and Color
The Settings property sheet on the Windows XP Display Properties dialog, shown in Figure 7.18, provides the ability to configure display resolution and color depth. Windows XP Professional supports a minimum display resolution of 800 × 600. Unlike all earlier versions of Windows, it does not support a 480 × 640 pixel resolution option. The ranges of resolution and color options that are available depend on the computer's video adapter. Generally speaking, the upper limits of one setting have an impact on the other setting, meaning that the highest resolution setting can only be implemented by reducing the color setting and vice versa.
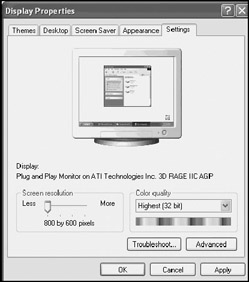
Figure 7.18: Configuring Windows XP display resolution and color settings
The following procedure outlines the steps involved in changing the computer's resolution and color settings.
-
Right-click on the Windows XP desktop and select Properties. The Display Properties dialog appears.
-
Select the Settings property sheet, as shown in Figure 7.18.
-
To change screen resolution, move the slider bar in the Screen resolution section to the left or right. Moving the slider to the left decreases the resolution setting, and moving it to the right has the opposite effect. If the slider bar will not move or only offers limited movement, the computer's video card does not support higher resolutions.
-
To change screen color depth, select an entry from the Color quality drop-down list.
-
Click on OK to close the Display Properties dialog.
| Note | Resolution and color settings can also be impacted if Windows XP Professional has installed the wrong video driver for the computer's video card or if a generic video driver has been installed. To avoid having the resolution and color display options artificially limited in this fashion, verify that the video adapter listed on the Monitor and Drivers Property dialog matches the video adapter installed on the computer. Also visit the Web site of the video adapter manufacturer and make sure that the most current video driver has been installed. |
At the bottom of the Settings property sheet are two buttons. The Troubleshoot button opens the Windows XP Help and Support Center and displays the Video Display troubleshooter. Clicking on the Advanced button opens the Monitor and Drivers Property dialog. This dialog contains a number of property sheets that provide the ability to view and change video adapter and monitor property settings.
EAN: 2147483647
Pages: 358