Creating a VPN Connection
A VPN connection is a connection that is established using the Internet as the communication infrastructure for the connection, as opposed to a dial-up connection. VPNs allow the Internet to be used as a secure channel for communication with corporate networks.
One of the advantages provided by VPN connections is that they can greatly reduce a company's long distance phone bills while still providing secure remote communications. If the client computer's connection to the Internet is made using a broadband connection, the bandwidth available to the connection can make it many times faster than a dial-up connection. In addition, if a broadband connection is used, the user can remain connected for long periods of time without the worry of being disconnected, as is often the case with dial-in connections.
VPN connections are secured by encrypting data before sending it out over the Internet. The receiving computer on the other end of the connection decrypts the data back into its original format. Microsoft Windows XP Professional supports two different WAN protocols that can be used when creating a VPN connection.
The older protocol is the PPTP (Point-to-Point Tunneling Protocol). PPTP uses PPP-encrypted communications to establish VPN connections. Alternatively, the L2TP (Layer-2 Tunneling Protocol) can be used. By default, this protocol does not encrypt data. However, it can be configured to use IPSec (Internet Protocol Security), which provides stronger security for VPN connections than PPTP.
Creating a Client VPN Connection
Like dial-up connections, a VPN connection is established between two computers. If the VPN server is configured to allow it, the VPN server can provide access to the local area network to which it is attached. The following procedure outlines the steps involved in configuring a VPN client connection.
-
Click on Start/All Programs/Accessories/Communications and then New Connection Wizard. The New Connection Wizard appears.
-
Click on Next.
-
Select Connect to the Network at My Workplace and click on Next.
-
Select Virtual Private Network Connection and click on Next.
-
Type a descriptive name for the connection and then click on Next.
-
The next screen asks how the Internet connection is to be established, as shown in Figure 15.13. If a broadband connection is to be used, select Do not dial the initial connection. Otherwise, select Automatically dial this initial connection and select the dial-up connection user's ISP from the drop-down list. Click on Next.
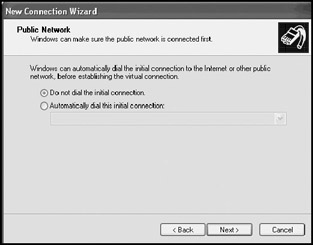
Figure 15.13: Specify how the computer is connected to the Internet -
Type the hostname or IP address of the VPN server and click on Next.
-
The New Connection Wizard displays a summary of the information that it has collected. Click on Finish.
An icon for the VPN client connection is created and placed in the Network Connections folder. By default, Windows XP Professional sets the VPN client connection to automatically detect the type of encryption that is to be used when establishing a VPN connection. The following procedure outlines the steps involved in manually specifying the type of encryption that the VPN connection is to use.
-
Click on Start, right-click on My Network Places, and select Properties to open the Network Connections folder.
-
Right-click on the VPN connection and select properties.
-
Select the Network property sheet.
-
Select one of the following options from the drop-down list in the Type of VPN section.
-
Automatic
-
PPTP VPN
-
L2TP IPSec VPN
-
Starting a VPN Connection
To initiate a VPN connection over the Internet, the user must first connect to the Internet. If the user has a broadband connection, the VPN session can be immediately started. If the user has a dial-up Internet connection, the connection must be started before the VPN connection can be established.
The following procedure outlines the steps involved in connecting to a VPN server over the Internet.
-
Click on Start, right-click on My Network Places, and select Properties to open the Network Connections folder.
-
Double-click on the VPN connection icon.
-
For broadband connections, the VPN client is prompted to enter a username and password, as demonstrated in Figure 15.14.

Figure 15.14: Specify the username and password required to establish the VPN connectionSupply the required information and click on Next.
-
For dial-up connections, the VPN client is prompted to enter a username and password only if the computer already has an active Internet connection. Otherwise, the user is prompted to first start an Internet connection. Click on Yes to start the Internet connection. Once the Internet connection is established, the VPN client asks for the username and password.
As with dial-up connections, once the connection is established, the user is able to access resources on the VPN server and on the network to which the VPN server is connected.
Setting Up a Windows XP Professional VPN Server
In addition to providing a client VPN connection to a VNP server, Windows XP Professional has the ability to act as a VPN server that can support a single incoming VPN connection. While not generally appropriate for the corporate settings, this capability may be of interest to smaller companies or home networks.
| Note | Windows XP Professional can only support a single incoming connection. If a dial-up connection has already been set up on the computer, the connection must also be used to double as a VPN connection. |
The following procedure outlines the steps involved in setting up Windows XP Professional to act as a VPN server using an existing incoming connection.
-
Click on Start, right-click on My Network Places, and select Properties to open the Network Connections folder.
-
Right-click on the Incoming Connection and select Properties. The Incoming Connections Properties dialog appears, as shown in Figure 15.15.
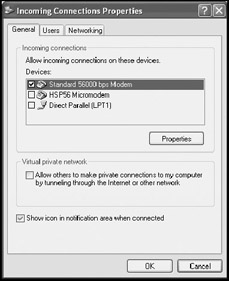
Figure 15.15: Configuring an incoming connection to accept a VPN connection -
Select the Allow others to make private connections to my computer by tunneling through the Internet or other network option in the Virtual private network section.
-
Click on OK.
EAN: 2147483647
Pages: 358