Building SOAP Extensions
Like HTTP modules, SOAP extensions have access to the SOAP request message and its corresponding SOAP response message for processing before they move on to the handler and the client, respectively. However, unlike HTTP modules, which are always constructed in the same way, the strategy for coding a SOAP extension can vary based on two factors:
-
Whether the extension will work autonomously for every request to a Web service or will work only against certain methods
-
Whether the extension will alter or add to the contents of the message it intercepts
Next we’ll look at extensions for three scenarios, each of which adds new code to old code and which together demonstrate everything you need to write SOAP extensions successfully. The code needed for a fourth scenario, an autonomous extension that alters a message, can be extrapolated from the other three.
An Autonomous SOAP Extension
As we did with modules, our first example is the simplest scenario for a SOAP extension—one that works autonomously and does not alter the contents of the request or response. We’ll build it, deploy it, and then go back over it to fill in the gaps we left along the way. As with modules, this means building an extension that blocks all requests for Web services in a Web application. Unlike with modules, this means raising a SOAP fault to be sent back to the client rather than stopping processing altogether. Don’t forget that we’re working with SOAP rather than HTTP. To emphasize the similarity in construction and deployment between the two, we’ll even use the same instructions as last time. You’ll see that the only real difference at this level is the test setup.
Open Visual Studio .NET and create a class library project called SimpleExtension. Add references to System.Web and System.Web.Services to the project, and then add the following code:
using System; using System.IO; using System.Web; using System.Web.Services.Protocols; public class SimpleExtension : SoapExtension { public override object GetInitializer(Type serviceType) { return null; } public override object GetInitializer(LogicalMethodInfo methodInfo, SoapExtensionAttribute attribute) { return null; } public override void Initialize(object initializer) { return; } public override void ProcessMessage(SoapMessage message) { switch(message.Stage) { case SoapMessageStage.BeforeDeserialize: throw new SoapException("This service is not available", SoapException.ClientFaultCode); break; case SoapMessageStage.AfterDeserialize: break; case SoapMessageStage.BeforeSerialize: break; case SoapMessageStage.AfterSerialize: break; default: break; } } } Save the code as SimpleExtension.cs and compile it into an assembly called Notashop.Wscr.C10.SimpleExtension.dll. You can do this by setting the assembly name on the project’s property pages before building the class.
Add a new Web service called TestWebSvc.asmx to our TestWebApp project in Visual Studio .NET and uncomment the HelloWorld Web method. It doesn’t matter what the service actually does for this example, but it does matter how we access it. An extension bolts onto the default ASMX handler and comes into play only when we deal with SOAP messages to and from the server. Just using the default test page won’t trigger an extension because the test page uses only HTTP-POST requests to access the service, so we have to generate a proxy class for the service and build a client page around it. You’ll find TestClient.aspx all ready for you among the code samples, but if you prefer to do the work yourself, here are the steps:
-
Add a Web reference to TestWebSvc.asmx to the TestWebApp project.
-
Add an ASP.NET page called TestClient.aspx to the TestWebApp project.
-
Add a button called btnGoProxy and a label called lblResponse to TestClient.aspx.
-
Create an event handler for clicking the button, and then add the following code:
private void btnGoProxy_Click(object sender, System.EventArgs e) { TestWebApp.localhost.TestWebSvc proxy = new TestWebApp.localhost.TestWebSvc(); lblResponse.Text = proxy.HelloWorld(); }
We can now test our SOAP extension and deploy it. We deploy by following the same steps as for deploying a module:
-
Copy the SOAP extension DLL file into the TestWebApp\bin directory or the GAC.
-
Tell the Web application that the SOAP extension exists by adding an entry for it in the application’s web.config file.
-
Restart or rebuild the application.
Steps 1 and 3 are straightforward enough. Step 2 requires opening up web.config and adding the following:
<?xml version="1.0" encoding="utf-8" ?> <configuration> <system.web> ⋮ <webServices> <soapExtensionTypes> <add type="SimpleExtension, Notashop.Wscr.C10.SimpleExtension" priority = "1" group ="0" /> </soapExtensionTypes> </webServices> </system.web> </configuration> If you’re still using the web.config file from the previous section, just add the <webServices> element and its contents after the <httpModules> element, which you should comment out. The extension should now be deployed and working. To test it, open testclient.aspx in a browser and click the button. The client will call the service, SimpleExtension, which will run and produce an error as expected (as shown in Figure 10-7).
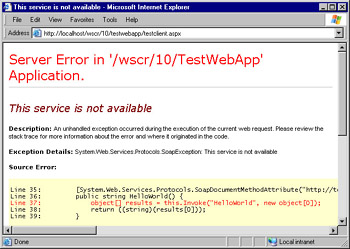
Figure 10-7: SimpleExtension blocks SOAP requests with a SOAP fault.
This error is not a particularly elegant response, but the proxy and Microsoft Internet Explorer know how to display it to give you the clearest information. Our TestClient page has a second button, which sends a custom- built request to TestWebSvc. The extension creates the same SOAP fault, but the results are much less clear in the browser; it looks like an Internal Server Error (code 500) has occurred.
Let’s go back and look at the key pieces of our extension.
The SoapExtension Class
Creating a SOAP extension means writing a class that inherits from the System. Web.Services.Protocols.SoapExtension class and overriding the methods it contains:
using System; using System.IO; using System.Web; using System.Web.Services.Protocols; public class SimpleExtension : SoapExtension { Two methods, GetInitializer and Initialize, work together to make available any information the extension needs while a message is being processed. In this simple example, we don’t need any preset data to raise an error, so we’ve left the methods empty. But note that GetInitializer (both overloads) and Initialize, shown here, must be overridden before the extension will compile.
public override object GetInitializer(Type serviceType) { return null; } public override object GetInitializer(LogicalMethodInfo methodInfo, SoapExtensionAttribute attribute) { return null; } public override void Initialize(object initializer) { return; } We’ll return to these two methods and their unique symbiotic relationship a little later on.
The SoapExtension class has a third method called ChainStream, which you don’t need to override unless you’re planning to alter the contents of the SOAP messages. For now, this isn’t the case, so ChainStream isn’t implemented. However, it’s useful to know that it exists.
Overriding ProcessMessage
The ProcessMessage method is where the extension does all its work; it is called four times by ASP.NET during a message’s lifetime. Its parameter is a SoapMessage object that represents the contents of and metadata for the request and the corresponding response the extension is processing. The two key properties of the SoapMessage object are SoapMessage.Stream and SoapMessage.Stage. The Stream property provides direct access to the stream containing the message (much like HttpContext.Response.GetOutputStream and HttpContext. Request.GetInputStream), and the Stage property defines the four stages during the processing of the request when we can do something. That is, it defines the equivalent of four events that we can hook into. The only difference is that we hook into them using a case statement rather than event handlers. Whenever ASP.NET calls ProcessMessage, it has already updated the Stage property to reflect the current state of processing and so the extension acts accordingly, as the following code illustrates.
public override void ProcessMessage(SoapMessage message) { switch(message.Stage) { case SoapMessageStage.BeforeDeserialize: throw new SoapException("This service is not available", SoapException.ClientFaultCode); break; case SoapMessageStage.AfterDeserialize: break; case SoapMessageStage.BeforeSerialize: break; case SoapMessageStage.AfterSerialize: break; default: break; } } } Here are the four stages represented by the SoapMessage.Stage property:
-
BeforeDeserialize Indicates that the SOAP request message is about to be deserialized into a SoapMessage object. You can still access it as XML here.
-
AfterDeserialize Indicates that the request has been deserialized into objects. Information contained in the XML message can now be accessed through the SoapMessage object that was passed to ProcessMessage as a parameter.
-
BeforeSerialize Indicates that the SoapMessage object is about to be serialized into a SOAP response message.
-
AfterSerialize Indicates that the SOAP response message has been created and is ready to be sent back through the pipeline and out to the client.
Our simple example merely throws an exception of type SoapException the first chance it gets, but nontrivial extensions will use the SoapMessage object parameter to pull data pertaining to the request and response and react to it. The only caveat is that some of its properties and methods are valid only some of the time. Table 10-1 describes the properties and methods of the SoapMessage object.
| Property or Method | What It Returns | When It’s Available |
|---|---|---|
| Action property | The HTTP SOAPAction header for the request. | All stages |
| ContentType property | The HTTP Content-Type of the request (read-only) or response (read/write). The default is text\xml. | AfterDeserialize BeforeSerialize |
| Exception property | The exception of type SoapException that was raised during the request. It is null if no exception has occurred. | All stages |
| Headers property | A SoapHeaderCollection list containing the headers in the request or response message. | All stages, but it contains content only at AfterDeserialize and BeforeSerialize |
| MethodInfo property | A LogicalMethodInfo object containing information about the Web service class method being called by the SOAP request. | All stages, but it contains content only at AfterDeserialize and BeforeSerialize |
| OneWay property | Boolean value indicating whether the request is one way (true) or expects a response (false). | All stages |
| Stage property | The current stage of message processing. | N/A |
| Stream property | The stream containing the SOAP request or SOAP response message. Note that this is read-only. | All stages |
| Url property | The URL of the Web service. | All stages |
| GetInParameterValue(int i) method | The ith parameter of the call to the Web method. | AfterDeserialize |
| GetOutParameterValue(int i) method | The ith out parameter of the call to the Web method. | BeforeSerialize |
| GetReturnValue method | The return value of the call to the Web method. | BeforeSerialize |
As noted back in our first module example, you must produce a SOAP fault in an HTTP module by hand, but a SOAP extension produces it automatically when we throw a SoapException.
Deploying Autonomous SOAP Extensions
You can deploy a SOAP extension in your Web application in two ways. If the SOAP extension should process every request made to every Web service method in your application, you add an entry to the application’s web.config file. If the SOAP extension should process only requests to specified methods, you associate the extension with a custom attribute and tag the specified methods with the attribute.
Our example is of the former type. Here’s how we add an entry to the web.config file:
<configuration> <system.web> <webServices> <soapExtensionTypes> <add type="SimpleExtension, Notashop.Wscr.C10.SimpleExtension" priority = "1" group ="0" /> </soapExtensionTypes> </webServices> </system.web> </configuration>
The ASP.NET configuration schema allows only an <add /> element under <soapExtensionTypes> and no <remove /> or <clear /> elements, as it does for HTTP modules. (This might be because ASP.NET doesn’t come with any SOAP extensions straight out of the box; it comes with only HTTP modules.) <add /> has three attributes: type lets you specify the extension’s class name and the assembly it is in, and priority and group pertain to the situation in which more than one extension is deployed in the same Web application.
Multiple Extensions in One Application
Although .NET doesn’t define any SOAP extensions, it doesn’t preclude the deployment of multiple extensions in a single Web application. But how will they coexist? The answer lies with their priority and group values.
All extensions, regardless of how they work, have a priority value. For applications that use multiple SOAP extensions, the order in which their methods run is determined by their priority. The methods are grouped together (all the GetInitializer methods first, then all the Initialize methods, and so on), but in order of priority (low to high). The only exception is when you call ProcessMessage for the BeforeSerialize and AfterSerialize stages, in which case the extension calls are prioritized from high to low. An extension’s group is related to its priority and can be 0 or 1; extensions in group 0 run before extensions in group 1, regardless of their priority level. In the case of a tie (same priority, same group), ASP.NET goes by the order in which the extensions were declared.
Figure 10-8 shows the order in which a SOAP extension calls its methods and the priority level an extension must have for its methods to be called first.
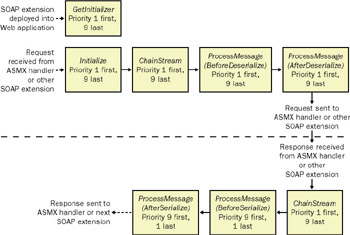
Figure 10-8: The order of method calls during the life of a SOAP extension
A Targetable SOAP Extension
As mentioned earlier, you should use the second type of SOAP extension deployment into a Web application if the extension should process only requests to methods that you identify. You associate the methods with a custom attribute that you create, and you tag the methods with the attribute. For example, we’ll create an extension that checks whether one integer parameter is less than another when a method is called. It’s a simple example of an extension implementing checks on the request in addition to validating it with the schema, a concept we introduced in Chapter 6.
In our sample Web service, we’ll add a new Web method that simply returns the sum of two integers, as follows. The [LessThan] attribute requires the names of two parameters in the method call on which to perform the check. The first parameter should be less than the second, or an error will occur.
[WebMethod] [LessThan("a", "b")] public int add(int a, int b) { return a + b; } The code that implements the attribute and extension can be found in LessThanExtension.cs in the sample code for this chapter.
Creating a SOAP Extension Attribute
To create a new attribute to trigger your extension, you create a class that inherits from System.Web.Services.Protocols.SoapExtensionAttribute and override its two properties: ExtensionType and Priority. The ExtensionType property returns the .NET class of the extension that the attribute is attached to, and Priority gets or sets the priority of the extension:
[AttributeUsage(AttributeTargets.Method)] public class LessThanAttribute : SoapExtensionAttribute { private int priority = 9; public override Type ExtensionType { get { return typeof(LessThanExtension); } } public override int Priority { get { return priority; } set { priority = value; } } An attribute need not have parameters, but if it does, their values will be passed into the attribute’s constructor. You must supply a different constructor for each combination of properties the attribute can have. Our example has just the one variation, in which the attribute is initialized with the names of two parameters that we’ll store in two class properties. When a SoapExtension is initialized, it is passed the SoapExtensionAttribute class attached to it and can pull those names out for comparison:
public string ParamName1; public string ParamName2; public LessThanAttribute(string param1, string param2) { this.ParamName1 = param1; this.ParamName2 = param2; } } That’s it for the SoapExtensionAttribute class. Next we’ll look at how to tie the attributes to their associated extensions.
Creating the SOAP Extension
Our LessThanExtension class has the same structure as SimpleExtension but needs to get the names of the parameters to compare them to the attribute that tagged the method. To do this, we must implement one of the GetInitializer overrides that gives us that access. It takes two arguments: a LogicalMethodInfo object, which represents the attributes and metadata of the method the attribute has tagged, and the custom attribute class we created in the last section. Note that the custom attribute class is passed to GetInitializer as a generic SoapExtensionAttribute object, so we must cast it to a LessThanAttribute object before we can access it.
public override object GetInitializer( LogicalMethodInfo methodInfo, SoapExtensionAttribute attribute) { LessThanAttribute lta = (LessThanAttribute)attribute; // Error traps removed for clarity return new string[]{lta.ParamName1, lta.ParamName2}; } GetInitializer runs only at one point in the lifetime of a Web application— the first time the extension is deployed (compiled) into the Web application. It executes and returns to ASP.NET an object known as an initializer, which is cached and passed to Initialize every time a Web method to be parsed by the SOAP extension is invoked. It is Initialize that creates an instance of the SoapExtension class and calls ProcessMessage to check or alter the SOAP messages. In our case, Initialize populates the extension’s member fields with the name of the parameters to check:
public override void Initialize(object initializer) { ParameterName1 = ((string[])initializer)[0]; ParameterName2 = ((string[])initializer)[1]; }
Understanding GetInitializer and Initialize
Why the elaborate two-step initialization? Why not just have Initialize set everything up when a SoapExtension object is initialized? The answer is to improve performance. A SoapExtension object is created every time a Web service method is invoked, but if its constructor has a lot to do, a performance hit might result if the method is invoked frequently. Our example extension needs only two string properties to be populated, but what if it were to require a set of namespaces and their schemas to be downloaded from the Web each time? Even the fastest connections would see the extension start to jam up if it had to download six different schemas every time a method was called.
To improve performance, we run the generic initialization code in GetInitializer only once for the lifetime of the application. The initializer object it returns to ASP.NET for caching contains the information (such as schemas, connection strings, and datasets) that Initialize needs to initialize a new instance of the extension object. Figure 10-9 shows this relationship.
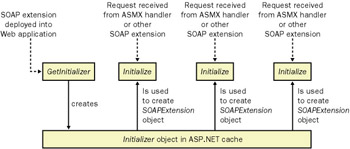
Figure 10-9: GetInitializer is called only once, but Initialize is called frequently. The initializer object remains in the ASP.NET cache throughout.
Two questions remain about GetInitializer:
-
Why are there two versions of GetInitializer? The two versions of GetInitializer correspond to the two scenarios we’ve discussed. Regardless of whether the extension alters the SOAP messages, if it is attached to methods with a custom attribute, GetInitializer(methodInfo, attribute) will be called to create the initializer object. If the extension works autonomously over all Web service methods in the application, it will call GetInitializer(serviceType). Of course, you can implement both versions in your extension, but only one will be called, depending on how the extension was deployed.
-
What happens to the initializer object if an extension attribute contains different parameter values for different methods? Do the contents of the object change according to which method is called? The contents of an initializer object do not change over time. Instead of having one initializer per extension class, GetInitializer is called and an initializer is created and cached for each method tagged by the extension’s attribute. When a method is invoked, ASP.NET passes Initialize the appropriate initializer object for the method.
Completing the Extension
Now that we’re clear on how our LessThanExtension object will be initialized, we just need to implement the ProcessMessage method, shown in the following code, before we can deploy the extension.
public override void ProcessMessage(SoapMessage message) { switch (message.Stage) { case SoapMessageStage.BeforeDeserialize: break; Our task is to check whether one of the integer parameters in the call to a Web method is less than another. GetInitializer has already checked that the named parameters are integers, so all we need to do is retrieve their values and compare them. Details of all a method’s parameters can be found in the SoapMessage object, but only after the SOAP request to the method has been deserialized. Here’s the ProcessMessage code for the AfterDeserialize stage:
case SoapMessageStage.AfterDeserialize: int pvalue1 = 0; bool foundval1 = false; int pvalue2 = 0; bool foundval2 = false; ParameterInfo[] inParams = message.MethodInfo.InParameters; for (int i=0; i<inParams.Length ; i++) { if (inParams[i].Name == ParameterName1) { pvalue1 = (int)message.GetInParameterValue(i); foundval1 = true; } if (inParams[i].Name == ParameterName2) { pvalue2 = (int)message.GetInParameterValue(i); foundval2 = true; } } The SoapMessage.MethodInfo.InParameters property returns an array of ParameterInfo objects. Each of these contains the name, value, and type of a parameter, among other properties. However, there’s no way to retrieve a parameter’s value given just its name. We have to iterate through the array until we find the parameters we need.
Upon retrieving the value of the parameter, we test the two flags we set to make sure we have values to compare. If one or both haven’t been set, we raise an error:
if (!foundval1) { string errormsg = "Couldn't find a value for " + ParameterName1 + ". Does it exist?"; throw new SoapException(errormsg, SoapException.ServerFaultCode); } if (!foundval2) { string errormsg = "Couldn't find a value for " + ParameterName2 + ". Does it exist?"; throw new SoapException(errormsg, SoapException.ServerFaultCode); } Last but not least, we make the comparison and raise an error if parameter 1 is greater than or equal to parameter 2:
if (pvalue1>=pvalue2) { string errormsg = ParameterName1 + " must be less than " + ParameterName2 + " for this Web method to run"; throw new SoapException(errormsg, SoapException.ClientFaultCode); } break; case SoapMessageStage.BeforeSerialize: break; case SoapMessageStage.AfterSerialize: break; default: break; } } To deploy our targetable SOAP extension, all we need to do is add its class file (and the attribute’s class file, too, if it is separate) to the Web application project and rebuild it. To test it, we need to regenerate the proxy class for TestWebSvc.asmx and add an extra button and some text boxes to TestClient.aspx. The text boxes will take hold of the parameters for the add method, and the button will send a message to the method with the following code in its onClick event handler:
private void btnAdd_Click(object sender, System.EventArgs e) { TestWebApp.localhost.TestWebSvc addproxy = new TestWebApp.localhost.TestWebSvc(); int a = int.Parse(txtA.Text); int b = int.Parse(txtB.Text); lblResponse.Text = (addproxy.add(a, b)).ToString(); } Our new SOAP extension will return an error from add if parameter a is not less than parameter b. Try sending equal values to add. The extension will kick in and return a SOAP fault message, as expected (as shown in Figure 10-10).
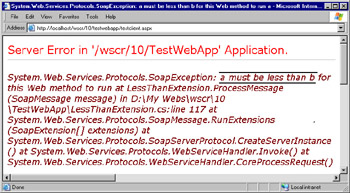
Figure 10-10: The LessThanExtension SOAP extension in action
Changing the SOAP Message Using Your Extension
Thus far, we’ve covered only extensions that inspect the contents of a SOAP message and then do something else. Now we’ll look at how to add to or change the message itself. You might want to do this, for example, if you want to compress and decompress or encrypt and decrypt the SOAP message for transmission across the wire or if you want to change the shape of the message to conform to a new version of the Web service.
| More Info | The next chapter includes a great example of an encryption extension that alters the SOAP message. We’ll cover the theory here, and you can see the full implementation in Chapter 11. |
The key to using an extension in this way is working with the stream containing the raw requests and responses. When we’re working in ProcessMessage, we can access the stream in the SoapMessage.Stream property. The only problem is that the stream is read-only, so if we want to alter its contents, we have to pull them out and copy them into another stream. This presents another problem. How do we tell the handler to use the stream with the new contents for any future processing? The answer is simple: we use the ChainStream method.
Implementing ChainStream
The method signature for ChainStream looks like this:
public override Stream ChainStream(Stream stream) { } The read-only stream it presents as the parameter contains the content you want to alter. The stream it expects as a return value is a new read-write stream that it will hook up to the message’s destination in place of the old one. Thus a simple implementation of ChainStream in an extension class looks like this:
public class AnExtension : SoapExtension { public Stream currentStream; public Stream newStream; public override Stream ChainStream(Stream stream) { currentStream = stream; newStream = new MemoryStream(); return newStream; } ⋮ } Remember that all ChainStream does is present the SOAP extension with a new stream that points at the message’s recipient. The actual processing of the current stream’s contents and the subsequent writing to the new stream must be done during one of the four calls to ProcessMessage. For this task, ProcessMessage needs access to both streams, and the simplest way to give it that access is to store the streams in member variables, as we did earlier.
With ChainStream set up, all that’s left to do is to implement ProcessMessage itself. If you’re developing an extension for encrypting or compressing a SOAP message, you should access currentStream, process it, and copy the results into newStream at the BeforeDeserialize and AfterSerialize stages. In outline form, this looks something like the following:
public override void ProcessMessage(SoapMessage message) { switch(message.Stage) { case SoapMessageStage.BeforeDeserialize: DecodeAndCopyRequestStream(currentStream, newStream); break; case SoapMessageStage.AfterDeserialize: break; case SoapMessageStage.BeforeSerialize: break; case SoapMessageStage.AfterSerialize: EncodeAndCopyResponseStream(currentStream, newStream); break; default: throw new Exception("Invalid stage"); } } Extensions that alter the content of the request or its response can be deployed as either autonomous or targetable SOAP extensions.
SOAP Extensions on the Client
A dog is not just for Christmas, and a SOAP extension isn’t just for the server. If you consider an extension that decrypts a request and encrypts a response, you’ll realize that there’s not much point in it existing on the server if it doesn’t also exist on the client where it will encrypt requests and decrypt responses. Fortunately, you can incorporate a targetable SOAP extension into your client by using Visual Studio .NET, in just five easy steps:
-
Generate a proxy class (Web reference) to the Web service for your client project.
-
Add the class files for your extension and its attribute to your client project.
-
Open the class file for your proxy class—usually called reference.cs—and tag the methods that need processing by your extension with its attribute.
-
Save reference.cs and build your client as you normally would.
-
Compile and run the extension.
Important If you regenerate the proxy class for a Web service, you lose any changes made to incorporate the extension into the client and you’ll have to add the attributes again.
By and large, an extension written for the server will work as expected on the client without any code modifications. This is because the four message stages in ProcessMessage are in a different order on the client. ProcessMessage generates a request and receives a response in this order: BeforeSerialize, AfterSerialize, BeforeDeserialize, AfterDeserialize. However, if the extension really needs to know whether it’s working on the client or the server, you can find out in ProcessMessage by calling typeof on its SoapMessage parameter. The typeof operator will return SoapServerMessage if the extension is on the server, and it will return SoapClientMessage if the extension is on the client. Both these classes inherit from SoapMessage.
Again, you’ll find a full example of adding a SOAP extension to the client in the next chapter.
EAN: 2147483647
Pages: 172