Getting Your Web Method to Work
We’ve looked at the attributes involved in creating a Web method, and, broadly speaking, our Web service is now complete. But although the code is finished, that’s not all we need to do by a long shot.
Debugging
After you create the Web method, you have no guarantee that it will work immediately, and even if it does run correctly, you have no guarantee that it will necessarily work in the future. There are no golden rules for how to proceed if things go belly-up with your Web server, but you can follow a common set of guidelines to minimize the effects of any errors that creep in. We’ll look at those as well as some situations that most developers will encounter at some point.
Exceptions
Intelligently handling exceptions is probably the best way to ensure that your Web services work as intended. When an error occurs in a Web service, the following protocol is observed:
-
.NET catches the error.
-
The error information is serialized within a SOAP message.
-
When the client receives the SOAP response, it throws the exception.
The type of exception raised is SoapException because the error message information is supplied in the body of the SOAP message. Quite often you will be invited to inspect the StackTrace object for further information relating to your error. The StackTrace object is accessible via the Exception object.
To exert greater control, you can get the Web method to raise an error itself, by explicitly throwing an exception. You are often better off throwing your own exceptions, because then you can get the Web service to behave in a predictable way when faced with a certain situation.
You saw in Chapter 2 that faults can be serialized in a SOAP fault message and that this message is displayed on the client. When designing Web methods, you should always account for every situation or every possible user entry. If an unexpected value is encountered, you can follow a particular course of action rather than letting the Web service encounter an error itself (such as a divide-by-zero error). For example, if you’re running a piece of code that relies on one of a particular range of inputs from a user, all possible values should be anticipated:
[WebMethod] public string Input(string userInput) { int amount; switch(userInput) { case 1: amount=1; break; case 2: amount=20; break; case 3: amount=30; break; default: throw new SoapException("Invalid Amount supplied", SoapException.ClientFaultCode); } ⋮ As you also saw in Chapter 2, you can add extra information about the exception being thrown via the Message, Code, Actor, Detail, and OtherElements properties of the SoapException object to let the user know exactly why the exception was thrown.
Error Logging
Debugging relies on the tracing of errors. When you write a Web service, you should be sure that any errors encountered are written to a log so they can be checked later.
.NET allows you to write and retrieve log entry information via the EventLog class. This class allows access to security, system, and application logs. If you are logging events from your Web service, the application log is the correct place to record them. The EventLog class is accessed via the System.Diagnostics namespace. You can log errors by placing them in a try/catch construct. For example, here’s a piece of code that tries to write more numbers into an array than the number of elements that the array can hold:
[WebMethod] public void ErrorLogging() { try { int[] testarray = new int[5]; for(int i=0; i++; i<=10) { testarray[i] = i+1; } } catch (Exception err) { EventLog Applog = new EventLog(); Applog.Source = "ErrorGenerator"; Applog.WriteEntry(err.Message, EventLogEntryType.Error); } } This code writes the contents of the exception from the application to the EventLog object. The event is logged as type EventLogEntryType.Error. The Source property of the EventLog object allows you to specify the name of the application that threw the error.
The EventLog class has the following properties (not including inherited ones):
-
EnableRaisingEvents Specifies whether the EventLog instance will receive EntryWritten event notifications (which are generated whenever an event is written to the log)
-
Entries Gets the contents of the event log in the form of a collection
-
Log Specifies the name of the log to be written to or read from
-
LogDisplayName Gets the event log’s “friendly” name
-
MachineName Specifies the names of the machine on which the event log is located
-
Source Specifies the name of the application to be used when writing events to the log
-
SynchronizingObject Gets or sets the object used to marshal the event handler calls that are issued when an event is generated by an EventLog entry being written
The EventLog class has the following methods (not including inherited ones):
-
BeginInit Begins the initialization of an event log at run time
-
Clear Clears all entries from the specified event log
-
Close Closes the event log
-
CreateEventSource Gives permission to a particular application to be able to write to an event log
-
Delete Deletes the event log
-
DeleteEventSource Removes permission to a particular application to be able to write to an event log
-
EndInit Ends the initialization of an event log at run time
-
Exists Returns a value depending on whether a specified log exists
-
GetEventLogs Creates an array of event logs
-
LogNameFromSourceName Retrieves the name of the EventLog given an application/source name
-
SourceExists Checks the registry to see if the application that claims to have generated the event actually exists
-
WriteEntry Writes an entry to the event log
Anyone can write to error logs, so they are prone to deletion, amendments, or overwriting by other applications and are not good permanent stores for such information.
To retrieve information from the error log, you can create another Web method that returns the appropriate information from the EventLog object. You can return the information in whatever format you want, ranging from a DataSet object to a more straightforward array. This example populates an array with the retrieved event log information:
[WebMethod] public void RetrieveLog() { EventLog log = new EventLog("Application1"); string[][] ErrorLogArray = new string[10][2]; int i=0; foreach (EventLogEntry entry in log.Entries) { if (entry.Source == "ErrorGenerator") { ErrorLogArray[i][0] = entry.Message; ErrorLogArray[i++][1] = entry.TimeGenerated; } } ⋮
Deployment
Deploying a Web service might feel like the final stretch of a project, but if you don’t get it right, it won’t work correctly on the machine it’s intended to run on. When I was deploying my first-ever project for my first client after becoming self-employed, I deployed a random batch generator that worked perfectly but used the Common Dialog OCX, which of course isn’t available on machines that don’t have Visual Basic installed. It took a good half-hour of discussions with the client to ascertain that the code wasn’t broken and that the problem was easily fixable. Motto: do it right the first time!
Visual Studio .NET offers facilities for creating a deployment project that builds an .msi file containing all the necessary dependencies and Web server configurations. The .msi file also registers the assemblies, making certain not to overwrite newer copies of them. The .msi file should be copied to the Web server and run. Once run, the application should be correctly set up to work and broadcast the Web service.
Deployment Using Visual Studio .NET
To add a deployment project to a solution, you choose Add Project from the File menu, and then choose New Project. In the Add New Project dialog box, select the Setup And Deployment Projects folder, then select the Web Setup Project template, and supply an appropriate name and location, as shown in Figure 7-2.
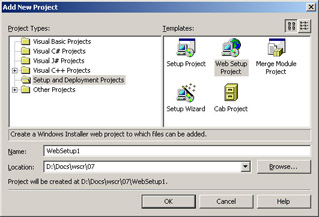
Figure 7-2: Visual Studio .NET’s Add New Project dialog box with the Web Setup Project template selected
The tree view that appears on the right lists two nodes: File System On Target Machine and Web Application Folder. Right-click Web Application Folder and choose Add from the shortcut menu. Then select Project Output to configure various options, such as which assemblies to include (as shown in Figure 7-3).
If you select the primary output for each file and select the appropriate configuration setup, you can select from among the configurations you set up and examine any detected dependencies.
When you deploy an XML Web service, you must be sure that the .asmx file and any associated assemblies not included as part of the .NET Framework are included as a part of the deployment. They must be placed in the virtual directory of the application and the bin folder of the virtual directory, respectively.
For example, for the Recordstore example, the .asmx file could be located at \Inetpub\wwwroot\Recordstore\service1.asmx. Assemblies would be found at \Inetpub\wwwroot\Recordstore\bin\RecordStoreProxy.dll.
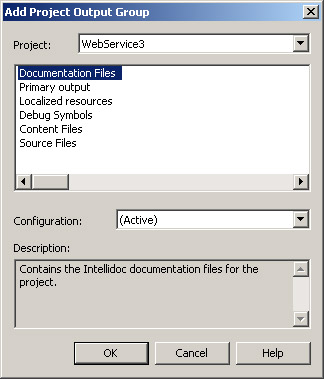
Figure 7-3: The Visual Studio .NET Add Project Output Group dialog box
If all of the target machines that the Web service is to be deployed on use the .NET Framework, it is possible to identify some deployment files that are included by default in the .msi installation file and exclude them in Solution Explorer so they are not included. When you run the .msi file, it will automatically update the setting for the Web server and the web.config file if you changed it in any way.
Deployment Using Code-Behind
Deployment might seem straightforward with Visual Studio .NET—in fact, just by building a solution, you can deploy a project, but what if you deploy using code-behind files? In this case, you need to take care of certain tasks when you configure how Visual Studio .NET will interact with IIS. Or, if you don’t use Visual Studio .NET at all and deploy the Web service directly to the Web server, you must deal with some issues.
FrontPage Server Extensions
Microsoft FrontPage Server Extensions are a notoriously unreliable piece of technology that allows the transfer of code directly from Visual Studio .NET to the Web server using the HTTP protocol. Previous versions could be broken if an FTP tool was used to conduct the transfer of files, and they posed security risks and often require a server to be restarted to make them work. You can install them as part of IIS or download them from Microsoft’s own site. You can manage them from the IIS Management Console, by right- clicking the Default Web Site icon, selecting All Tasks, and then selecting Configure Server Extensions.
UNC
Using the Universal Naming Convention (UNC), you can share files across the network. Using UNC is much faster than using FrontPage extensions. UNC involves a network resource being identified by a three-part name consisting of the server name, the share name, and the file path, as in \\contoso\wwwroot$\RecordStore. You can choose UNC access for access to your Web server in place of Front Page Extensions, and, in fact, by default Visual Studio .NET will attempt to access your Web server via UNC.
Deployment via IIS
Of course, just by creating a virtual application on an IIS server that is available to an intranet or extranet, you can deploy a Web service as well. When you set up a new virtual application on IIS, you can manually add a bin folder and place any assemblies that the Web service needs in this folder. .NET will automatically look first in this folder for assemblies.
Discovery of the Web Service
Once the service has been deployed, it’s still not fully functioning. It’s like creating a Web site and then hoping people will happen to visit. Unless you’ve got paranormal powers of persuasion, you could wait a long time. We’ve already talked about the UDDI repository in Chapter 4 and how Web services can be registered there, and then how they can be searched for via a directory of different companies and organizations. We also looked at the other alternative in Microsoft’s DISCO protocol, which allows you to discover the different Web services running on a single machine. The times that you’d use these methods varies depending on what you intend to do with the Web service and who you’re intending to reach. We’ll start with a quick look at how DISCO might be used for our Web service.
DISCO
If your Web methods are intended to be consumed by people other than the ones who regularly browse your machine, registering the service on the UDDI registry instead of using DISCO would be a more appropriate solution for discovery of the service. However before you open the service to the general public, it’s a good idea to check that you can find it first on our own server and that it is exposed in the correct fashion—and for this purpose, DISCO is better suited.
In Chapter 4, we mentioned that there are three types of documents: the .disco file, in which the endpoint of the service is known and which contains details about a single web service; the .disco file that is generated when you append the ?disco query string to a .asmx Web service file, allowing you to treat the Web service itself as a discovery document; and the .vsdisco file, in which the endpoint of the Web service isn’t known and which is helpful when you need to discover different Web services on your server. By default, the dynamic discovery capability that enables .vsdisco files to work is turned off for security reasons. To use .vsdisco files, you need to enable dynamic discovery in the machine.config file by uncommenting the line in .NET 1.0:
<!-- <add verb="*" path="*.vsdisco" type="System.Web.Services.Discovery.DiscoveryRequestHandler, ΠSystem.Web.Services, Version=1.0.3300.0, Culture=neutral, ΠPublicKeyToken=b03f5f7f11d50a3a" validate="false"/> -->
Then you can let Visual Studio .NET create the file that will iterate through all the paths for you.
You can create your own static discovery document (.disco file) as follows. Add a new item within Visual Studio .NET to your Web service project, and select Static Discovery File. The document for static discovery of the example Web service would look like this:
<?xml version="1.0"?> <discovery xmlns="http://schemas.xmlsoap.org/disco/"> <contractRef ref=" http://www.notashop.com/wscr/07/disco/service1.asmx?wsdl" docRef=" http://www.notashop.com/wscr/07/disco/service1.asmx" xmlns="http://schemas.xmlsoap.org/disco/scl/" /> <discoveryRef ref="http://www.notashop.com/wscr/07/disco/simple/default.disco" /> <discoveryRef ref="http://www.notashop.com/wscr/07/disco/soap/default.vsdisco" /> <schemaRef ref="http://www.notashop.com/wscr/07/disco/soap/schema.xsd" /> </discovery>
A static discovery document for our example Web service requires just three elements: <contractRef>, which specifies the service we wish to make available; <discoveryRef>, which references other discovery documents; and the <schemaRef> element, which is used to connect to the Web service’s schema.
DISCO works much better on a small, local scale, allowing you to discover services running on a local computer and to browse them. Another advantage is that UDDI requires registration with the Microsoft server, whereas DISCO doesn’t. However, for any large-scale Web service, you’ll probably want to use a registry of some sort; the UDDI is the probable discovery mode of choice.
UDDI
You can think of UDDI as a giant telephone directory of Web services. If you want to reach a particular person using a telephone directory, you might struggle if you had only her address. UDDI, however, addresses the problem of locating services when you don’t know the provider.
If you go to the UDDI site at http://uddi.microsoft.com and choose Register from the left-hand menu, you can register the service. You must register your company first and supply a verifiable e-mail address. Then you can go to the Publish section of the site and, under the Providers tab, you can add a service and details about your service. Chapter 4 explains the process in more detail.
WS-Inspection
WS-Inspection, a part of the Global XML Web Services Architecture (GXA), offers another alternative for Web service discovery. It is a set of rules governing how Web service–related information should be made available for consumption. The proposed recommendation is currently in working-draft status on W3C’s site, but it will move away from UDDI’s business-centric approach and offer the discovery and description of services at a more functional level to the customer. That is, it is intended to allow users to scour Web sites for their Web service offerings, via descriptions of Web services. It aims to allow referencing of Web service descriptions in a more organized fashion. In theory, a customer will be able to interrogate a company’s Web server for a list of available Web services. WS-Inspection also aims to provide a method whereby search engines can tag and reference the services offered.
The WS-Inspection specification hasn’t been changed since November 2001; the current version of the specification can be found at http://msdn.microsoft.com/library/default.asp?url=/library/en-us/dnglobspec/html/ws-inspection.asp .
EAN: 2147483647
Pages: 172