P2P Web Services
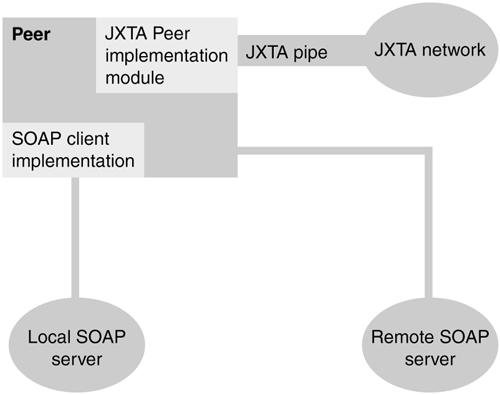
| We have seen Web services and P2P networks operating independently. We'll now discuss an important architectural model and use case scenarios in which Web services and P2P coexist to provide value-added applications. SOAP-Over-P2PThe simplest logical model in which Web services can work over a P2P infrastructure is the operation of SOAP over P2P. The largest number of SOAP deployments today work over HTTP. This means the XML payload of SOAP requests and responses travel over HTTP. To elaborate upon this idea, have a look at the following HTTP request that wraps and transports a SOAP (UDDI) request over the Internet (it's a HTTP request containing a SOAP request that in turn contains a UDDI request): POST /services/uddi/testregistry/inquiryapi HTTP/1.1 Host: www-3.ibm.com Content-type: text/xml; charset=utf-8 Content-length:509 SOAPAction: "" <?xml version='1.0' encoding='UTF-8'?> <SOAP-ENV:Envelope xmlns:xsi="http://www.w3.org/1999/XMLSchema-instance" xmlns: The only addition to the normal XML payload in SOAP is the inclusion of HTTP headers. If you want to operate SOAP-over-P2P, you'll transport the SOAP request's XML payload as such, without any headers. If you consider JXTA as an sample P2P network, the transport of SOAP messages will essentially be accomplished through JXTA pipes. Figure 20.1 shows a SOAP-over-P2P application as a box. This application contains two smaller boxes, each representing a module:
Figure 20.1. The SOAP-over-P2P architecture.
The JXTA peer is connected to the JXTA network through a pipe service. JXTA pipes are capable of receiving any type of data payload. For SOAP requests, this pipe will be used to carry XML payloads. The SOAP client is responsible for interacting with SOAP servers. We have shown two SOAP servers in Figure 20.1: a local SOAP server, and a remote SOAP server. The local server can host any applications that this peer would like to host for itself on its own machine. If this application did not have any JXTA module in it, it would be required to own an Internet address (most likely an HTTP URL such as http://www.mySOAPService.com), or a static IP address (like 216.23.4.6) to expose any of its Web services. But with this type of arrangement, it needs neither an HTTP URL nor a static IP address, and it can still host its SOAP services and expose them to the outside world. If you don't believe what we're suggesting, try the application that we'll develop for this chapter. One of your friends can connect his computer to the Internet through normal dial-up (or any other way) and run the application. You can then access his SOAP services from your PC connected to the Internet! This is exactly the purpose of P2P. Every peer is responsible to manage its own content (perhaps through SOAP services or by using any means it feels appropriate), and respond to queries from other peers. There is no longer the need to have central data repositories, search engines, and Web servers. We have also shown a remote SOAP server in Figure 20.1, for the sake of completeness. This remote SOAP server can be any SOAP server over the Internet. Our SOAP-over-P2P application can invoke this remote server through conventional client-server interaction. Other JXTA peers will not know whether the SOAP service being exposed resides locally or remotely. Use Cases for SOAP-Over-P2PWe will now write two major use cases for our SOAP-over-P2P application. The two use cases involve advertising (or publishing) and service invocation. The following actors will appear in this use case analysis:
Advertising Use CaseWhile considering this use case, we are assuming that the service that we want to advertise over a JXTA network is already deployed on our local SOAP server. The deployment of services over a SOAP server is an independent process, and depends on which SOAP server you're using. Because our SOAP-over-P2P application is supposed to work with any SOAP server, we will not consider the deployment process in our use cases. In this use case scenario, the user wants to advertise her SOAP services over a JXTA network. Through a GUI, she will ask the SOAP-over-P2P application to advertise the SOAP service on the JXTA network. The application will ask for the required data (name and description of the SOAP service). The user will provide the required data. The application will create an advertisement according to the data provided, and publish it at all known JXTA rendezvous points. Our SOAP-over-P2P application will also create an input pipe and start listening for service invocation requests. Service Invocation Use CaseFor this use case, we are assuming that you know the name of the SOAP service that you want to invoke. You do not need to know the location of the service implementations (the JXTA network can take care of this, as you'll shortly see), but you still need to know name of the service. The process of finding the name of the service might be part of a UDDI search process, and is not relevant in the present SOAP-over-P2P application. Here, the user wants to invoke a SOAP service named P2PCarRentalService that resides somewhere across the JXTA network. He will ask our SOAP-over-P2P application to find the service. The application will author a search query to find a JXTA pipe service according to the name of the required SOAP service. The application (now acting as a requesting peer) will send the search query to all known JXTA rendezvous points. The rendezvous points will match the pipe services published with them, and also forward the search request to other rendezvous points known to them. If and when the service is found, its advertisement is returned to the requesting peer. Upon receipt of the pipe (SOAP) service advertisement, our SOAP-over-P2P application will open an output pipe and send the message invocation request to the peer who that's hosting the service. The requesting peer might receive more than one response. The reason for multiple responses is because there can be any number of publishers hosting the same SOAP service. Our SOAP-over-P2P implementation will contain both advertising and requesting peers. This will enable the user to use this application for advertising its SOAP services and searching/invoking services from other JXTA peers. Classes in the SOAP-Over-P2P ApplicationBased on the preceding use case analysis, we can decide to implement the following classes in the SOAP-over-P2P application:
We'll now see each of these classes in detail. JXTAPeerJXTAPeer is the main class that provides all JXTA functionality. We have designed the JXTAPeer class so that other JXTA-related classes will inherit from it for specific purposes. For example, Publisher will extend JXTAPeer and provide specific functionality to act as a publisher of SOAP services. The JXTAPeer class is responsible for performing the following functions:
These four functions form the major interface of the JXTAPeer class. In addition, there are a few small functions that will be described after covering the details of the four methods. We developed the JXTAPeer class by customizing different examples provided at JXTA.org. We have copied the licensing information in the JXTAPeer.java file. We'll start with the constructor. Look at the following lines of code from the constructor: public JXTAPeer(){ if (group==null) { try { group = PeerGroupFactory.newNetPeerGroup(); } catch (Exception e) {} objectCount++; }//if (!objectCount) startJXTA(); }//constructor This code makes sure that only one JXTA instance exists at a time. We have kept group as a static variable, so the newNetPeerGroup method will be called only once for all instances of the SOAP-over-P2P application. The variable group is of type PeerGroup. Creating a new PeerGroup is the first step while instantiating JXTA. The current Java implementation of JXTA that we have used in building our SOAP-over-P2P application provides a class PeerGroupFactory, with static methods that can create new peer groups for us. We have used a static method (newNetPeerGroup) of this class to create a NetPeerGroup. According to the JXTA specification, every peer at boot-time (while instantiating JXTA) joins the NetPeerGroup. Later on, a peer can join other groups as well, and there is no limitation on the number of groups a peer can join. The next step is to get references to a few services for our NetPeerGroup. The following lines of code form the startJXTA method that's called from the constructor: groupAdvertisement = group.getPeerGroupAdvertisement(); disco = group.getDiscoveryService(); pipes = group.getPipeService(); We will shortly require discovery and pipe services for this peer group, so we have called the getDiscoveryService and getPipeService methods of PeerGroup class. We will keep a reference to each of these services stored for future use. The pipe service will be used whenever an input or outpipe pipe needs to be created. The discovery service is required while performing a search. This finishes our constructor. We will now have a look at the publishServiceOverJXTAPipe() method of the JXTAPeer class. PublishServiceOverJXTAPipe()The publishServiceOverJXTAPipe() method, as its name implies, will publish our SOAP service over the JXTA network. For this purpose, we will use a JXTA pipe service. A pipe service is a mechanism that enables JXTA applications to send and receive messages. If a JXTA application wants to send a message through a pipe service, it will create an output pipe on the service. Similarly, to receive messages, an application will create an input pipe on the pipe service. Think of a JXTA pipe service as a courier service, and the output and input pipes as the sending and receiving ends, respectively. We will simply create a new pipe service, advertise it on NetPeerGroup, create an input pipe on the pipe service, and return a reference to the newly created pipe. We will use this input pipe to represent our SOAP service. The name of the pipe will be the same as the name of our SOAP service. Other peer applications will search for our pipe service, and when found, create an output pipe to send service invocation messages. Look at the publishServiceOverJXTAPipe method signature: protected InputPipe publishServiceOverJXTAPipe( String ServiceName, String ServiceVersion, String ServiceDescription, String ServiceCreator, String SpecURI, String PipeAdvFile ){ try{ // Entire code for this method to be copied in this try block } catch (Exception ex) { return null;} }// publishServiceOverJXTAPipe This method takes in six parameters. We will use these parameters in creating the input pipe. ServiceName and ServiceVersion are the name and version of the SOAP service, respectively. ServiceDescription is a textual description of the service being published. ServiceCreator is the identification of a company or person advertising this service. SpecURI is a URI to a specification (descriptive) document that may reside anywhere (possibly over the Internet). The last parameter, PipeAdvFile, is perhaps the most important. All JXTA services are specified by advertisements. Whether it is a pipe, discovery, or some other service, its details will be specified through XML-based advertisements. You can think about all JXTA services as logical entities that are supposed to function according to their respective advertisements. PipeAdvFile is the name of an XML file that we will use to advertise the JXTA pipe so that it can be used to exchange method invocation messages. We will shortly provide a sample of such an XML-based advertisement file. The PublishServiceOverJXTAPipe() method follows three steps to publish a SOAP service as an input pipe. First, it creates a shortform pipe advertisement (an XML file that lets everyone know about the existence of a pipe) and publishes it over the JXTA network. This shortform advertisement only proves the existence of a service, and does not provide its details. In the current implementation of JXTA, the ModuleClassAdvertisement class provides the shortform advertisement. The following is the code to create and publish the shortform advertisement: // Step 1: Copy this code in the beginning of try block. ModuleClassAdvertisement mcadv = (ModuleClassAdvertisement) AdvertisementFactory. All advertisements are created from an AdvertisementFactory. After the AdvertisementFactory has created a ModuleClassAdvertisement object, you can call its set methods to specify its name, description, and ID (unique identification). Although the name and description come from the parameters passed to the publishServiceOverJXTAPipe() method, the ID needs to be created by another factory named IDFactory. After setting the name, description, and ID, you will use the DiscoveryService object created earlier in the constructor to publish this information on the local cache, as well as remotely on the NetPeerGroup. The second step is to create a detailed advertisement for our pipe. This is handled by the ModuleSpecAdvertisement class. The purpose of using this advertisement in our application is to enable requesting peers to instantiate our advertisement in the form of a pipe service, so that they can send us method invocation requests through an output pipe. Have a look at the following lines of code that accomplish the creation and publishing of this detailed advertisement: //Step 2, First segment: Copy this code after step 1. //Create a ModuleSpecAdvertisement and //call its set methods to specify parameters. ModuleSpecAdvertisement mdadv = (ModuleSpecAdvertisement)AdvertisementFactory. This code is divided into three segments. In the first segment, you will create a ModuleSpecAdvertisement and use its set methods in exactly the same way that you created a ModuleClassAdvertisement in Step 1. In the second segment, you will create a pipe advertisement by reading from an XML file specified by PipeAdvFile. The XML file will provide an identification (Id), type, and the name of the pipe that we want to advertise. We are going to create a JxtaUnicast-type pipe, which means it will be a unidirectional pipe that can have two end points (one transmitter and one receiver). The JXTA set of specifications also specifies a multicast type of pipe that can connect a single transmitter to many receivers. The following is a simple XML pipe advertisement that can be used for this purpose: <?xml version="1.0"?> <!DOCTYPE jxta:PipeAdvertisement> <jxta:PipeAdvertisement xmlns:jxta="http://jxta.org"> <Id>urn:jxta:uuid-9CCCDF5AD8154D3D87A391210404E59BE4B888209A2241A4A162A109 16074A9504 </Id> <Type>JxtaUnicast</Type> <Name>JXTA-SOAP-SERVER</Name> </jxta:PipeAdvertisement> The root element in this advertisement is PipeAdvertisement, which belongs to the jxta namespace. It contains child elements to specify the ID, type, and name of the pipe being advertised. After you have created a pipe advertisement, you will add it to the ModuleSpec-Advertisement that you created in the first segment. This means our pipe advertisement has to become part of the ModuleSpecAdvertisement. For this purpose, you will create a structured text document (a new empty StructuredTextDocument object), copy the pipe advertisement into it, then copy the StructuredTextDocument into the ModuleSpecAdvertisement. The StructuredTextDocument class helps in the marshaling and demarshaling of XML or non-XML structured content. In our case, we want to load our pipe advertisement, which is XML data. Therefore, we have to specify the media type as text/XML. After the pipe advertisement has been copied into the ModuleSpecAdvertisement, our second segment is finished. In the third segment of Step 2, you will simply publish the completed ModuleSpec-Advertisement, both in the local cache, as well as remotely on the JXTA network. You are now all set to create an input pipe, which will receive SOAP service method invocation requests. You will use the PipeService object named pipes that was created in the JXTAPeer constructor. Have a look at the following lines of code: InputPipe ip = pipes.createInputPipe(pipeadv, ((listener==null)?this:listener)); return ip; You will call the createInputPipe method of the pipes object and pass on two parameters:
We have a separate set method available to specify which object should act as a listener for our input pipe. The current JXTA implementation requires every listener to implement the PipeMsgListener interface. Our JXTAPeer class implements this interface (which is just one method, pipeMsgEvent, that will receive control upon the arrival of a new message) so it can act as a listener. However if the application using our JXTAPeer wants to implement its own message receiving logic, it can call the setMessageReceiver method of the JXTAPeer class to specify the listener. If there is such a listener available, it will be used. If not, the JXTAPeer will itself act as the listener. We will discuss later how to implement application-specific message listening logic (see the discussion on Publisher and Requester classes later in the chapter). CreateOutputPipeAndSendMessage()This method creates an output pipe, and sends a message over it. Our SOAP-over-P2P application needs this functionality for two purposes:
You'll now see how an output pipe is created and a message sent over it. First look at the method signature: public void createOutputPipeAndSendMessage( String ServiceName,//Name of output pipe service. String resBody//Message to be sent.) { //Method body .......................... } This method takes two parameters, namely ServiceName and resBody. ServiceName is the name of the input pipe service over which we want to create an output pipe (the input pipe will be the recipient of our message). We will first search for the input pipe advertisement on the JXTA network whose name matches with ServiceName: OutputPipe myOutPipe;//Output pipe to send the message out. Message msg = null;//The message to be sent. Enumeration enum = null; while (true) { try { enum = disco.getLocalAdvertisements(DiscoveryService.ADV, "Name", "JXTASPEC: The preceding code works on a combination of two methods of the DiscoveryService class: getLocalAdvertisements and getRemoteAdvertisements. The GetLocal-Advertisements method will look for matching advertisements in the local cache. If there are none found, getRemoteAdvertisements will look for matching advertisements remotely on the JXTA network. If found, they will be loaded in the local cache, so that next call to getLocalAdvertisements can find and store them in an enumeration. Your next task is to read the advertisement from the enumeration: ModuleSpecAdvertisement pipeAdvertisement = (ModuleSpecAdvertisement) enum.nextElement(); We have read only the first element from the enumeration in order to keep the logic and this explanation simple. You now have the advertisement stored in an object named moduleAdvertisement. Recall from the discussion of advertising a pipe service (Step 2 of PublishService-OverJXTAPipe method) that we published our pipe service as part of a detailed ModuleSpecAdvertisement. So what you have stored in the moduleAdvertisement object is actually the complete ModuleSpecAdvertisement, from which you will now extract the pipe advertisement. For this purpose, you will use a StructuredTextDocument (recall that we used the same class in copying a pipe advertisement into a module specification advertisement): try { StructuredTextDocument paramDoc = (StructuredTextDocument) mdsadv.getParam(); String pID = null; String pType = null; Enumeration elements = paramDoc.getChildren("jxta:PipeAdvertisement"); elements = ((TextElement) elements.nextElement()).getChildren(); while (elements.hasMoreElements()) { TextElement elem = (TextElement) elements.nextElement(); String nm = elem.getName(); if(nm.equals("Id")) { pID = elem.getTextValue(); continue; }//if if(nm.equals("Type")) { pType = elem.getTextValue(); continue; }//if }//while //code blocks A and B should be copied here } catch (Exception ex) { } The preceding code reads the Id and Type children of the jxta:PipeAdvertisement element. You will now form a pipe advertisement from the Id and Type values: //code block A PipeAdvertisement pipeadv = (PipeAdvertisement) AdvertisementFactory.newAdvertisement( You are now all set to create an output pipe based on the pipe advertisement that we just formed, then author a message and send it on the output pipe: //code block B myOutPipe = pipes.createOutputPipe(pipeadv, 11000); msg = pipes.createMessage(); msg.setString("ServiceName", ServiceName); msg.setString("SOAPResponse", resBody); myOutPipe.send (msg); This finishes our discussion of creating an output pipe and sending a message over it. The JXTAPeer class also has three other small methods. SetInputPipeMessageListenerThis method designates an object that will receive all messages destined for the input pipe that we created in the PublishServiceOverJXTAPipe() method: public void setInputPipeMessageListener(PipeMsgListener msgListener){ listener = msgListener; } PipeMsgEventThis method is part of the PipeMsgListener interface that JXTAPeer implements in order to receive pipe messages. This method doesn't do anything, and is meant to be overridden in subclasses: public void pipeMsgEvent ( PipeMsgEvent event ){ } SetMessageReceiverThis method specifies a JtextArea object that will display all messages (including the SOAP response message) on the GUI: public void setMessageReceiver(JTextArea msgReceiver){ receiver = msgReceiver; }//setMessageReceiver We will now see how our Publisher and Requester classes will extend the JXTAPeer class. Most of the functionality required by the publishing and requesting processes is already covered in the JXTAPeer class. Therefore, these two classes only need to implement logic specific to publishing and requesting processes. PublisherThis class is responsible for performing the following functions:
The first and last tasks are already implemented by the publishServiceOverJXTAPipe and createOutputPipeAndSendMessage methods of the JXTAPeer class. Application-level logic (for example, GUI classes) can directly call these methods to publish SOAP services and send responses. We only need to take care of the middle two points in the Publisher class. The interface of the Publisher class is very simple. There are only two methods a constructor and a method named pipeMsgEvent. The constructor relies entirely on the methods of the JXTAPeer (super) class, while the pipeMsgEvent method implements the middle two points. Publisher ConstructorThe Publisher constructor simply calls the JXTAPeer constructor (super) and relies on it to check whether a JXTA instance already exists, and to start JXTA accordingly. public Server() { super(); setInputPipeMessageListener(this); }//constructor After calling the super's constructor, the Publisher constructor also sets itself as the listener for receiving all input pipe messages. This is important, because we need to implement comprehensive logic for SOAP service invocation requests. All of this is handled in the pipeMsgEvent method. PipeMsgEventThis method performs the following tasks:
Let's see how all this is accomplished. As usual, first have a look at the method signature: public void pipeMsgEvent ( PipeMsgEvent event ){ //method body } This method takes only one parameter event, an object of type PipeMsgEvent. The event object holds the complete message received from the requesting peer, so your first step should be to extract the message from the event object. You will call the getMessage method of the PipeMsgEvent class that returns the complete message: Message SOAPRequest = event.getMessage(); Next you will read the name of the service being invoked from the received message: String SOAPServiceName = SOAPRequest.getString("ServiceName"); Now it's time to author a SOAP request. You will author a very simple hard-coded SOAP request, in which the only dynamic part is the name of the service. SOAP request authoring requires the creation of an XML file that contains a SOAP envelope, a SOAP body, and service-related elements. The following code authors the complete XML payload of our simple SOAP request: // SOAP authoring: StringBuffer sh = new StringBuffer(); sh.append("<?xml version=\'1.0\' encoding=\'UTF-8\'?>\r\n"); sh.append("<SOAP-ENV:Envelope"); sh.append("\r\n"); sh.append(" xmlns:xsi=\"http://www.w3.org/1999/XMLSchema-instance\" "); sh.append("\r\n"); sh.append(" xmlns:SOAP-ENV=\"http://schemas.xmlsoap.org/soap/envelope/\" "); sh.append("\r\n"); sh.append(" xmlns:xsd=\"http://www.w3.org/1999/XMLSchema\">"); sh.append("\r\n"); sh.append( " SOAP-ENV:encodingStyle=\"http://schemas.xmlsoap.org/soap/encoding\">"); sh.append("\r\n"); sh.append(" <SOAP-ENV:Body>"); sh.append("\r\n"); sh.append("<NS:invoke xmlns:NS='"+SOAPServiceName+"'>"); sh.append("</NS:invoke>"); sh.append(" </SOAP-ENV:Body>\r\n"); sh.append("</SOAP-ENV:Envelope>\r\n"); The preceding code simply takes a StringBuffer and adds a hard-coded SOAP request to it. The only dynamic part is the name of the service that appears within the SOAP-Env:Body element. You will now add HTTP headers to this SOAP request and send it to a local SOAP server. We have used a simple HTTP client implementation named HttpConnection for this purpose: // HTTP related stuff. HttpConnection connection; String response = ""; try{ connection = new HttpConnection("http://localhost/soap/servlet/rpcrouter", 8080, This is a very simple use of HTTP for SOAP transport between a SOAP client (our SOAP-over-P2P application) and a SOAP server. The last step is to send the SOAP response back to the requesting peer. You will need to perform the following two steps for this purpose:
This is accomplished by the following lines of code: String ResponsePipeName = SOAPRequest.getString("SOAPResponse"); createOutputPipeAndSendMessage(ResponsePipeName,response); RequesterThe Requester class is responsible for performing the following tasks:
The Requester class depends entirely on its parent JXTAPeer class for all its functions. GUI classes will create a Requester object, and call its methods to perform the first two of the preceding tasks. The third task is handled by the pipeMsgEvent method in the following simple lines of code, which are self-explanatory: public void pipeMsgEvent ( PipeMsgEvent event ){ receiver.setText(receiver.getText()+"Response received:\n"); Message SOAPMessage = event.getMessage(); receiver.setText( receiver.getText()+SOAPMessage.getString("SOAPResponse")+":\n"); } Graphical User InterfaceThe GUI class (JxtaGui) is a very simple class that contains the following:
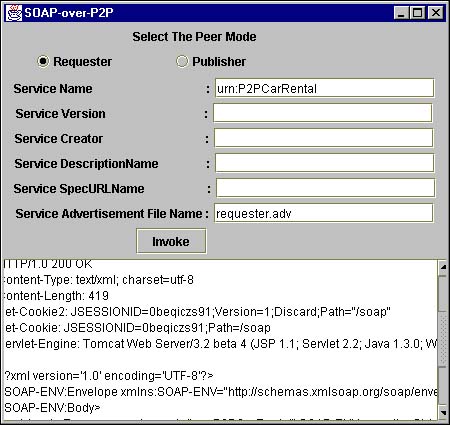
The GUI can be seen in Figure 20.2. Figure 20.2. The GUI for the SOAP-over-P2P application.
The JxtaGui class has a main method that calls the class constructor. The constructor will instantiate the GUI components, manage their layout, and display them. The JxtaGui constructor also contains handlers for data entry events, such as typing in the text fields and pressing buttons. The event handler for the Publisher/Requester button is the most important one. When the user presses the Publisher or Requester button (whose caption changes according to the mode selected), the event handler for the button is called: button.addActionListener(new java.awt.event.ActionListener() { public void actionPerformed(ActionEvent e) { if (button.getText().equals("Publish")){ publisher.publishServiceOverJXTAPipe( ServiceName, ServiceVersion, ServiceDescription, ServiceCreator, ServiceSpecURL, ServiceAdvertisementFileName ); } else if (button.getText().equals("Invoke")){ requester.publishServiceOverJXTAPipe( "requester", ServiceVersion, ServiceDescription, ServiceCreator, ServiceSpecURL, ServiceAdvertisementFileName ); requester.createOutputPipeAndSendMessage( ServiceName,"requester"); } } }); In the preceding code, you will first check whether the user wants to publish or request. If the user wants to publish, it calls the publishServiceOverJXTAPipe method of the publisher object and passes on the values read from the GUI. If the user wants to send a SOAP service invocation request, the application needs to perform the following two tasks:
How to Use the SOAP-over-P2P ApplicationThe following are the simple steps for using the SOAP-over-P2P application:.
As a sample setting, we tested this application on a single isolated machine. We started two instances of JXTA Shell (installed on separate locations within the same machine), with each shell acting as a rendezvous service for the other. Each of the two shells were listening at different ports. Next we started two instances of the SOAP-over-P2P application (again, installed on separate locations within the same machine). One SOAP-over-P2P instance had one of the shells in its list of available rendezvous services. Similarly, the other SOAP-over-P2P instance was using the rendezvous service provided by the second shell. We used one SOAP-over-P2P instance to publish a SOAP service. We had the publisher.adv file in the same directory where the SOAP-over-P2P.jar was located. This is accomplished by executing the JAR file, selecting the Publish radio button, entering the name of a SOAP service in the Service Name field, and pressing the Publish button. We had a SOAP service with matching name hosted on our Apache SOAP server hosted at http://localhost:8080/soap/servlet/rpcrouter. We used the other SOAP-over-P2P instance as a requester. We had the requester.adv file in the same directory where the SOAP-over-P2P.jar for the requester instance was located. We selected the Requester radio button, typed the name of the service that we want to invoke on the Publishing peer, and pressed the Request button. We had to wait for a while, in which the following things happened:
After all these steps are finished, the SOAP response was displayed on the display text window of the requesting peer. |