| iMovie can easily import photos you've scanned or taken with a digital still camera. iMovie makes this process easier by giving you access to your iPhoto library of pictures. To import pictures from iPhoto: 1. | In the Media pane, click the Photos button to view the Photos list (Figure 9.1).
Figure 9.1. All the pictures in your iPhoto library are accessible from within the Photos pane. 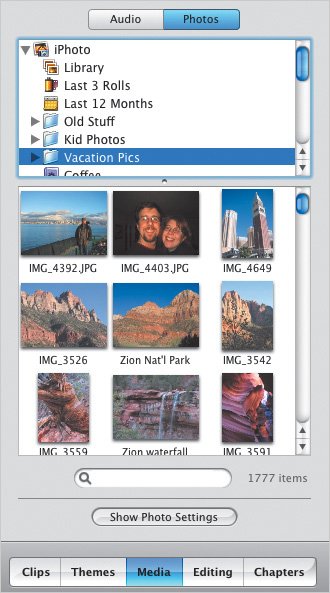
| 2. | Your entire photo library is shown in the preview area. If you want to access a specific photo album, choose its name from the list. You can also type a name into the search field to locate pictures based on their titles (Figure 9.2).
Figure 9.2. Use the search field to quickly locate photos using names you assigned to them in iPhoto. 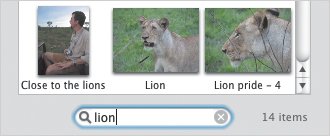
| | | 3. | Click a photo to select it for importing. A preview appears in the Monitor. Using the Preview controls, you can (Figure 9.3):
- Click the Play button to start or stop playback of the preview.
- Click the Loop button to start or stop continuous playback.
- Drag the Preview playhead in the preview's scrubber bar.
- Click the Hide Preview button (marked X) to cancel the photo.
- Click the Apply button (marked with a checkbox) to apply the photo, which adds it to the Timeline.
Figure 9.3. Use the Preview controls to see how the rendered photo will appear. 
The Photo Settings palette also appears (Figure 9.4). If the Ken Burns Effect is enabled, click the checkbox to turn it off for now. We'll cover Ken Burns later in this chapter.
Figure 9.4. The floating Photo Settings palette appears when you select a photo or click the Show Photo Settings button. 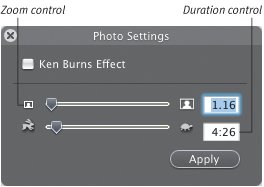
| | | 4. | When imported, the photo is treated as a video clip, so set the clip's length by using the Duration slider, or type a value in the Duration field (in timecode's seconds:frames format).
| 5. | For most photos, iMovie doesn't automatically scale the image to fit the screen. To compensate, use the Zoom slider or field to enlarge the picture slightly (see next page).
| 6. | Drag the picture from the Photos pane to the Timeline, where it appears as a regular clip (Figure 9.5). Or, click the Apply button to add the picture to the end of the Timeline.
|
Figure 9.5. Imported photos appear in the Timeline just like other video clips. The small square icon in the Clip Viewer indicates that a clip is a still picture. 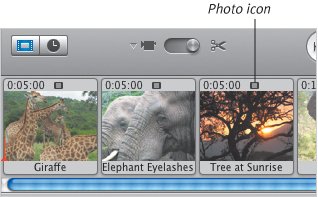
Tips  | Command-click to select multiple photos at once, then drag them to the Timeline. The number to the right of the search field indicates the number of pictures in the selected photo album. Do you shoot movies using the video capture feature on your digital still camera? If you use iPhoto to import you pictures to your Mac, those movies also show up in the Media pane's Photos list. As with photos, simply drag them to the Timeline to add them to your movie. Double-click a movie file in the Photos list to preview it. The video plays only within the icon's thumbnail, but that's enough to get a sense of what the clip is (especially if it's named something like "MVI_0379.AVI"). One more tip on working with movies in iPhoto: I created a Movies smart album in iPhoto (set up a few "Filename contains" selectors to match common video file extensions such as .mov and .avi). That way I can display all my movie clips without hunting for them.
|
Dealing with black borders DV video resolution isn't as cut and dried as it may seem. For example, although your movie may appear to be 640 by 480 pixels, video pixels are actually rectangular, not square, so the actual resolution is closer to 720 by 480 pixels. iMovie HD uses a new scaling algorithm that takes discrepancies like this into account, but it leads to the imposed black borders as shown in Figure 9.6. It's easy enough to change the Zoom setting to compensate, but I'd rather not tweak it for every picture. Instead, prepare your pictures in iPhoto to make them fill iMovie's screen. (Also see "Importing Pictures from Other Sources," later in this chapter.) Figure 9.6. Importing a photo with no zoom applied results in black borders on the sides. Eww. 
To prepare pictures in iPhoto 6: 1. | In iPhoto 5, double-click a photo you want to import into iMovie to edit it.
| 2. | From the Constrain popup menu, choose Custom and enter the following values, depending on the format of your project (Figure 9.7):
- DV, MPEG-4, and iSight: 4.09 x 3
- DV Widescreen: 1.818 x 1
- HDV 1080i and 720p: 16 x 9
Figure 9.7. Set a custom constraint in iPhoto to crop your images before importing them into iMovie. 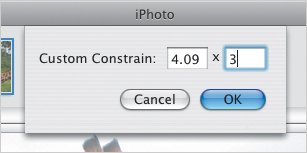
| 3. | Drag the selected area to position which area of the photo is to remain visible (Figure 9.8).
Figure 9.8. After setting the constrain values in iPhoto, position the visible area and then crop the image. 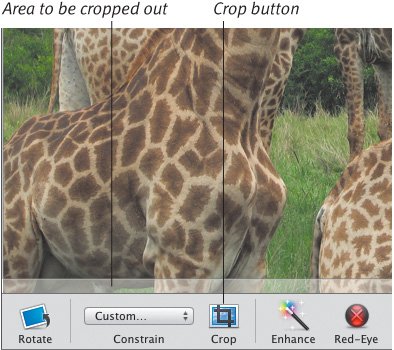
| 4. | Click the Crop button.
| 5. | Click Done.
| 6. | Import the photo according to the directions on the previous page.
|
Tip
|