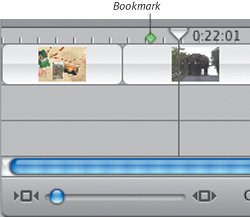
Using Bookmarks
When editing long movies, it's sometimes difficult to locate a particular scene without scrubbing through the movie in the Monitor. iMovie's bookmarks let you set placeholders that are easy to locate. Bookmarks don't appear in your final movie in any waythey exist purely for your organizational
To set a bookmark:
To delete a bookmark:
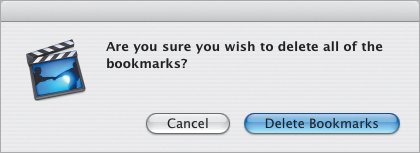
To delete all bookmarks:
To jump to bookmarks:
|
Editing ClipsRemember in Chapter 2 when I advised you to shoot plenty of footage? Take a moment to look back on those lingering, leisurely days, because in this chapter you're going to chop your film into the smallest pieces you can, and still keep it comprehensible. Part of your job as editor is to arrange the many pieces into a unified whole, but you also want to keep your audience awake. Direct Trimming
Direct Trimming
lets you edit a clip directly in the Timeline in such a way that
Think of Direct Trimming as working with a page of rolled-up blueprints. If you want to view just one portion of the plans, you roll the edges in to hide the rest of the design. In an iMovie video or audio clip, you can hide the frames you choose not to use in your movie. If you need those frames later, you can simply unroll the edges of the clip to display the footage. Direct Trimming works only in the Timeline Viewer, though you'll discover that this style of editing affects cuts made in the Monitor as well. To edit a clip using Direct Trimming:
To recover footage using Direct Trimming:
Tips
Other editing
|
|
1. |
Position the Playhead at the point where you want to split the clip.
|
|
2. |
Choose Split Video Clip at Playhead from the Edit menu, or press Command-T. A new clip is created and placed next to the original (
Figure 8.25
). iMovie appends a slash and number to the
Figure 8.25. Use the Split Video Clip at Playhead command to slice a clip into two separate clips.
|
Tips
|
|
|
Get In, Get Out
There are times when long, lingering shots can define a scene or even an entire moviebut not many. When you're editing, concentrate on making your movies
tight
, showing only the essential shots within your scenes. For example, it's a good idea to have an establishing shot of a room, and perhaps a person opening the door. But you don't need to show him closing the door, walking to the center of the room, and beginning a conversation. Jump right to the conversation, since that's probably the
Of course, there are always exceptions (watching 2001: A Space Odyssey immediately comes to mind), but a tighter film is almost always a better film. |
To select portions of a clip:
|
1. |
Select a clip and place the mouse pointer just below the Scrubber Bar where you want to start the selection (
Figure 8.26
).
Figure 8.26. Position the mouse pointer just below the Scrubber Bar at the beginning of your selection.
|
|
2. |
Click and drag to make a selection, which is highlighted in yellow (
Figure 8.27
) in the Scrubber Bar and in the Timeline Viewer. The Monitor playback
Figure 8.27. Click and drag to create a selection, which appears in yellow.
|
|
3. |
Move the crop markers to fine-tune your selection.
|
Tips
|
|
|
To trim a clip:
|
1. |
Select a portion of a clip.
|
|
2. |
Choose Clear or Cut from the Edit menu, or press the Delete key. The selection is removed (
Figure 8.29
).
Figure 8.29. Trimming deletes selected frames. The remaining segments become two separate clips. (If you trim from the beginning or end of a clip, you end up with just one smaller clip.)Before trimming
After trimming
If you chose to cut the selection, it will be stored in the Mac's Clipboard. |
To crop a clip:
|
1. |
Select a portion of a clip.
|
|
2. |
Choose Crop from the Edit menu, or press Command-K. The selection is retained, and the rest of the clip's frames are deleted (
Figure 8.30
).
Figure 8.30. Cropping works
|
Tips
|
|
|
To copy and paste a selection to a new clip:
|
1. |
Select a portion of a clip.
|
|
2. |
Choose Copy from the Edit menu, or press Command-C. The selection is stored in your Mac's Clipboard.
|
|
3. |
Select any clip in the Clips pane, then choose Paste from the Edit menu (Command-V). iMovie creates a new clip.
Figure 8.31. When pasting a
|
To duplicate a clip:
|
1. |
Select the clip in the Timeline or the Clips pane.
|
|
2. |
Choose Copy from the Edit menu.
|
|
3. |
Choose Paste from the Edit menu. A new, identical clip appears beside the original (
Figure 8.32
).
Figure 8.32. Duplicating creates an exact clone of the original, so it's a good idea to rename the new clip.
|
To duplicate a clip by Option-dragging:
|
1. |
Select the clip in the Clips pane.
|
|
2. |
Option-drag the clip to an empty space in the Clips pane (
Figure 8.33
).
Figure 8.33. In the Clips pane, hold down Option and drag a clip to an empty slot to create a clone of the original.
|
Tips
|
|
|