| Including multiple sections within each section area of your report provides for an extremely flexible presentation of your report data. Chances are good that you do not need to create more than one occurrence of any of the existing report sections for basic reporting needs. However, Crystal Reports enables you to define multiple report sections within any given section area and to identify section-specific properties for challenging formatting requirements within more complex reports. Certain reporting tasks are performed most efficiently by creating multiple sections within an area. For example, multiple report sections would be very useful if you want to create a form letter for your customers and you need to display only one of two possible return addresses on the letteran American address for customers based in the United States and a Canadian address for the Canadian customers. To accomplish this, you do need to insert two report header sections into your report and use Conditional Formatting to dynamically apply the appropriate return address based on where the customer is located. To demonstrate how to implement and use multiple report sections, you first need to review the basic operations of resizing, inserting, removing, and merging report sections. Resizing Report Sections Report sections might require resizing to accommodate for various sized report objects, such as large database fields, lengthy text objects, or corporate logo images, but they cannot exceed the size of the report page itself. From the Design tab of the report environment, you can drag the bottom boundary of the various sections up and down with the mouse to resize each section. Using the mouse, float the pointer over the horizontal boundary lines of the different sections. When the mouse pointer changes into a double-headed arrow icon, click and hold the left mouse button while dragging the boundary line to the desired position. Inserting New Report Sections To display only one of two possible return addresses on a form letter based on the country of the customer, you need to insert a second page header onto the report. The following steps walk you through constructing the following report using the Customer table from the Xtreme Sample Database: 1. | Create a new Crystal Report using the standard Report Wizard, connecting to the Xtreme Sample database and selecting the Customers table. Do not add any database fields to the report. Click the Finish button at the Fields Selection dialog.
| 2. | Create a Group (by choosing Insert, Group) based on the Customer Name field, but remove the Customer Name field from the Group header section. The Group field should have automatically appeared in the Group Header section when you created the group.
| 3. | Select the New Page After property for the Group Footer #1 section.
| | | 4. | Ensure that the Report Header section is suppressed.
| 5. | Create and insert text objects in the appropriate report sections, as shown in Figure 7.10.
|
Figure 7.10. This simple form letter report shows the correct return address conditionally. 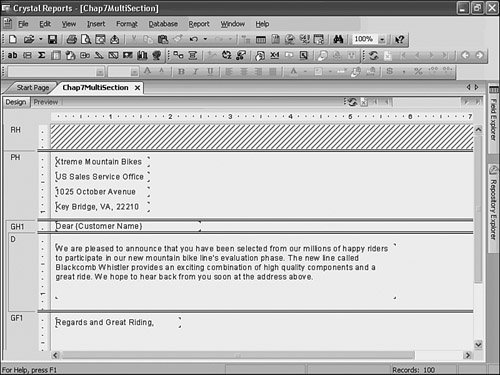
Note Notice that in this sample form letter report, each report object displayed on the report is just a text object inserted into the appropriate section. There are no database fields included in the report yet.
Next you will insert a new Page Header in which to display an alternate return address for Canadian customers. The following steps will take you through this process: 1. | To insert a new Page Header section, locate the existing Page Header section, right-click on the section name (on the left of the design environment), and select Insert Section Below from the pop-up menu.
The new section is entitled Page Header b and the original section was renamed to Page Header a so that there are now two Report Header sections within your report. The application follows this naming convention whenever multiple report sections are added.
| | | 2. | After you have inserted a new Page Header section (labeled Page Header b), insert text objects to display a Canadian return address to be used for the non-U.S.-based recipients of the form letter, as shown in Figure 7.11.
Figure 7.11. The form letter report now shows two Page Header sections. 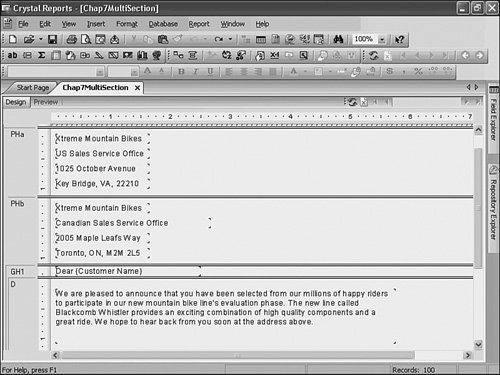
Now that the report has the two different return addresses and report sections created, the logic must be created within the report to implement the appropriate Page Header section based on each customer's locationwhether they are based in the United States or Canada. Each customer's mailing address needs to be evaluatedthe Country field from the Customer table. For this example, you're only concerned with North American customers, and if this field is equal to USA, use Page Header a to display the return address. If it is equal to Canada, use Page Header b.
| 3. | To isolate your report for only North American (excepting Mexico) customers, choose the Select Expert option from the Report menu. From the list of available fields, select the Country field from the Customer table listing and click OK to continue.
| 4. | You should now see the Select Expert dialog. From the drop-down list on the left, select Is One Of and include Canada and USA in the list box.
| 5. | To add additional personalization to the form letter, use the Field Explorer to insert the Customer Name field into the Text Objectlocated in the Group Header #1 that reads "Dear Customer,"so that it appears as Dear {Customer Name} in the Design tab of your report. To do this, you'll need to modify the text portion of this combined object to read "Dear" (the word Dear followed by a space), and then followed by the database field object.
Finally, you need to apply the logic to display the appropriate return address on the form letter. To do this, you apply a conditional formatting statement (format formula) to each of the two Page Header sections.
| | | 6. | Using the Section Expert for Page Header a, click on the x+2 button (with the pencil symbol) located directly to the right of the Suppress (No Drill-Down) option on the Common tab. After clicking this icon, you should be presented with the Format Formula Editor dialog (see Figure 7.12). Here, you can use the Field, Function, and Operator windows (located in the upper area of the dialog) to insert the necessary format formula within this dialog, or you can just type in the statement in the lower area of the Editor dialog so that it reads {Customer.Country} = "Canada". After you have inserted this statement, click Save and Close to return to the Section Expert. Note that the x+2 button has changed color (to red) to signify a conditional formula has been created here.
Figure 7.12. The report section is suppressed only if the conditional statement defined in the Format Formula Editor is true. 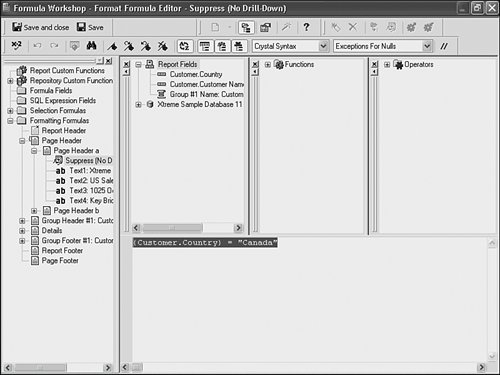
| 7. | You now need to implement a very similar formatting condition for the Page Header b section. Following the same procedure used for the first section, use the Section Expert to insert a statement that reads {Customer.Country} = "USA".
Note You do not need to check the Suppress (No Drill-Down) check box in the Section Expert dialog for either report Page Header section. By inserting a format formula, you have effectively applied conditional formatting that suppresses the section if the format formula is found to be true. In this case, one of the two format formulas should always be true because the customers are either located in the United States or Canada. | 8. | Close the Section Expert dialog by clicking OK. As shown in Figure 7.13, your report should now display only one of the two possible return addresses on the form letter. To verify that the appropriate return address is being populated on the form letter report for each customer, you can easily add the Country field from the Customer table into the Group Header #1 section, also shown in Figure 7.13.
|
Figure 7.13. A simple form letter report is now dynamically formatted with the appropriate return address based on the customer's location. 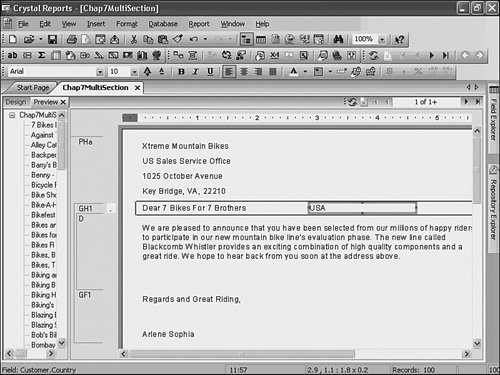
Deleting Report Sections In much the same manner sections were inserted, unused report sections can be removed from reports quickly by right-clicking on the section name and selecting Delete Section from the pop-up menu. Be aware, however, that any report objects positioned within the section are also deleted from the report. If any of the objects within a section that will be removed are required, they will need to be relocated into alternative report sections before deletion. Note Crystal Reports requires at least one section to be present for certain section types in every reportthe Report Header and Footer, Page Header and Footer, and Details sections. These report sections are generated by default when creating new reports. Also, if Group objects exist within a report, you cannot remove the Group Header and Footer sections unless you first remove the Group object itself from the report.
Merging Report Sections When designing reports, you might periodically want to merge two report sections to simplify the layout of a report. To merge the two Page Header sections from your earlier example, right-click on the Page Header a section title and select Merge Section Below from the pop-up menu. The Merge Section Below command is available from the right-click menu of any report section that meets two criteria: There are more than one of the given section type (Page Headers) within the Section Area. The section is not last in a series of sections (Page Headers) consisting of the same section types within a common area.
For example, if three Page Header sections are present on a report (as shown in Figure 7.14), the Merge Section Below command would be accessible from the right-click menus of Page Header a and Page Header b, but not from Page Header c. Figure 7.14. The Merge Section Below command is available from the right-click menu of certain report sections. 
|