| Remember in Chapter 2 when I advised you to shoot plenty of footage? Take a moment to look back on those lingering, leisurely days, because in this chapter you're going to chop your film into the smallest pieces you can, and still keep it comprehensible. Part of your job as editor is to arrange the many pieces into a unified whole, but you also want to keep your audience awake. iMovie offers four methods for editing clips: splitting, which divides a clip where the Playhead is located; trimming, which deletes a selection of frames; cropping, which deletes the frames that aren't selected; and copying and pasting, which creates a new clip based on selected frames. These actions can be performed on clips that are on the Shelf or in the Viewers. Remember that you can use Undo to easily cancel up to the last 10 edits you've made. Also, you can always resurrect clips that have been cut up (see "Restoring Clips" at the end of this chapter). To split a clip: Position the Playhead at the point where you want to split the clip. Choose Split Video Clip at Playhead from the Edit menu, or press Command-T. A new clip is created and placed next to the original (Figure 8.7). iMovie appends a slash and number to the name to indicate it's a partial clip (such as "Trees/1"). Figure 8.7. Use the Split Video Clip at Playhead command to slice a clip into two separate clips. 
 Tips Tips
This command works wherever the Playhead is located you don't need to select a clip in order to split it. After splitting, the two clips are still selected. To deselect the clips, click the top of the Viewer, or select another clip.
Get In, Get Out There are times when long, lingering shots can define a scene or even an entire movie but not many. When you're editing, concentrate on making your movies tight, showing only the essential shots within your scenes. For example, it's a good idea to have an establishing shot of a room, and perhaps a person opening the door. But you don't need to show him closing the door, walking to the center of the room, and beginning a conversation. Jump right to the conversation, since that's probably the core action of the scene. This advice applies to all types of movies: for your trip to the zoo, jump straight to the lions; we don't need to see you bounce along the pathway looking for directions. Of course, there are always exceptions (watching 2001: A Space Odyssey immediately comes to mind), but a tighter film is almost always a better film. |
To select portions of a clip: Locate the crop markers at the left side of the scrubber bar (Figure 8.8). Figure 8.8. Unlike iMovie 2, the crop markers are always visible in iMovie 3.  Click and drag to make a selection, which is highlighted in yellow (Figure 8.9). The Monitor playback follows your pointer so you can see the frames being selected. Figure 8.9. Click and drag to create a selection, which appears in yellow.  or Shift-click in the scrubber bar to make a selection. Move the crop markers to fine-tune your selection.
Tips Click on another clip or at the top of the Timeline Viewer to deselect the frames. You can also choose Select None from the Edit menu (Command-Shift-A). If you move the right crop mark past the left crop mark, it becomes the left mark (Figure 8.10). However, if you use the Shift-click method, the selection is extended in the direction based on which crop mark is closest. Figure 8.10. Dragging one crop marker past the other swaps their positions (right becomes left, or left becomes right). This allows you to make a different selection in only one mouse move instead of several.  With a selection made on the scrubber bar, choose Select All from the Edit menu (or press Command-A) to highlight all the frames in the clip; conversely, choose Select None from the Edit menu (or press Command-Shift-A) to cancel your selection. This only works when you have a single clip selected; otherwise it selects or deselects all clips in your movie. The crop markers can be finicky at times. If you're positioning your pointer beneath the scrubber bar and not seeing the ghosted markers, try clicking and dragging anyway to force their appearance.
To trim a clip: Select a portion of a clip. Choose Clear or Cut from the Edit menu, or press the Delete key. The selection is removed (Figure 8.11). Figure 8.11. Trimming deletes selected frames. The remaining segments become two separate clips. (If you trim from the beginning or end of a clip, you end up with just one smaller clip.)  If you chose to cut the selection, it will be stored in your Mac's Clipboard.
To crop a clip: Select a portion of a clip. Choose Crop from the Edit menu, or press Command-K. The selection is retained, and the rest of the clip's frames are deleted (Figure 8.12). Figure 8.12. Cropping works opposite to trimming. The frames outside the selection are deleted. 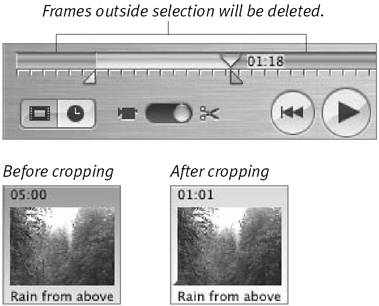
To copy and paste a selection to a new clip: Select a portion of a clip. Choose Copy from the Edit menu, or press Command-C. The selection is stored in your Mac's Clipboard. Select any clip on the Shelf, then choose Paste from the Edit menu (Command-V). iMovie creates a new clip. or Position the Playhead in your movie to the location where you want the clip to appear, then paste it. iMovie inserts the new clip at that point, splitting any clip that was present and pushing its remaining footage to the right (Figure 8.13). Figure 8.13. When pasting a copied selection into your movie, the new clip splits any existing clip at the Playhead and pushes its parts out of the way. 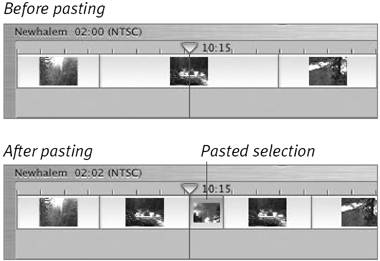
To duplicate a clip: Select the clip in the Timeline or Shelf. Choose Copy from the Edit menu. Choose Paste from the Edit menu. A new, identical clip appears beside the original (Figure 8.14). Figure 8.14. Duplicating a clip creates an exact clone of the original, which is why it's a good idea to rename the new clip. 
To duplicate a clip by Option-dragging: Select the clip in the Shelf. Option-drag the clip to an empty space on the Shelf (Figure 8.15). Figure 8.15. In the Shelf, hold down Option and drag a clip to an empty slot to duplicate it. 
Tips Consider renaming your new dragged or pasted clip, since it will share the original's name. You can edit clips by trimming, cropping, or cutting and pasting in the Shelf. However, what's nice about doing it in the Clip Viewer or Timeline Viewer is that the new clips are already positioned within your movie.
|