| The first Web Part is called the Employee Locator Web Part; it browses through a list of employees in the SharePoint dashboard. Employee information might be stored in Oracle, SQL Server, or other relational databases. For the purpose of this Web Part, we will assume that it is stored in SQL Server 2000, but it really does not matter which backend database is used. The code will mainly stay the same. Creating Employees Table To simplify the process, I have used the employees table from a sample SQL Server database that is shipped with SQL 7 and SQL 2000 (the Northwind database), and added a field to the table for an email address. Figure 15.6 shows the data structure of the Employees table used for this example. Figure 15.6. This figure displays the Employees table data structure after adding an email field. 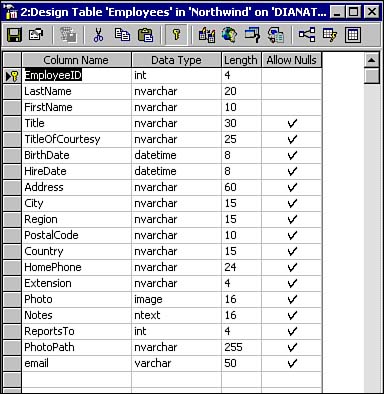 Creating an XML File from Employees Information In the first version of the Employee Locator, we will create an XML file from the employees table, so we need to Listing 15.3 shows the VBScript code required to create an XML file from employees table. Figure 15.7 shows the result. Figure 15.7. Displays the content of the employee1.xml file generated through code in Listing 15.3 when it is opened with IE version 5 or higher. 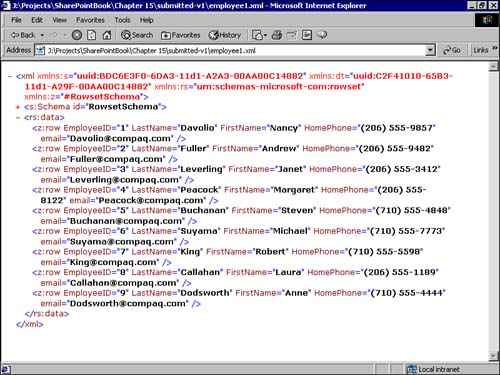 Listing 15.3 The following VBScript code generates an XML file from Employees Table. Option Explicit Const adPersistXML = 1 Const adUseClient = 3 Const adOpenKeyset = 1 Const adLockOptimistic = 3 Dim strConnection Dim rs Dim strSQL strConnection = "Provider=SQLOLEDB;Data Source=dianatr;Initial Catalog=NorthWind;User  Id=sa;Password=;Connect Timeout=30;" strSQL = " select EmployeeID, LastName, FirstName, HomePhone, email from Employees " set rs = CreateObject ("ADODB.RECORDSET") rs.CursorLocation = adUseClient rs.Open strSQL, strConnection, adOpenKeyset, adLockOptimistic rs.Save "employee 1.xml", adPersistXML rs.close Id=sa;Password=;Connect Timeout=30;" strSQL = " select EmployeeID, LastName, FirstName, HomePhone, email from Employees " set rs = CreateObject ("ADODB.RECORDSET") rs.CursorLocation = adUseClient rs.Open strSQL, strConnection, adOpenKeyset, adLockOptimistic rs.Save "employee 1.xml", adPersistXML rs.close Creating an XSL File for Data Transformation The next step is to transform the XML file into an HTML file, so we can show it in the Web Part. For this purpose, we created an XSL file that extracts the attributes (LastName, HomePhone, and email) of each row element (z:row) from the rs:data node. Then the address of each row, with respect to the root (xml), will be xml/rs:data/z:row. Example 15.4 List The XSL Code That Has Been Used for Formatting the XML File <?xml version="1.0"?> <xsl:stylesheet xmlns:xsl="http://www.w3.org/TR/WD-xsl"> <xsl:template match="/"> <HTML> <BODY> <TABLE width="420"> <TR bgcolor="Black"> <TD width="130"><font face="Verdana" size="1" color="white"> <b>NAME</b></ font></TD> <TD width="110"><font face="Verdana" size="1" color="white"> <b>PHONE</b></ font></TD> <TD width="150"><font face="Verdana" size="1" color="white"> <b>EMAIL</b></ font></TD> </TR> <xsl:for-each select="xml/rs:data/z:row"> <TR bgcolor="#ffdead"> <TD><font face="Verdana" size="1" color="black"><xsl:value-of select="@LastName"/></ font></TD> <TD><font face="Verdana" size="1" color="black"><xsl:value-of select="@HomePhone"/ ></font></TD> <TD><font face="Verdana" size="1" color="black"><xsl:value-of select="@email"/></ font></TD> </TR> </xsl:for-each> </TABLE> </BODY> </HTML> </xsl:template> </xsl:stylesheet> NOTE If you are new to XML and XSL you may want to take a look at the following resources for a quick start. http://www.xml101.com/ http://msdn.microsoft.com/library/default.asp?url=/library/en-us/xmlsdk30/htm/xmtutxmltutorial.asp http://msdn.microsoft.com/library/default.asp?url=/library/en-us/xmlsdk30/htm/xmtutxmltutorial.asp
Creating the Web Part To create the Employee Web Part, we need to apply the XSL file (employee1.xsl) to the XML file (employee1.xml). We follow the steps mentioned in the "Date Web Part" section for creating a new Web Part, up until the advanced settings. At this point there are three options to integrate XML and XSL files for the Web Part. Using XML as Content Type -
In the Advanced Settings, we select XML as the Content Type, and copy and paste the XML file into the Embedded content text area. We also copy and paste the XSL file into the Embedded XSL text area section (Figure 15.8). Figure 15.8. This figure shows how the Advanced Settings screen will look after having copied the code into the embedded text areas. 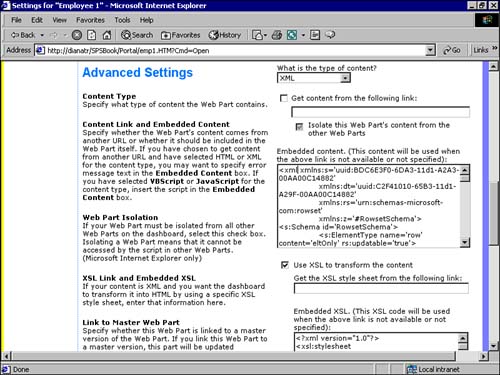 -
Save the settings. We are now done with the Employee Locator Web Part (Figure 15.9). Figure 15.9. This figure shows the final form of the Employee Web Part in the Home dashboard. 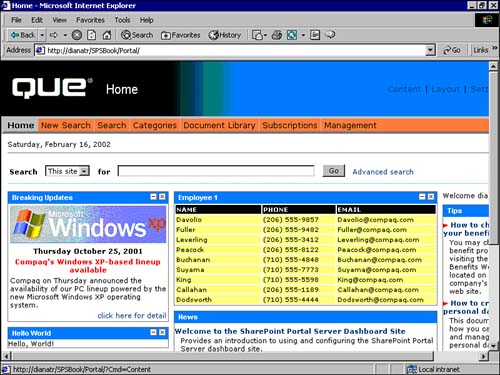 Using HTML as Content Type In this case, we will use HTML as the content type for the Employee Web Part. For this purpose, we need to create a virtual directory in the Internet Information Server (IIS) that points to the employee1 subdirectory. Follow these steps to create the employee1 virtual directory: -
Use Windows Explorer to create a new folder under c:\inetpub\ wwwroot (if you are using other drives , use that drive letter instead of C) and name it employee1. -
Copy the employee1.xml and employee1.xsl files to the employee1 folder. -
Use the Internet System Manager to create a new virtual directory and call it employee1 (select the employee1 folder as the physical location). -
In the Advanced Settings for the Web Part, select HTML as the content type. -
Check the Get content from the following link check box, and type http:// servername >/employee1/employee1.xml in the text box for the link. -
Check the Use XSL to transform the content check box, and in the text box Get the XSL style sheet from the following link, type http://servername/ employee1 /employee1.xsl for the link. Figure 15.10 shows the Advanced Settings for the HTML Content Type option. Figure 15.10. Employee Web Part using HTML and External Link. 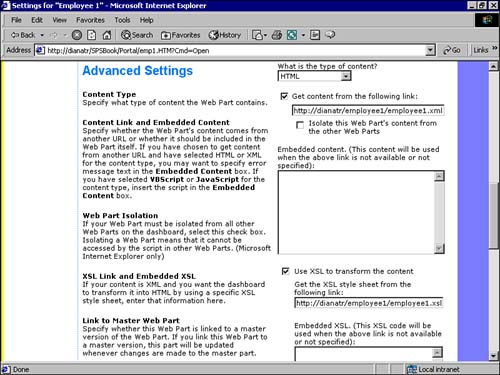 Saving XML and XSL Files in the Web Storage System (WSS) You might bypass creating a separate virtual directory in IIS, as we showed in the second option, and copy the XML and XSL files in a folder in the SharePoint Web Storage System (WSS). -
In the Web folder interface of the SharePoint Portal Server, create a new folder under the Portal Content Web folder and name it employee1. -
Copy the employee1.xml and employee1.xsl files to the employee1 folder. -
In the Advanced Settings of the Web Part, select HTML as the content type. -
Check the Get content from the following link check box, and type http:// servername/workspacename /PortalContent/employee1/employee1.xml in the text box for the link. -
Check the Use XSL to transform the content check box, and in the text box Get the XSL style sheet from the following link , type http://servername/employee1/employee1.xml for the link. As you can see here, we accessed XML and XSL in the Web storage system the same way (using HTTP) that we accessed them in the second option. In this example we showed that all the items stored in the Web Storage System are URL addressable and can be viewed using HTTP. NOTE In fact, the SharePoint Web Storage System is in compliance with the WebDAV protocol, which is an extension to the HTTP 1.1 protocol.
 | 