Developing with the Caching Application Block
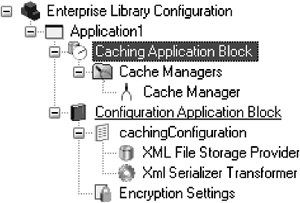
| The previous section detailed the design of the Caching Application Block and showed that it met the design goals outlined in the Caching Architecture Guide for .NET Framework Applications. As you saw, the Caching Application Block has been designed for extensibility: It offers extension points for creating new expiration policies, RefreshActions, and BackingStores. Another design goal for the Caching Application Block was to provide a simple and consistent API that allows an application to remain agnostic as to the BackingStore that is used. This lets an application be loosely coupled with the BackingStore, thus negating the need for code changes if a change occurs to the configuration for the BackingStore that is used. The first step to develop an application to take advantage of these features is to configure the CacheManagers for that application; the second step is to write code to call the API exposed by the Caching Application Block. This section provides detailed information for both of these tasks. Configuring the Caching Application BlockLike all of the other application blocks in Enterprise Library, the Caching Application Block depends on the Configuration Application Block's features to determine how it will work at runtime. Therefore, the first step toward using the Caching Application Block is to add it by creating configuration information for it. The easiest and least error-prone way to do this is to use the Enterprise Library Configuration Tool (described in Chapter 2). To add the Caching Application Block, open the application's domain configuration file in the Configuration Tool, right-click on the application node, and select New > Caching Application Block. Figure 4.6 shows the resulting configuration hierarchy. A new configuration section is added to the nodes underneath the settings for the Configuration Application Block, and a configuration hierarchy has been created to hold the settings for the Caching Application Block. Figure 4.6. Hierarchy from Adding the Caching Application Block to an Application CacheManagersIn the previous version of the Caching Application Block, only one cache could exist per application domain. However, in Enterprise Library's version, many caches can be created and configured for an application. As described earlier in this chapter, there is a one-to-one relationship between a CacheManager and a cache. To add a CacheManager to the configuration for an application, right-click the Cache Managers node and select New > Cache Manager. Since each instance of a CacheManager must have a unique name, it is advisable to rename the CacheManager with a name that is meaningful for the application (e.g., ReferenceDataCacheManager or CustomersCacheManager). The configuration information for each CacheManager is kept independent of the others. In addition to its Name, the other properties that can be configured for every CacheManager are ExpirationPollFrequencyInSeconds, MaximumElementsInCacheBeforeScavenging, and Number ToRemoveWhenScavenging. Figure 4.7 shows the Property pane where these settings can be modified. Figure 4.7. Setting Properties for a CacheManager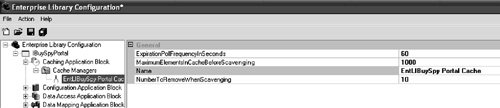
Additionally, the DefaultCacheManager property can be set for the Caching Application Block. The DefaultCacheManager property signifies the CacheManager that will be used if the name of a CacheManager is not supplied through the API. This can be set by selecting the Caching Application Block node and selecting an available CacheManager for the DefaultCacheManager property. Figure 4.8 illustrates how to accomplish this. Figure 4.8. Setting the DefaultCacheManager Property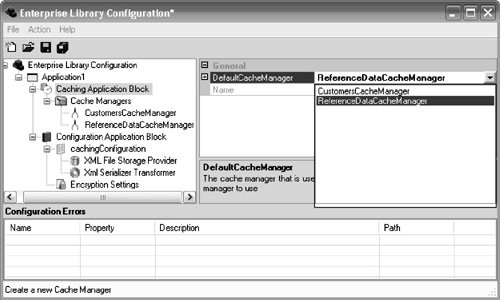 Cache StoresIn addition to selecting the data to be cached, another major consideration is where the data should be physically located if the cached data must survive application restarts. Each CacheManager can either be configured to store data only in memory or to store data both in memory and in persistent storage, also known as a BackingStore. Many caching implementations are available, all of which can be categorized as either a memory-resident cache or a disk-resident cache. NullBackingStoreBy default, the Caching Application Block stores items in memory by using the NullBackingStore. A CacheManager will use the NullBackingStore if no other BackingStore has been explicitly configured for it. If a BackingStore has been added and there is a need to switch back to the NullBackingStore, then the BackingStore that was added must be removed. This will allow the CacheManager to determine that there is no explicit BackingStore configured and cause it to use the NullBackingStore. IsolatedStorageBackingStoreTo configure an application to leverage isolated storage as a BackingStore, right-click a CacheManager and select New > Isolated Storage. Click the new subnode and enter a partition name. This identifies the portion of the isolated store that the CacheManager will use. Figure 4.9 illustrates how to do this. Figure 4.9. Configuring an Isolated Storage BackingStore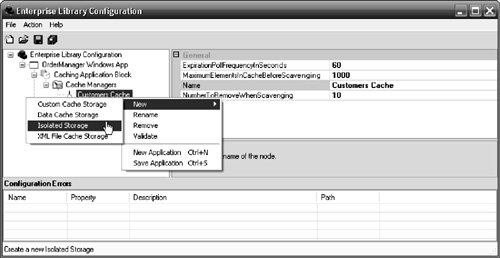 DataBackingStoreTo configure an application to leverage data cache storage as a BackingStore, you must add and configure the Data Access Application Block for the application. Right-click on the Cache Manager node and select New > Data Cache Storage to add the Data Access Application Block hierarchy to the overall configuration hierarchy. However, this doesn't configure the information for the Data Access Application Block. You must configure a DatabaseInstance separately. For information on how to do this, see the "Configuring a Database Provider" section in Chapter 3. Once you have configured a DatabaseInstance in the Data Access Application Block, that DatabaseInstance can be selected from the drop-down list box for the data cache storage's DatabaseInstance property. Additionally, a partition name must be entered so two applications that point to the same DatabaseInstance don't corrupt each other's cached data. Figure 4.10 illustrates what the configuration for a data BackingStore might look like. Figure 4.10. Configuring a Data BackingStore Custom BackingStoreEarlier in this chapter you saw how to create a custom BackingStore that is designed to work with the Caching Application Block. There are two kinds of BackingStores that can be created: a custom BackingStore and a new BackingStore that has the same design-time features as the ones that ship with the Caching Application Block. To add the first type of custom BackingStore so that it can be used by a CacheManager, right-click on the Cache Manager node and select New > Custom Cache Storage. A new node will be created underneath the CacheManager node and three properties will be available to set the values for the Name, Type, and Extensions collection for the custom BackingStore. The first property that you should configure is the Type property. Clicking the ellipses button for this property will display the Type Selector dialog. This dialog box only shows the classes that the tool recognizes as having implemented the IBackingStore interface. Figure 4.11 shows how to use this dialog box to select the CustomXmlFileBackingStore that was created earlier in this chapter. Figure 4.11. Selecting the Type for a Custom BackingStore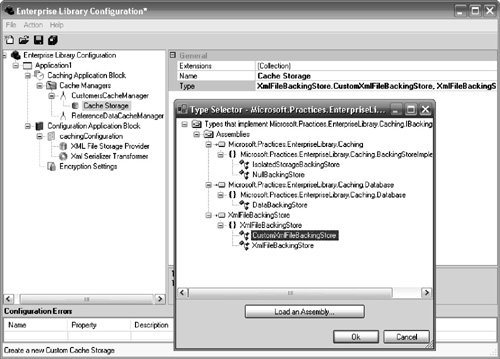 Once the application has been configured with the type of the custom BackingStore, you can configure the Extensions collection to add any items that the BackingStore will need to initialize properly. Figure 4.12 shows how to add the XmlFileName and PartitionName items to the Extensions collection for this BackingStore. Setting these two properties correctly is crucial for a custom BackingStore to function properly. Figure 4.12. Adding Items to the Extensions Collection for a Custom BackingStore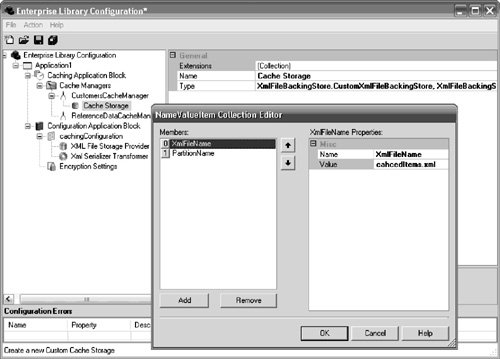 If you took the additional steps to create a custom BackingStore that has the same design-time features as those provided by the Caching Application Block, then you don't need to set the Type and Extensions properties. Instead, the properties that are exposed by the new BackingStore will need to be set. A new menu option will appear for the CacheManager node that will let the new BackingStore be added for it (shown earlier in Figure 4.5). Once the new BackingStore has been added, its properties can be set in the same way that the properties for the IsloatedStorageBackingStore and DataBackingStore were set. Figure 4.13 shows how to set the FileName and PartitionName properties for the XmlFileBackingStore that was created earlier in this chapter. Figure 4.13. Configuring the New XmlFileBackingStore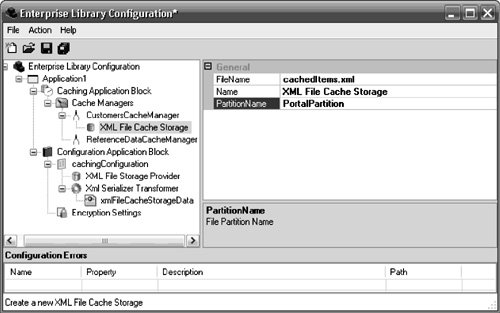 Encrypting Cached DataYou can configure a BackingStore to leverage the features in the Cryptography Application Block to encrypt and decrypt cached data using a named symmetric encryption algorithm. To configure a BackingStore to use a symmetric encryption algorithm, right-click on the BackingStore node and select New > Symmetric Storage Encryption. This will add a new node for configuring the symmetric encryption algorithm that will be used and will add the Cryptography Application Block to the application's configuration hierarchy if the block was not already added. It will not, however, configure the symmetric encryption algorithm in the Cryptography Application Block; this must be completed as a separate step. For information on how to do this, see the section "Encrypting/Decrypting Data" in Chapter 8. Once a symmetric encryption algorithm has been configured in the Cryptography Application Block, that algorithm can be selected from the drop-down list box for the StorageEncryption node's SymmetricProvider property. Figure 4.14 illustrates how to enable encryption for the custom XmlFileBackingStore with a symmetric encryption algorithm provider named RijndaelManaged that was added to the Cryptography Application Block. Figure 4.14. Configuring Encryption for the New XmlFileBackingStore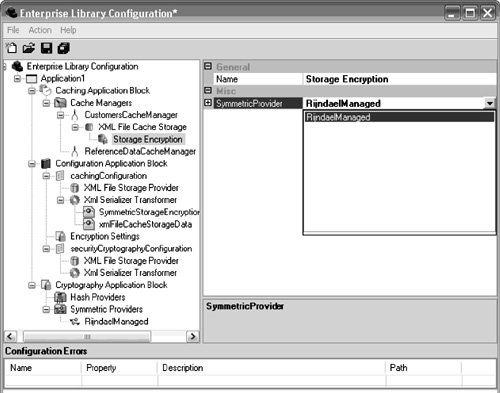 Using the Caching Application Block's APIUsing the CacheFactory or CacheManagerFactory to obtain an instance of a CacheManager is the most probable starting point for performing any type of caching operation. The CacheFactory's overloaded GetCache-Manager method will return the CacheManager that was configured as the DefaultCacheManager when the name of a CacheManager is not specified. Alternatively, a specific CacheManager can be obtained by supplying the name of the CacheManager as an argument to the GetCacheManager method. Listing 4.15 shows both methods for creating a CacheManager. The first line obtains the DefaultCacheManager and the second line obtains a CacheManager that has been configured with the name Products. Listing 4.15. Obtaining a CacheManager
Adding Items to the CacheA cache should be used to store items that are either expensive to create or expensive to transport and in which a degree of staleness is acceptable. This is typically semi-static, nontransactional data like reference data (e.g., countries, states, etc.) or customer information. With the Caching Application Block, there are several overloaded Add methods that make it possible to not only add an item to the cache, but also to set cache item expiration policies, priorities for the scavenging process, and cache item removal callbacks. The only caveat for adding an item to the cache is that the item must be remoting-serializable for it to work with any of the BackingStores that ship with the Caching Application Block. This is because the BackingStores serialize the object before storing it and deserialize it when the item is retrieved. If the expiration policies, removal callback, or priority properties are not explicitly set in the Add method, then the Caching Application Block sets them to their default settings. The default setting for cache item expirations is NeverExpire; the default setting for the CacheItemRefreshAction is null (or Nothing in VB.NET), which indicates that no method will be notified when a CacheItem is removed; and the default setting for the scavenging priority is Normal. Listing 4.16 shows the simplest way to call the Add method. It creates an object of type Product and then adds it to the cache, with the default scavenging priority (Normal), no callback to refresh the item if it expires, and no expiration policies. Listing 4.16. Adding an Item to the Cache with Default Settings
Expiration PoliciesAs mentioned earlier, the CacheManager's Add method is overloaded to allow expiration policies to be set for a cached item. The different types of expiration policies, as well as a step-by-step process for creating a new expiration policy, were discussed in detail earlier in this chapter. There is no logical limit to the number of expiration policies that can be set for an item. If an item is added with multiple policies, the item will expire if any one of the expiration policy's criteria is met. Listing 4.17 adds a product to the product cache while setting several expiration policies, including the custom one created earlier in this chapter. Listing 4.17. Adding an Item to the Cache with Multiple Expiration Policies
CacheItemRemovedCallback (aka ICacheItemRefreshAction)The Add method also gives you the ability to receive a callback after an item expires and is removed from the cache. Although it isn't mandatory, the application can refresh the item at this time. This might be useful for reducing the degree of staleness for a particular cached item, as the application can determine if the item was removed because of an external change and can refresh the cached item with fresh data if appropriate. In the Caching Application Block, the interface that allows this capability is the ICacheRefreshAction interface. The Add method lets an object that implements the interface ICacheItemRefreshAction be specified. The object's Refresh method is called whenever this item is removed from the cache, providing the opportunity to refresh items in the cache. Earlier in this chapter you saw how to create a class that implements the ICacheItemRefreshAction interface. In Listing 4.18, an item is added to the cache and a RefreshAction is set that will be notified when the item is removed from the cache. Listing 4.18. Adding an Item to the Cache with a RefreshAction
Loading Items in the CacheBefore data can be retrieved from a cache, data must first be loaded into it. For example, in a retail application it may make sense to load data about various products, or all products, into the cache when the application initializes. You can use various methods to load data into a cache. When determining the data acquisition methods for a cache, it is important to consider how much data will need to be acquired and when it will need to be loaded. The two methods for loading data into the cache are proactive loading and reactive loading. A proactive loading method retrieves required data for an application or process before it is requested and typically caches it for the lifetime of the application or the process. Proactively loading data into a cache usually occurs when the application or process starts. Proactive caching is recommended in the following situations.
There are several advantages to proactively loading data into a cache.
Conversely, there are also a few disadvantages to proactively loading data into cache.
If proactive loading is not leveraged properly, applications may initialize slowly. When proactive caching is implemented, it is important to load as much state as needed when the application or process initializes. You should use an asynchronous programming model like asynchronous pull loading to load the state on a background thread. Asynchronous pull loading is a proactive loading process that is based on expected, not actual, usage. When using asynchronous pull loading, none of the requests for data perform worse than any other because the state is retrieved into the cache proactively, not as a response to a specific request. Service agent caches are usually good candidates for asynchronous pull loading, especially if the data comes from many services and needs to be consolidated for consumption. Listing 4.19 shows how to implement asynchronous pull loading to populate a CacheManager with static employee information like an employee's photograph. Listing 4.19. Asynchronous Pull Loading of Employee Information
A reactive loading method retrieves data when it is requested by the application and then caches it for future requests. Reactive caching is recommended in the following situations.
There are several advantages to reactively loading data into a cache.
There are also a few disadvantages to reactively loading data into a cache.
Reactive cache loading means that the state is loaded only when it is requested, and it is acquired using a synchronous programming model like synchronous pull loading. With synchronous pull loading, the data is loaded into the cache when the application requires the data. When using synchronous pull loading, the first request for the data decreases performance because the data has to be retrieved from the application service. Therefore, synchronous pull loading is best used when a specific piece of state is needed rather than all of the state for the entire application or process. It is relatively easy to implement synchronous pull loading, because all of the loading code is written in the application and none is needed in the underlying application services. However, the major problem that occurs when using pull loading is state staleness. If no mechanism exists to notify the cache of data changes in the underlying application services, data changes in the application services might not be reflected in the cached data. Listing 4.20 demonstrates the simplicity involved with synchronously pull loading static product information. Listing 4.20. Synchronous Pull Loading of Product Information
Retrieving Items from the CacheThe Caching Application Block is generic in that it supports the storage of many types of items (as long as they are remoting-serializable). You can make several different design choices when designing a generic cache. One possible design allows a cache to have multiple potential keys with a hash table for each identifier. However, doing so makes it harder to remove items from the cache because information is needed for all of the hash tables that refer to the cache item. The Caching Application Block design doesn't allow multiple keys; only one primary key or identifier is used to identify an item in the cache. Its API lets you load and retrieve cached items based on a single identifier, for example, a product ID. When different types of items are being stored, it is best to create multiple CacheManagersone CacheManager for each type of item. This increases the efficiency of data searching when retrieving an item because it reduces the number of items in each cache. The Getdata method is used to retrieve items from a CacheManager. Because the CacheManager deals with its data in a generic fashion, the Getdata cannot be aware what data type to return and therefore returns a data type of object. Consumers of this method must cast the object to the proper type. Furthermore, it is important to note that if an item doesn't exist in the cache for the requested key, the Getdata method will return a null (or Nothing in VB.NET). Listing 4.21 shows how you can use the Getdata method to retrieve an instance of the serializable Product object from a ProductsCache. Listing 4.21. Retrieving Items from the Cache
Removing Items from the CacheThis chapter has already discussed how the Caching Application Block's scavenging and expiration processes automatically remove items from the cache according to the priorities and expiration policies of the items. Items can also be explicitly removed from the cache. For example, it may make sense to simply remove items from a cache when an update to an item occurs, so the item will be restored from its original data source the next time it is retrieved. The CacheManager's Remove method removes a specific item from a cache. Listing 4.22 shows how you can use the Remove method to remove a product from the ProductsCache. Listing 4.22. Removing an Item from the Cache
Flushing the CacheFlushing lets the management of cached items ensure that storage, memory, and other resources are used efficiently. Flushing is different from expiration policies in that valid cache items may be removed to make space for more frequently used items, whereas expiration policies are used to remove invalid items. There are two categories of flushing techniques: explicit flushing and scavenging. Explicit flushing requires that code be written not only to determine when the item should be flushed from cache but also to flush it. Scavenging can be implemented to flush items based on when they were last used, how often they have been used, or using priorities that were assigned in an application. With scavenging, an algorithm is used for the cache to determine what items can be flushed. Explicit FlushingDifferent scenarios require that cache stores be explicitly flushed by instructing the cache to clear its content. Explicit flushing can be implemented either manually or programmatically. For example, if cached data becomes obsolete or damaged, there may be an immediate need to clear the contents of the cache. In this situation, a system administrator must be able to explicitly flush the cache. The CacheManager's Flush method removes all the items in a cache. If an error occurs, the cache does not change. Listing 4.23 shows how to flush the ProductsCache. Listing 4.23. Explicitly Flushing the Cache
ScavengingYou can use a scavenging algorithm to automatically remove seldom used or unimportant items from the cache when system memory or some other resource becomes scarce. Typically, scavenging is activated when storage resources become scarce, but it can also be activated to save computing resourcesfor example, to reduce the time and CPU cycles required to look up specific cached items. The Caching Application Block's scavenging process is performed by the BackgroundScheduler. It checks the cache every time an item is added to see if the number of items in the cache has reached a predetermined limit. This is determined by the MaximumElementsInCacheBeforeScavenging property. The Caching Application Block also uses the value for a CacheManager's NumberToRemoveWhenScavenging property to determine how many items should be removed from the cache after scavenging begins. The earlier section about configuration showed how to configure both of these properties. Unlike the expiration process, the scavenging process performs marking and sweeping in a single pass. When an item is added to the cache, it is given one of four priorities: Low, Normal, High, or Not Removable. The BackgroundScheduler determines which items should be scavenged by doing a major sort based on priority and a minor sort based on the last time the item was accessed. For example, an item with a Low priority that has just been used will be scavenged before something with a High priority that has not been accessed for three years. The default value is Normal. The NotRemovable priority is used when it is imperative that an item remain in the cache until it expires. However, the cache should not be the only loca tion where such an item exists. A cache should be used to improve performance and scalability, but it should never be used as a form of permanent storage. |
EAN: 2147483647
Pages: 103