| Access can import files created by spreadsheet and related applications, such as project management systems, in the following formats: Excel 3, 4, 5, 7, 9x, and 200x .xls files as well as task and resource files created by Microsoft Project in .xls format. A single ISAM driver handles the import of all Excel formats. Lotus 1-2-3 .wks (Release 1 and Symphony), .wk1 (Release 2), and .wk3 (Release 3 and later), and .wj* files created by the DOS version of Lotus. Most spreadsheet applications can export files to at least one of these Lotus formats.
Note You can use OLE to embed or link charts created by Microsoft Excel and stored in files with an .xlc extension. Copy the contents of the file to the Windows Clipboard from Excel. Choose Edit, Paste to embed or link (via OLE) the chart in a field of the OLE Object type; then display the chart on a form or print it on a report as an unbound object. Similarly, you can embed or link most views displayed in Microsoft Project, which also uses the Microsoft Graph applet; the exceptions are task and resource forms and the Task PERT chart.
Creating a Table by Importing an Excel Worksheet Figure 8.16 illustrates the preferred format for Excel and other spreadsheet applications for importing to Access and other RDBMS tables. Most spreadsheet applications refer to this format as a database. The names of the fields are typed in the first row and the remainder of the database range consists of data. The type of data in each column must be consistent within the database range you select. Figure 8.16. This Excel 2003 worksheet was created by exporting the Orders table to a workbook file. The worksheet serves as an example for importing a worksheet to an Access table. 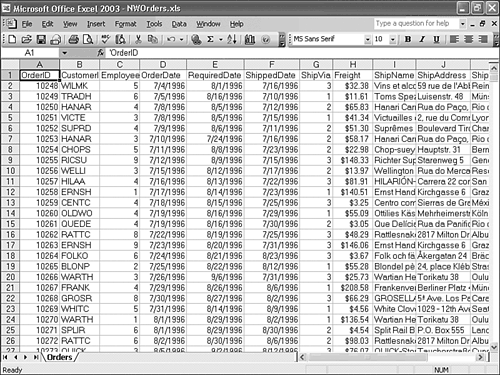 Caution All cells that comprise the worksheet range to be imported into an Access table must have frozen values. Frozen values substitute numeric results for the Excel expressions used to create the values. When cells include formulas, Access imports the cells as blank data cells. Freezing the values causes Access to overwrite the formulas in the spreadsheet that has the frozen values. If the range to import includes formulas, save a copy of your .xls file with a new name. Open the new workbook, select the worksheet and range to import, and freeze the values by pressing Ctrl+C. Choose Edit, Paste Special, select the Values option, and click OK. Save the new worksheet by its new name and use this file to import the data.
Tip You get an opportunity to assign field names to the columns in the worksheet during the importation process, although the process is easier if you add field names as column headings first.
To prepare the data in an Excel spreadsheet for importation into a Jet table, follow these steps:  Launch Excel and then open the .xls file that contains the data you want to import. Launch Excel and then open the .xls file that contains the data you want to import.
Add field names above the first row of the data you plan to export (if you haven't done so). Field names can't include periods (.), exclamation points (!), or square brackets ([]). You can't have duplicate field names. If you include improper characters in field names or use duplicate field names, you see an error message when you attempt to import the worksheet. If your worksheet contains cells with data you don't want to include in the imported table, select the range that contains the field names row and all the rows of data needed for the table. In Excel, choose Insert, Name, Define and then name the range. If the worksheet cells include expressions, freeze the values as described in the caution preceding these steps. Save the Excel file (use a different filename if you froze values) and exit Excel to conserve Windows resources for Access, if you're short on RAM.
 | Now you're ready to import worksheets from the Excel workbook file, NWOrders.xls for this example. (NWOrders.xls is located in the \Seua11\Chaptr08 folder of the accompanying CD-ROM). To import the prepared data from an Excel spreadsheet into an Access table, follow these steps: |
 Open the database you want to add the new table to. The Database window must be active before you can import a file. Open the database you want to add the new table to. The Database window must be active before you can import a file.
Choose File, Get External Data, Import to open the Import dialog, select Microsoft Excel (*.xls) in the Files of Type drop-down list, and navigate to the folder that contains the .xls file with the worksheet to import (see Figure 8.17). Figure 8.17. Navigate to the folder, select Microsoft Excel (.xls) in the Files of Type list, and select the worksheet to import. 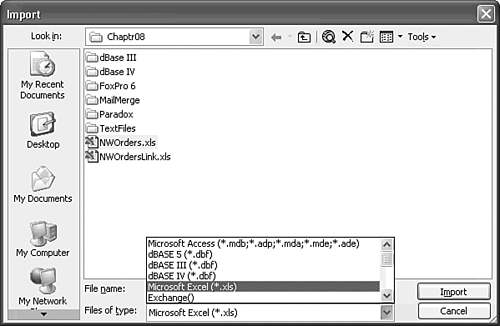 Double-click the name of the Excel workbook that contains the spreadsheet you want to import (you also can click the filename to select it and then click Import). Access invokes the Import Spreadsheet Wizard (see Figure 8.18). Figure 8.18. The first dialog of the Import Spreadsheet Wizard lets you select multiple worksheets or named ranges to import as tables. 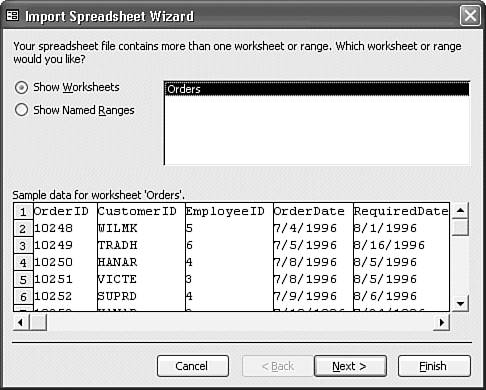 If you're importing an entire worksheet, select the Show Worksheets option; if you're importing a named range, select the Show Named Ranges option. The Import Spreadsheet Wizard lists the worksheets or named data ranges, depending on the option you select in the list box in the upper-right corner of the Wizard's opening dialog. Select the worksheet or the named data range that you want to import in the list box. The Import Spreadsheet Wizard shows a sample view of the data in the worksheet, Orders in the NWOrders.xls workbook for this example, or the named range at the bottom of the dialog. Click Next to move to the second dialog of the Spreadsheet Import Wizard, shown in Figure 8.19. Figure 8.19. The Wizard's second dialog lets you specify whether the first row of the worksheet or named range contains column headings. 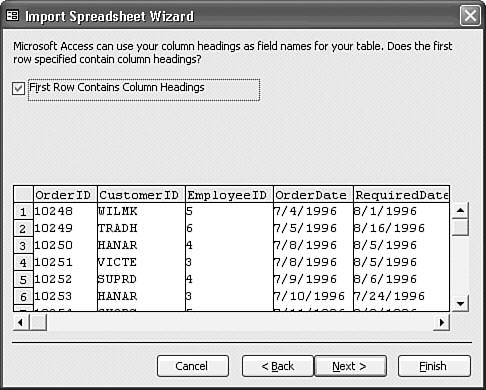 If the first row of your spreadsheet data contains the field names for the imported table, select the First Row Contains Column Headings check box. (In most cases, the Wizard detects the headings and marks the check box for you). Click Next to continue with the third step; the Import Spreadsheet Wizard displays the dialog shown in Figure 8.20. Figure 8.20. The third dialog lets you choose between creating a new table or appending the rows in the worksheet or range to an existing table. If you select the latter option, the existing table must have the same structure as the appended data. 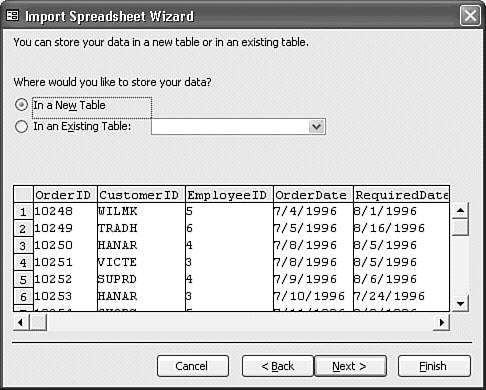 If you want to create a new table to hold the imported spreadsheet data, select the In a New Table option. To add the imported data to an existing table, select the In an Existing Table option and select the table you want to add the imported data to in the drop-down list. Click Next to continue with the fourth step; the Import Spreadsheet Wizard displays the dialog shown in Figure 8.21. Figure 8.21. The fourth Wizard dialog lets you edit the field name, specify an index, or skip a field. For unknown reasons, you can't change the field data type in this version of the Wizard. 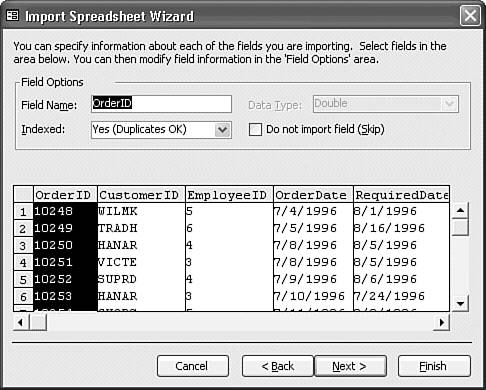 Note If you elect to add the imported data to an existing table, the Import Spreadsheet Wizard skips over all intervening steps and goes immediately to its final dialog, described in step 14. If you want to exclude a column from the imported database, select the column by clicking it, select the Do Not Import Field (Skip) check box, and skip to step 12. The Import Spreadsheet Wizard lets you edit or add the field names for the spreadsheet columns; click the column whose name you want to edit or add and then type the name in the Field Name text box. If you want Access to index this field, choose the appropriate index type in the Indexed list box; you can choose No, Yes (Duplicates OK), or Yes (No Duplicates). Repeat steps 9, 10, and 11 for each column in the worksheet or data range that you import. When you're satisfied with your options for each column, click Next to move to the fifth dialog. Select the Let Access Add Primary Key option to have Access add an AutoNumber field to the imported table; Jet fills in a unique number for each existing row in the worksheet that you're importing. Select the Choose My Own Primary Key option and select the primary-key field in the drop-down list if you know you can use a column in the worksheet or data range as a primary key for the imported table. The OrderID column is the primary-key field for this example (see Figure 8.22). If this imported table doesn't need a primary key, select the No Primary Key option. Figure 8.22. If the data you're importing contains a column with a unique value to identify each row, select the Choose My Own Primary Key option and the column name with the unique data. 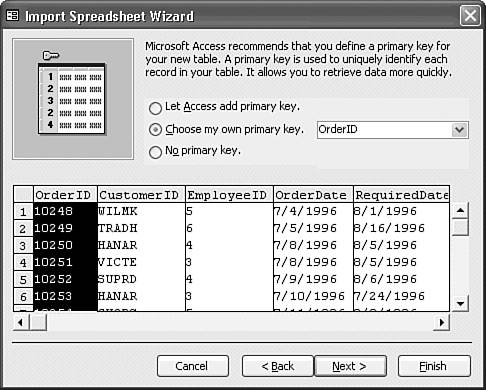 Click Next to move to the final dialog of the Import Spreadsheet Wizard (see Figure 8.23). Type the name of the new table, Orders for this example, in the Import to Table text box; Access uses the name of the worksheet or data range as the default table name. If you want to use the Table Analyzer Wizard to split the imported table into two or more related tables, select the I Would Like a Wizard to Analyze My Table After Importing the Data check box. Figure 8.23. The final Wizard dialog lets you rename the table and, optionally, run the Table Analyzer Wizard on the table data after the import operation completes. 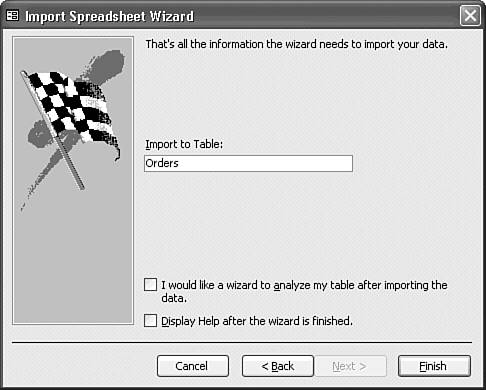 Tip You can use the Table Analyzer Wizard at any time on any table by choosing Tools, Analyze, Table.  To review use of the Table Analyzer Wizard to move duplicate data to a related table, see "Using the Table Analyzer Wizard," p. 207. To review use of the Table Analyzer Wizard to move duplicate data to a related table, see "Using the Table Analyzer Wizard," p. 207.
Click Finish to complete the importing process. Access closes the Import Spreadsheet Wizard and imports the data. When Access completes the import process without errors, it displays the message shown in Figure 8.24. Click OK to dismiss the message. Figure 8.24. This message confirms the spreadsheet import process succeeded. 
The Import Spreadsheet Wizard analyzes approximately the first 20 rows of the spreadsheet you are importing and assigns data types to the imported fields based on this analysis. If every cell in a column has a numeric or date value, the columns convert to Number and Date/Time field data types, respectively. If a column contains mixed text and numbers, the Wizard converts the column as a text field. If, however, a column contains numeric data in the first 20 rows (the rows that the Wizard analyzes) and then has one or more text entries, the Wizard doesn't convert these rows. If the Wizard encounters cell values that it can't convert to the data type that it assigned to the imported field, Access creates an Import Errors table with one record for each error. You can review this table, select the records in which the errors are reported, and fix them. A better approach, however, is to correct the cells in the spreadsheet, resave the file, and import the corrected data. Tip The Import Spreadsheet Wizard doesn't display an error message when it encounters inconsistent field data types; it just creates the Import Errors table. You must look in the Database window to see whether the Import Errors table is present. After you resolve the import errors, make sure that you delete the Import Errors table so that you can more easily detect errors the next time you import a spreadsheet or other external file.
The Database window now contains a new table with the name you accepted or edited in the final dialog of the Import Spreadsheet Wizard. If you import another file with the same name as your worksheet or named range, the Wizard asks if you want to overwrite the existing table. To verify that you obtained the desired result, double-click the name of the imported table in the Database window to display the new table in Datasheet view. Figure 8.25 illustrates a part of the Jet table created from the Orders worksheet in the NWOrders.xls spreadsheet file shown in Figure 8.16. The table appears to be identical to the Orders table of Northwind.mdb from which it was exported, with the exception of the CustomerID, EmployeeID, and ShipVia lookup fields. Figure 8.25. The Orders table imported from the Excel worksheet appears to be identical to the Northwind Orders table from which it was created but it isn't. 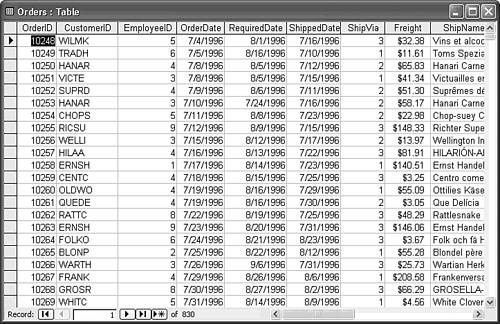  To display the .xls file data types that the Wizard chose, click the Design view toolbar button. Figure 8.26 shows the structure of the new Orders table. The Wizard incorrectly applied the Jet Double data type to the OrderID and EmployeeID fields, which you should change to the Long Integer data type. The Wizard correctly detected that the Currency data type applies to Freight field, because of the dollar-sign prefix of data in the worksheet column. To display the .xls file data types that the Wizard chose, click the Design view toolbar button. Figure 8.26 shows the structure of the new Orders table. The Wizard incorrectly applied the Jet Double data type to the OrderID and EmployeeID fields, which you should change to the Long Integer data type. The Wizard correctly detected that the Currency data type applies to Freight field, because of the dollar-sign prefix of data in the worksheet column.
Figure 8.26. The Import Spreadsheet Wizard isn't omniscient. It chose the wrong Jet data type (Double) for the OrderID and EmployeeID columns. 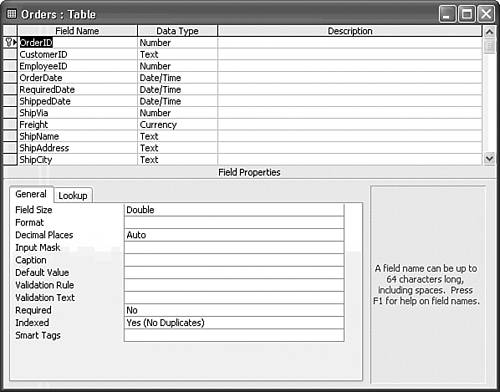 Tip Don't use the Double (or Single) data type for primary-key fields. These data types require floating-point arithmetic to determine their values, which is subject to rounding errors. Relationships based on floating-point values might fail because of these rounding errors. In addition, multitable queries having relationships based on Double (or Single) fields usually exhibit very poor performance.
Linking Excel Worksheets Prior to Access 2000, you could link Excel worksheets with either the ISAM or ODBC driver; Access 2003 doesn't permit use of the ODBC driver to link Excel worksheets. Like RDBMS tables, the advantages of linking an Excel worksheet are that you always work with the latest version of the worksheet, and you can alter worksheet cell values from within Access. The primary beneficiaries of linked Excel worksheets are die-hard spreadsheet users who aren't willing to move to database applications. The principal problem with linked worksheets is that you can't change the data type of fields used as primary keys. Linking an Excel spreadsheet uses a truncated version of the Import Spreadsheet Wizard renamed to the Link Spreadsheet Wizard. To link an Excel worksheet to a Jet 4.0 table, do the following: Open the database to which you want to link the worksheet, if necessary, and choose File, Get External Data, Link Tables to open the Link dialog. Select Microsoft Excel (*.xls) from the Files of Type list.  Navigate to the folder containing the worksheet you want to link, select the folder, and click Link to open the Link Spreadsheet Wizard (see Figure 8.27). Navigate to the folder containing the worksheet you want to link, select the folder, and click Link to open the Link Spreadsheet Wizard (see Figure 8.27).
Figure 8.27. The Link Spreadsheet Wizard's first dialog lets you select a worksheet or named range to link to a Jet database. 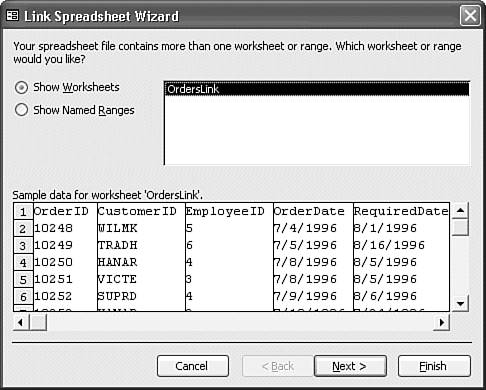  | Select the worksheet or named range to link, the NWOrdersLink.xls sample worksheet for this example, and then click the Next button. |
The Wizard automatically detects that the first row contains column headings. If the Wizard guesses incorrectly, mark or clear the First Row Contains Column Headings check box. Click Next to continue. The Wizard proposes the name of the worksheet as the table name. Change the table name if you want, click Finish, and then click OK to link the table. The linked table is identified in the Database window by an Excel icon and an arrow (see Figure 8.28). Figure 8.28. Worksheets or ranges linked to Jet databases display the Excel icon with a link-identifier arrow. 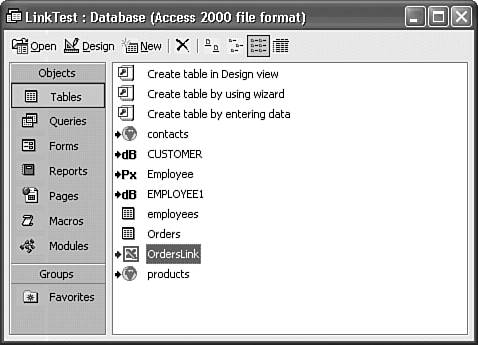  Open the linked table in Design view, clicking OK to acknowledge that you can't change the design of a linked table. Unfortunately, the Wizard again makes the wrong data type choice (Double) for the OrderID and EmployeeID columns. Open the linked table in Design view, clicking OK to acknowledge that you can't change the design of a linked table. Unfortunately, the Wizard again makes the wrong data type choice (Double) for the OrderID and EmployeeID columns.
The Linked Table Manager lets you fix broken links to worksheets. |


 To review use of the Table Analyzer Wizard to move duplicate data to a related table,


