Working with Relations, Key Fields, and Indexes
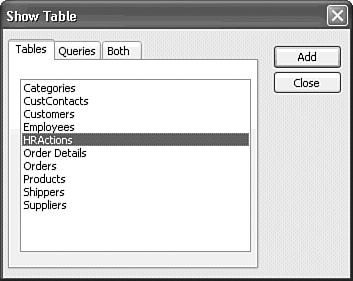
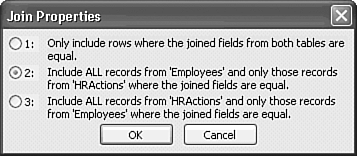
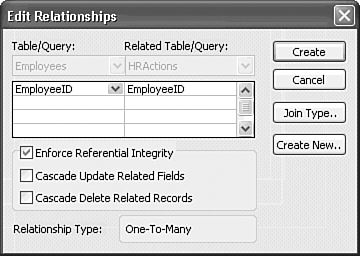
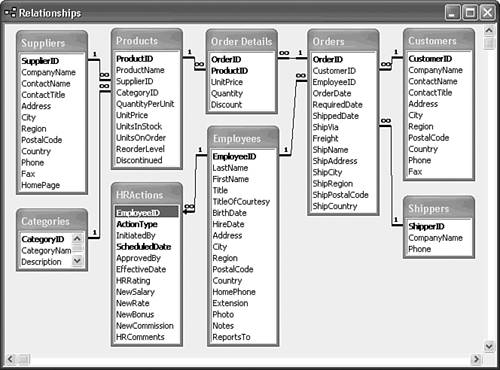
| Your final tasks before adding records to the HRActions table are to determine the relationship between HRActions and an existing table in the database, assign a primary-key field, and add indexes to your table. Establishing Relationships Between TablesMany records in the HRActions table apply to a single employee whose record appears in the Employees table. A record is created in HRActions when the employee is hired, and a record is created for each quarterly and yearly performance review. Also, any changes made to bonuses or commissions other than as the result of a performance review are added, and employees might be terminated. Over time, the number of records in the HRActions table is likely to be greater by a factor of 10 or more than the number of records in the Employees table. Thus, the records in the new Personnel table have a many-to-one relationship with the records in the Employees table. Establishing the relationships between new and existing tables when you create a new table enables Access to enforce the relationship when you use the tables in queries, forms, pages, and reports. Access requires that the two fields participating in the relationship have exactly the same data type. In the case of the Number field data type, the Field Size property of the two fields must be identical. You cannot, for example, create a relationship between an AutoNumber type field (which uses a Long Integer data type) and a field containing Byte, Integer, Single, Double, or Currency data. (You can create a relationship between fields having AutoNumber and Long Integer data types only.) On the other hand, Access lets you relate two tables by text fields of different lengths. Such a relationship, if created, can lead to strange behavior when you create queries, which is the subject of Part III, "Transforming Data with Queries and PivotTables." As a rule, the relationships between text fields should use fields of the same length. Access uses a graphical Relationships window to display and create the relationships among tables in a database. To establish the relationships between two tables with Access's Relationships window, using the Employees and HRActions tables as an example, follow these steps:
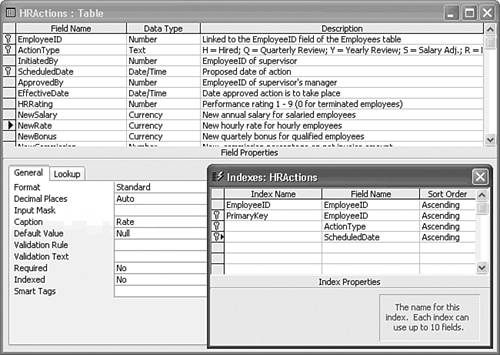
Access uses the relationship that you've created when you design queries and design forms, pages, and reports that use data in the HRActions table. Access 2000 introduced the File, Print Relationships menu command, which gives you a convenient means of printing the relationships. In Access 97, the Print Relationships command was provided as an add-in. Cascading Updates and DeletionsAccess's cascading deletion and cascading update options for tables with enforced referential integrity makes maintaining referential integrity easy: Just mark the Cascade Update Related Fields and Cascade Delete Related Records check boxes. In this case, marking the Cascade Update Related Fields check box is unnecessary, because you can't change the value of the AutoNumber EmployeeID field of the Employees table. You can delete records in the Employees table, so marking the Cascade Delete Related Records check box prevents orphan records records without a corresponding record from appearing in the Employees table in the HRActions table. Note Automatically enforcing referential integrity is usually, but not always, good database design practice. An example of where you would not want to employ cascade deletions is between the EmployeeID fields of the Orders and Employee tables. If you terminate an employee and then attempt to delete the employee's record, you might accidentally choose to delete the dependent records in the Orders table. Deleting records in the Orders table could have serious consequences from a marketing and accounting standpoint. (In practice, however, you probably would not delete a terminated employee's record.) Selecting a Primary KeyYou don't need to designate a primary-key field for a table that is never used as a primary table. A primary table is the term used in this book to designate a table that contains information representing an object, such as a person or an invoice, and only one record uniquely associated with that object. The HRActions table can qualify as a primary table because it identifies an object in this case, the equivalent of a paper form representing the outcome of two actions: initiation and approval. HRActions, however, probably wouldn't be used as a primary table in a relationship with another table. Using a primary key field is a simple method of preventing the duplication of records in a table. Access requires that you specify a primary key if you want to create a one-to-one relationship or to update two or more tables at the same time. (Chapter 11, "Creating Multitable and Crosstab Queries," covers this subject.) The primary table participating in relationships that you set with the Relationships window must have a primary key. Access considers a table without a primary-key field an oddity; therefore, when you make changes to the table and return to Design view, you might see a message stating that you haven't created a key field. (Access 2000 and later asks only once whether you want to add a primary-key field.) Related tables can have primary-key fields and often do. A primary-key field is useful for preventing the accidental addition of duplicate records. You can create primary keys on more than one field. In the case of the HRActions table, a primary key that prevents duplicate records must consist of more than one field. If you establish the rule that no more than one type of personnel action for an employee can be scheduled for the same date, you can create a primary key that consists of the EmployeeID, ActionType, and ScheduledDate fields. When you create a primary key, Access creates an index based on the primary key. To create a multiple-field primary key, called a composite primary key, and a primary-key index for the HRActions table, follow these steps:
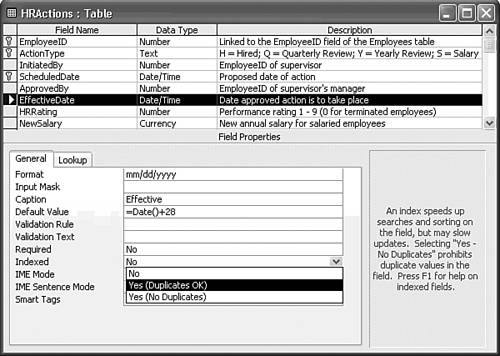
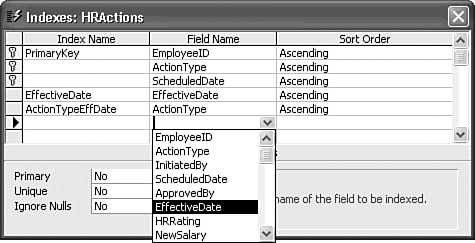
You now have a multiple-field primary key and a corresponding index to the HRActions table that precludes the addition of records that duplicate records with the same primary key value. Adding Indexes to TablesAlthough Access creates an index on the primary key, you might want to create an index on some other field or fields in the table. Indexes speed searches for records that contain specific types of data. For example, you might want to find all HRActions that occurred in a given period and all quarterly reviews for all employees in ScheduledDate sequence. If you have many records in the table, an index speeds up the searching process. A disadvantage of multiple indexes is that data-entry operations are slowed by the time it takes to update the additional indexes. You can create as many as 32 indexes for each Jet table, and 5 of those can be of the multiple-field type. Each multiple-field index can include as many as 10 fields. Tip You should add only indexes you need to improve search performance. Each index you add slows the addition of new records, because adding a new record requires an addition to each index. Similarly, editing indexed fields is slower, because the edit updates the record and the index. When you create relationships between tables, Access automatically creates a hidden index on the related fields, if the index doesn't already exist. Hidden indexes count against the 32-index limit of each table. If an extra index appears in the Indexes dialog, as occurred for the HRActions table, see the "Extra Indexes Added by Access" item in the "Troubleshooting" section near the end of this chapter. To create a single-field index for the HRActions table based on the EffectiveDate field, and a multiple-field index based on the ActionType and the ScheduledDate fields, follow these steps:
You now have three indexes for the Primary Key table: the index automatically created for the primary key, the single-key index on EffectiveDate, and the multiple-key index on ActionType and ScheduledDate. |
 ) symbol indicates the "many" side of one-to-many relationships. Bold type identifies primary-key fields.
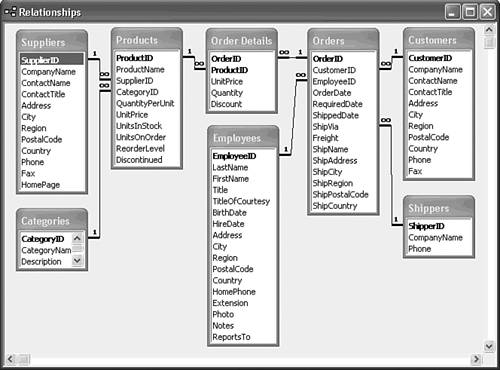

EAN: 2147483647
Pages: 417
- Chapter I e-Search: A Conceptual Framework of Online Consumer Behavior
- Chapter V Consumer Complaint Behavior in the Online Environment
- Chapter VI Web Site Quality and Usability in E-Commerce
- Chapter VII Objective and Perceived Complexity and Their Impacts on Internet Communication
- Chapter XVII Internet Markets and E-Loyalty