| Up to this point, you've ignored the warning messages that recommend placing the data source for your pages in a shared network folder and substituting the UNC path and file name for the default file name in this case, Northwind.mdb. Following are the steps to deploy pages to a network share: If the pages' data source is a shared back-end database, skip to step 4. Create a network share for the source database back end. All users of the share must have read-write access to the share and its files so that they can add records to the .ldb lock file. If you haven't done so already, use the Database Splitter tool to move the back-end .mdb to the share. This example uses a split copy of Northwind.mdb with the front end named Pages24.mdb and the back-end named Data24.mdb. Data24.mdb is located in a \\OAKLEAF-MS10\PageData share on a Windows 2000 member server. Pages24.mdb is in the ...\Office11\Samples folder.  To review creating a front-end/back-end application, see "Creating Linked Jet Tables with the Database Splitter," p. 745. To review creating a front-end/back-end application, see "Creating Linked Jet Tables with the Database Splitter," p. 745.
Tip Alternatively, use the Upsizing Wizard to create an SQL Server 2000 back-end database and convert the front end to an Access project. As noted in the "Moving from Jet to SQL Server Page Data Sources" section near the end of the chapter, using SQL Server as the data source for a DAP doesn't involve significant differences in the design process. Deploying a DAP with a SQL Server database is simpler than a shared Jet back end because you don't need to create a server share for the database. If you specified the UNC path to the .mdb file in step 3, skip to step 6. Otherwise, in the front-end .mdb, choose Tools, Database Utilities, Linked Table Manager, which has the well-formed path to the folder in which you created the back-end .mdb. Click Select All, mark the Always Prompt for New Location check box, and click OK to open the Select New Location of FirstTableName dialog. Type the UNC path to the file \\OAKLEAF-MS10\PageData\Data24.mdb, for this example in the File Name text box, and click OK to substitute the UNC path. (Alternatively, navigate to the network share in My Network Places or Network Neighborhood.) After a few seconds, a message confirms the new links to the tables (see Figure 24.65). Click OK twice. Figure 24.65. Use the Linked Table Manager to change from a fixed, well-formed path to the UNC path of the back-end database. 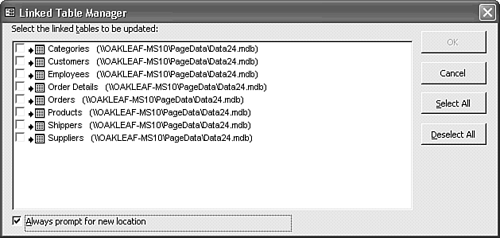 If any page uses a query as its data source, open the back-end .mdb file, choose File, Get External Data, Import, and then import the required queries from your front-end .mdb file. If you're in doubt about which queries are required, import all queries.  Open the first page of the front-end .mdb in Page Design view, right-click the title bar, and choose Page Connection. If the Data Link Properties dialog doesn't open, choose Page Properties, click the Data tab, and select the ConnectionString property. Then click its Builder button to open the Connection page of the Data Link Properties dialog. Open the first page of the front-end .mdb in Page Design view, right-click the title bar, and choose Page Connection. If the Data Link Properties dialog doesn't open, choose Page Properties, click the Data tab, and select the ConnectionString property. Then click its Builder button to open the Connection page of the Data Link Properties dialog.
Delete the existing path and replace the entry with the UNC path that you specified in step 5. If the back-end database is secure, complete the User Name and Password text boxes for a user account with at least Read Definitions and Read Data permissions for the back end.  Click Test Connection to verify the path and copy the path in the text box to the Clipboard. Click OK to update the ConnectionString property value, and change to Page view to verify the connection. Press Ctrl+S to save the page. Click Test Connection to verify the path and copy the path in the text box to the Clipboard. Click OK to update the ConnectionString property value, and change to Page view to verify the connection. Press Ctrl+S to save the page.
If you want to update the design of the page on the server rather than in your working directory, choose File, Save As; change the name of the link to PageLinkName (Server), for example; and click OK. In the File Name text box, type the UNC path to the server location, which need not be the same share as the back-end database, and the original name of the .htm file. When you click OK, a message box opens asking if you want to make the share the default location for all pages. Unless you have a reason not to do so, click Yes. Close the page and repeat steps 7 9 or 10 for each additional page that you want to make accessible to network users. In step 8, paste the UNC path into the text box. If you don't save the pages to a server share, you must manually save copies of the pages to the page share at this point. Tip If your pages deliver images, you must copy the bitmap files to the server page share manually. If pages rely on static XML data sources, you also must copy the .xml files to the page share. Test the pages from a network client by logging on to the client with a test account that has ordinary user privileges. (Don't use a network administrator account.) Launch IE 5+ on the client, choose File, Open, and then click Browse to navigate to the server share with the page files. Double-click one of the files, and click OK to test the page. (The client must have OWC 11 licensed or runtime installed to fully open the page.)  | If you encounter a problem connecting to the data source for your page when you deploy DAP on a production server, see the "DAP Clients Can't Find the Jet Data Source" topic of the "Troubleshooting" section near the end of the chapter. |
Users with runtime OWC 11 licenses experience no difference in working with pages that don't use Spreadsheet, PivotTable, or PivotChart controls. For example, the sample CustomersOrdersDetails.htm page behaves alike in the runtime and licensed OWC versions. Filter buttons of PivotTables open read-only filter lists, which makes filtering data impossible. Runtime users must expand and collapse rows and columns manually because the Expand All and Collapse All buttons are disabled. The only buttons enabled on the PivotTable toolbar are About, Refresh, and Help. When you click the Help button, the "About view-only mode for Office Web Components" topic opens. |