| If you've created a single-file Jet application and want to make it available to your colleagues who have Access 200x installed, the Upsizing Wizard makes the process easy and fast. You must, of course have installed MSDE 2000 from the distribution CD-ROM or have access to another version of SQL Server 2000 before you can upsize your application. If your application is secured, you must have full (Admins) permissions for the Jet tables. All the examples of this chapter assume you are logged in to the Jet database as the Admin user, with or without a password.  For instructions on how to install MSDE 2000, see "SQL Server 2000 Desktop Engine Setup," p. 47. For instructions on how to install MSDE 2000, see "SQL Server 2000 Desktop Engine Setup," p. 47.
Tip For a production application, install MSDE 2000 from the distribution CD-ROM on the production server, if you don't intend to create the new database on an existing installation of SQL Server 2000 Standard or Enterprise Edition. The network name of the server called its NetBIOS name is embedded in the Description property value of each table. If you specify the local instance of MSDE 2000 installed on your client computer, you must change the property value called the ODBC connection string to reflect the NetBIOS name change when you move the database to a production server. Making this change isn't a simple process; you must update each link manually or use a VBA subprocedure to regenerate the links to the new server.
For details on the required subprocedure, see "Changing the Link Connection String with a VBA Subprocedure," p. 767.
Modifying Table Properties to Assure Successful Upsizing The Upsizing Wizard has several limitations, most of which are imposed by SQL Server 2000 or earlier. In some cases, the upsizing process fails silently, and the final upsizing report doesn't indicate the reason for the failure. Following is a check list of modifications you must make to your tables and a few other recommendations to assure upsizing success: Validation rule and default value expressions T-SQL can't handle many Jet-specific or VBA expressions that establish default field values, or table- or field-level validation rules. In such cases, the Upsizing Wizard won't create the SQL Server table. You must remove the offending expressions and run the Upsizing Wizard again to link only the missing tables. Then you must rewrite the expressions to comply with T-SQL syntax rules using the da Vinci toolset or SQL Server Enterprise Manager. Note Chapter 21, "Moving from Jet Queries to Transact-SQL," includes examples of T-SQL expressions you can use for default values and validation rules, and shows you how to use the da Vinci toolset to change the property values of SQL Server tables and fields.
Hidden tables If you've applied the Hidden attribute to any of the tables you want to upsize, the Wizard ignores the hidden tables during the upsizing process. Fields added by Jet replication If you've implemented Jet replication, you must remove all replication system fields from the tables before upsizing. Tables with replication fields don't upsize. Tip  | Replication fields have a dbSystemField attribute applied, which prevents you from deleting them in Table Design view. Microsoft Knowledge Base article Q153526, "ACC: How to Make a Replicated Database a Regular Database," has links to two downloadable wizards for removing replication system fields from Access 95 and 97 tables. Michael Kaplan's Trigeminal Software Web site, http://www.trigeminal.com/, has a TSI Access 2000 Un-Replicator for Jet 4.0 and a TSI Replication System Fields Utility for Jet 3.5x and 4.0. Both utilities work with Access 2003 if your database uses the default Access 2000 format. |
Tables without unique indexes You can update a Jet table that doesn't have a Unique Values Only index, but SQL Server tables require a unique index for updatability. Make sure all tables have a unique index. Add an AutoNumber field to the table if you can't create a unique index from the data in the table. (AutoNumber fields become integer fields with the identity property in SQL Server tables.) The unique index doesn't need to be a primary key. Related fields with unequal Field Size property values Jet lets you create relations on Text fields having different sizes, but SQL Server doesn't. The tables upsize, but the Wizard doesn't establish the relationship between them. Make sure that the size of the primary- and foreign-key field pair is the same in both related tables. Specify the longer of the two size values to prevent inadvertently truncating data. Very large tables During addition of data to an upsized table, SQL Server adds entries to the transaction log file. If you have a very large table and are short on disk space, the combination of the table and log file might exceed the free space on the destination disk. Make sure that the destination drive has free space greater than three times your .mdb file size.
Tip | Microsoft has published a "Using the Access 2002 Upsizing Tools" whitepaper, which you can download from Knowledge Base article Q294407. The whitepaper hadn't been updated for Access 2003 when this book was written. Search the Knowledge base at http://search.support.microsoft.com/kb/c.asp with Access 2003 as the product and upsizing tools as the text to find the updated version. |
Running the Upsizing Wizard Following are the steps to upsize a simple, single-file Jet application with the Upsizing Wizard: Make a backup copy of the Jet database to upsize, and verify that the backup copy works. Open the original database file, but don't open any database objects. This example uses Nwind.mdb, a modified copy of the Access 2000 version of the Northwind.mdb database with images embedded in the Photo field of the Employees table and the Employees form imported from Access 2000's Northwind.mdb file. For an explanation of how to embed the EmpID#.bmp bitmap files in an OLE Object field, see "Dealing with Images in External Database Files," p. 278.
Note  | The Nwind.mdb database used for this example is included as Nwind19.mdb in the \Seua11\Chaptr19 folder of the accompanying CD-ROM. Nwind19.mdb includes the VBA subprocedure required to change the server name when you move the SQL Server database from one machine to another. |
Choose Tools, Database Utilities, Upsizing Wizard to start the upsizing process. Accept the default Create a New Database option in the first Wizard dialog (see Figure 19.8), and click Next. Figure 19.8. The first Upsizing Wizard dialog lets you add your tables to an existing database or create a new database. You create a new SQL Server database unless you're running the Wizard to upsize a table that wasn't upsized because of an error.  In the second Wizard dialog, open the What SQL Server Would You Like... list, and select the name of a production server or peer workstation server that has MSDE 2000 installed. This example uses MSDE 2000 installed on a Windows 2000 member server (OAKLEAF-MS10). The client computer (OAKLEAF-XP1) runs Office 2003 under Windows XP Professional. Note If you're upsizing a sample database to become familiar with the process, you can select (local) or the NetBIOS name of your computer. If the target SQL Server is running under Windows XP/2000+/NT, the Use Trusted Connection check box is enabled (see Figure 19.9). MSDE 2000 installs by default with Windows authentication only enabled, which prevents use of the sa (system administrator) login and SQL Server-based security. Figure 19.9. The second Wizard dialog requires you to select the machine running SQL Server, specify the authentication method for your connection, and provide a name for the new database.  Note A Trusted Connection to SQL Server uses Windows .NET/2000/NT authentication for database connections, and is the much preferred method of managing client/server database security. Using Windows NT/2000+ authentication requires that your logon account has at least CREATE DATABASE privileges for SQL Server. A member of the local Administrators group of the machine running SQL Server (BUILTIN\Administrators) has system administrator (sa) rights for the server and all databases by default. Accept the default database name, the name of your .mdb file with an "SQL" suffix, or change it to a name you like better. Don't use spaces or punctuation symbols in the name; doing so violates generally accepted database naming practices. Click Next. After a brief delay, the third Wizard dialog opens with a list of the tables in the Jet database in the Available Tables list. Click the >> button to export all the tables to SQL Server (see Figure 19.10). If you want to retain temporary or local tables on the client, select the table(s) and click the < button to move them from the Export to SQL Server list back to the Available Tables list. Click Next. Figure 19.10. The only Jet tables you should retain in the front-end application are temporary tables or local tables that you use to set user preferences.  In the fourth Wizard dialog, accept the default options unless you have a specific reason for doing otherwise (see Figure 19.11). Click Next. Figure 19.11. The fourth Wizard dialog proposes the most common set of options for the upsizing process.  Note As mentioned earlier in the chapter, SQL Server's DRI features are preferred over triggers to enforce referential integrity. Prior to SQL Server 7.0, triggers were the only method of enforcing referential integrity. SQL Server can use optional timestamp fields to determine quickly whether large Memo and OLE Object fields (SQL Server ntext fields) have been updated. The size of the bitmap and text data in the example database is relatively small, so timestamp fields aren't needed. If your Jet table includes lengthy Memo fields or OLE Object fields contain large images or other data, select the Yes, Let The Wizard Decide choice in the Add Timestamp Fields to Tables list. In the fifth Wizard dialog, select the Link SQL Server Tables to Existing Application option (see Figure 19.12). If you accept the default No Application Changes option, you must manually link the tables to your database front-end application. Click Next to open the final Wizard dialog and click Finish to start the upsizing process. Figure 19.12. Be sure to select the Link SQL Server Tables to Existing Application option to have the Wizard handle the table-linking process for you.  Note The Save Password and User ID check box only applies to SQL Server security, which isn't enabled by default. Even if you could save your administrative logon name and password, doing so would breach security rules users would be able to impersonate your administrative account to gain full control over the SQL Server instance. A progress indicator dialog appears for a period that depends on the size of the tables, the speed of your computer and, if the database is remote, network and server performance. After the Wizard completes its task, an Upsizing Wizard Report appears in Print Preview. Click the report to zoom to 100% scale and review its contents (see Figure 19.13). Figure 19.13. After the Wizard updates and links the table, it generates a report summarizing the upsizing process. Look for errors and "not upsized" entries. (The report for upsizing the example Nwind.mdb database is 15 pages long.)  Print the report, if you want, and then close the Upsizing Wizard window. The Wizard saves the report as a Snapshot file (FileName.snp) in the front-end application's folder.
Verifying the Upsizing and Linking Process  The Wizard renames your Jet tables by adding a "_local" suffix to the table name and adds links identified by the ODBC symbol to the SQL Server tables (see Figure 19.14). When you pass the mousepointer over a linked table item, a ScreenTip displays in a single line part of the ODBC connection string for the database. The Wizard renames your Jet tables by adding a "_local" suffix to the table name and adds links identified by the ODBC symbol to the SQL Server tables (see Figure 19.14). When you pass the mousepointer over a linked table item, a ScreenTip displays in a single line part of the ODBC connection string for the database.
Figure 19.14. The Database window displays linked tables with the original Jet table names and the Jet tables renamed with a "_local" suffix.   | If some tables don't upsize to SQL Server, indicated by a missing link entry for the tables, see the "Jet Tables Fail to Upsize" topic of the "Troubleshooting" section at the end of the chapter |
After you've verified that all required server tables have links, do the following to confirm that the tables are operable with your front end:   Open the front-end forms and reports to verify that the upsizing process completed satisfactorily. Open the front-end forms and reports to verify that the upsizing process completed satisfactorily.
 Verify in Form or Table Datasheet view that default values, formats, input masks, field and table validation rules, and other special property values you've specified for tables have upsized successfully. SQL Server 7.0 doesn't support extended properties, so display formats, input masks, and other Jet-specific properties aren't updated. Also, verify by the presence of the tentative append record that the tables are updatable. Verify in Form or Table Datasheet view that default values, formats, input masks, field and table validation rules, and other special property values you've specified for tables have upsized successfully. SQL Server 7.0 doesn't support extended properties, so display formats, input masks, and other Jet-specific properties aren't updated. Also, verify by the presence of the tentative append record that the tables are updatable.
If your tables have lookup fields, subdatasheets, or both, verify that these extended property features work as they did in the Jet tables.  Open the upsized tables in Design view, and acknowledge the message that warns you that you can't change some table properties. Check the data type of a Jet Hyperlink field, which changes to a Jet Memo field (see Figure 19.15). Jet Memo fields upsize to SQL Server's ntext (Unicode text) data type. No version of SQL Server supports the Allow Zero Length property, so this value is No for all fields, regardless of your original setting. The upsize_ts field is the timestamp field added by the Upsizing Wizard. Open the upsized tables in Design view, and acknowledge the message that warns you that you can't change some table properties. Check the data type of a Jet Hyperlink field, which changes to a Jet Memo field (see Figure 19.15). Jet Memo fields upsize to SQL Server's ntext (Unicode text) data type. No version of SQL Server supports the Allow Zero Length property, so this value is No for all fields, regardless of your original setting. The upsize_ts field is the timestamp field added by the Upsizing Wizard.
Figure 19.15. Upsizing Jet Hyperlink fields results in a change to the SQL Server data type (ntext) that corresponds to a Jet Memo field. Design view of a linked SQL Server database displays Jet, not SQL Server, field data types. 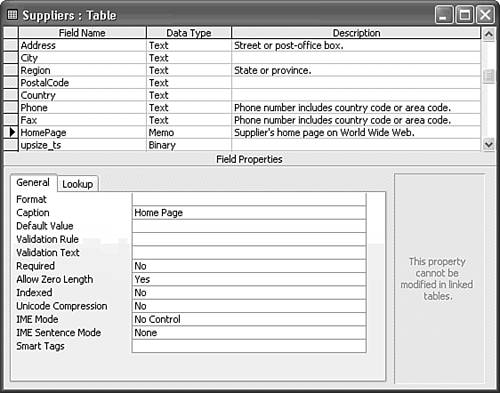  Right-click the Table Design view window, and choose Properties to open the Table Properties dialog with the Description text box selected. Press Shift+F2 to open the Zoom dialog to view the full connection string for the table. Figure 19.16 shows the connection string for the Suppliers table with the Zoom dialog's font size changed to 10 points and newline characters added to format the string for readability. Right-click the Table Design view window, and choose Properties to open the Table Properties dialog with the Description text box selected. Press Shift+F2 to open the Zoom dialog to view the full connection string for the table. Figure 19.16 shows the connection string for the Suppliers table with the Zoom dialog's font size changed to 10 points and newline characters added to format the string for readability.
Figure 19.16. The Zoom dialog displays a formatted version of the ODBC connection string for the Suppliers table.   Execute every SELECT query to make sure the Wizard hasn't modified the query and rendered it inoperable. Don't execute action queries that update table values. Some queries such as Northwind.mdb's Sales by Year query require entering parameter values. Execute every SELECT query to make sure the Wizard hasn't modified the query and rendered it inoperable. Don't execute action queries that update table values. Some queries such as Northwind.mdb's Sales by Year query require entering parameter values.
 Open the Relationships window. Upsized tables lose their relationships, and you must depend on SQL Server's DRI to maintain referential integrity. To make creating new queries easier, re-establish the relationships between the tables. (Referential integrity options are disabled in the Edit Relationships window for client/server tables.) Open the Relationships window. Upsized tables lose their relationships, and you must depend on SQL Server's DRI to maintain referential integrity. To make creating new queries easier, re-establish the relationships between the tables. (Referential integrity options are disabled in the Edit Relationships window for client/server tables.)
 After you've verified the success of the upsizing process, you can safely delete the ..._local tables, if you made a backup of your application. After you've verified the success of the upsizing process, you can safely delete the ..._local tables, if you made a backup of your application.
Tip | To return a test application to its original condition, delete the links to the table, and rename the Jet tables by removing the _local suffix. |
Upsizing an Application with Linked Tables As mentioned earlier in the chapter, the process for upsizing Access front-ends with linked Jet tables is identical to that for upsizing single-file applications. You run the Upsizing Wizard from the front-end .mdb. The Wizard connects to the shared .mdb back-end and generates the SQL Server tables from the linked Jet database. This example uses the NWClient.mdb front end and NWData.mdb back end you created at the beginning of the chapter. To create an SQL Server database on your local machine that you move to a production server later in the chapter, do the following: Make backup copies of NWClient.mdb and NWData.mdb, if you haven't done this. Open the NWClient.mdb front end, start the Upsizing Wizard, accept the default Create New Database option in the first dialog, and click Next. In the second Wizard dialog, specify (local) as the SQL server, accept NWDataSQL as the name of the database, and click Next. In the third dialog, select all tables, and in the fourth dialog, accept the defaults. In the fifth dialog, make sure to select the Link SQL Server Table to Existing Application option and clear the Save Password and User ID check box. Click Next and Finish to upsize the linked tables. Verify the upsizing process with the methods described in the preceding section.
Examining the ODBC Table Connection String When you choose the Create a New Database option in the first Upsizing Wizard dialog, the ODBC connection string for each table contains all the information Jet needs to connect to the server and link each table (refer to Figure 19.16). This type of ODBC connection doesn't require you to create a named ODBC user or system data source (user or system DSN), or a file data source to establish the connection. Using a DSN-less connection simplifies the process of making your linked-table application available to users, because they don't need a user or system DSN on their computer or a link to a file data source on the server. A DSN-less ODBC connection string consists of the following elements, separated by semicolons: ODBC designates the connection as using the ODBC API. Driver=SQL Server specifies the current version of the SQL Server ODBC driver on the user's machine. SERVER= SERVERNAME designates the NetBIOS computer name of the machine running the instance of SQL Server with the upsized database. In a Windows 2000/.NET domain, the NetBIOS name often is called the downlevel name of a computer. UID= UserName specifies the network logon ID for your administrative account. PWD= Password is present only when you specify SQL Server security during the MSDE 2000 installation process or by changing a Registry entry after installation. Using Windows authentiation is recommended strongly, because it's integrated with Windows networking, and is more secure and easier to administer than SQL Server's username/password security approach. APP= Microsoft Office 11 is for information only. WSID= COMPUTERNAME is the NetBIOS name of your computer (workstation ID) and is for information only. DATABASE= DatabaseName designates the name of the upsized database. Trusted_Connection= Yes specifies use of Windows 2000/NT authentication; No or a missing entry specifies SQL Server security. TABLE=dbo. TableName specifies the SQL Server table and its owner prefix. The default prefix is dbo, which is the abbreviation for the system administrator (sa) as the object's owner (database owner).
Note The dbo. TableName element isn't present in the Connect property value of the link's TableDef object. (Jet local or linked tables are members of the database's TableDefs collection). Access appends TABLE= and the SourceTableName property value of the TableDef to the Description property value.
If you select the Use an Existing Database in the first Upsizing Wizard dialog, you must use an existing or create a new machine or file data source. If one of your tables won't upsize, you must run the Wizard again to create the table and add the link to existing database. If you delete a link and must restore it, you must choose File, Get External Data, Link Tables, select ODBC Databases() in the Files of Type list, and select or create the DSN to use. To learn how to create a temporary or permanent ODBC DSN, see "Linking Client/Server Tables Manually," p. 770.
Note When you use the Link Tables command to link a table, the link name gains a dbo_ prefix. Delete the prefix to enable existing Access objects to connect to the table.
In either case, your tables end up with a combination of conventional and DSN-less convention strings. If you don't change the Connect property of the TableDef object to specify a DSN-less connection, all users of your application must add the ODBC DSN to their computer or have access to a server share holding a file data source. The standard DSN for an SQL Server table replaces the Driver=SQL Server element with DSN=DataSourceName, and SERVER= SERVERNAME element with Description= OptionalText in the Description and Connect property values. Otherwise, the elements of the connection string are the same as in the preceding DSN-less connection list. The ChangeServer VBA subprocedure, which is described in the later "Changing the Link Connection String with a VBA Subprocedure" section, also changes DSN to DSN-less connections. |