Using Built-In Access Add-Ins
3 4
The built-in add-ins on the Analyze and Database Utilities submenus of the Tools menu are part of the standard installation of Access and are available as soon as you install Access.
tip - View all wizards in Access 2002
To see a list of all the wizards in Access 2002, type wizards in the Ask A Question box, and select the Which Wizards Are Installed In Access 2002 Help topic. This topic lists all the Access 2002 wizards and builders and tells you which setup component each one belongs to.
Built-in Access add-ins basically help you do two things: The add-ins available through the Analyze submenu help you analyze and document database components, and those on the Database Utilities submenu have more substantial functionality—they perform housekeeping, repair, and conversion chores. The sections that follow look more closely at all these add-ins.
Using the Add-Ins on the Analyze Submenu
Three of the built-in Access add-ins help ensure that your tables are well-designed and well documented. You start the analysis add-ins by choosing Tools, Analyze and then selecting one of the following add-ins:
- Table. Launches the Table Analyzer Wizard, which walks you through the process of dividing a large, non-normalized data table into separate, linked normalized tables.
- Performance. Starts the Performance Analyzer, which evaluates your database and makes suggestions for improving performance.
- Documenter. Starts the Documenter, which analyzes the objects in your database and produces an Object Definition report that details each object’s attributes.
Troubleshooting - I can’t see the wizards I want to work with
If you’ve installed Office XP using the default selection of Office Components, the add-ins on the Analyze and Database Utilities submenus of the Tools menu should be installed. (They’re included in the Typical Wizards component, which is part of the standard Office XP installation.) However, the Add-In Manager, which is needed to install custom Access add-ins, is part of the Additional Wizards component and isn’t installed by default.
If you can’t see the wizards you want to work with, you can rerun Office XP setup and select either the Typical Wizards or the Additional Wizards component (I recommend selecting both) by following these steps:
- Close all programs.
- If you installed Office XP from a CD, insert the CD. If you installed Office XP from a network drive, make sure the drive is available.
- Open Control Panel, and double-click the Add/Remove Programs icon.
- Click the Microsoft Office XP selection in the Currently Installed Programs box, and then click the Change button in the highlighted band.
- On the Maintenance Mode Options page, select the Add Or Remove Features option and click Next.
- On the Choose Installation Options For All Office Applications And Tools page, expand the Microsoft Access For Windows branch of the feature tree, select Run From My Computer for the Typical Wizards and Additional Wizards selections, and then click Update.
- A progress bar will indicate that the selected components are being installed, and then you’ll see a message stating that Office setup has successfully updated your installation. Click OK to exit setup, and then close the Add/Remove Programs dialog box.
When you next open Access, the extra wizards will be available.
The Table Analyzer Wizard
The Table Analyzer Wizard helps you split a non-normalized table into separate tables, linked by key fields. After splitting the original table into two or more linked tables, the wizard creates a query based on the linked tables and gives it the same name as the table (the table itself is renamed), which ensures that if the table was used as a form, report, or data access page record source, the query will now be the record source.
note
To use the Table Analyzer Wizard effectively, you need to understand the principles of data normalization—the wizard isn’t a magic wand that will take a mass of non-normalized data and automatically convert it into a set of properly normalized, related tables. For more information about data normalization, see Chapter 3, "Introduction to Database Design."
The Table Analyzer Wizard is a great help for pinpointing data errors that often creep into non-normalized data tables, where information has been typed into the fields rather than being selected from a look-up table.
To use the Table Analyzer Wizard on your database, follow these steps:
- Choose Tools, Analyze, and then click Table.
- The Table Analyzer Wizard launches, and the page shown in Figure 15-1 appears, giving some general information about the problem of duplicate and inconsistent data in tables. Click one of the Show Me An Example buttons if you want to see more information; otherwise, click Next.
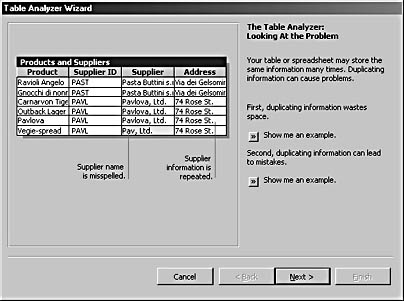
Figure 15-1. The first page of the Table Analyzer Wizard gives an idea of why duplicate information can cause problems.
Why Worry About Duplicate and Inconsistent Data?
Duplicate information wastes space in a database. For instance, in the example shown on the first page of the Table Analyzer Wizard, when the Supplier ID field is present in the table, all the other Supplier information can (and should) be picked up via a link on Supplier ID to the Suppliers table, instead of being duplicated in the Products and Suppliers table. Inconsistent information (such as the misspelled Supplier name highlighted in blue) means that records belonging to a single supplier will be classified incorrectly as belonging to two different suppliers, at least if the supplier name is used for grouping rather than the Supplier ID.
Also, if you make a change to a supplier name in one table, the change won’t carry over to the other tables, leading to incorrect data in reports and forms. This type of error won’t occur in a normalized database.
- The next wizard page shows how the sample table used in the wizard can be divided into two linked tables to prevent the duplication of data in the single original table. Click one of the Show Me An Example buttons if you want to learn more; otherwise, click Next.
- Select the table to be analyzed from a list of available tables in the database. (See Figure 15-2.) By clearing the Show Introductory Pages check box, you can skip the two introductory wizard pages the next time you run this wizard. Click Next.
- On the next wizard page, you indicate whether you want the wizard to determine which fields are assigned to which tables or you want to make those choices yourself. Click Next.
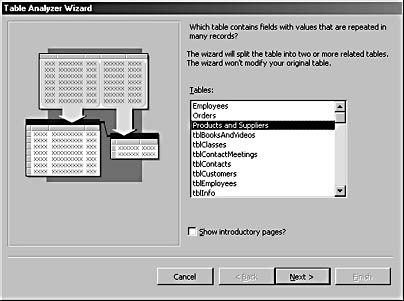
Figure 15-2. Scroll through the Tables list, and select the table you want to analyze.
InsideOut
The Table Analyzer Wizard doesn’t always create an optimal set of linked tables—which isn’t surprising because the proper division of data depends so much on the nature of the data and what you’re going to do with it. You might find that the wizard breaks out addresses and ZIP codes into separate tables, for example, which is rarely appropriate. Another problem area: The wizard generally creates new unique ID fields for tables, even those that already have a suitable unique ID field.
Also, the wizard’s practice of renaming the query with the same name as the original table has two problems: It violates any naming convention you might be using (by giving a query the tag used for a table), and it assumes that a query based on linked tables is the most appropriate record source for a form or report. In many cases (particularly for forms), nested subforms, each based on a single table, are a more appropriate interface for displaying and editing data from linked tables.
It’s probably best to split a non-normalized table into separate tables and link them appropriately without using this wizard, because the wizard isn’t smart enough to do the job right. However, the wizard does a great job of tracking down data errors and inconsistencies, so it’s worth using just for that purpose.
- The wizard will display the proposed new arrangement of linked tables in the Relationships window. (See Figure 15-3.) You can make relationship changes that Access suggests, rename tables, and drag a field from one table to another, as follows:
- To change the relationships or create tables other than those selected by the wizard, drag the fields and/or tables to create the splits and relationships you want. (When you drag all the fields out of a table, the table disappears.)
- To rename a table, select it, click the Rename Table button, and then enter the new table name. I suggest renaming the main data tables with the LNC tbl tag and the look-up tables with the tlkp tag.
After making the necessary changes, click Next.
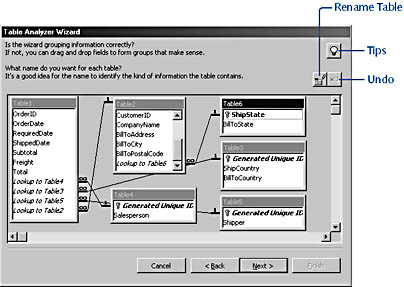
Figure 15-3. The wizard displays the proposed new set of tables and their relationships.
- The next wizard page asks whether the fields shown in boldface are the appropriate key fields for each table (fields that uniquely identify each record in the table). If any key field isn’t appropriate, you can select another field or create a new unique ID field as follows:
- To set an identifier (a field containing unique data) for the new table, select a field and click the Set Unique Identifier button.
- To add a new key for the table, click the table, and then click the Add Generated Key button.
- To see a screen of more detailed information about making changes to the proposed database schema, click the Tips button.
- To undo your last change, click the Undo button.
- After you make any necessary changes, click Next.
For more information about using a naming convention in a database, see "Naming Conventions," in Chapter 20, "Customizing Your Database Using VBA Code."
note
The Table Analyzer Wizard will check for inconsistent data (spelling errors) only in tables with a Generated Unique ID as the key field. - Next, the wizard analyzes the tables for inconsistent data and might display several different pages, depending on the problem found. Figure 15-4 shows a typical page, with two different spellings for the ShipName field. Select the check box for the correct entry, and click Next.
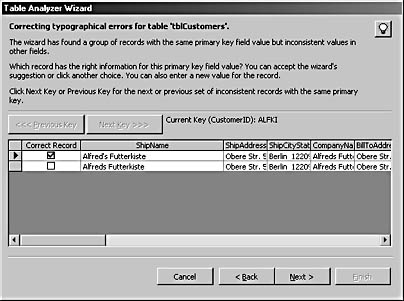
Figure 15-4. The wizard gives you the opportunity to fix typographical errors.
- The final wizard page (shown in Figure 15-5) gives you the option to create a query based on the linked tables and offers a check box for displaying Help for working with the new tables or query.
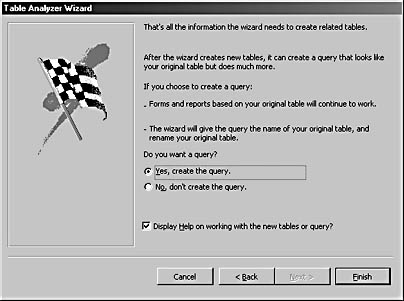
Figure 15-5. The final wizard page asks whether you want to create a query based on the tables it has created.
Figure 15-6 shows the query produced by the Table Analyzer Wizard. (Notice that the query has a misleading tbl tag). You can then make any necessary changes to the query in Design view.
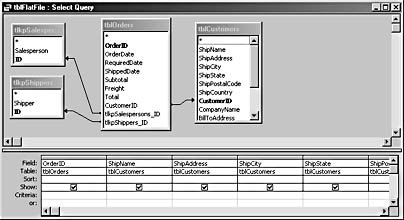
Figure 15-6. The query produced by the wizard links the various tables created from the original table.
Troubleshooting - Even after I use the Table Analyzer Wizard, my tables still need work
Although the Table Analyzer Wizard is a real help when it comes to finding errors and inconsistencies in your data, you’ll need to do some of the fine-tuning yourself. You might need to make changes such as these after you use the wizard:
- Rename key linking fields. In the example, the foreign key linking fields in tblOrders have names in the form tablename_ID, where tablename is the name of the table the field links to.
You can’t change these field names in the wizard. If you want to change them (and you probably will), you must do so in the table, in Design view. The changes to the foreign key names will then be picked up in the Relationships window.
- Finalize relationships. If the table breakdown goes too far, you might need to fix it. For example, if it creates a separate table for ZIP codes, you’ll probably want to move the Zip Code field back to the main table and delete the Zip Codes table.
- Add links. If you need to break up a table into two tables (say, to store multiple addresses or phone numbers), split the original table into two linked tables, and set the appropriate field (such as CustomerID) as the foreign key in the "many" table, linked to the primary key in the "one" table.
The Performance Analyzer
The Performance Analyzer evaluates the objects in your database and suggests how the performance of the database might be improved. This tool can make some changes for you automatically, if you choose, or you can make the changes yourself after you exit the tool.
To use the Performance Analyzer on your database, follow these steps:
- Choose Tools, Analyze, and then click Performance. You’ll see the Performance Analyzer dialog box in Figure 15-7, which is similar to the Access 97 Database window. The dialog box contains tabs for each of the six types of database objects (excluding data access pages), plus a tab for the Current Database and one for All Object Types, which makes it easy to select everything in the database.
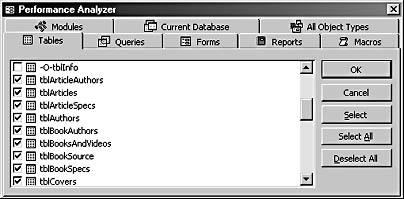
Figure 15-7. The Performance Analyzer dialog box has a tab for each type of database object (except data access pages).
caution
Before you run the Performance Analyzer, close any database objects you want to analyze. The Performance Analyzer skips any open objects. - Click the items you want to include in the analysis. If you want to select all objects in the database, click the All Object Types tab, click Select All, and click OK. The Performance Analyzer evaluates the items you selected and displays the findings (as shown in Figure 15-8).
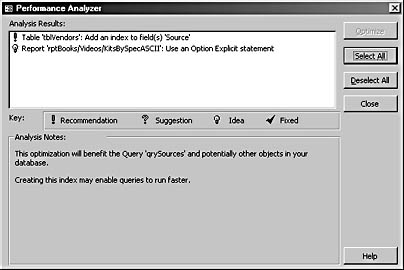
Figure 15-8. The Performance Analyzer makes suggestions for improving database performance.
- The Performance Analyzer provides three kinds of advice, as follows:
- Recommendations. These are marked with a red exclamation point and point out ways that your database can be optimized.
- Suggestions. These are indicated by a question mark and provide suggestions for improving performance.
- Ideas. These are marked with a light bulb symbol and offer additional tips for enhancing performance.
- To make a change, select the item, and click Optimize. The symbol for the item will change to a blue check mark, indicating that it has been fixed.
Even if you think your database is performing well, it’s still worthwhile to run the Performance Analyzer to see whether it finds anything you missed.
The Documenter
It’s a good idea to print the design attributes of the objects in your database because if disaster strikes and you need to re-create some or all of your database, a printout will provide a useful roadmap. A Documenter printout of field names is also useful when you’re writing VBA code that references table fields. The Documenter is an add-in that evaluates the objects in your database and produces a report of the design characteristics of each selected object, such as table fields and their properties. You can print the report or save it to a file, depending on your preference and needs.
To use the Documenter, follow these steps:
- Choose Tools, Analyze, and then click Documenter. The Documenter dialog box will appear, as shown in Figure 15-9.
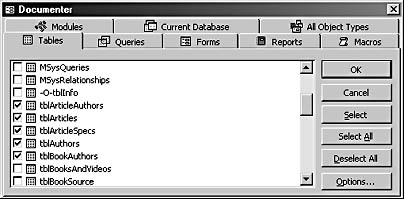
Figure 15-9. The Documenter dialog box has a tab for each type of database object (except data access pages).
- On the Tables tab, click the objects you want to document. (If you want to select all database objects, click the All Object Types tab, and click Select All.)
- Click the Options button. The Print Table Definition dialog box will appear (as shown in Figure 15-10), allowing you to specify attributes of the selected object type you want to document. Select the options you want to print, and then click OK to close the dialog box.
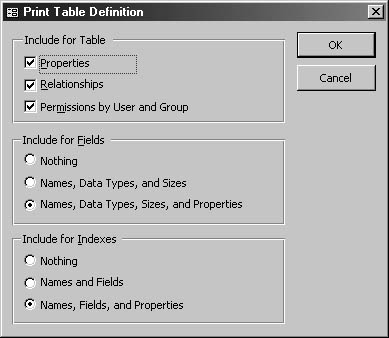
Figure 15-10. The Documenter has several options for documenting tables.
- Click OK in the Documenter dialog box. You’ll see messages about various database objects being analyzed in the status bar, and then an Object Definition report will open in print preview (as shown in Figure 15-11), listing the requested information about the selected database objects.

Figure 15-11. The Documenter creates an Object Definition report.
Using the Add-Ins on the Database Utilities Submenu
The add-ins on the Database Utilities submenu of the Tools menu provide various utilities to manipulate your database. Figure 15-12 shows the selections on the Database Utilities submenu.
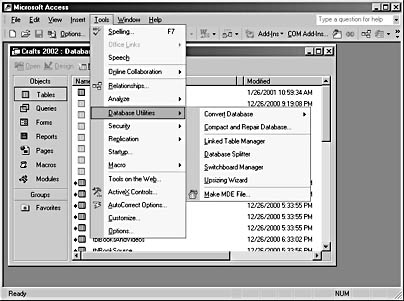
Figure 15-12. The Database Utilities submenu of the Tools menu offers a choice of add-ins.
The Convert Database Utility
The Convert Database utility was introduced in Access 2000. Before that version, there was no way to save a database in an earlier database format. Access 2000 let you save an Access 2000 format database in Access 97 format, and Access 2002 lets you convert an Access 2002 database to Access 97 or Access 2000 format or convert an Access 2000 database to Access 97 or Access 2002 format.
Converting from New to Old The following steps show a typical sequence of error messages and reparative actions you’d need to take (in Access 97) after opening an Access 97 database created by converting an Access 2002 database to Access 97 format:
- Open the converted database in Access 97. Figure 15-13 shows a typical error message resulting from an incorrect reference. Access 97 needs a reference to DAO 3.51, and the converted database had a reference to a higher version of DAO (such as 3.60).
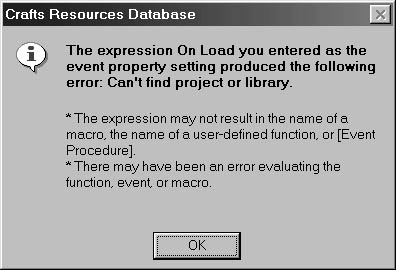
Figure 15-13. This message results from a missing reference when a converted database is opened.
- Click OK. Another message will appear, informing you that the database has been converted and advising you to compile it. This message will appear even if no errors occurred.
- Open a module, and compile the database. The error message Compile Error: Can’t find project or library willappear, giving more specific information about the error. Click OK to close the error message.
- You can examine the cause of the error by displaying the References dialog box (shown in Figure 15-14). To open this dialog box, press Alt+F11 to display the Visual Basic Editor, and then choose Tools, References.
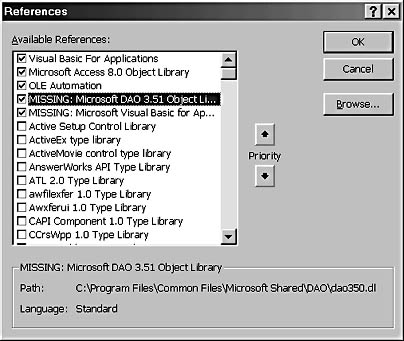
Figure 15-14. Two items are marked MISSING in the References dialog box.
In this example, the two references marked MISSING are the problem. You can simply clear the Microsoft Visual Basic For Applications item marked MISSING because there’s already a checked item for the current version of this library (the Visual Basic For Applications item at the top of the list). The Microsoft DAO 3.51 Object Library item marked MISSING should also be cleared, but in this case you need to select the appropriate item as well. To do so, close the dialog box, reopen it, and select Microsoft DAO 3.51 Object Library.
- Click OK to close the References dialog box. The code will compile, and the database will be ready for use in Access 97.
Converting from Old to New To convert an older Access database to Access 2002 or Access 2000 format (whichever one you’ve selected as the default file format on the Advanced tab of the Options dialog box, available from the Tools menu), you don’t use the Convert Database utility. To convert an older database to the current format, follow these steps:
- Open the database in Access 2002. A dialog box will appear (as shown in Figure 15-15), offering a choice of converting the database to the current version or opening it in read-only mode. Click Convert Database, and click OK.

Figure 15-15. This dialog box appear when you try to open an older Access database in Access 2002.
- A standard File Open dialog box will appear. Select the appropriate folder, enter a name for the converted database, and click Save.
- If no compilation or conversion problems occur, the database will open in Access 2002 with a message telling you that the new Access 2002 database can’t be shared with Access 97 or Access 2000 users. Click OK to close the message.
If compilation problems occur during the conversion, you’ll get a different message that reports compilation errors and offers a Help button to click for more information. Click OK to continue.
If conversion errors occur, you’ll get a conversion error message, again with a Help button. Click OK to continue, and you’ll get the message telling you that the new Access 2002 database can’t be shared with Access 97 or Access 2000 users.
Troubleshooting - I’m having conversion problems converting my database to an older format
There are several problems you might experience when you convert a database to an older format. Here are some of the problems and their solutions:
- Problem: I can’t save a converted database to the name of an existing database. (There’s no Overwrite selection when I save the converted database.)
Solution: Make sure that the name you want to use isn’t already in use in the target folder. Rename, move, or delete any existing file with that name.
- Problem: I get compile errors in the converted database.
Solution: Compile the converted database. Generally, that’s all you need to do. In some databases, you might need to rewrite some code to take into account changes in the Access object model or other functionality.
- Problem: PivotCharts are missing from a database I converted from Access 2002 to an earlier version of Access.
Solution: PivotCharts are new to Access 2002; you’ll have to do without them or replace them with MS Graph charts.
- Problem: I get a Can’t find project or library error when I compile a database converted from a later Access version to an earlier Access version.
Solution: A reference to an object library hasn’t been downgraded to the correct version. This often happens with references to the Word or Outlook object libraries. To fix this problem, open the References dialog box from the Tools menu in the Visual Basic Editor, clear the references to the Word 10.0 or Outlook 10.0 object library (or any library that’s marked MISSING), and select the reference for the appropriate version of the object library.
note
If any compilation or conversion errors occur, the details are saved in a table named Conversion Errors. Open the table to check out the errors so that you can fix them.
The Compact And Repair Database Utility
The Compact And Repair Database utility runs two add-ins (which were separate selections in earlier versions of Access), One add-in compacts a database by removing temporary objects (usually resulting in a considerable reduction in size), and the other repairs database errors. To start the utility, choose Tools, Database Utilities, and then click Compact And Repair Database.
You’ll see a progress bar in the database’s status bar, and if the compact and repair process is successful, you’ll then be returned to the database. If problems occur, you’ll get an error message letting you know what the problem is. Depending on the nature of the problem, you might be able to resolve it; if not, you might have to restore your last backup database.
The Linked Table Manager
The Linked Table Manager helps you fix broken links to back-end tables, which usually result from moving the back-end database to another folder. You open the Linked Table Manager by choosing Tools, Database Utilities and then clicking Linked Table Manager or by clicking Linked Table Manager on the shortcut menu of a linked table.
tip - View table links
Links to tables in back-end databases are stored as explicit paths; you can see them in the Object Definition report created by the Documenter. For more information about creating an Object Definition report, see the section "The Documenter."
Because Access lacks a constant that represents the current folder (the folder in which the front-end database is located), you still have to fix broken links even if you move both the front-end and back-end databases to the same folder in a new location.
To fix the broken links, follow these steps:
- Run the Linked Table Manager, either from the Database Utilities submenu or from a linked table’s shortcut menu. The Linked Table Manager dialog box (shown in Figure 15-16) lists all the linked tables, with their stored (now incorrect) paths.
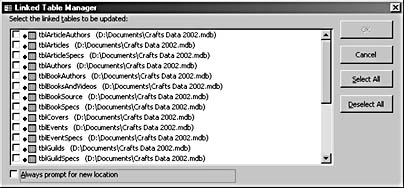
Figure 15-16. The Linked Table Manager dialog box lists incorrect paths for linked tables.
- Click Select All to select all the tables to refresh. (This is generally what’s needed, although you might need to select specific tables if you have two or more back-end databases.) The Always Prompt For New Location check box lets you change the path for a back-end database even if the current link is valid. (Changing the path can be useful if you have several versions of the back-end database in different locations.) Click OK.
- A standard File Open dialog box will open, in which you can browse for the current location of the back-end database. Select the database, and then click the Open button in the Select New Location Of tablename dialog box to refresh the tables.
All links will be refreshed, and you’ll see a message confirming this. Click OK to close the message box. Close the Linked Table Manager dialog box, and the linked tables will have the correct links to the database you selected.
tip
If you don t have a database with linked tables to experiment with, create one with the Database Splitter, as described in the next section, and then move the back-end database to another folder. This will trigger a "Could not find file" error message when you try to work with data in a linked table in the database, which you can fix using the Linked Table Manager.
Troubleshooting - I can’t refresh the link to a certain table
The Linked Table Manager can’t refresh links to tables whose names were changed in the back-end database after they were linked (for example, to give them names using LNC tags). If you can’t refresh a link to a table, delete the link, and then re-create it by choosing File, Get External Data, and then selecting Link Tables.
The Database Splitter
The Database Splitter is a wizard that automates the process of splitting a database into a front end and a back end. This split makes it easier to make changes to the interface objects without affecting the data.
To start the Database Splitter, follow these steps:
- Choose Tools, Database Utilities, and then click Database Splitter. The first page of the wizard (shown in Figure 15-17) informs you of the advantages of splitting a database.
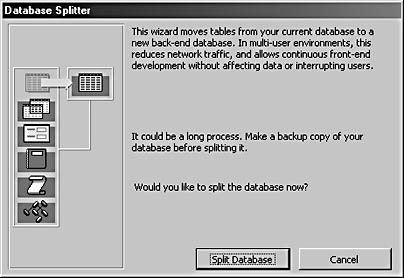
Figure 15-17. The first page of the Database Splitter wizard offers general information about the wizard.
- Click the Split Database button to start the process.
- In the Create Back-End Database dialog box, select a location in which to save the back-end database. (By default, the back end has the original database’s name with _be appended to it.)
- Click the Split button. The database tables will be moved to the new back end, and a message will appear, telling you that the database was successfully split.
The original database now has links to the tables in the new back-end database, as indicated by arrows to the left of the linked table names in the Database window.
The Switchboard Manager
The Switchboard Manager is a wizard that creates a switchboard (main menu) for a database, with text buttons to run various commands. If you click the Switchboard Manager selection for a database that doesn’t already have a switchboard, you’ll get the message shown in Figure 15-18.

Figure 15-18. A message from the Switchboard Manager indicates that the database doesn’t have a switchboard.
You can click Yes to open a dialog box in which you can add new pages to the switchboard or edit existing ones. The switchboard created by the wizard has an old-fashioned appearance. (It hasn’t changed since early versions of Access.) It includes a set of buttons, each of which opens a form or a report or performs some other action. You can also create subsidiary menus—say, a Forms menu and a Reports menu, each with its own set of buttons.
The process of adding items to the switchboard is fairly tedious. After you click Yes in the initial message box, the Switchboard Manager dialog box will open, with one Main Switchboard page listed (as shown in Figure 15-19). (If a switchboard page is not listed, you can click New to create a new switchboard.)
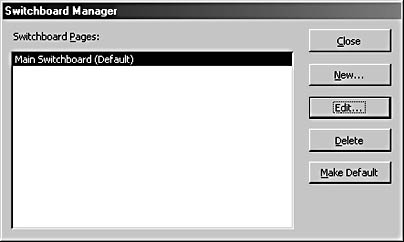
Figure 15-19. The Switchboard Manager lets you set up the default Main Switchboard page.
To add buttons to the Main Switchboard form, follow these steps:
- Click the Edit button. The Edit Switchboard Page dialog box will appear.
- Click the New button to open the Edit Switchboard Item dialog box.
- Enter the text you want to use for the button, and select the command you want to run when the button is clicked. Figure 15-20 shows the dialog box with its fields filled in with data for a button to open a form.
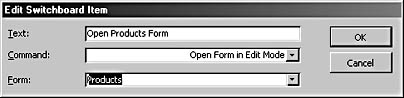
Figure 15-20. You create a button to open a form in the Edit Switchboard Item dialog box.
- Repeat steps 2 and 3 for each button you want to add to the switchboard. When you finish, you’ll have a switchboard like the one shown in Figure 15-21 (which includes buttons for opening three different forms).

note
The Menu Manager add-in on the companion CD creates a more streamlined all-in-one main menu with drop-down lists of forms and reports to select from and other interface elements that make it easy to work with a database. See the section titled "Creating a Main Menu Using the Menu Manager Add-In" later in this chapter for details.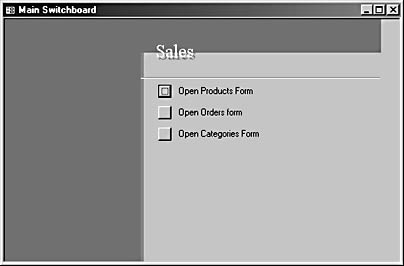
Figure 15-21. The new Main Switchboard form has three buttons for opening forms.
The switchboard form’s functionality is based on a Switchboard Items table created by the Switchboard Manager. This table contains information used in a function in the form’s class module.
tip - Display the switchboard automatically
To make the switchboard appear automatically when the database is opened, select the Main Switchboard form (or fmnuMain, if you have renamed it according to the LNC) as the Display Form/Page in the Startup dialog box (choose Tools, Startup).
The Upsizing Wizard
The Upsizing Wizard automates the process of converting an Access database to a Microsoft SQL Server database, with an option to either create a new SQL Server database or use an existing one. You start the wizard by choosing Tools, Database Utilities and then clicking Upsizing Wizard.
For more information about using the Upsizing Wizard, see Appendix E, "Upsizing to SQL Server."
Saving a Database as an MDE File
Saving a database as an MDE file compiles all its modules, removes editable source code, and compacts it. This protects the VBA code from being viewed or edited, while still allowing it to run. Saving a database to MDE is a quick way of securing its code, without the complexity of setting up a secured database. In an MDE file, users can’t do the following:
- View, modify, or create forms, reports, or modules in Design view.
- Add, delete, or change references to object libraries or databases.
- Change VBA code.
- Import or export forms, reports, or modules. (However, tables, queries, data access pages, and macros can be imported or exported to non-MDE databases).
To save a file as an MDE file, follow these steps:
- Choose Tools, Database Utilities, and then click Make MDE File. The Save MDE As dialog box will appear.
- Navigate to the folder in which you want to save the file, type the file name, and click Save. The default name is the database name with the MDE extension.
caution
You can’t re-create an MDA file from an MDE file, so be sure to keep a copy of the original MDA file in case you need to edit the database in the future.
EAN: 2147483647
Pages: 172
- Step 1.1 Install OpenSSH to Replace the Remote Access Protocols with Encrypted Versions
- Step 1.2 Install SSH Windows Clients to Access Remote Machines Securely
- Step 2.1 Use the OpenSSH Tool Suite to Replace Clear-Text Programs
- Step 4.3 How to Generate a Key Pair Using OpenSSH
- Step 5.2 Troubleshooting Common OpenSSH Errors/Problems