Creating Tables for an Application
Now that you have some information from the client, you can start creating tables and setting up relationships between them, turning a mass of inchoate data into a set of normalized tables representing the things (entities) the database works with. Using the list of tables obtained from the Q&A session with the client, let’s start creating tables for the Toy Workshop application. First, though, a note on naming objects: applying a naming convention right from the start when creating a database will make it much easier to work with. I use the Leszynski Naming Convention (LNC), which is described more fully in Chapter 9, Reworking an Existing Application. For tables, the LNC tag is tbl, so all table names will start with that tag.
Table Creation Methods
To create a new table, click the New button in the Database window with the Tables object selected in the object bar. You have several choices in the New Table dialog, as shown in Figure 1.1.
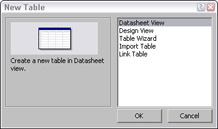
Figure 1.1
In many cases, it’s best to just select the Design view choice and go ahead with creating the table fields, but some of the other choices are useful in certain cases. The primary consideration is whether your table is a standard table type (in which case the Table Wizard is a useful shortcut) or not (Design view is best). All the choices are discussed more fully in later sections:
-
Datasheet view. This choice doesn’t have much to offer. The new table opens in Datasheet view, and you can enter data into the first row. To name the fields in Datasheet view, you need to click several times on the Fieldn field name (until it is highlighted), then type the new name over it—much less convenient than just entering the field name on a new row in Design view. Access guesses at the field data type according to the data entered into the first row, not always accurately, so you will have to modify data types in Design view in any case. In the sample table shown in Figures 1.2 and 1.3, for example, when you switch to Design view you will see that the ToyID field is not identified as the key field, and the two price fields are Long Integer rather than Currency.
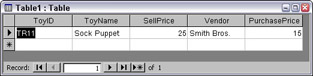
Figure 1.2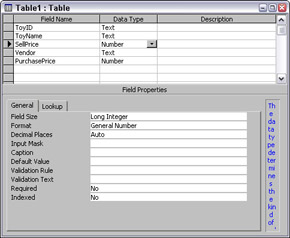
Figure 1.3When creating a new table in Datasheet view, if you enter text into a field, a Text field is created; if you enter a number alone, a Long Integer field is created; if you enter a number with a dollar sign, a Currency field is created; and if you enter a recognizable date, a Date field is created. If you need any other data types (such as a Double numeric field, a Yes/No field, a Memo field, or an OLE Object field), you will have to create them in Design view.
-
Design view. The best choice for nonstandard tables you need to create from scratch. The table opens in Design view, letting you enter each field name on its own row and select the appropriate data type from the Data Type drop-down list (see Figure 1.4).
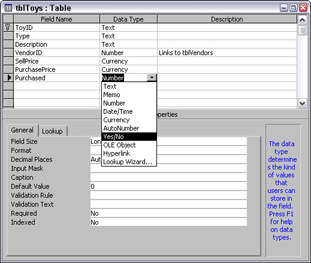
Figure 1.4 -
Table Wizard. Useful as a shortcut when creating standard tables, such as a table of customer name and address data. However, these tables should be used with caution, because they are not always normalized. For example, the Contacts table shown in Figure 1.5 has a number of phone number fields (perhaps to match Outlook contacts), which (depending on the contact) could either provide too many or too few phone fields. With rare exceptions, phone and ID data should be stored in a linked table, which lets you enter exactly as many items as are needed for each contact.
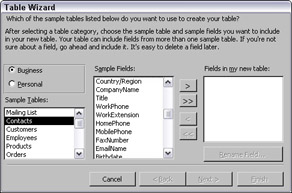
Figure 1.5 -
ImportTable. Lets you import data from an external source into an Access table. If you import outside data as a starter, you will need to examine the fields to make sure that they have the correct data type, and possibly break up the table into several linked, normalized tables.
-
LinkTable. Links an Access table to data in another program, such as Excel. Linked tables aren’t as useful as other tables because you can’t modify their structure; use linked tables only when you need a quick view of current data maintained in an outside program.
In the Database window, linked tables have an arrow to the left of the table name, and a distinctive icon for each data type, as shown in Figure 1.6, where you can see three linked tables—one a comma-delimited text file, one a dBASE file, and one an Excel worksheet. I use the tag tcsv for a linked comma-delimited text file, tdbf for a linked dBASE file, and txls for a linked Excel worksheet, so that I will know what type of linked file I am dealing with when I can’t see the icons in the Database window.
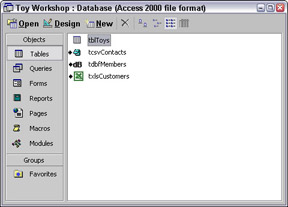
Figure 1.6Important A native table is a table that contains data within Access; the great majority of tables you will work with in Access are native tables. When you create a table in Access, it is a native table, and when you import data from an outside program, the imported data is placed into a native table. In addition to native tables, you can also work with linked tables, which let you work with data in other programs, such as Excel or dBASE.
Creating the Tables
I’ll start with tblToys, which is the database’s main table, containing information about the toys sold (and in some cases, manufactured) by the client. Since the Table Wizard offers a Products table, let’s start with that, and modify it as needed. Figure 1.7 shows the Products table in the Table Wizard; I selected most of the standard fields to get a head start on creating tblToys.
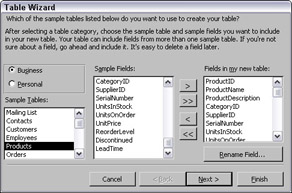
Figure 1.7
There is a button on the Table Wizard screen that lets you rename a field; you can either rename fields as desired in the wizard, or wait until the table opens in Design view and rename fields as needed there. After selecting and (optionally) renaming fields as desired, click the Next button to go to the next page of the wizard, where you give the table a name (tblToys in this case), and select the option to have Access set the primary key, or do it yourself; select No, I’ll set the primary key, because you want to have control over the selection of the key field.
After clicking Next again, the wizard correctly assumes that the ToyID field should be the key field, and gives you three choices (shown in Figure 1.8). Select the third, because in this case the ToyID field contains a combination of letters and numbers. (If you need an AutoNumber ID, select the first option; for a numeric ID, the second option is appropriate.)
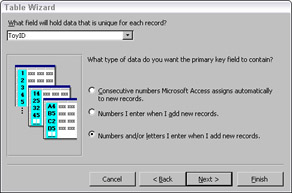
Figure 1.8
After clicking Next again, you are asked if you want to link the new table to any other tables in the database; because this is a new table, just click Next again. On the final screen, select Modify the table design to open the new table in Design view, where you can finalize its structure.
If you don’t set table relationships in the Table Wizard, you can always set them later in the Relationships window—in fact, you may prefer to create all your relationships there, using its more intuitive visual interface.
The first step is to set up an input mask for the ToyID key field, to ensure that data entry into this field meets the client’s specifications for this field. To create the input mask, you can either click the Build button to the right of the Input Mask property for the ToyID field to open the Input Mask Wizard, or just type in the input mask. Since the Input Mask Wizard doesn’t have a standard selection of the appropriate type, we’ll need to type it directly. The table below lists the characters you can use in input masks, to restrict data entry into the field.
| Mask Character | Entries Allowed. |
|---|---|
| 0 | Required digit from 0 through 9; plus and minus signs not allowed. |
| 9 | Optional digit from 9 through 9, or space; plus and minus signs not allowed. |
| # | Optional digit or space; blanks converted to spaces; plus and minus signs |
| allowed. | |
| L | Required letter A through Z or a through z. |
| ? | Optional letter A through Z or a through z. |
| A | Required letter or digit. |
| a | Optional letter or digit. |
| & | Required character or space. |
| C | Optional character or space. |
| . , : ; - / | Decimal placeholder and thousands, date, and time separators—the character |
| used depends on the Regional settings in the Control Panel. | |
| < | Converts following characters to lowercase. |
| > | Converts following characters to uppercase. |
| ! | Causes the input mask to be displayed from right to left, instead of the standard left to right. In some versions of Office, this switch does not work correctly. See the Microsoft Knowledge Base (KB) article 209049, Input Mask Character (!) Does Not Work as Expected” for a discussion of the problem in Access 2000. KB articles can be viewed or downloaded from the Microsoft support Web site at http://support.microsoft.com/ |
| \ | Marks the next character as a literal character. |
| Password | Creates a password entry textbox—characters typed into the textbox are stored as entered, but displayed as asterisks, for security. |
For the sample table’s key field, the client says that the ToyID consists of two uppercase letters and three numbers, so we’ll need the > character to make entered letters uppercase, then two L’s and three zeroes entered into the InputMask property of this field:
>LL000
In addition to the standard fields from the Table Wizard, we’ll need a few more fields to hold data related to manufactured toys. Figure 1.9 shows the table with the extra fields. There is another product ID field in the table, VendorProductID, but I won’t put an input mask on this field, because vendors have their own ID formats.
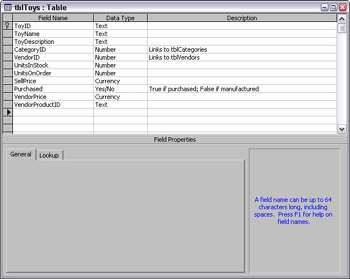
Figure 1.9
Information on materials isn’t stored in this table, but in another table that will be created later.
Next, we need to create tblVendors and tblCategories, which will be linked to tblToys. After selecting the standard Categories table in the Table Wizard, click the Relationships button to set up a relationship with the CategoryID field in tblToys, as shown in Figure 1.10.
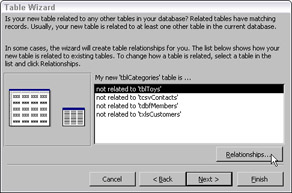
Figure 1.10
Select the middle choice on the next wizard screen (shown in Figure 1.11), because one toy category will be selected for many records in tblToys.
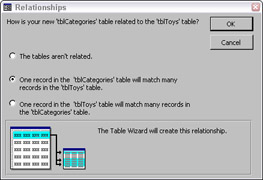
Figure 1.11
Now the wizard screen shows that tblCategories is related to tblToys (see Figure 1.12).
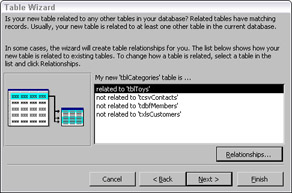
Figure 1.12
There is now a relationship between tblToys and tblCategories, which you can see in the Relationships window in Figure 1.13.
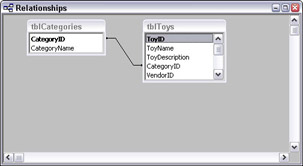
Figure 1.13
Note that although we selected One record in the ‘tblCategories’ table will match many records in the ‘tblToys’ table, in the Relationships page of the Table Wizard, the relationship between these two tables is not set up as a one-to-many relationship—although it should be one (another reason you may prefer to not create relationships in the wizard, and just set up all relationships in the Relationships window). See the Relationships section later in this chapter for information on modifying the relation types set up by the Table Wizard.
Continuing with table creation, tblVendors can be created using the Table Wizard, selecting the standard Suppliers table as the source, and linking it to tblToys on the VendorID field. The Table Wizard doesn’t do all you need to link these tables, though. If you want to set up tblCategories or tblVendors as the row source of a lookup field, so the value can be selected from the linked table, you will need to do this yourself (see the lookup field information in the “Table Field Data Types” section in this chapter).
EAN: 2147483647
Pages: 124