Sharing a Calendar
| After your calendar is up to date with appointments and events, you can use the calendar to plan meetings with other users and even share your calendar with others so that they can effectively plan meetings with you. Sharing a calendar with others, or viewing a calendar someone else has shared with you, encourages effective meeting planning. After all, if you schedule a meeting with a coworker on a day she's on vacation, the meeting definitely won't happen as scheduled. If you utilize calendar sharing, you can plan meetings when all participants are available. Of course, this requires all participants to actively use their Outlook calendar and keep it up to date. This is just one more reason to always keep your calendar up to date. If your calendar isn't accurate, you might be asked to participate in meetings during times when you aren't available. Sharing your calendar with others requires the use of Microsoft Exchange Server, an Internet Free/Busy server, or a network shared folder. Setting Up Calendar Sharing Using Exchange ServerIf you use Exchange Server for your email server, you can share your calendar directly with another user or you can publish your free/busy information to the server for others to access.
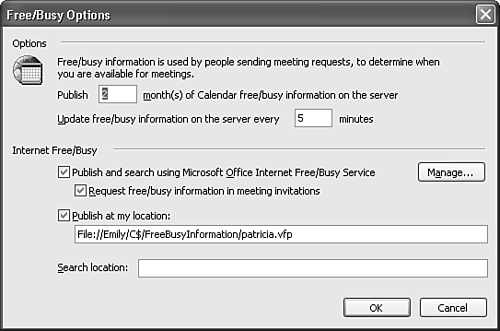
To publish your free/busy information to Exchange Server, select Tools, Options, Calendar Options, and select Free/Busy Options to display the Free/Busy Options dialog box shown in Figure 13.1. Figure 13.1. The Free/Busy Options dialog enables you to publish your free/busy information to an Exchange Server or an Internet Free/Busy server.
Outlook defaults to publishing two months of free/busy information on the server every 15 minutes. You can change this default to any number of months you choose. The number of months you choose will depend on how far in advance you typically schedule meetings. NOTE You might be concerned that you're using too many system resources or too much bandwidth by publishing your free/busy information every 15 minutes. However, only changes are actually replicated to the server. If nothing has changed in your Calendar, nothing is sent to the server. Setting Up Calendar Sharing Using Other Free/Busy Server OptionsIf you aren't using Exchange Server or want to share your free/busy information with users who aren't part of your Exchange network, you can utilize an Internet Free/Busy server or create a folder on your network to store free/busy information. Publishing free/busy information on the Internet is simple and can provide your free/busy information to anyone with an Internet connection. To use an Internet Free/Busy server:
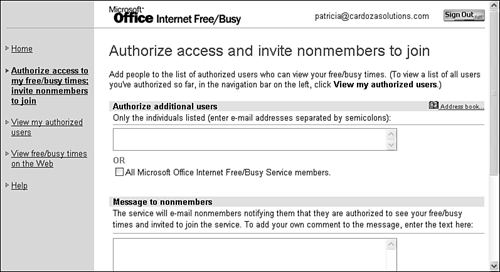
NOTE If this is the first time you've configured Internet Free/Busy options, you might need your Outlook 2003 CD to install needed files. Be sure to have this CD handy when configuring these options. Configuring the Microsoft Office Internet Free/Busy ServiceIf you choose to publish your free/busy information using the Microsoft Office Internet Free/Busy service, you'll need to configure additional options. Return to the Free/Busy Options dialog box shown in Figure 13.1. Click Manage to configure the Microsoft Office Internet Free/Busy service. Sign in with your Passport ID and password. If you don't have a Passport ID, click the link to sign up for a Passport ID. NOTE You must be connected to the Internet to configure the Microsoft Office Internet Free/Busy options. If you've checked the box on the Free/Busy options dialog to publish your information to the Office Internet Free/Busy service, you don't need to install the ActiveX control on your computer. Click Next to access the free/busy service Web site as shown in Figure 13.2. Figure 13.2. You can enter any number of addresses of people who can view your free/busy information using the Microsoft Office Internet Free/Busy service and create an email message instructing them how to use the service.
Enter the email addresses of the individuals you want to be able to access your free/busy information. To select users from your Outlook address book, click the Address Book icon to display your Outlook address book and select users to add. You can also send an email message instructing users how to become a member of the Microsoft Office Internet Free/Busy Service to access your calendar information. Click OK after entering email addresses and composing the welcome message to display a confirmation message containing the email addresses you've authorized to view your free/busy information. The users you authorize to view your free/busy information must register with the Internet Free/Busy service before they can access your schedule. They do not, however, need to publish their free/busy information for you to view. From this Web site, you can also view your authorized users and view your own free/busy information or the information of other users directly on the Web. Depending on the publishing interval you selected in the Free/Busy Options dialog box, your free/busy information might not appear right away. You can send your free/busy information to the server manually at any time. Simply click Tools, Send/Receive, Free Busy Information. Publishing Free/Busy Information to a Network Folder or Local Web SiteYou can publish your free/busy information to a network folder or Web server as well. In the Free/Busy Options dialog box, check the Publish at My Location box and enter the location of a Web server that you're authorized to access. A valid entry needs to be in the format ftp://ServerName/Directory/YourName.vfb. Alternatively, you can specify the following link: ftp://%SERVER%/Directory/%NAME%.vfp. %SERVER% resolves to the server name reflected in the email address, and %NAME% resolves to the username. For a user address of john@doe.com, the URL would resolve to ftp://doe.com/Directory/john.vfb. TIP A network folder can also serve as a Web server if you have Internet Information Server (IIS) installed. Contact your IIS administrator for help setting up a shared folder for storing free/busy information on your company's intranet. To publish your calendar information to a network folder without using IIS, enter a location similar to the following: File://servername/foldername/name.vfb. To view other users' free/busy information over a network share, instruct them to publish their free/busy information the same way, using name.vfp as the filename, where name is their name. NOTE To avoid confusion in case there are two Bills, Teds, or Lisas in an organization, consider using either first and last name together as the name of the free/busy file or using the network username. Sending Calendar Information to a ContactAfter you've published your free/busy information on the Exchange Server, Microsoft Office Free/Busy Service, network folder, or Web site, you can send that information to others. To send free/busy information to a contact, use the following steps:
Before you send free/busy information to other uses in this manner, make sure that they have access to the server that stores your free/busy information. Otherwise, they'll see an error message when they attempt to access your free/busy information. |
EAN: 2147483647
Pages: 426
 For more information about sharing folders with Exchange Server,
