Using Visual Studio .NET Components and Working with Strongly Typed DataSets
Now that you have a solid introduction to working with DataAdapters and DataSets (as well as the other related classes in the System.Data namespace), we will show you how Visual Studio .NET can make working with these classes much easier. In the examples that you have seen so far, we have written the code that is necessary to declare, instantiate, and set the properties for our ADO.NET objects. In this section, you are going to use the Visual Studio .NET data components to create an application.
These components are found in the Visual Studio .NET Toolbox and can be added to your project simply by dragging and dropping them onto a form, just like the standard TextBox or Command Button controls that you are used to using. After the controls are added to the project, Visual Studio .NET will generate the majority of the code that is required to use them, based on the settings that you make by using dialog boxes. These components behave exactly the same way as the ADO.NET objects that you create manually. After the code has been generated, you can modify it or add additional code of your own for further customization.
In this section, you will also learn about strongly typed DataSets. The second goal of this section is to demonstrate their use. A strongly typed DataSet, also referred to simply as a typed DataSet, is an object whose definition is provided at design time and expressed in the form of an XML Schema Definition (XSD) document. Visual Studio .NET will also generate a class in your project that expresses the definition in terms of object properties, methods, and events.
All of the examples so far in this chapter relied on the ADO.NET DataSet object’s ability to create appropriate columns automatically as data is being loaded. Although this is convenient, it can lead to errors if you use data types inappropriately when your application is running. A typed DataSet has all column names and data types defined in advance, so while you are writing code, the compiler can check whether you are using data types correctly and ensure that you are not making any invalid type conversions while working with the data. Another advantage of typed DataSets is that you can see column name information in Intellisense while you are working in the Visual Studio .NET code editor. Using the Visual Studio .NET Toolbox data components is one of the easiest ways to create a typed DataSet, although they can be created in other ways. For example, you can add an XSD Schema file to your project, or can drag and drop a stored procedure definition from the Server Explorer.
We cover specifics about XSD in Chapter 7. This section concentrates on creating the typed DataSet and working with it in your code. After having completed the first four exercises in this chapter, you will appreciate the time savings that Visual Studio .NET provides by generating much of the repetitive code for you.
Using the Toolbox Components
Just as you did when you first began learning about ADO.NET in Chapter 5, you will begin by creating and configuring a Connection object to access the database. Then you will see how to add a DataAdapter component to the application and use the Data Adapter Configuration Wizard to set its properties. After you have configured the DataAdapter, you can use the Generate DataSet menu option to create a strongly typed DataSet that will be automatically configured according to the settings that you have previously specified for the DataAdapter.
ADO.NET Toolbox components can easily and quickly be added to your project in Visual Studio .NET. To add a component, go to the Data tab in the Toolbox and click on the item you want to add. Then, drag it onto the form design surface, just as you would add a standard Windows forms control such as a TextBox or Command Button. The components will not appear on the design surface itself, but in the “tray” area directly below it. The ADO.NET-equivalent components that are available from the Visual Studio .NET Toolbox are as follows:
-
DataSet
-
OleDbDataAdapter, SqlDataAdapter
-
OleDbConnection, SqlConnection
-
OleDbCommand, SqlCommand
-
DataView
Figure 6.1 shows the Visual Studio .NET Toolbox and data components added to the tray area below the form design surface.
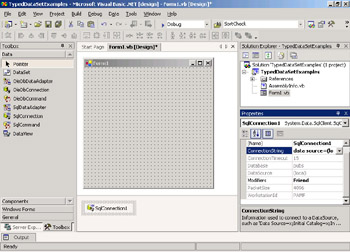
Figure 6.1: The Visual Studio .NET data components
After you drag a Connection component onto the form, you can then go to the Properties window to begin configuring the ConnectionString property. When you select <NewConnection>,you will see the familiar Data Link Properties dialog box, shown in Figure 6.2, to select a server, login information, and a database.
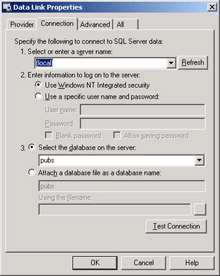
Figure 6.2: The Data Link Properties dialog box
If you expand the Windows Form Designer Generated region of your form’s code module, you will see the SqlConnection1 object declared as Friend and WithEvents, and then instantiated, as shown in this code snippet for the Connection component:
Friend WithEvents SqlConnection1 As _ System.Data.SqlClient.SqlConnection Me.SqlConnection1 = New _ System.Data.SqlClient.SqlConnection()
The ConnectionString property is set with the values that you set in the Data Link Properties dialog box:
Me.SqlConnection1.ConnectionString = _ "data source=(local);initial catalog=pubs;" & _ "integrated security=SSPI;persist security " & _ "info=False;workstation id=COMP1;packet size=4096"
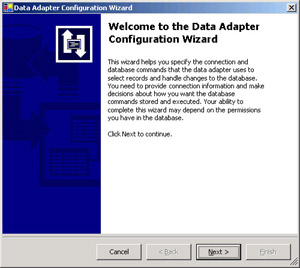
When you add a DataAdapter component, Visual Studio .NET automatically starts up the Data Adapter Configuration Wizard.
| Note | You will go through the steps of using the Data Adapter Configuration Wizard in detail in Exercise 6.5. |
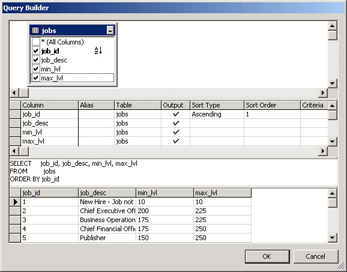
This wizard helps you to configure the SelectCommand property of the DataAdapter component by using a visual query builder, and then automatically generates matching InsertCommand, UpdateCommand, and DeleteCommand SQL statements. The wizard gives you the option of creating SQL statements that will be added to your source code or calling stored procedures. While configuring a DataAdapter to create a simple SelectCommand to retrieve data from the jobs table (just as you did in Exercise 6.1), the visual query builder would look like Figure 6.3.
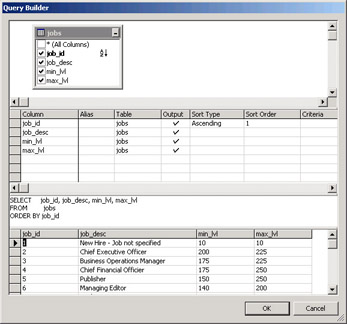
Figure 6.3: The Query Builder
The Data Adapter Configuration Wizard then generates code, which is also found in the Windows Form Designer generated code region of the form’s code module.
For the DataAdapter component, the SelectCommand property is generated based on your query builder selections. Matching InsertCommand, UpdateCommand, and DeleteCommand statements are also generated. However, this is done differently from the way that you created them in Exercise 6.1. Visual Studio .NET creates a complex WHERE clause, which requires every column value for that row in the database to match the corresponding original value stored in the DataSet. Any mismatches that are found indicate that another user made changes to the same record in the database since the time that the data was retrieved to your local DataSet. Rather than have your update overwrite another user’s changes, the Visual Studio .NET–generated code, by default, will not allow the update to go through and will show that row to be in error.
This is the safest way to create the SQL updates and it protects against inadvertently overwriting another user’s changes. It does, however, create some complex SQL statements. If you prefer, you can change these statements to use a time stamp or row version column to check whether intermediate changes were made, in order to simplify your code. Keep in mind that if you change the generated code and then have to run the Data Adapter Configuration Wizard again, your changes will be replaced by new wizard-generated code. Also, keep in mind that one of the options is to call stored procedures; you might prefer to create your own stored procedures and then let the wizard generate ADO.NET code to call only your procedures.
Listing 6.9 shows what the generated code looks like for the SelectCommand and UpdateCommand properties. The DeleteCommand property uses similar logic to make sure you do not delete a record if another user has changed it since you first retrieved the data.
Listing 6.9: The Wizard-Generated SQL Statements
'SqlSelectCommand1 Me.SqlSelectCommand1.CommandText = _ "SELECT job_id, job_desc, " & _ "min_lvl, max_lvl FROM jobs ORDER BY job_id" Me.SqlSelectCommand1.Connection = Me.SqlConnection1 'SqlUpdateCommand1 Me.SqlUpdateCommand1.CommandText = _ "UPDATE jobs SET job_desc = @job_desc, " & _ "min_lvl = @min_lvl, max_lvl = @max_lvl " & _ "WHERE (job_id = @Original_job_id) AND " & _ "(job_desc = @Original_job_desc) AND (max_lvl = " & _ "@Original_max_lvl) AND " & __ "(min_lvl = @Original_min_lvl); " & _ "SELECT job_id, job_desc, min_lvl, max_lvl " & _ "FROM jobs WHERE (job_id = @job_id) ORDER BY job_id" Me.SqlUpdateCommand1.Connection = Me.SqlConnection1 Me.SqlUpdateCommand1.Parameters.Add(New _ System.Data.SqlClient.SqlParameter( _ "@job_desc", System.Data.SqlDbType.VarChar, & _ 50, "job_desc")) Me.SqlUpdateCommand1.Parameters.Add(New _ System.Data.SqlClient.SqlParameter( _ "@min_lvl", System.Data.SqlDbType.TinyInt, _ 1, "min_lvl")) Me.SqlUpdateCommand1.Parameters.Add(New _ System.Data.SqlClient.SqlParameter( _ "@max_lvl", System.Data.SqlDbType.TinyInt, _ 1, "max_lvl")) Me.SqlUpdateCommand1.Parameters.Add(New _ System.Data.SqlClient.SqlParameter( _ "@Original_job_id", System.Data.SqlDbType.SmallInt, _ 2, System.Data.ParameterDirection.Input, _ False, CType(0, Byte), CType(0, Byte), _ "job_id", System.Data.DataRowVersion.Original, Nothing)) Me.SqlUpdateCommand1.Parameters.Add(New _ System.Data.SqlClient.SqlParameter( _ "@Original_job_desc", System.Data.SqlDbType.VarChar, _ 50, System.Data.ParameterDirection.Input, False, _ CType(0, Byte), CType(0, Byte), "job_desc", _ System.Data.DataRowVersion.Original, Nothing)) Me.SqlUpdateCommand1.Parameters.Add(New _ System.Data.SqlClient.SqlParameter( _ "@Original_max_lvl", System.Data.SqlDbType.TinyInt, 1, _ System.Data.ParameterDirection.Input, False, _ CType(0, Byte), CType(0, Byte), "max_lvl", _ System.Data.DataRowVersion.Original, Nothing)) Me.SqlUpdateCommand1.Parameters.Add(New _ System.Data.SqlClient.SqlParameter( _ "@Original_min_lvl", System.Data.SqlDbType.TinyInt, 1, _ System.Data.ParameterDirection.Input, False, _ CType(0, Byte), CType(0, Byte), "min_lvl", _ System.Data.DataRowVersion.Original, Nothing)) Me.SqlUpdateCommand1.Parameters.Add(New _ System.Data.SqlClient.SqlParameter( _ "@job_id", System.Data.SqlDbType.SmallInt, 2, "job_id"))
Generating the Typed DataSet
After you have finished the DataAdapter configuration, you can generate a typed DataSet based on the SelectCommand that you created for your DataAdapter. This feature is available from the Visual Studio .NET Data Ø Generate DataSet menu, or by right-clicking the SqlDataAdapter component in the tray.
Give your DataSet a descriptive name. The name you choose here will be the name given to the files that are generated and used for the class name. By default, the component that is added to your project will be called DataSet1, the same way that a TextBox control that you add to your form is called TextBox1 by default. This is the name that you will use in your code when working with the component. For this example, the component is named jobSet. Figure 6.4 shows JobSet1in the tray, and the jobSet.xsd file (which is the XSD document) and the jobSet.vb class in the Solution Explorer.
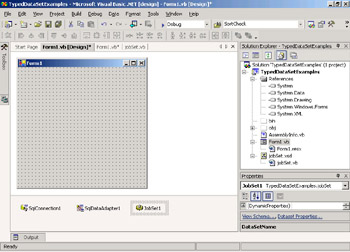
Figure 6.4: The typed DataSet is added to the project.
If you review the code in the generated class file, you will find overridden methods for constructors, and other methods and event procedures of the ADO.NET DataSet class. There are also property accessor procedures for all of the columns. The following code snippet shows the property procedure for the job_desc column:
Public Property job_desc As String Get Return CType(Me(Me.tablejobs.job_descColumn),String) End Get Set Me(Me.tablejobs.job_descColumn) = value End Set End Property
After you have created the typed DataSet, it is easier to access its tables and columns. The table and column names show up in Intellisense. The next code snippet shows how to retrieve a field value, and Figure 6.5 shows how Intellisense provides the column names.
txtDescription.Text = JobSet1.jobs(0).job_desc
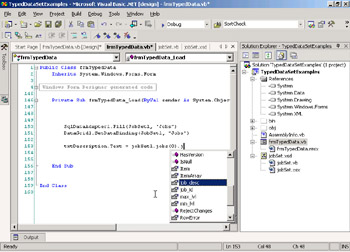
Figure 6.5: Typed DataSet column names in Intellisense.
As you’ve seen, the XSD document that is generated to describe the typed DataSet contains information about the original table and column names and data types in the database, and also reflects the jobSet class name that we assigned.
Listing 6.10 shows the XSD document for the typed DataSet named jobSet.
Listing 6.10: The jobSet XSD Document
<?xml version="1.0" standalone="yes" ?> <xs:schema targetNamespace="http://www.tempuri.org/jobSet.xsd" xmlns:mstns="http://www.tempuri.org/jobSet.xsd" xmlns="http://www.tempuri.org/jobSet.xsd" xmlns:xs="http://www.w3.org/2001/XMLSchema" xmlns:msdata="urn:schemas-microsoft-com:xml-msdata" attributeFormDefault="qualified" elementFormDefault="qualified"> <xs:element name="jobSet" msdata:IsDataSet="true"> <xs:complexType> <xs:choice maxOccurs="unbounded"> <xs:element name="jobs"> <xs:complexType> <xs:sequence> <xs:element name="job_id" msdata:ReadOnly="true" msdata:AutoIncrement="true" type="xs:short" /> <xs:element name="job_desc" type="xs:string" /> <xs:element name="min_lvl" type="xs:unsignedByte" /> <xs:element name="max_lvl" type="xs:unsignedByte" /> </xs:sequence> </xs:complexType> </xs:element> </xs:choice> </xs:complexType> <xs:unique name="Constraint1" msdata:PrimaryKey="true"> <xs:selector xpath=".//mstns:jobs" /> <xs:field xpath="mstns:job_id" /> </xs:unique> </xs:element> </xs:schema>
If you are not using Visual Studio .NET to create your applications, you can use the command-line tool xsd.exe to use an XSD document, such as the one shown in Listing 6.10, to generate the class module that can then be compiled along with your other source code.
Exercise 6.5 gives you an opportunity to try using the Visual Studio .NET Toolbox DataAdapter component and to see how strongly typed DataSets are used.
Exercise 6.5: Creating a Typed DataSet and Using Visual Studio .NET Components
-
Start a new Windows application project in Visual Studio .NET. Name the project TypedDataSetExample.
-
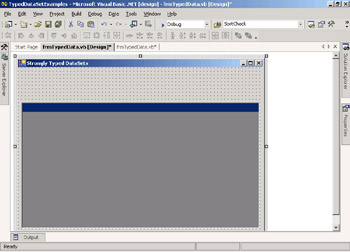
Change the name of the form to frmTypedData. Add a DataGrid control. Your form should look something like this:
-
From the Toolbox, drag a SqlDataAdapter component to the form design surface. The Data Adapter Configuration Wizard will run. Click the Next button.
-
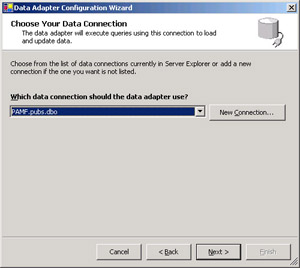
The next screen asks you to choose a connection. Click the New Connection button.
-
Fill in the Data Link Properties dialog box with the server name. Use (local) if you are running SQL Server on your development machine, or use the appropriate server name for your environment. Set the login information to Use Windows NT Integrated Security (or provide appropriate username and password information for your environment), and select the pubs sample database. Click the Test Connection button. Then click OK.

-
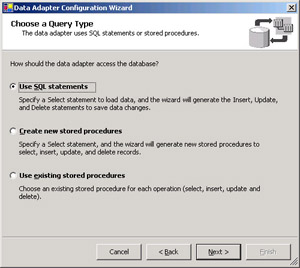
The next screen asks you to select a query type. Click the Use SQL Statements radio button to select it. Click Next.
-
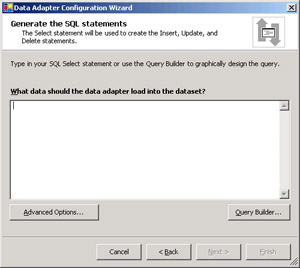
The next screen asks you to provide a SQL SELECT statement. Click the Query Builder button.
-
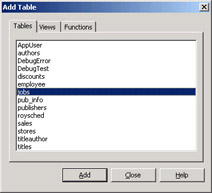
Select the jobs table and click Add. Then click Close.
-
Use the query builder to design a query that looks like the following graphic. Right-click in the query builder window and choose Run from the menu to test your query.
-
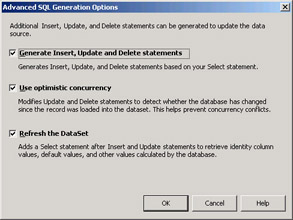
Click OK to close the query builder and click Advanced Options. This screen gives you options as to how the DataAdapter Insert, Update, and Delete command statements will be coded. Notice that all options are selected by default. Click OK to close the Advanced SQL Generation Options dialog box. Then click Next.
-
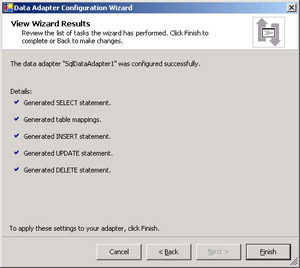
The last screen is a summary of what the wizard has created. Click Finish.
-
Open the code module for frmTypedData and expand the Windows Form Designer generated code region. Examine the code that was generated to create and configure the Connection and DataAdapter components.
-
Right-click the SqlDataAdapter1 component in the tray area. Choose Generate DataSet from the menu. Change the DataSet name to jobSet and click OK.

You will see the JobSet1 component added to the tray.
-
Review the files jobSet.xsd and jobSet.vb that have been added to your project. You might have to click the Show All Files toolbar button at the top of the Solution Explorer to see these files.
-
Even though you have created and configured the components, you still need to write code to fill the DataSet and bind to the DataGrid. Add the following code to the frmTypedData_Load procedure:
SqlDataAdapter1.Fill(JobSet1, "Jobs") DataGrid1.SetDataBinding(JobSet1, "Jobs")
-
Save and test your work.
EAN: 2147483647
Pages: 153
- Chapter V Consumer Complaint Behavior in the Online Environment
- Chapter XII Web Design and E-Commerce
- Chapter XIII Shopping Agent Web Sites: A Comparative Shopping Environment
- Chapter XVI Turning Web Surfers into Loyal Customers: Cognitive Lock-In Through Interface Design and Web Site Usability
- Chapter XVIII Web Systems Design, Litigation, and Online Consumer Behavior