A Realistic Example
Although the previous example was very easy to implement, it doesn’t demonstrate a real-world application of Web Services. Let’s take a look at a more realistic example by building a Web Service that sends out a richer set of data from a database instead. For this example, imagine that a third-party provider hosts the site. The SQL server is behind a firewall, and the IIS server is in a demilitarized zone - a safe, though exposed, network position, as shown in Figure 26-6.
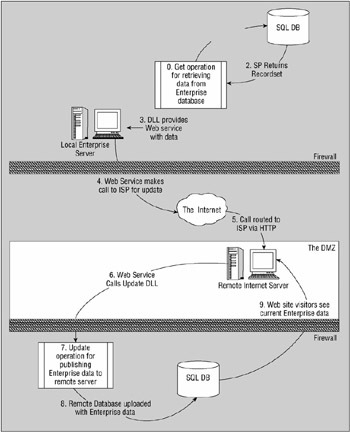
Figure 26-6
To get the data from your site to the remote site, you need to call a Web Service on the remote Web server from your intranet. The SOAP envelope is sent via HTTP, so the firewall allows it to pass through, and ADO.NET on the IIS server handles the actual database manipulation. The remote firewall allows database calls only from the IIS server, and the data is updated safely because of the security.
In real life, the method GetEmployees() would be local to your intranet server, and the database file would be a SQL server on a second server. Across the Internet, as shown in Figure 26-6, the Web Service would be on an IIS server sitting outside the network firewall. The DLL that actually provides the data functions would be on an application server inside the firewall, and the database would again be on a separate server.
For this application, though, you need to create a Web Service that exposes some of the Contact table, as well as some of the Employee table, from the sample AdventureWorks database, across the intranet, that will later be consumed by a Web application. Keep in mind that Web Services not only expose simple values, but also a richer data set of values such as entire tables from a datastore (for example, SQL Server).
Start this example by first creating a new Web Service project in Visual Studio called WebService1.
Using Visual Studio 2005 to Build Web Services
The Visual Studio 2005 IDE shows a marked improvement from the add-ins provided for Visual Studio 6 in the SOAP Toolkit. For instance, Web Services are shown as references on a project, rather than in a separate dialog box. The discovery process, discussed later, is used to its fullest, providing much more information to the developer. In short, it is nearly as easy to consume a Web Service with Visual Basic as it is to use DLLs.
Producing a Typed DataSet
For simplicity, you’ll use Visual Studio to first create a typed DataSet, which will be returned from the WebMethod that you later produce. This IDE enables you to quickly and easily create the needed data access without having to dig through a lot of ADO.NET code.
Right-click the WebService1 project in the Solution Explorer and select Add New Item. From the provided menu of file options, select DataSet. Change the name of this file to MyDataComponent.xsd. This creates an already strongly typed DataSet on-the-fly. In addition, Visual Studio requests to place this file in the App_Code folder of your solution. Confirm this request, because having it in the App_Code folder allows for programmatic access to the DataSet (see Figure 26-7).

Figure 26-7
Once created, the MyDataComponent.xsd file opens itself in Visual Studio. This file appears as a blue screen in the document window, with a single DataTable on its design surface. Along with the file, the TableAdapter Configuration Wizard also opens, as shown in Figure 26-8.
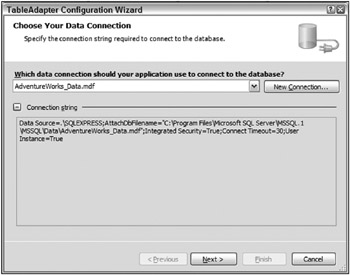
Figure 26-8
The first step in the TableAdapter Configuration Wizard is establishing a data connection. If a connection is not already in place, create one by clicking the New Connection button. Using this dialog, make a new connection to the sample AdventureWorks_Data.mdf database, which is a SQL Server Express Edition database file. You can find this and other SQL Server 2005 samples online on the MSDN website (http://msdn.microsoft.com) under the title of SQL Server 2005 Samples and Sample Databases (July 2006).
Once the connection is in place, you can move the database file to your project and store the connection in the web.config file. Choosing both of these actions will copy the AdventureWorks_Data.mdf database file to the App_Data folder in your project, and the connection to this database file will now be named and placed within the web.config file of your ASP.NET Web Service project.
<connectionStrings> <add name="AdventureWorks_DataConnectionString" connectionString="Data Source=.\SQLEXPRESS;AttachDbFilename=|DataDirectory| \AdventureWorks_Data.mdf;Integrated Security=True;Connect Timeout=30; User Instance=True" providerName="System.Data.SqlClient" /> </connectionStrings> Once the connection to the datastore is established, click the Next button. In the dialog that appears, pick the command type that you want to work with. Typically, the options are working with either direct SQL commands, existing stored procedures, or stored procedures that you can create directly in the wizard. For this example, choose the first option: Use SQL Statements.
The next page in the wizard asks for the query that you want to use to load the table data. Input the following:
SELECT HumanResources.Employee.EmployeeID, HumanResources.Employee.Title, HumanResources.Employee.Gender, HumanResources.Employee.HireDate, Person.Contact.Title AS EXPR1, Person.Contact.FirstName, Person.Contact.MiddleName, Person.Contact.LastName, Person.Contact.EmailAddress, Person.Contact.Phone FROM Person.Contact INNER JOIN HumanResources.Employee ON Person.Contact.ContactID = HumanResources.Employee.ContactID Clicking the Next button results in a page from which you can select the methods that the wizard will generate (as shown in Figure 26-9). These are the methods used in your Web Service to load data into data sets for transmission. In this case, the Fill() and GetData() methods are specified with the first two options in the dialog. In some cases, you might want to also select the last check box, which creates the additional Insert(), Update(), and Delete() methods that you might want to later expose via a Web Service. When you are done, click the Next button again to proceed to the next step in the TableAdapter Configuration Wizard.
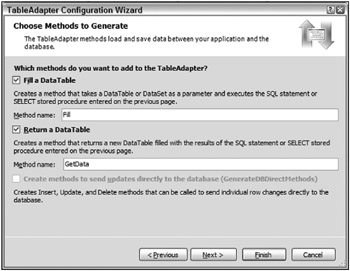
Figure 26-9
Figure 26-10 shows the last page of the wizard. This final page just shows the results of all the actions taken in the preceding steps.
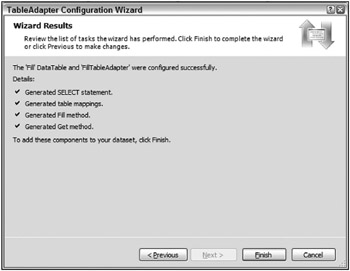
Figure 26-10
After clicking the Finish button, note that the design surface of the MyDataComponent.xsd file changes to reflect the data that comes from the two tables of the AdventureWorks database (see Figure 26-11).
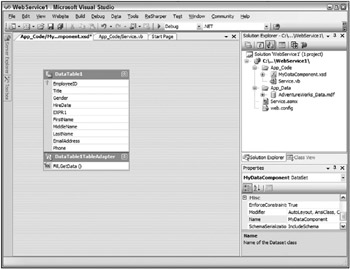
Figure 26-11
At this point, your typed data set is now in place and ready for use by the Web Service. Looking at the results on the design surface of the .xsd file, you can see that indeed the typed MyDataComponent data set is in place and contains a single DataTable called DataTable1. In addition to this there is also a DataTable1TableAdapter object with Fill() and GetData() methods in place.
Building the Service
Right-click Service.asmx from within Solution Explorer in Visual Studio and select View Code. Rename the HelloWorld() function to GetEmployees(). From here, simply retrieve data from the DataTable1TableAdapter that was created when you created the .xsd file earlier:
Imports System.Web Imports System.Web.Services Imports System.Web.Services.Protocols <WebService(Namespace:="http://www.lipperweb.com/namespace")> _ <WebServiceBinding(ConformsTo:=WsiProfiles.BasicProfile1_1)> _ <Global.Microsoft.VisualBasic.CompilerServices.DesignerGenerated()> _ Public Class Service Inherits System.Web.Services.WebService <WebMethod()> _ Public Function GetEmployees() As MyDataComponent.DataTable1DataTable Dim da As New MyDataComponentTableAdapters.DataTable1TableAdapter Dim ds As New MyDataComponent.DataTable1DataTable da.Fill(ds) Return ds End Function End Class Right-click the Service.asmx file in Solution Explorer and select View in Browser. If there are no errors, a simple screen listing GetEmployees as the sole method of the service appears. Click the Service Description line. You’ll get a screen like the one shown earlier in Figure 26-2.
Consuming the Service
Although the Web Service is in place, you really have seen only half the story. Exposing data and logic as SOAP to disparate systems across the enterprise or across the world is a simple task using .NET, and particularly ASP.NET. The other half of the story is the actual consumption of an XML Web Service into another application.
It is important to understand that you are not limited to consuming Web Services only into ASP.NET applications, as shown shortly. Consuming Web Services into other types of applications is not that difficult; in fact, it is rather similar to how you would consume them using ASP.NET. Remember that the Web Services you come across can be consumed in Window Forms, Windows Presentation Foundation applications, mobile applications, other databases, and more. You can even consume Web Services with other Web Services, resulting in a single Web Service made up of what is basically an aggregate of other Web Services.
For this consuming application, provide a Web application called WSEmployees by creating a new ASP.NET Web Site project with that name. For this example, create this new project within your current solution: Right-click on the WebService1 solution and select Add ![]() New Web Site from the menu. Once complete, your solution will now contain a project called WebService1 and another called WSEmployees. The first step to take within your WSEmployees project is to create a Web reference to the remote XML Web Service that was created in the WebService1 project.
New Web Site from the menu. Once complete, your solution will now contain a project called WebService1 and another called WSEmployees. The first step to take within your WSEmployees project is to create a Web reference to the remote XML Web Service that was created in the WebService1 project.
Adding a Web Reference
The only bit of magic here is the adding of a Web reference to the project using the Visual Studio IDE. As described later, you are really creating a proxy based upon the WSDL file of the service and referencing the proxy in the project, but the IDE makes this all quite simple.
To create the proxy needed by the consuming application, right-click the WSCustomers project in the Solution Explorer and select Add Web Reference from the list of options. In this form, enter the WSDL file of the Web Service to which you want to make a reference. If the Web Service is a .NET Web Service (with an .asmx file extension), simply input the URL of the .asmx file and nothing more because the wizard automatically adds ?wsdl at the end of the input. If you are referencing a Java Web Service, then place the URL for the .wsdl file in this wizard. In most cases, you would simply enter the URL of the service you are interested in consuming in the address bar of the Add Web Reference dialog. For this example, click the “Web Services found at this URL” link. The dialog box should appear as shown in Figure 26-12.
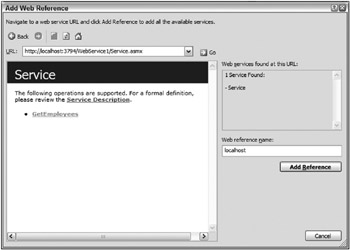
Figure 26-12
The service description page you see when you build your service appears in the left pane of the wizard, with .NET-specific information in the right. Click the Add Reference button at the right of the window to add this reference to your project. The service appears in a new folder within the Solution Explorer called Web References, as shown in Figure 26-13.
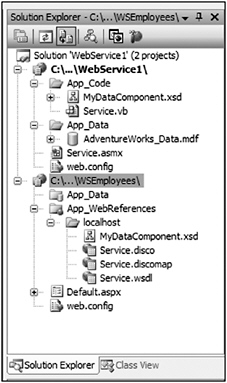
Figure 26-13
In making the reference, you can see that the .wsdl file was copied over, as well as the typed DataSet, MyDataComponent. The power of this Web Services model is that it can work with the GetEmployees() method as if it were now local to your machine, when in fact it is hosted in an entirely different application.
Building the Consumer
The COM architecture continually promised “one line of code” to generate great results. Web Services live up to the promise, minus the declarations. Now the only thing left to do is call the referenced Web Service and pass the generated DataTable that comes from the DataSet. Compared to the scores of lines of XML needed to pass the DataSet in the existing Microsoft technologies, this is a breeze.
The first step to consuming an .aspx page is simply to make a reference to the proxy that Visual Studio created and then call the GetEmployees() WebMethod through this instantiated object. The results pulled from the GetEmployees() method are then displayed in a GridView control, which is placed on a Web form.
You have a couple of ways to achieve this. The first method is to use an ObjectDataSource control, which does the work of invoking the GetEmployees() WebMethod and then displaying the results in the GridView control. (The second method, discussed a bit later, is to manually write the required code.) To work through this example, drop a GridView and an ObjectDataSource server control onto the design surface of the Web Form. Open the smart tag of the ObjectDataSource control and select Configure Data Source. You are then presented with the Configure Data Source Wizard.
In the first page of this wizard, uncheck the Show Only Data Components check box and select local host.Service from the drop-down list. Click the Next button to choose the SELECT method for that ObjectDataSource control to use (shown in Figure 26-14).
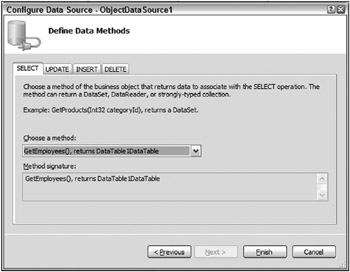
Figure 26-14
From the drop-down list on this page of the wizard, select GetEmployees(), returns DataTable1DataTable and click Finish to progress to the next step of binding the GridView control to the returned DataTable from this ObjectDataSource control.
Now, turn your attention to the GridView control. In configuring this control, open the control’s smart tag. From the drop-down list, select ObjectDataSource1 as the data source control for this control. Note that once you do this, the GridView control expands to include all the appropriate columns from the result set you specified earlier from the AdventureWorks database.
Now, in the same smart tag, enable paging by selecting the appropriate check boxes. The code generated by Visual Studio is shown here:
<%@ Page Language="VB" AutoEventWireup="false" CodeFile="Default.aspx.vb" Inherits="_Default" %> <!DOCTYPE html PUBLIC "-//W3C//DTD XHTML 1.0 Transitional//EN" "http://www.w3.org/TR/xhtml1/DTD/xhtml1-transitional.dtd"> <html xmlns="http://www.w3.org/1999/xhtml" > <head runat="server"> <title>Consuming Application</title> </head> <body> <form runat="server"> <div> <asp:GridView runat="server" AllowPaging="True" AutoGenerateColumns="False" DataKeyNames="EmployeeID" DataSource> <Columns> <asp:BoundField DataField="EmployeeID" HeaderText="EmployeeID" InsertVisible="False" ReadOnly="True" SortExpression="EmployeeID" /> <asp:BoundField DataField="Title" HeaderText="Title" SortExpression="Title" /> <asp:BoundField DataField="Gender" HeaderText="Gender" SortExpression="Gender" /> <asp:BoundField DataField="HireDate" HeaderText="HireDate" SortExpression="HireDate" /> <asp:BoundField DataField="EXPR1" HeaderText="EXPR1" SortExpression="EXPR1" /> <asp:BoundField DataField="FirstName" HeaderText="FirstName" SortExpression="FirstName" /> <asp:BoundField DataField="MiddleName" HeaderText="MiddleName" SortExpression="MiddleName" /> <asp:BoundField DataField="LastName" HeaderText="LastName" SortExpression="LastName" /> <asp:BoundField DataField="EmailAddress" HeaderText="EmailAddress" SortExpression="EmailAddress" /> <asp:BoundField DataField="Phone" HeaderText="Phone" SortExpression="Phone" /> </Columns> </asp:GridView> <asp:ObjectDataSource runat="server" SelectMethod="GetEmployees" TypeName="localhost.Service"></asp:ObjectDataSource> </div> </form> </body> </html> Once the page is complete, build and run it. That’s it. There is now a table in the Web form with all the data from a remote SQL Server Express Edition file that can be paged - and you didn’t have to write any code to achieve this functionality! The page results are shown in Figure 26-15.
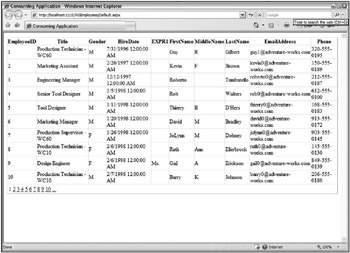
Figure 26-15
Now consider doing the same thing but instead spending a little time writing some code. This is a good move because it offers more control over the situation (if desired), and it teaches you more about what is going on.
Create a page that includes only a GridView server control. From here, you get at the data that comes from the Web Service in the Page_Load event. This is illustrated in the following example:
<%@ Page Language="VB" %> <script runat="server"> Sub Page_Load(ByVal sender As Object, ByVal e As System.EventArgs) Dim ws As New localhost.Service GridView1.DataSource = ws.GetEmployees() GridView1.DataBind() End Sub </script> <html xmlns="http://www.w3.org/1999/xhtml" > <head runat="server"> <title>Consuming Application</title> </head> <body> <form runat="server"> <div> <asp:GridView Runat="server" AllowPaging="True" AllowSorting="True"> </asp:GridView> </div> </form> </body> </html> The first line of code contained in the Page_Load event instantiates the proxy object that was created for you. The next line assigns the DataSource property of the GridView server control to the result set from the GetEmployees() WebMethod call. Finally, close everything by calling the DataBind() method of the GridView control. By compiling and running the XML Web Service, you can retrieve from the database the view of the Employees table that you created earlier from the AdventureWorks database. A returned dataset contains a wealth of information, including the following:
-
An XSD definition of the XML contained in the DataSet
-
The employee information from the Employees table of the AdventureWorks database
On the consumption side, consumers of this XML Web Service can easily use the XSD definition and the XML contained within the DataTable within their own applications. If consumers are then consuming this DataTable into .NET applications, they can easily bind this data to a GridView and use it within their applications with minimal lines of code.
EAN: 2147483647
Pages: 267