Managing Security Policy
As stated in the introduction to the chapter, two new command-line utilities (Caspol.exe and Permview.exe) help in configuring and viewing security policy at both machine and user levels. When you manage security policy at this level, you are doing so as an administrator of a machine or user policy for a machine that is hosting code that will be called from other front-end applications. Caspol.exe is a command-line utility with many options for configuring your security policies (Caspol stands for Code Access Security Policy). User and machine policy are associated with groups and permission sets. One group is automatically provided, the AllCode group.
The Caspol utility has two categories of commands. The first category listed in the following table is the set of commands that provide feedback on the current security policy:
| Command | Short Command | Parameters | Effect |
|---|---|---|---|
| -List | -l | None | This lists the combination of the available groups and permission sets |
| -ListGroups | -lg | None | This lists only groups |
| -ListPset | -lp | None | This lists only permission sets |
| -ListFulltrust | -lf | None | This lists only assemblies that have full trust privileges |
| -List Description | -ld | None | This lists code group names and descriptions |
| -Reset | -rs | None | This resets the machine and user policies to the default for .NET. This is handy if a policy creates a condition that is not recoverable. Use this command carefully, as you will lose all changes made to the current policies. |
| -ResolveGroup | -rsg | Assembly File | This lists what groups are associated with a given assembly file |
| -ResolvePerm | -rsp | Assembly File | This lists what permission sets are associated with a given assembly file |
This is not the list in its entirety, but some of the more important commands. Now let’s look at some examples of output from our previous listed commands. If you wanted to list the groups active on your local machine at the Visual Studio command prompt, you would type the following:
Caspol -Machine -ListGroups
The output looks similar to that shown in Figure 12-5 (it varies slightly depending on the machine you are working on).
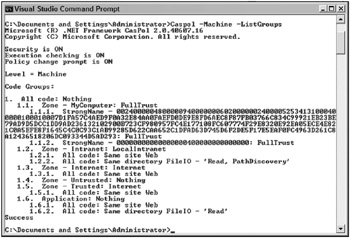
Figure 12-5
Let’s look at the output in a bit more detail so that you are aware of some of the other things that are listed besides what was specifically requested. The third line shows that code access security checking is ON. On the following line, the machine is checking for the user’s right to execute the Caspol utility, as Execution checking is ON. The Policy change prompt is also ON, so if the user executes a Caspol command that changes system policy, then a confirmation prompt appears to verify that this is really intentional.
The level is also listed on the screen prior to the requested output, which is detailed at the bottom, listing the groups present on the machine. The policies pertain to two levels: the machine and the user. When changing policy, if the user is not an administrator, then the user policy is affected unless the user specifically applies the policy to the machine through use of the -machine switch, as illustrated in the screen shot. If the user is an administrator, then the machine policy is affected unless the user specifically applies the policy to the user level through the use of the -user switch.
Let’s now look at another request result example. This time we ask for a listing of all of the permission sets on the machine. At the command prompt, you would type the following:
Caspol -machine -listpset
This would result in output similar to that shown in Figure 12-6. The following output has been shortened for space considerations, but it would contain a listing of all the code explicitly set to execute against the seven permission sets mentioned in the definitions section. In addition, note that the output is an XML representation of a permission object. The listing details the named permission sets and what each one has as active rights. For instance, the fifth permission set is named LocalIntranet, while the next lines detail the Permission class, an environment permission with read access to the environment variable - USER- NAME. The next class detail is regarding FileDialogpermissions, and it lists those as being unrestricted. The output then goes on to detail the effective settings for IsolatedStorage and others.
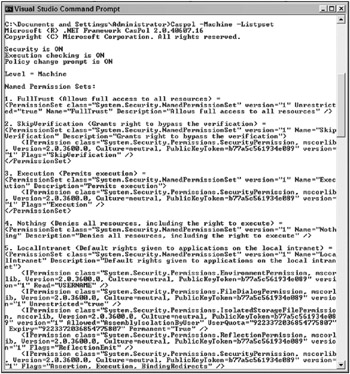
Figure 12-6
Let’s now look at the second category of commands that go with the Caspol utility, shown in the following table. These are the commands that we will use to actually modify policy:
As before, this is not a comprehensive list of all the available commands, so consult the MSDN documentation for the complete listing if needed. Let’s begin our discussion of these commands with a few more definitions that help clarify the parameters associated with the commands. An assembly file is created within Visual Basic each time you do a build whereby your version is a release version. An assembly needs to have a strong name associated with it in order to be used in your permissions groupings. It gets a strong name from being associated with a digital signature uniquely identifying the assembly. You carry out this association in addition to providing other pieces of evidence to be used with the strong name within the AssemblyInfo.vb file of your project.
| Command | Short Command | Parameters | Effect |
|---|---|---|---|
| -AddFullTrust | -af | Assembly File Name | Adds a given Assembly file to the full trust permission set |
| -AddGroup | -ag | Parent Label, Membership, Permission Set Name | Adds a code group to the code group hierarchy |
| -AddPSet | -ap | Permission Set Path, Permission Set Name | Adds a new named permission set to the policy; the permission set should be an XML file |
| -ChgGroup | -cg | Membership, Permission Set Name | Changes a code group’s information |
| -ChgPset | -cp | File Name, Permission Set Name | Changes a named permission set’s information |
| -Force | -f | This option is not recommended. It forces Caspol to accept policy changes even if the change could prevent Caspol itself from being executed | |
| -Recover | -r | Recovers policy information from a backup file controlled by the utility | |
| -RemFullTrust | -rf | Assembly File Name | Removes a given Assembly file from the full trust permission set |
| -RemGroup | -rg | Label | Removes a code group |
| -RemPSet | -rp | Permission Set Name | Removes a permission set. The seven default sets cannot be removed. |
To do this, open the AssemblyInfo.vb file within Visual Studio 2005. This file is automatically created for you by Visual Studio when you create a project. Simply add a new assembly attribute to the list:
<Assembly: AssemblyKeyFileAttribute("myKey.snk")> This associates your assembly with an existing originating key file in order for Visual Studio to generate a strong name during the build process. Be sure to place the key file in the project directory, as this is where Visual Studio looks for it during the build process.
During the build, Visual Studio generates the strong name, after which you can add your assembly to your security configuration. Place the executable, SecurityApp.exe (your executable will be the name of your project), which was created from the build, into the C:\testsecurity directory on the local machine for use with the policy method illustrations.
If you wanted to add your assembly to the fulltrust permission set, you would type Caspol -addfull-trust C:\testsecurity\SecurityApp.exe.
Figure 12-7 shows the outcome of the command.

Figure 12-7
As you can see, you are prompted before your command alters your security policy, and then the new application is added to the fulltrust assembly list. You can confirm it was added by issuing the following command:
Caspol -listfulltrust
An excerpt of output from the command that includes the new assembly would look like what is shown in Figure 12-8.
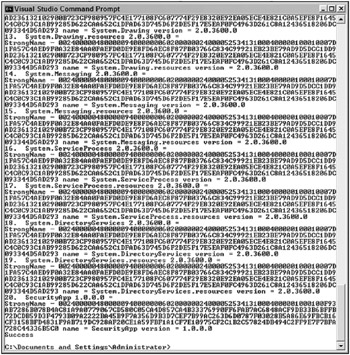
Figure 12-8
This shows the application name, version, and key information associated with the .exe file when the build was performed. Now let’s look at the creation and addition of a permission set to the permission sets in the security policy. Permission sets can be created by hand, in any text editor, in an XML format and saved as an .xml file (this example saves it as securityexample.xml). Following is a listing from one such file that was created for this example:
<PermissionSet version="1"> <Permission version="1"> <Read> C:\TestSecurity </Read> </Permission> <Permission version="1"> <Read> [TEMP] </Read> </Permission> <Name>SecurityExample</Name> <Description>Gives Full File Access</Description> </PermissionSet> The listing has multiple permissions within the permission set. The listing sets up read file permissions within one set of tags as shown:
<Permission version="1"> <Read> C:\TestSecurity </Read> </Permission>
You then set up read access to the Temp environment variable in the second set of permission tags:
<Permission version="1"> <Read> [TEMP] </Read> </Permission>
The listing also gives our custom permission set the name of SecurityExample with a description:
<Name>SecurityExample</Name> <Description>Gives Full File Access</Description>
When you want to add your permission set to your policy, you would type the following command:
Caspol -addpset C:\testsecurity\securityexample.xml securityexample
The last command issues the -addpset flag to indicate that you want to add a permission set, followed by the XML file containing the permission set, followed finally by the name of the permission set. Figure 12-9 shows the outcome of your command.

Figure 12-9
You can then list your security permission sets by typing Caspol -listpset. Figure 12-10 shows the excerpt of the new security permission set.
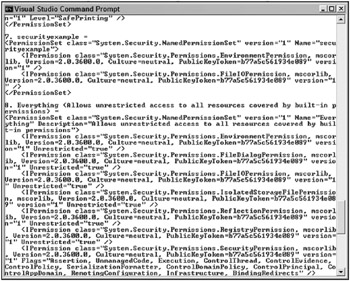
Figure 12-10
As you can see, typing Caspol -listpset provides a listing of just the permission sets within your policy. The named permission set SecurityExample shows up under the Named Permission Sets head-ing, and its description is listed just after its name.
Once you have a permission set, you can add a group that your assembly object fits into and which enforces the new permission set. You add this group by using the AddGroup switch in Caspol. The AddGroup switch has a couple of parameters that need more explanation. The first parameter is par ent_label. As shown in Figure 12-11, the All code group has a “1” before it. The labels within code groups have a hierarchy that is established when you add groups, so you need to specify what your parent label would be. In this case, because the only one that exists is “1,” that is what you designate.

Figure 12-11
Because you designate 1, the new group becomes a child of 1. The second parameter is membership. The membership parameter has a certain list of options that you can add based on the following table. Each option designates a piece of information you are providing about the pieces of code you will add to your group. For instance, you might state that you will only be adding code that has a specific signature with the -Pub option, or only code in a certain application directory with the -AppDir option.
| Option | Description |
|---|---|
| -All | All code |
| -Pub | Code that has a specific signature on a certificate file |
| -Strong | Code that has a specific strong name, as designated by a filename, code name, and version |
| -Zone | Code that fits into the following zones: MyComputer, Intranet, Trusted, Internet, or Untrusted |
| -Site | Originating on a website |
| -Hash | Code that has a specific assembly hash |
| -AppDir | A specific application directory |
| -SkipVerif | Code that requests the skipverification permission |
| -URL | Originating at a specific URL |
| -Custom | Code that requires a custom membership condition |
The third parameter to the AddGroup command is the permission set name that you want to be associated with your group. The group that we will create will be under parent label 1, and we will designate the -Zone parameter as MyComputer because the code lives on a local drive. We will also associate the new group with our SecurityExample permission set by typing the following command:
Caspol -addgroup 1. -Zone MyComputer SecurityExample
Output from the command was successful, as shown in Figure 12-11.
Figure 12-12 shows the -listgroups command used for listing the new group. You can see that a 1.6 level was added, with the SecurityExample permission set attached to all code that fits into the MyComputer Zone. You can verify that the assembly object fits into the MyComputer Zone by using the resolveperm command, as shown in Figure 12-13.
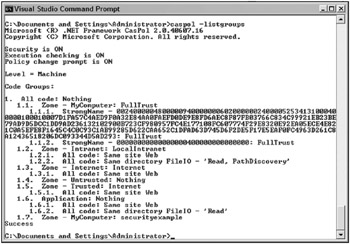
Figure 12-12
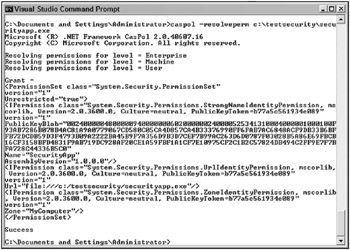
Figure 12-13
The bottom of the figure lists which ZoneIdentityPermission the assembly object has been associated with - MyComputer. In addition, each assembly gets a URLIdentityPermission specifying the location of the executable.
Not only do you have the utility that helps with managing security permission sets and groups, you also have a utility that views the security information regarding an assembly, Permview.exe. (Permview stands for Permissions Viewer.)
Permview is not as complex as Caspol because its main purpose is to provide a certain type of feedback regarding the security requests of assemblies. In fact, the Permview utility only has two switches: one for the output location, and one for declarative security to be included in the output. In order to specify an output location, the switch is /Output, and then a file path is appended to the command line after the switch. The Permview utility brings up another concept not covered yet: declarative security.
Declarative security is displayed in the Permview utility with the /Decl switch; it is security that a piece of code requests at an assembly level. Because it is at the assembly level, the line that requests the security is at the top of the Visual Basic module, even before your Imports statements. You can request one of three levels of security, as described in the following table:
| Level | Description |
|---|---|
| RequestMinimum | Permissions the code must have in order to run |
| RequestOptional | Permissions that code may use, but could run without |
| RequestRefused | Permissions that you want to ensure are never granted to the code |
Requesting permissions at the assembly level helps ensure that the code will be able to run, and won’t get permission-based security exceptions. Because you have users calling your code, the declarative security ensures that the callers have proper security to do all that your code requires; otherwise, a security exception is thrown. The following example shows the syntax for requesting minimum permissions; the code would be placed at the top of our procedure. This example also illustrates syntax described in the table at the beginning of the chapter regarding permissions in the Security.Permissions namespace. Moreover, it illustrates the use of a security constant, SecurityAction.RequestMinimum, for the type of security you are requesting:
<Assembly: SecurityPermissionAttribute(SecurityAction.RequestMinimum)>
Once this line is added to the assembly by means of the AssemblyInfo.vb file, Permview will report on what the assembly requested by listing minimal, optional, and refused permission sets, including the security permission set under the minimal set listing.
Figuring Minimum Permissions Required for Application
Before the .NET Framework 2.0, one of the big requests from developers who were building and deploying applications was the need for clarification regarding which permissions were required for the application to run. This was sometimes a difficult task, as developers would build their applications under Full Trust and then the applications would be deployed to a machine that didn’t have those kinds of privileges.
The .NET Framework 2.0 introduces a new tool that can be used to fully understand which permissions your application is going to need in order to run on another machine. This command-line tool, PermCalc.exe, does this by emulating the complete path of your assembly and all the permissions that it would require.
To use PermCalc.exe, open the Visual Studio command prompt and navigate to the location of the assembly you want to check. PermCalc.exe takes the following command structure:
PermCalc.exe [Options] <assembly> You can also have PermCalc.exe evaluate more than a single assembly:
PermCalc.exe [Options] <assembly> <assembly> For example, running the PermCalc.exe tool on the SecurityApp.exe resulted in the following:
Microsoft (R) .NET Framework Permissions Calculator. Copyright (C) Microsoft Corporation 2003. All rights reserved. <Assembly Name="C:\Documents and Settings\Administrator\My Documents\Visual Studio\Projects\SecurityApp\SecurityApp\obj\Debug\securityapp.exe"> <PermissionSet version="1"> <IPermission version="1" Unrestricted="true"/> <IPermission version="1" Unrestricted="true"/> <IPermission version="1" Unrestricted="true"/> <IPermission version="1" Flags="UnmanagedCode, Execution, ControlEvidence, ControlPrincipal, RemotingConfiguration"/> <IPermission version="1" Unrestricted="true"/> <IPermission version="1" Unrestricted="true"/> <IPermission version="1" Access="Read"/> </PermissionSet> </Assembly>
From this output, you can see the permissions that would be required for the application to run on someone’s machine. These results were generated using the following command:
PermCalc.exe -under SecurityApp.exe The option -under should be used when you are unsure of the exact permissions, as PermCalc.exe actually overestimates the permissions by default. Using -under forces PermCalc.exe to underestimate the permissions instead.
Using Visual Studio to Figure Minimum Permissions
Looking at the properties of your solution in Visual Studio, note the new Security tab. In the past, one of the problems in testing your application’s security and permissioning was that as a developer, you were always forced to develop your programs under Full Trust. This means that you have access to the system’s resources in a very open and free manner. This was an issue because the programs that you build typically cannot run under Full Trust and you still have to test the application’s abilities to tap into the system’s resources in which the program is being run.
The Security tab is a new GUI to the PermCalc.exe tool that enables you to run your applications under different types of zones. Figure 12-14 shows this new page.
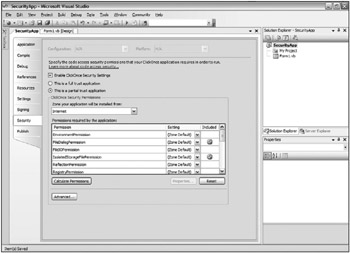
Figure 12-14
After checking the Enable ClickOnce Security Settings check box, you can specify whether the application will be running on the client machine under Full Trust or whether the application will only have partial trust status. You can also select the zone in which your application will run. The options include the following:
-
Local Intranet
-
Internet
-
Custom
After selecting the zone type, you can examine all the various permissions that are required by the application in order to run.
Clicking the Calculate Permissions button on the form enables you to do just that (see Figure 12-15). Visual Studio examines the assembly and provides you with information about which permissions for which assemblies would be required to run the application in the zone specified.
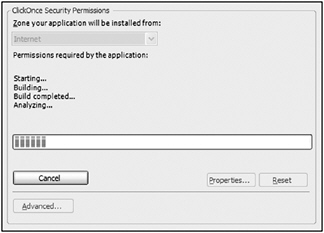
Figure 12-15
Once analyzed, Visual Studio presents information about what is needed from each of the assemblies in order for the application to function, as shown in Figure 12-16.
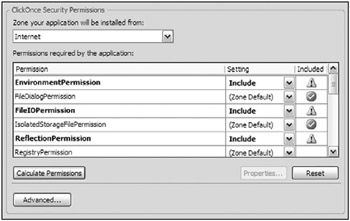
Figure 12-16
What makes this section of the application’s property pages even better is that from the text box of assemblies listed, you can highlight selected assemblies and fine-tune their permissions even further - granularizing the permissions the assemblies are allowed to work with. For instance, highlighting the FileIOPermission line in the text box and clicking the Properties button enables you to fine-tune how the permissioning around this assembly functions. The Permission Settings dialog that appears is shown in Figure 12-17.
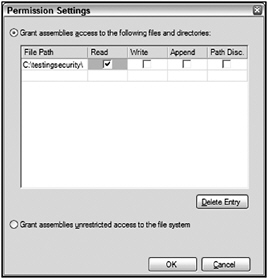
Figure 12-17
The FileIOPermission part of the permission settings enables you to specify the file path that the assembly is allowed to access, as well as the actions that the assembly is allowed to take in the path defined.
The capability to examine assemblies is not only provided through the new command-line tool, PermCalc.exe; even Visual Studio joins in and allows for easy management and understanding of your applications.
Security Tools
Microsoft provides many security tools in its .NET SDK. Most of these tools are console-based utility applications. These tools can be used to help implement the security processes outlined earlier. They are not described in great detail, though they do deserve a review. Basically, two groups of tools are provided with the SDK:
-
Permissions and assembly management tools
-
Certificate management tools
Permissions and Assembly Management Tools
| Program Name | Function |
|---|---|
| Caspol.exe | Stands for Code Access Security Policy tool. This tool enables you to view and modify security settings. |
| Signcode.exe | A file signing tool that enables you to digitally sign your executable files |
| Storeadm.exe | An administrative tool for isolated storage management. Restricts code access to the filing system. |
| Permcalc.exe | Emulates the complete path of your assembly and all the permissions that it requires. It can also evaluate assemblies and provide information on the permissions an end user would require to run the program. This is a new command line tool provided by the .NET Framework 2.0. |
| Permview.exe | Displays an assembly’s requested access permissions |
| Peverify.exe | Checks whether the executable file will pass the runtime test for type-safe coding |
| Secutil.exe | Extracts a public key from a certificate and puts it in a format that is usable in your source code |
| Sn.exe | Creates assemblies with strong names - that is, a digitally signed namespace and version information |
Certificate Management Tools
| Program Name | Function |
|---|---|
| Makecert.exe | Creates an X.509 certificate for testing purposes |
| Certmgr.exe | Assembles certificates into a CTL (Certificate Trust List). Can also be used for revoking certificates. |
| Chktrust.exe | Validates a signed file containing data, its PKCS#7 hash, and a X.509 certificate |
| Cert2spc.exe | Creates an SPC (Software Publisher Certificate) from an X.509 certificate |
Exceptions Using the SecurityException Class
In this latest release of the .NET Framework, the SecurityException class has been greatly expanded in order to provide considerably more detailed information on the types of exceptions that are encountered in a security context.
In the past, using the .NET Framework versions 1.0/1.1, the SecurityException class provided very little information in terms of actually telling you what was wrong and why the exception was thrown. Due to this limitation, the .NET Framework 2.0 added a number of new properties to the SecurityException class. The following table details the properties of the SecurityException class:
| Properties | Description |
|---|---|
| Action | Retrieves the security action that caused the exception to occur |
| Demanded | Returns the permissions, permission sets, or permission set collections that caused the error to occur |
| DenySetInstance | Returns the denied permissions, permissions sets, or permission set collections that caused the security actions to fail |
| FailedAssemblyInfo | Returns information about the failed assembly |
| FirstPermissionThatFailed | Returns the first permission contained in the permissions set or permission set collection that failed |
| GrantedSet | Returns the set of permissions that caused the security actions to fail |
| Method | Returns information about the method connected to the exception |
| PermissionState | Returns the state of the permission that threw the exception |
| PermissionType | Returns the type of the permission that threw the exception |
| PermitOnlySetInstance | Returns a permissions set or permission set collection that is part of the permit-only stack frame if a security action has failed |
| RefusedSet | Returns the permissions that were refused by the assembly |
| Url | Returns the URL of the assembly that caused the exception |
| Zone | Returns the zone of the assembly that caused the exception |
Clearly, you can get your hands on a lot of information if a security exception is thrown in your application. For instance, you can use something similar to the following Catch section of code to check for security errors:
Dim myFile as FileStream Try myFile = My.Computer.FileSystem.GetFileInfo("C:\testingsecurity\testing.txt") Catch ex As Security.SecurityException MessageBox.Show(ex.Method.Name.ToString()) End Try One nice addition to the SecurityException class is how Visual Studio so easily works with it. When you encounter a SecurityException error while working in the debug mode of your solution, you will see something similar to the warning shown in Figure 12-18 directly in the IDE.
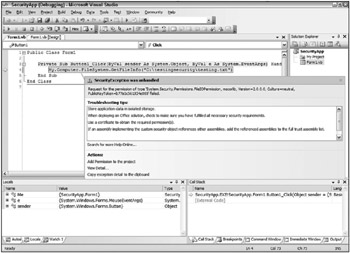
Figure 12-18
It is also possible to get Visual Studio to provide a detailed view of the error by breaking down the SecurityException object in the Locals window of Visual Studio when you catch the error using a Try-Catch statement.
EAN: 2147483647
Pages: 267