Using the User Interface DTCs
The standard User Interface (UI) DTCs are:
- Button
- Textbox
- Listbox
- Label
- Grid
- Checkbox
- OptionGroup
- RecordsetNavbar
These DTCs allow you to bind to a database and construct an event-driven interface. With these DTCs, you can build an interface with the same functionality of a traditional application written in Visual Basic but design the interface in a traditional Web style.
You can use the events and methods of the DTCs to control their actions at run time. The next bit of code takes the value in the Listbox DTC and places it in the Textbox DTC. Then it hides the list box and displays the text box.
<SCRIPT ID=clientEventHandlersVBS LANGUAGE=vbscript> <!-- Sub window_onload Listbox1.addItem "Widget A" Listbox1.addItem "Widget B" Listbox1.addItem "Widget C" Listbox1.addItem "Widget D" txtItemName.hide End Sub Sub Listbox1_onchange() if Listbox1.getValue() > "" then MsgBox "list is: " & Listbox1.getText() txtItemName.value = Listbox1.getValue() Listbox1.hide txtItemName.show end if End Sub --> </SCRIPT>
The above code comes from the InventoryListClient.asp file.
The if statement checks the value of the list box to determine whether the user has selected a valid entry. This expression must include the empty parentheses at the end of getValue:
Listbox1.getValue()
The () must be included because getValue is a function. If you do not include them, this expression will evaluate to the JScript code that implements getValue. This is not the desired effect!
The events for the DTCs are also handy for setting up database operations. You can use the onchange event to determine when a user has completed an action in a DTC, and then take the value of that DTC and perform some database action with it. To demonstrate this, we created InventoryLookup.asp and InventoryShow.asp.
InventoryLookup.asp displays a list of item names in a list box. When a user selects an item, the onchange event navigates to InventoryShow.asp and displays the record which corresponds to that item. The InventoryLookup.asp file is shown in the Source Editor in Figure 8-3.
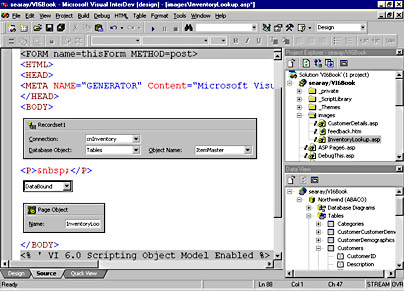
Figure 8-3. The InventoryLookup.asp page contains Listbox, Recordset, and RecordsetNavbar DTCs.
The Recordset DTC uses the following SQL statement to extract all the records in the ItemMaster table:
Select * from ItemMaster
The Listbox DTC's properties are shown in Figure 8-4.
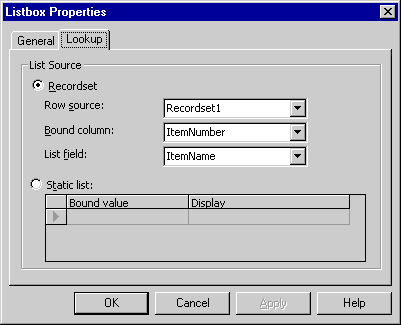
Figure 8-4. The Lookup tab of the Listbox Properties dialog box sets the parameters for the lookup operation of the Listbox DTC, not the binding of the DTC.
You can see in Figure 8-4 that the Recordset option is chosen in the List Source group on the Lookup tab. (There are no data settings for this DTC on the General tab because we are only using the DTC to populate the list, not to update a field in the recordset.) The Row Source drop-down list corresponds to the Listbox DTC's RowSource property, and is set to Recordset1. The Bound Column drop-down list corresponds to the BoundColumn property, and is set to ItemNumber—the field that should be returned from the list box when the user selects an entry. The List Field drop-down list corresponds to the ListField property, and is set to ItemName. When the page is displayed in the browser, the user will see a list of ItemName entries, which is more descriptive than ItemNumber entries. When the user selects an ItemName entry from the list, the corresponding ItemNumber is returned from the DTC. You will see how this works in the code in just a moment.
In addition to the Recordset and Listbox DTCs, we added a PageObject DTC named InventoryLookup. The PageObject DTC will be used to store the ItemNumber in a property and to navigate to the page that will display the details for the item. To set the properties for the PageObject DTC, follow these steps:
- Right-click the PageObject DTC, and select Properties.
- Click the Properties tab in the PageObject Properties dialog box.
- Create a property with the name ItemNumber.
- Set the Lifetime for ItemNumber to Session.
This creates a variable that we can use across the entire session.
The Listbox DTC's onchange event is used to determine when the user selects an ItemName entry from the list. The code in the onchange event is shown below:
<SCRIPT ID=serverEventHandlersVBS LANGUAGE=vbscript RUNAT=Server> Sub Listbox1_onchange() if Listbox1.getValue() then InventoryLookup.setItemNumber(Listbox1.getValue()) InventoryLookup.navigateURL("InventoryShow.asp") end if End Sub </SCRIPT> The first line checks the value of the list box to make sure it is not blank. The second line sets the PageObject DTC's ItemNumber property to the value contained in the list box. Pay particular attention to the parentheses on the methods such as getValue. It is important to note that the set and get methods for the PageObject DTC's properties are methods, not properties. To use them, you must pass the value in as a parameter to the method, as shown in the previous code. You cannot set the property using an equal sign (=), as you can in Visual Basic.
The second line of code in the onchange event navigates to InventoryShow.asp.
Figure 8-5 shows InventoryShow.asp in Design view.
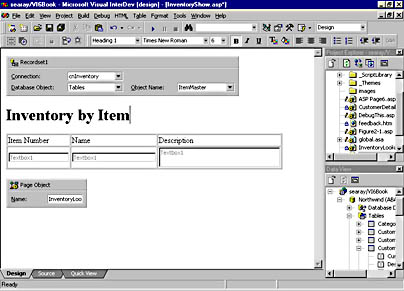
Figure 8-5. InventoryShow.asp uses the Recordset DTC to open the ItemMaster table.
This page contains the following DTCs:
| DTC | Name |
|---|---|
| Recordset | Recordset1 |
| Textbox | Textbox1 (displays ItemNumber) |
| Textbox | Textbox2 (displays ItemName) |
| Textbox | Textbox3 (displays ItemDescription) |
| PageObject | InventoryShow |
The Textbox DTCs are each bound to Recordset1. The SQL statement for Recordset1 is
Select * from itemmaster
This SQL is used to preset the Recordset DTC so that we can bind the Textbox DTCs to it. When the page executes, we reset the SQL. The field that each Textbox DTC is bound to is shown after its name in the table above.
After you add the Recordset DTC to the page, right-click the DTC, select Properties to display the Recordset Properties dialog box, and then click the Implementation tab. (See Figure 8-6.) Uncheck the Automatically Open The Recordset option, and then click Close to apply the change.
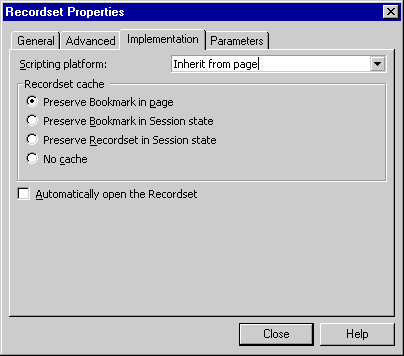
Figure 8-6. You can change the implementation properties of a Recordset DTC by using the Recordset Properties dialog box.
The Automatically Open The Recordset option is checked by default, which results in the recordset opening when the page loads. Unchecking this value allows you to control when the recordset opens.
Add the PageObject DTC and set a reference to InventoryLookup.asp:
- Right-click the PageObject DTC, and select Properties.
- Click the References tab in the PageObject Properties dialog box.
- Click Browse (…), and select InventoryLookup.asp.
Now you can add the code used in InventoryShow.asp just after the <HEAD> tag:
<% dim ItemNumber ItemNumber = InventoryLookup.getItemNumber() Recordset1.setSQLText _ ("Select * from itemmaster where itemnumber = " & _ ItemNumber) Recordset1.open %> The next line extracts the value from the ItemNumber property of the PageObject DTC in InventoryLookup.asp and places it in the ItemNumber variable using the getItemNumber method:
ItemNumber = InventoryLookup.getItemNumber()
Then set the SQL for the recordset by concatenating the string using a Select statement and the ItemNumber variable. Now open the recordset using the open method.
We can also provide this functionality in a single page without using the PageObject DTC. The page shown in Figure 8-7 is a single page. The user simply selects an item from the list box and the page redisplays with the correct information. The code for the page is also straightforward.

Figure 8-7. The Listbox DTC and its onchange event control the operation of this page.
Below, the code for InventoryLookup2.asp is shown from the beginning of the page through the </HEAD> tag. The section of code below contains all the script that I added to the page.
<%@ Language=VBScript %> <% ' VI 6.0 Scripting Object Model Enabled %> <!--#include file="_ScriptLibrary/pm.asp"--> <% if StartPageProcessing() Then Response.End() %> <FORM name=thisForm METHOD=post> <HTML> <HEAD> <META NAME="GENERATOR" Content="Microsoft Visual Studio 6.0"> <% if thisPage.firstEntered then Listbox1.addItem "",""0 end if %> <SCRIPT ID=serverEventHandlersVBS LANGUAGE=vbscript RUNAT=Server> Sub Listbox1_onchange() dim ItemNumber dim SQL if Listbox1.getValue() > "" then ItemNumber = Listbox1.getValue() rsInventoryItem.close SQL = "Select * from itemmaster where " & _ "ItemNumber = " & ItemNumber rsInventoryItem.setSQLText(SQL) rsInventoryItem.open end if End Sub </SCRIPT> </HEAD>
This code runs when the page is executed:
<% if thisPage.firstEntered then Listbox1.addItem "",""0 end if %>
If the page is executed as a result of a user navigating to it, firstEntered is True and the addItem method fires. This method is used to add a blank entry to the list. The 0 at the end of the parameters puts the blank entry at the top of the list. This code was added to present a blank to the user when the page first starts. If you do not use this code, the user cannot select the first item in the list without selecting another item in the list. Why, you might ask? When the page is loaded for the first time, the first entry in the list would be the first item in the recordset. If the user selects that item, the data the user selects and the data in the bound field are the same, and the onchange event does not fire. The blank entry solves this problem and gives the application a cleaner look.
The code in the onchange event works similarly to the code we might use in a Visual Basic application containing a list box. The if statement makes sure we have a nonblank item in the list:
if Listbox1.getValue() > "" then
The next line extracts the current value from the list box and stores it in ItemNumber:
ItemNumber = Listbox1.getValue()
The next line might seem out of place. This line makes sure the recordset is closed before you try to open it. If you use open and the recordset is already open, it is not refreshed. Since we are changing the SQL for the recordset, it should be reopened anyway.
rsInventoryItem.close
This statement sets the variable SQL to the new query. The query is built in the same manner as the last page, except that we are now storing it in a variable:
SQL = "Select * from itemmaster where " & _ "ItemNumber = " & ItemNumber
This line sets the SQLText property of the recordset object:
rsInventoryItem.setSQLText(SQL)
The next line opens the recordset, and then we terminate the if statement:
rsInventoryItem.open end if
We created one more version of this page to demonstrate the flexibility of using the DTCs. This one is Inventory3.asp and uses the same list box and logic but replaces the Textbox DTCs with the Grid DTC. This page also allows you to choose between seeing one record or all records in the table by selecting the various items in the list.
Figure 8-8 below shows the page when the user has selected All Items from the list.
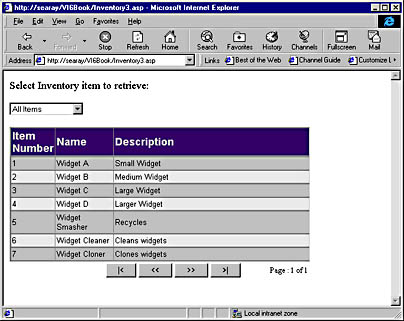
Figure 8-8. The list contains the All Items entry to allow users to select all records from the table.
Notice that Figure 8-8 shows the Grid DTC displaying several rows. Figure 8-9 shows the same page when we have selected Widget A from the list. Notice how the display changes to show only that record.
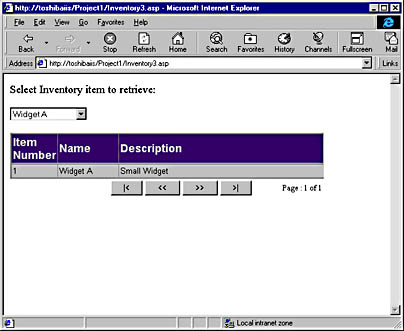
Figure 8-9. The Grid DTC automatically adjusts its output, depending upon the number of records in the recordset.
You can see how the grid adjusts itself to the number of records in the recordset. Setting up the page to use the grid is quite simple:
- Delete the Textbox controls from the original page.
- Add the Grid DTC.
- Right-click the Grid DTC, and select Properties.
- Click the Data tab in the Grid Properties dialog box.
- Select the Recordset DTC to use from the Recordset drop-down list.
- Select the fields to use from the Available Fields list.
Figure 8-10 shows the Data tab with the data-binding settings. Those are all the setting changes you must make to wire the control up and make it functional. In our sample, we also changed the layout and the number of records per page. You can see in Figure 8-10 that we also modified the headings.
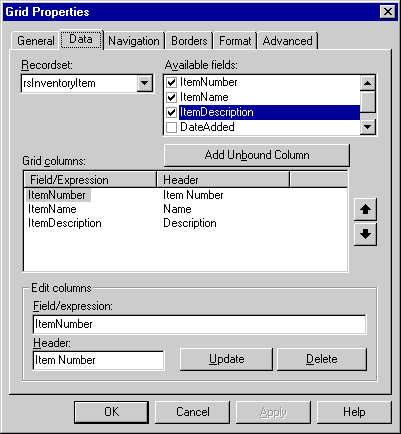
Figure 8-10. The Data tab of the Grid Properties dialog box contains the settings to bind the Grid DTC to the Recordset DTC.
The code that controls this page is shown below:
<%@ Language=VBScript %> <% ' VI 6.0 Scripting Object Model Enabled %> <!--#include file="_ScriptLibrary/pm.asp"--> <% if StartPageProcessing() Then Response.End() %> <FORM name=thisForm METHOD=post> <HTML> <HEAD> <META NAME="GENERATOR" Content="Microsoft Visual Studio 6.0"> <% dim qFlag if thisPage.firstEntered then Listbox1.addItem "All Items","*",0 Listbox1.addItem "",""0 end if %> <SCRIPT ID=serverEventHandlersVBS LANGUAGE=vbscript RUNAT=Server> Sub Listbox1_onchange() dim ItemNumber dim SQL if Listbox1.getValue() > "" then ItemNumber = Listbox1.getValue() rsInventoryItem.close select Case ItemNumber case "*": SQL = "Select * from itemmaster" case else: SQL = "Select * from itemmaster " & _ " where ItemNumber = " & ItemNumber end select rsInventoryItem.setSQLText( sql) rsInventoryItem.open end if End Sub </SCRIPT>
The first bit of script code has the following line added:
Listbox1.addItem "All Items","*",0
This line adds the All Items entry in the list and places it just after the blank entry. The placement occurs because the line to add the blank entry follows this one. Also notice the * parameter. This sets the bound field of the control which is returned as the value field when we call getValue. So, when the user clicks the All Items entry, a * is returned so that we can correctly set the SQL statement.
Next I added this code to set the SQL statement:
select Case ItemNumber case "*": SQL = "select * from itemmaster" case else: SQL = "Select * from itemmaster " & _ " where ItemNumber = " & ItemNumber end select
This code checks for an ItemNumber that is equal to *, and if it finds one, sets the SQL statement to retrieve all records from the database. If the value is not *, it sets the SQL statement as we did in the first two pages.
Those are all the changes required to set up the Grid DTC as opposed to the Textbox DTCs. In fact, the first version of the Grid DTC page was made with no code changes whatsoever. We added the other features to enhance the page, but they were not required. This is one of the advantages of using the data-binding features. You can make changes quickly without having to do a lot of recoding.
EAN: 2147483647
Pages: 143