Data Islands
| only for RuBoard |
Data islands are a technology that is specific to Internet Explorer. Data islands are XML documents embedded within an HTML document. By using data islands, you can use either the client-side Document Object Model (DOM) to retrieve values from the embedded XML, or you can use Microsoft's Data Source Objects (DSO) to bind the data from the XML document to HTML objects that support data binding.
You can create an XML data island in two ways:
-
Declare the XML within the HTML document
-
Reference an external XML document
XML data islands are created by specifying an <XML> element within an HTML document and then either inserting the XML directly into the HTML or referencing it by using the SRC attribute of the XML element to identify the external document's source.
Creating Inline Data Islands
Listing 3.1 creates an inline data island.
Listing 3.1 Creating an Inline Data Island
<!DOCTYPE HTML PUBLIC "-//W3C//DTD HTML 4.0 Transitional//EN"> <html> <head> <title>Favorite Pitchers</title> </head> <body> <XML id="xmldso" async="false"> <Pitchers> <Pitcher> <Name>Tom Glavine</Name> <Team>Braves</Team> </Pitcher> <Pitcher> <Name>David Wells</Name> <Team>Yankees</Team> </Pitcher> <Pitcher> <Name>Roger Clemens</Name> <Team>Yankees</Team> </Pitcher> <Pitcher> <Name>Randy Johnson</Name> <Team>Diamondbacks</Team> </Pitcher> <Pitcher> <Name>Curt Schilling</Name> <Team>Diamondbacks</Team> </Pitcher> </Pitchers> </XML> <table datasrc="#xmldso" width="100%" border="1"> <tr align="left"> <td><span datafld="Name"></span></td> <td><span datafld="Team"></span></td> </tr> </table> </body> </html>
In Listing 3.1, the XML document is embedded between a pair of XML tags. The XML tag is given an ID attribute by which the data island is referenced.
Elements within Internet Explorer support binding to data source objects, such as span. Others, such as td , do not support binding directly and require a child element. Listing 3.1 shows a table that uses a data island as its data source (through the datasrc attribute), and each cell in the table is bound to an element in the data island (through the use of the datafld attribute).
Referencing External XML
Listing 3.1 used inline XML to create a data island. You can also create a data island by using the SRC attribute of the reserved <XML> element to indicate the XML file that's being referenced. Listing 3.2 shows you how an external XML file can be referenced to create a data island.
Listing 3.2 Using an External XML File as the Source for a Data Island
<!DOCTYPE HTML PUBLIC "-//W3C//DTD HTML 4.0 Transitional//EN"> <html> <head> <title>HTMLPage1</title> </head> <body> <XML id="xmldso" async="false" src="pitchers.xml"> </XML> <table datasrc="#xmldso" width="100%" border="1"> <tr align="left"> <td><span datafld="Name"></span></td> <td><span datafld="Team"></span></td> </tr> </table> </body> </html> When using data islands in this manner, be aware that the entire XML document referenced is downloaded to the client. For significantly large documents, this might not be feasible . This can, however, provide an effective caching mechanism for XSLT stylesheets.
Single Record Binding
Another cool use for XML data islands is the ability to use single-record binding to create a paging effect. You can navigate through the document one record at a time. Listing 3.3 shows how you can use binding with navigation buttons to iterate through the pages.
Listing 3.3 Using a Paging Effect with a Bound DSO
<!DOCTYPE HTML PUBLIC "-//W3C//DTD HTML 4.0 Transitional//EN"> <html> <head> <title>HTMLPage1</title> </head> <body> <XML id="xmldso" async="false"> <Pitchers> <Pitcher> <Name>Tom Glavine</Name> <Team>Braves</Team> </Pitcher> <Pitcher> Name>David Wells</Name> <Team>Yankees</Team> </Pitcher> <Pitcher> <Name>Roger Clemens</Name> <Team>Yankees</Team> </Pitcher> <Pitcher> <Name>Randy Johnson</Name> Team>Diamondbacks</Team> </Pitcher> <Pitcher> <Name>Curt Schilling</Name> <Team>Diamondbacks</Team> </Pitcher> </Pitchers> </XML> <table datasrc="#xmldso" datapagesize="2" width="100%" border="1" id="tbl"> <tr align="left"> <td><span datafld="Name"></span></td> <td><span datafld="Team"></span></td> </tr> </table> <input type="button" value="<<" onclick="tbl.firstPage();" ID="Button1"NAME="Button1"> <input type="button" value="<" onclick="tbl.previousPage();" ID="Button2"
Several parts of Listing 3.3 must be noted. The table is declared with a page size , which limits the number of displayed records to two. Also, the navigation buttons are bound to the table, not directly to the data source. The result is shown in Figure 3.1.
Figure 3.1. Paging through an HTML table that's bound to a data island.
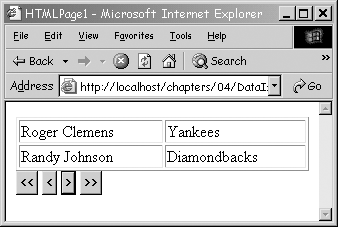
Also included are several navigation buttons to navigate through the HTML table using the bound table's methods firstPage, nextPage , previousPage , and lastPage .
Multiple Record Binding
You can also bind an entire table to a data island. By simply omitting the datapagesize attribute from the table element, you can see the entire table bound to the data island.
Working with the Client-Side DOM
Internet Explorer 5.5 and higher and Netscape 6.0 and higher support a client-side XML DOM. This DOM provides access XML documents that can populate UserInterface (UI) elements in the browser.
Let's work through an example of using XML DOM on the client. The example shows the use of the client-side DOM and DHTML to enable dynamic sorting. This section does not use any technology that's specific to .NET: It shows a mechanism for displaying XML dynamically on the client by using JavaScript, HTML, and the client-side DOM.
The files that are created for this example are shown in Table 3.2.
Table 3.2. Explanation of Files Used to Create a Client-Side DOM Example
| Filename | Description |
|---|---|
| Pitchers.xml | Contains the data to display |
| PitcherStyle.xslt | Transforms the XML document into HTML |
| Pitchers.js | Contains the code used to perform the transformation |
| Pitchers.htm | Contains the UI elements |
Begin by creating an XML file to hold the data that you want to dynamically display. For this example, you are displaying a list of pitchers for different baseball teams . Create a new web project called DataIslands in Visual Studio .NET. Add a new XML file called Pitchers.xml to the web project and paste the XML from Listing 3.4 into it.
Listing 3.4 Pitchers.xml
<?xml version="1.0" encoding="utf-8" ?> <PITCHERS> <PITCHER> <FNAME>John</FNAME> <LNAME>Rocker</LNAME> <TEAM>Indians</TEAM> <CITY>Cleveland</CITY> <ERA></ERA> </PITCHER> <PITCHER> <FNAME>Tom</FNAME> <LNAME>Glavine</LNAME> <TEAM>Braves</TEAM> <CITY>Atlanta</CITY> <ERA></ERA> </PITCHER> <PITCHER> <FNAME>Greg</FNAME> <LNAME>Maddux</LNAME> <TEAM>Braves</TEAM> <CITY>Atlanta</CITY> <ERA></ERA> </PITCHER> <PITCHER> <FNAME>Randy</FNAME> <LNAME>Johnson</LNAME> <TEAM>Diamondbacks</TEAM> <CITY>Arizona</CITY> <ERA></ERA> </PITCHER> </PITCHERS>
The next step to building the sample application is to add an XSLT file called PitcherStyle.xslt . This file transforms the XML data into HTML. XSLT transformations are discussed later in the section, "XSLT". Listing 3.5 shows the code that you enter into PitcherStyle.xslt .
Listing 3.5 PitcherStyle.xslt
<?xml version="1.0" encoding="UTF-8" ?> <xsl:stylesheet version="1.0" xmlns:xsl="http://www.w3.org/1999/XSL/Transform"> <xsl:param name="sortBy" select="'CITY'"/> <xsl:template match="/"> <xsl:apply-templates/> </xsl:template> <xsl:template match="PITCHERS"> <TABLE border="1"> <tr> <th bgcolor="teal"><a onclick="javascript: SortData('FNAME');">First Name</a></th> <th bgcolor="teal"><a onclick="javascript:SortData('LNAME');">Last Name</a></th> <th bgcolor="teal"><a onclick="javascript:SortData('CITY');">City</ a></th> <th bgcolor="teal"><a onclick="javascript:SortData('TEAM');">Team</ a></th> <th bgcolor="teal"><a onclick="javascript:SortData('ERA');">ERA</a></ th> </tr> <xsl:for-each select="PITCHER"> <xsl:sort select="*[name()=$sortBy]"/> <tr> <td><xsl:value-of select="FNAME"/><br/></td> <td><xsl:value-of select="LNAME"/></td> <td><xsl:value-of select="CITY"/></td> <td><xsl:value-of select="TEAM"/></td> <td><xsl:value-of select="ERA"/></td> </tr> </xsl:for-each> </TABLE> </xsl:template> </xsl:stylesheet> When this transformation is applied, a table is rendered with anchor tags in the headings. When one of the anchor tags is clicked, the table is sorted based on that column.
Next, you create the HTML that will display the data and create an XML data island on the client. Add an HTML file called pitchers.htm and enter the code from Listing 3.6 into it.
Listing 3.6 Pitchers.htm
<!DOCTYPE HTML PUBLIC "-//W3C//DTD HTML 4.0 Transitional//EN"> <html> <head> <title>HTMLPage1</title> <script language="javascript" src="Pitchers.js"> </script> </head> <body MS_POSITIONING="GridLayout"> <form name="SortMethod"> <div id="SortedPitchers"></div> </form> </body> </html>
The only item worth noting in Listing 3.6 is that a <DIV> element was created, called SortedPitchers . This <DIV> element will display the contents of the transformed XML. An external JavaScript file was also referenced, Pitchers.js , which will contain the functions used to work with the DOM on the client.
The final step is to create the JavaScript that will perform the sorting. In Listing 3.7, a JavaScript file is created, Pitchers.js , that contains the functions that manipulate the XML.
Example 3.7 Pitchers.js
Listing 3.7 Pitchers.js function SortData(strSortCol) { var template = new ActiveXObject("Msxml2.XSLTemplate"); var xslDoc = new ActiveXObject("Msxml2.FreeThreadedDOMDocument"); var xmlDoc = new ActiveXObject("Msxml2.DOMDocument"); var processor; xslDoc.async = false; xslDoc.load("PitcherStyle.xslt"); template.stylesheet = xslDoc; processor = template.createProcessor(); processor.addParameter("sortBy",strSortCol); xmlDoc.async = false; xmlDoc.load("pitchers.xml"); processor.input = xmlDoc; processor.transform(); SortedPitchers.innerHTML = processor.output; } function window.onload() { SortData("TEAM"); } Let's walk through the JavaScript file, beginning with the window.onload function.
When the browser window first loads the HTML page, the window.onload event fires. This function, in turn , calls the SortData function with a string value of TEAM .
The SortData function performs the actual transformation of data. The JavaScript file contains the code that declares the MSXML objects and instantiates them. Because the browser uses MSXML on the client, you have access to a familiar programming model. A FreeThreadedDOMDocument is created and loaded with the XSLT document PitcherStyle.xslt (refer to Listing 3.5). This document is then used as the stylesheet for the XSLTemplate object template .
The createProcessor method returns an IXSLProcessor object that performs the actual transformation over the XSLT document. The processor adds the parameter sortBy . (This variable is defined in the XSLT stylesheet in Listing 3.5.) Finally, the XML document is loaded and the XSL processor is invoked to perform the transformation. Finally, the HTML div element, named SortedPitchers and declared in Listing 3.6, is populated with the results of the XSLT transformation.
The cool part of this sample application is that clicking a table header causes the table to be sorted completely on the client. This is because the SortData method is called each time a table header is clicked. The code that specifies this is in the XSLT file itself.
Recall in Listing 3.5 that the XSLT stylesheet actually emitted the HTML that renders the HTML table. In the XSLT stylesheet, you declared the table headers with the following code:
<th bgcolor="teal"> <a onclick="javascript:SortData('FNAME');">FirstName</a> </th> <th bgcolor="teal"> <a onclick="javascript:SortData('LNAME');">Last Name</a> </th> <th bgcolor="teal"> <a onclick="javascript:SortData('CITY');">City</a> </th> <th bgcolor="teal"> <a onclick="javascript:SortData('TEAM');">Team</a> </th> <th bgcolor="teal"> <a onclick="javascript:SortData('ERA');">ERA</a> </th> Notice that inside the XSLT file, you can specify the JavaScript function that is called as a result of a UI event. In this case, specify that your custom SortData function should be called when the onclick event occurs.
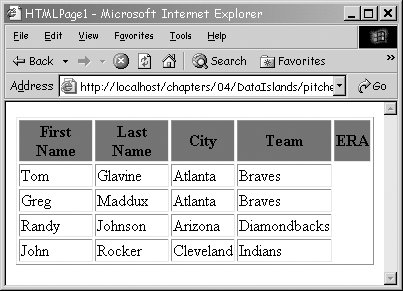
The results of this example are shown in Figure 3.2.
Figure 3.2. A client-side DOM example.
This example introduced many techniques. You saw how XSLT can be applied to XML to render a new format. You saw how MSXML is used to load and manipulate XML data, and how MSXML can perform transformations on the client. For more information on MSXML, see Chapter 5, "MSXML Parser." XSLT is covered in depth in the section, "XSLT."
| only for RuBoard |
EAN: N/A
Pages: 184