Walk-Through of Code
| only for RuBoard |
This sample contains a bit of code that you might find useful in future projects. To set up the application, create a new C# web application called pagebuilder . We will explain the web forms that need to be added and the code they contain by focusing on each page that comprises the application individually. Table 12.1 shows the files that comprise the pagebuilder application.
Table 12.1. Files in the pagebuilder Application
| Filename | Description |
|---|---|
| BuilderLib.cs | Contains a common set of methods used within the application. |
| CreateForm.aspx | Captures database connection information and the form name that is to be created. |
| ChooseTable.aspx | Provides the user with a drop-down list of tables within the database specified in CreateForm.aspx . The table chosen is used to create the generated code. |
| CreatePage.aspx | Creates the generated code and delivers the code to the user through email. |
| Template.txt | Contains the template code that is used to create the generated web form. |
| PageBuilder.css | Styles the output display. |
The overall flow of the code is fairly simple. You collect data pertaining to the database connection and desired table to automate a user interface for. After the data is collected, connect to the database, retrieve the schema, and generate a user interface based on the table schema. To generate the .aspx page, use a template file, Template.txt , that holds placemarkers for the code that's unique to each usage of the application. You then simply build a string and replace the placemarkers in the template file to generate the .aspx page.
BuilderLib.cs
Throughout the code presented in this chapter, you might notice calls to a component called BuilderLib . This is a custom component developed for this application that provides several static helper methods. These methods are then reused in several pages in the application, reducing code redundancy.
BuilderLib.GetDataTable
The first method to note is the GetDataTable static function. This method retrieves an ADO.NET DataTable object using the SQL command and connection string passed to the component.
SQL Server allows the execution of multiple commands in a single command string. That is, you can execute multiple statements simply by separating them with a semicolon. For example, the following statement could be executed:
SELECT * FROM CUSTOMERS;DROP TABLE ORDERS
Because you build the command string directly from the UI elements, it is possible for the user to enter a semicolon into a UI element and enter malicious code. To avoid this possibility, simply remove the semicolon from the command string. The resulting command would be an invalid SQL call and would generate an error rather than allow potentially malicious code.
This function then uses a SqlDataAdapter to fill a DataTable object using the SQL command specified and returns the filled DataTable .
BuilderLib.GetNode
The GetNode method returns a node from an XML document if it exists, or creates a new node and appends it to the parent node if it doesn't exist. There are two overloaded versions of the GetNode method: one that specifies the node value and one that does not.
These functions are called by passing in a member of the XmlNodeType enumeration to specify what type of node is being retrieved. The method is only concerned with Attribute and Element nodes: Other node types, such as ProcessingInstruction and CData are not used in this sample application.
Listing 12.1 shows the code listing for the BuilderLib component.
CreateForm.aspx
The first .aspx page that we will walk through is CreateForm.aspx . This page should be set as the start page for the application by right-clicking the .aspx page in Visual Studio .NET and selecting Set as Start Page.
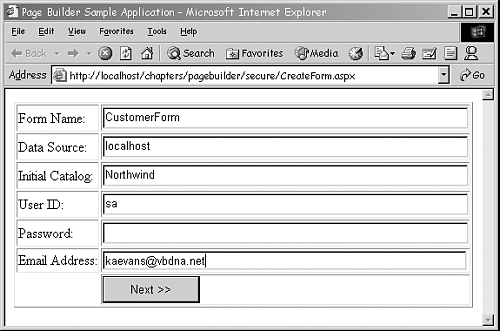
This page presents a UI that interrogates the user for database connectivity information. We do this through a very simple-looking UI. Figure 12.1 shows the first screen that captures connectivity information.
Figure 12.1. The first screen of the application captures database connectivity information.

The information from this screen is stored in an XmlDocument object in memory in the Session object. Because this is not likely a high-volume application, this is a great use of the Session object to enable persistence of stateful data.
The form contains several text box controls and an asp:Button control. The button has its OnClick attribute set to the function that will fire when the button is clicked. You will use the Button1_Click custom method.
After the Button1_Click method is called, the connection string is formed by using elements from the UI. A StringBuilder object forms the string based on the values in the UI, and the connection string is tested against the database.
If the database connection cannot be made, the error is displayed in the HTML div server control. If the connection can be made, the form name and connection string are stored in an XML document. The XML document, in turn , is stored in Session state and the page is redirected.
Another point to note is the inclusion of the namespace pagebuilder . This namespace is necessary to access the methods in the PageBuilder.cs file, shown in Listing 12.1.
Listing 12.2 shows the code for the first page, CreateForm.aspx .
As you can see, the code so far is fairly simple:You are gathering the information needed to generate the code.
ChooseTable.aspx
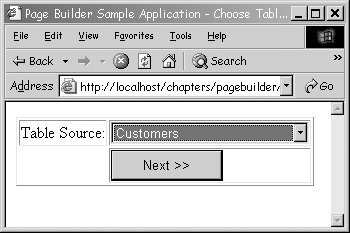
The next screen of the application is even simpler. Use this screen to determine to which database table that the end user wants to connect. This code leverages the BuilderLib component again to retrieve the table names within the specified database. Figure 12.2 shows this simple drop-down listbox.
Figure 12.2. The second screen of the application captures the database table to use.

The code listing for the page shown in Figure 12.2 is fairly simple. When the page is loaded, the XML document created in ChooseTable.aspx is retrieved from Session state and the database connection string is retrieved from it. The sp_tables system stored procedure in SQL Server is called to retrieve the list of table names in the current catalog. This list of tables is contained in a DataTable that's returned from the BuilderLib component. The DropDownList control is bound to the DataTable object using the TABLE_NAME column as both the display and value of each item in the drop-down list.
After the button on the UI is clicked, the XML document is retrieved again from Session state and the chosen column is added to the document, after which the page is redirected to the final page, CreatePage.aspx .
Listing 12.3 shows the code for ChooseTable.aspx .
Template.txt
Template.txt is a simple text file that contains a template for an .aspx page. The code for template.txt is shown in Listing 12.4. Four placeholders are in the template file: <##DATA_TABLE##> will be replaced by the database table name, <##CONNECTION_STRING##> will be replaced by the database connection string, <##BOUND_COLUMNS##> will be replaced by the asp:BoundColu mn elements that are to be bound to the DataGrid , and <##UPDATE##> will be replaced by the code that handles updating the database.
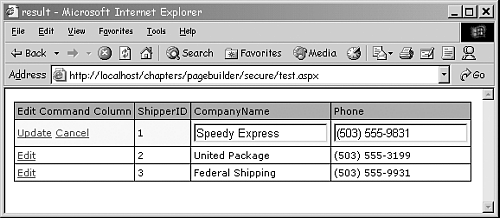
The UI it generates consists of a single editable DataGrid . The DataGrid allows editing of values in a single row by presenting an Edit link for each row. If the Edit link is clicked by the user, the links Update and Cancel are presented to the user. This is handled by using the OnEditCommand , OnCancelCommand , and OnUpdateCommand events of the DataGrid .
If Edit is clicked, the grid's EditItemIndex is set to the index of the clicked row. This causes the Update and Cancel links to appear. (This is a behavior of the DataGrid ”no additional code is needed to display these.) Textboxes also appear in the editable columns for the DataGrid .
If Cancel is clicked for a row being edited, the EditItemIndex is set back to “1 and the grid is rebound. Because the EditItemIndex is -1, all rows show only the Edit link in the edit command column. The Update and Cancel links are hidden, as well as the Textbox controls that were shown when Edit was first clicked. Again, this is a behavior of the DataGrid; no additional code is necessary.
If Update is clicked, the code in the resultGrid_Update event handler is fired . The DataGridCommandEventArgs parameter of the Update event handler contains the objects that access the row information for the DataGrid . As previously stated, textboxes are displayed for inline editing. To retrieve the user's input from the grid, you must reference the cell and the first control in its Controls collection to retrieve the textbox.
Again, the code for template.txt is in Listing 12.4.
CreatePage.aspx
Now that you have determined which table will create your generated page, look at how you can achieve generating a dynamic page. So far, you have collected the form name, database connection string, and the database table name that will generate an .aspx page. The file CreatePage.aspx generates the file and delivers it to the end user.
The biggest point to make when looking at the code in Listing 12.5 is that you are writing code that is writing code. In other words, you are writing code that generates code, so the syntax might get confusing.
We will break up the code into manageable sections here with interspersed commentary , and the complete code is also found in Listing 12.5.
The driver function for the entire page is the Page_Load event because it controls the program flow:
private void Page_Load(object sender, System.EventArgs e) { FileStream file = new FileStream(Server.MapPath("template.txt"), System.IO.FileMode.Open); StreamReader reader = new StreamReader(file); string contents = reader.ReadToEnd(); reader.Close(); file.Close(); In the Page_Load event, open the template file and read the template file's contents into a string. This string is used to build your generated page, and the template file is left untouched by your application.
XmlDocument doc = (XmlDocument)Session["doc"]; XmlElement root = doc.DocumentElement; string tableName = root.Attributes["tableName"].Value; string connectionString = root.Attributes["connectionString"].Value; string emailAddress = root.Attributes["emailAddress"].Value;
The next step in the Page_Load event: Retrieve the XML document from Session state and retrieve the settings from it:
//Replace the DATA_TABLE marker with the name of the database //table contents = contents.Replace("<##DATA_TABLE##>", tableName); //Replace the CONNECTION_STRING marker with the // database connection string contents = contents.Replace("<##CONNECTION_STRING##>", connectionString); //Replace the UPDATE marker with the string returned // from the GetUpdate function. contents = contents.Replace("<##UPDATE##>", GetUpdate(root)); contents = contents.Replace("<##BOUND_COLUMNS##>", GetBoundColumns(tableName,  connectionString));
 After you retrieve information from the XML document in Session state, generate the .aspx page based on the user's input. The template file's contents are replaced with the user's input and other generated code. The largest replacement occurs in the GetUpdate function, highlighted in this code snippet:
System.Web.Mail.MailMessage msg = new System.Web.Mail.MailMessage(); msg.Subject="PageBuilder Generated Code"; msg.To = emailAddress; msg.From = "pagebuilder@vbdna.net"; msg.Body = contents; System.Web.Mail.SmtpMail.Send(msg); }
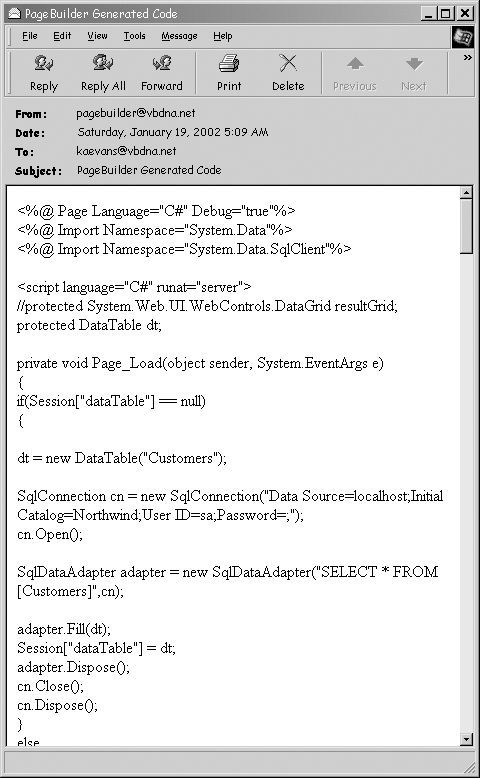
After the .aspx web form is generated, the contents are mailed to the user at the specified email address. Figure 12.3 shows a sample email where the body of the email is the C# code for the web form.
Figure 12.3. The email generated by the PageBuilder application.

Retrieving from Disconnected WorkstationsIf you are working on a workstation, you might have difficulty retrieving the generated code because your machine might not have SMTP services running. Start the default SMTP site in the Internet Services Manager MMC snap-in and start the default mail SMTP virtual server. Then go to your mailroot directory (mine is at c:\inetpub\mailroot ) and look for your message in the pickup directory. If you see a message with a .eml extension, you can view it using Outlook Express to retrieve the generated code. |
The GetUpdate function is the largest function: It contains the code that generates the UpdateCommand for the updated rows in the DataSet . Although the code is fairly lengthy, it is actually simple. The modified data is retrieved from the user interface as textboxes within the DataGrid . Code is then generated to create SqlParameter objects for use in the generated SQL statements.
It can be added to any C# web application. Just add a new web form to a C# web application and replace the code in the .cs file with the generated code received by email. Run the application, and the output will be similar to what's shown in Figure 12.4.
Figure 12.4. Running the generated code displays an editable DataGrid . An example is depicted of using the Shippers table in the Northwind database.

| only for RuBoard |
EAN: N/A
Pages: 184
- Integration Strategies and Tactics for Information Technology Governance
- An Emerging Strategy for E-Business IT Governance
- Measuring and Managing E-Business Initiatives Through the Balanced Scorecard
- A View on Knowledge Management: Utilizing a Balanced Scorecard Methodology for Analyzing Knowledge Metrics
- Governance in IT Outsourcing Partnerships