Adding a Jump Menu
|
| < Day Day Up > |
|
The jump menu in Dreamweaver is an easy-to-use form object that's often used for navigation; the menu lists different options, and a JavaScript behavior powers the options to switch pages on demand. Some jump menus use a Go button, but most visitors expect to have the page switch when they choose an item.
Jump menus are added in the same fashion as any other form object, but they have their own dialog box to allow easy development. To edit a jump menu, select the menu object and use the Behaviors panel to double-click the jump menu listing.
Habitat Alert site Here you'll build a Resource Menu to allow visitors to select from a dynamically generated list of resources, sorted by category. We are still using the find/index.htm page.
| Cross-Reference | See the exercise dynamic_form_menus.pdf in Chapter 46's exercise files for more information about setting up dynamically generated form drop down menus. While the exercise uses ASP server technology, a similar process could be used with ColdFusion. |
-
Click the form you just added (quicksearch) and select the <form#quicksearch> tag using the Tag selector. Press right arrow to move past the form code.
-
Type Resource Menu and add another ¬ special character. Format this as Heading 4 and select the <h4> tag using the Tag selector.
-
Press the Right Arrow key to move past the heading and Insert ® Form Objects ® Jump Menu.
You won't need to add a form first because the Jump Menu tool adds it for you if needed. You may opt to add the form first if you prefer .
-
In the Text field, type Find a Resource.
Tip It is advisable to make the first item in a jump menu a call to action. Jump menus use a JavaScript function that works with the event onChange, meaning that the script is called only when an item is changed. Because the first item is already chosen, there's no way to choose it.
-
Add a new menu item by clicking the Add (+) button. In the Text field type Gov't Agencies for this item and place a hash mark (#) into the When Selected, Go to URL field. Figure 38-7 shows the Jump Menu dialog box.
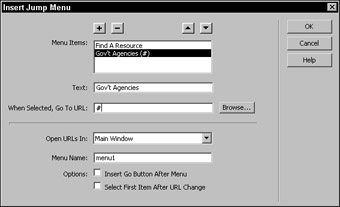
Figure 38-7: The Jump Menu dialog box -
Add these items, each time using a hash mark instead of a URL:
-
State Agencies
-
Groups
-
Habitat Alert Links
-
-
Click OK. Select the jump menu's <form> tag and name this form resources.
-
To finish this page, add some class to your form objects by setting style rules. Styles have already been created for this purpose. Select item (from the first form) and right-click (Control+click) to set its class to .formbox. Select the form button (input) and set it to .formbtn. Select the jump menu (select) and set its class to .formbox, too. Save your page and preview.
Note Form styles are not well-supported in Netscape 4x and have no effect there, but they jazz up your form objects in W3C compliant browsers. Be careful about which properties you use if developing form styles, and always set these style rules in an imported style sheet to hide them from NN4x.
Figure 38-8 shows the page in Netscape 4x. Figure 38-9 shows Internet Explorer 6.0. The styles used to format this page are contained in two style sheets, with some adjustment to make NN4x happier.
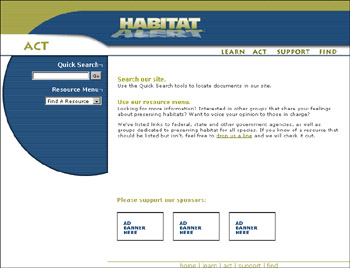
Figure 38-8: The main Find page in Netscape 4x
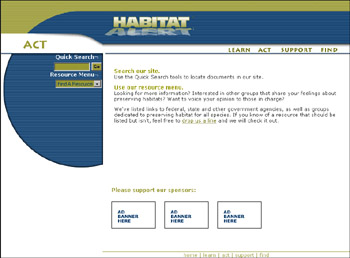
Figure 38-9: The main Find page as viewed in Internet Explorer 6.0
|
| < Day Day Up > |
|
EAN: 2147483647
Pages: 491