Using Great Table Tricks
|
| < Day Day Up > |
|
You've probably seen table tricks in action — outlines that stretch to rounded corner tables. Have you ever wondered how it was done? Every designer/developer should build an arsenal of table tricks to use in their layouts to add a new level of sophistication to a page. Here are just a few of my favorites.
Creating great table borders
The problem with table borders is that they are kind of clunky. Of course, table borders can make content easier to read by helping the eye understand the relationship of a row or column of text. Although all browsers allow control over the presence and width of table borders, not all browsers render borders equally. Some browsers bevel the border, adding a 3-D effect with a light source from the top and left of the page. Others allow more control through the use of color and shading. No browser actually renders a single-pixel border. Borders are a table property; you cannot turn off the border for some cells and leave it for others.
Using cell padding and cell spacing
You can use cell padding and spacing to add white space to tables. Padding places space on all four sides of all the table cells in the table, so content placed in the cell doesn't touch the cell's edges. Where two cells meet, the space between them is doubled. Spacing adds room between the cells. The amount of space between cells is not doubled but rather is shared.
Here's a handy border trick to give you the control you want. This trick requires a nested table, so use it sparingly:
-
Create a new basic page. Add a one row, one column table set to 400px. Give the table zero border and spacing, but set the padding to 1px. You can use any width for your page, but work with this one for now.
-
Click the table cell and select it. Set the cell's background color to a color of your choice. Be sure you are setting the cell's color, not the table's.
-
With your cursor still in the cell, add a new table, setting the width to 400px, with three rows and three columns. Give your new table a zero border, 1px spacing, and 5px padding.
-
Select all the cells in the second and third rows by shift+clicking from the first cell in the second row to the last cell in the third row. Color these cells white.
-
Save and preview. As you can see in Figure 34-18, the spacing between the cells of the nested, inner table let the color of the outer table's cell show through. The white of the nested table's cells block the color, forming 1px outlines.
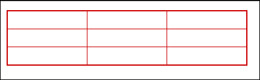
Figure 34-18: A one-pixel border showing around the nested table -
Select all the cells in the top row. Merge them and set this cell to a table heading by checking the Header box in the Property inspector. Headings are automatically centered and bolded. Type a heading into the table; then save and preview.
| Tip | You can merge cells and set different colors to control your border. You can even make the spacing wider to create a wider outline or change the color of the outlines. To make the outline wider, select the outer <table> tag and increase the cell pad (our border) value in the Property inspector. To change the color of the table borders, click the table and select the <td> that appears just before the second <table> tag. |
Creating a rounded-corner table
This trick uses graphics to give a table a unique look by getting rid of the hard, boxy rectangular shape.
Fireworks MX The next exercise uses files exported from Chapter 23, which is the Fireworks optimizing and exporting chapter.
A simple, fixed-width version
-
In Dreamweaver, use the Site panel to open
 corners.htm from the rounded_tables folder. This page was exported from Fireworks and contains comments — hidden notes in the code — to maintain a relationship between the Fireworks source file and the page.
 -
Each cell contains a graphic. The gold graphics form the outlines and rounded corners for the table. Delete the center cell's image and type put content here. The side graphics keep this cell open. But they also make the table bigger than you want it.
-
You can set the center cell to Top align (Vert) and sample the corner graphics to set the center cell's background color. With the center cell colored (Figure 34-19), the text no longer appears to be against an edge.
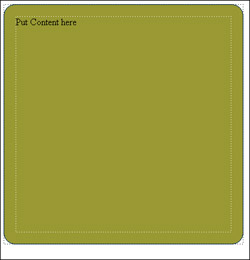
Figure 34-19: The center of the rounded table set to Top vertical alignment with the background color the same as the borders -
Save and preview.
A relative-width (more complex) version
The simple fixed-width table was easy because Fireworks sets the width of each cell. Because the graphics in the cells match the width of the cells, all browsers render the table accurately. But making a relative table with rounded corners is like building a hybrid table; it's trickier to get all browsers to render it properly.
-
Using the same
corners.htm file, select the <table> tag and set the table's width to 50%, replacing the 400px width. -
Save and preview your page in your target browsers. Open the browser to full window and don't be surprised to see the table fall apart — creating gaps beside all the corners — when you expand the browser window. Remember, this is a hybrid table.
-
To fix the table, set the top, center cell's width to 100%. (Press the right arrow to get into the cell or select the <td> tag and test again.) You should still see gaps, but only beside the right corners. The gaps are caused because the graphic in the top, and the bottom-center cells are too short to fill in the entire cell.
-
Click the top-center cell and select the <td> tag. Set the Bg image for this cell to the same graphic used in the foreground. Browse to locate the rounded_tables folder. Inside, you will find an images folder containing all the graphics for this page. Select bg_top..gif.
-
Save and preview.
-
Repeat the previous step for each of the outer cells, including the left and right side cells. Using these images:
- bg_btm.gif for the bottom row background
- bg_left.gif for the left side
-
bg_right.gif for the right side
As you add content to the center cell, you would experience the same gaps you saw when you expanded the table. By placing background images in all four cells, the outline seems to magically expand, whatever the size of the table!
-
-
Replace the foreground images in the four sides with spacer GIFs. Leave the spacers set to 1 × 1 to allow the table to shrink horizontally and vertically in response to sizing the browser window and reduced cell content.
Tip Here's a fast way to add the spacers: Double-click the first image and select
spacer.gif. Select the second foreground side image. Press Ctrl+Y (Command+Y) to repeat the last step. Because you are using the same image, Macromedia Dreamweaver sets this image source to spacer.gif.! (This may not work for Windows XP systems.) Repeat until all four images are replaced. -
Set the center cell's height to a minimum of 100px. Save and test the page. As you add content to the center cell, it expands vertically. But it only expands horizontally as you widen the browser window.
Tip Keep in mind that the 50 percent width of this table reacts to the browser window because that is its container; if the same table were nested in a fixed-width table cell, it would not expand horizontally at all.
Round-trip editing between Fireworks and Dreamweaver
There are several options for editing your corner graphics. You could simply go to Fireworks, reopen the source file, and re-export only the graphics into the image folder. That is a valid way to work. But the integration between Dreamweaver and Fireworks makes it possible to edit the table with a single click:
-
Select the table.
-
Click the Edit button. This launches Fireworks MX, opening the source file for the page. Because you moved this file into the Chapter 34 folder Dreamweaver may not be able to find the source file. Navigate to the rounded tables folder and select it.
The code in the top of the table and the Macromedia Fireworks Src path in the Property inspector tell Macromedia Dreamweaver where to find the source file.
<!-- fwtable fwsrc="/books/2/375/1/html/2/corners.png" fwbase="corners.gif" fwstyle="Dreamweaver" fwdocid = "742308039" fwnested="0" -->
-
In the Fireworks toolbar, toggle the slice visibility by clicking the Hide Slices and Hotspots button; then click the Swap Strokes and Fill button below the Stroke and Fill color pickers. This changes the table to a blue table with gold outlines.
-
Click the Done button at the top of the Document to close Fireworks and return to Dreamweaver. To finish the alterations, you have to change the background cell color for the center cell.
Fireworks respects the changes made to the table in Macromedia Dreamweaver and does not try to return the table to its original state. The spacers in the sides are still in place as well. Although complex tables may not always be so easy to update, if you use Fireworks HTML, be sure to check out this handy integration feature.
|
| < Day Day Up > |
|
EAN: 2147483647
Pages: 491