Building a Modular Layout
|
| < Day Day Up > |
|
Using multiple tables to lay out your content is superior to using a single, complex table structure. The table code is less complex, and it is easier to modify your page regions without disturbing every section of the page. Plus the page will begin to load faster. When you have one large table nothing will display until the browser has read the last table tag. So by using smaller tables they will load one at a time and appear to load faster.
Figure 34-11 shows a more desirable table layout for the Habitat Alert site. Because the site specifications call for a "stretchy" or fluid behavior to fit more target monitor widths, hybrid table structures are stacked to create a modular design.
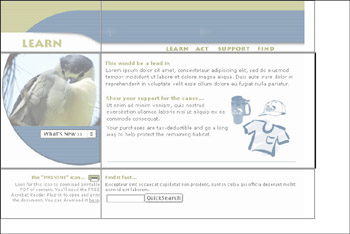
Figure 34-11: Modular tables make this page layout easier to build and modify. The table border is for demonstration purposes only.
Building a hybrid table
There's nothing hard about building a fluid table that renders consistently in all browsers, when you know the secrets. In the Habitat Alert layout, you build three tables.
| On the CD-ROM | Save the Habitat Alert34 folder from the chapter34_exercise folder to your hard drive. Define a new site. Hint: If you already have another Habitat Alert site defined, then choose the Edit Site option in the Site panel of the Site Definition drop-down menu and change the path to the Local Root folder. |
-
Habitat Alert site Open the Site panel (F8 makes the Site panel active) and open the html folder, and the site folder. Then double-click the
 index.htm file to open it.
 Cross-Reference All the margins have been set in Page Properties to zero, and the background image was added in Chapter 33.
-
Insert your cursor into the page and add a table with the Insert Table tool. Set the table to use 1 row, 3 columns, and a width of 100%. Set Border, Cell Padding, and Cell Spacing to zero (Figure 34-12). Click OK.
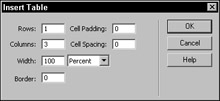
Figure 34-12: The Table dialog box with the settings for the first table in the index page of the Habitat Alert site -
Place your cursor into the first cell and use the Property inspector to set its width to 230. This is a pixel value by default.
-
Select the <tr> from the Tag selector, and set the vertical alignment for the row, to Top using the Vert menu options (Property inspector). Click in the first cell.
-
Use the Assets panel to insert
banner_left.gif. -
Press right arrow to move to the right of the image's tag then insert
location_home.gif. Total the height of both images. You'll see that together they are 119px. (Don't worry if the table cells jump around and change sizes. You fix that shortly.) Press Tab to move into the next cell. -
Insert
logo.gif and note its dimensions (208 × 47). Figure 34-13 shows the table and images so far.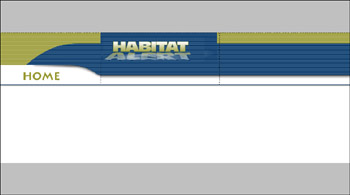
Figure 34-13: The first table added with the logo and left side images added -
Press Tab to move to the next cell.
Note If you are using Windows 2000 or XP, you may have to reselect the image to place the keyboard's focus back in the document.
-
Insert
spacer.gif, go to the Property inspector, and set the spacer's width to 300px and its height to 102px. -
Move to the right of the image by pressing right arrow, and add a line break.
-
Add
spacer.gif and set its dimensions to 20×17. The spacer will keep the buttons off the right edge of the browser window when you align the cell's content to the right. -
With your cursor still in the last cell, go to the Property inspector and change the Horz setting to Right. Do not use the paragraph alignment buttons to set alignment!
-
Set the last cell's width to 400px.
So far you have set the width of two columns using fixed pixel values, but earlier you learned that percentage-based tables generally use percentage values. When pixel values are used for column widths in a relative table, that makes it a hybrid table; therefore, at least one column must use a percentage value to allow for stretch in the table. Because you cannot know what the fixed width would need to be in the user's browser window, it makes sense to use a value that will take up all of the remaining space available. That value is 100%.
-
Set the middle column's width to 100%, manually adding the percentage sign. To select the middle cell, select the logo graphic; then click <td> in the Tag selector (Figure 34-14).
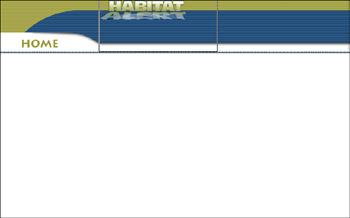
Figure 34-14: The first table with the cells set, spacers added, and the logo inserted -
Save and preview your page.
The logo isn't positioned properly. To force the logo to align properly, follow these steps:
-
Select the logo and press left arrow to move in front of the image.
-
Add a line break; then press up arrow to move to the new line that is now above the logo.
-
Add another spacer image, setting its dimensions to 190 × 34.
-
Select the logo image and add 10px to its Hspace value. It looks much better now, as shown in Figure 34-15.
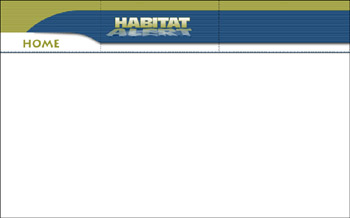
Figure 34-15: The logo in a better position -
Save and preview in both target browsers.
| Note | Hspace (horizontal space) places white space before and after an image. Vspace (vertical space) does the same, only it places the space above and below. |
Stacking tables
By default, tables will stack. You do not have to place line breaks or paragraph returns between tables to place one table below another. In fact, adding a line break may actually cause unwanted space between your table structures.
Habitat Alert site You'll now add the table that holds the bird image and the main content in the Habitat Alert layout.
-
To build the next table, click the page below the existing table, and click the Insert Table icon to add another table.
-
Give the table 1 row, 2 columns, and set its width to 100%. Set border, padding, and spacing to zero.
Now you can see the advantage to using modular, stacked tables. If you had to build a single table to hold three columns for the top portion and two columns for the remaining structure, you would be forced to span columns by merging two columns into one. Although this would work, it offers less flexibility in the long run because it is unnecessarily complex. Two tables are simpler, and they load faster. Keep it simple with stacked, modular tables.
Using a table cell background image
Almost all major browsers recognize the use of background images in table cells. The Habitat Alert layout uses a graphic in the background to form the bottom of the circle below the heron image. The heron image is inserted into the cell and sits at the top of the cell, over the background image. This forms a more flexible layout that you can use in other pages, replacing the heron image with a form or other HTML content.
| Cross-Reference | Although it's possible to apply a background image to the table, Netscape 4x browsers will not render it. In fact, Netscape 4x browsers have several documented problems with background images, covered more in-depth in Chapter 36. |
Habitat Alert site To set the background for the second table's first cell in the Habitat Alert homepage, follow these steps:
-
Place your cursor into the first cell, and click the Browse for folder icon next to the Bg field in the Property inspector.
-
Locate
circle_btm_plus.gif in the sharedimages\backgrounds folder of your site. Don't worry about what you see onscreen; you're not finished! -
The image appears to tile horizontally because you haven't yet set a width for the table cell. Set the cell's width to 230px.
-
Use the Asset panel to insert
circlepic0.jpg. -
Tab to move to the next cell. Set this cell's width to 100% to create the stretchy cell for this hybrid table. This prevents the horizontal tiling of the background image in the first cell.
| Tip | Without the heron image, the fixed width cell would collapse because the 100% width set to the second cell is very powerful. When working with hybrid tables where you do not have a foreground image to force the fixed cell to remain open, use a spacer GIF, setting the width to the desired column size. |
Using a minimum cell height
You can't set the maximum height of a table. The same is true of table cells and rows. You can, however, set the minimum height, and a spacer is not necessary to hold it open.
Habitat Alert site Although you fixed the tiling problem, the background image's bottom portion is not visible because the cell isn't tall enough to display it. Follow these steps to correct the problem:
-
Select the heron image; then use the Tag selector to select the cell (<td>).
-
Set the height of the cell to 300px.
-
Select the <tr> row and set the vertical alignment to Top, using the Vert menu options. Save and preview.
| Tip | Before you apply a background image to a table cell, be sure you set up the image to behave properly. Remember, background images tile, repeating horizontally and vertically. The circle graphic used here has lots of white space added to the bottom — roughly 2,800px to prevent vertical tiling — much like the edit made to the Mission Statement's page background image in the previous chapter. |
Coloring a table cell
This trick can be used horizontally or vertically but the example shown from the Habitat Alert layout uses a cell in a table row to form a colored line that stretches as the document widens in the browser window. Not all browsers support coloring horizontal rules, and it would be nearly impossible to get the rule to align properly.
Habitat Alert site In this set of steps, you use a background color in a table cell to create a 1-pixel line that stretches with the right column of the page.
-
To place some quick content into the right column of the second table, open the
content.htm file and copy it all. Then close the document and paste into the index.htm file. -
Insert your cursor below the second table in the Habitat Alert homepage. If you cannot easily place your cursor below the page content, click into the last cell, and select the <table> tag, using the Tag selector. Press right arrow to move outside of the table.
-
Insert a new table. Give this table two rows and two columns, and set the width to 98%. Set the border, padding, and spacing to zero.
-
Click the second cell of the top row; then scroll to see the top of the page. Use the Bg color picker to sample the darker gold color (#999933) from the banner area (or the bird's belly). Be sure to use the Bg color picker found below the Bg field. If you hover over the color picker, a ToolTip should say Background Color.
-
Click the first cell of the top row. Set this cell's width to 230px and add a spacer Gif, setting its width also to 230px. Leave the spacer's height set to 1px.
-
Click the second cell again and set its width to 100%. Although this table's width is 98%, you still use a 100% value for the stretchy column. Remember, relative values are relative to their container. The 98% value set for the table takes up 98% of the document. The 100% value in the stretchy column takes up 100% of the remaining width in the table.
-
Add a spacer Gif to the gold cell. Click the <table> tag in the Tag selector to force the page to update; then save and preview the page. Figure 34-16 shows the nice, single-pixel line that sits along the bottom of the main content area and stretches to the right when the browser window is expanded.
Figure 34-16: A line added to the bottom of the content area -
Place your cursor in the second cell of the second row and set the Horz setting to Center.
-
In the same cell, type home | learn | act | support | find.
-
Save and preview your page.
| Tip | Create the vertical divider between the words using the pipe character. To add one of these cross-platform characters, type a backslash while pressing Shift. |
|
| < Day Day Up > |
|
EAN: 2147483647
Pages: 491