Editing with the Pen Tool
|
| < Day Day Up > |
|
So far in this chapter, you have learned how to draw paths and how to connect the beginning and ending points. Sometimes, you will need to join multiple paths that you have drawn, or you may want to break apart a path. The Pen tool is used to join multiple paths, close a path, and continue a path you have drawn.
Closing a path
If you try to fill a path object and nothing happens, or the fill doesn't go just inside the path, producing very strange results, your path is probably not closed. If this happens, you need to join the path, or join multiple paths to close the path. To close a path, follow these steps:
-
With the Pointer tool, select the path you want to close.
-
Select the Pen tool, move your cursor over one of the end points of the path (when you are near the end point, a little x will appear in the lower-right corner of the cursor), and click the end point once. A little arrow appears in the corner of the cursor, indicating you can now select a closing point.
-
Move your cursor to the closing point and click it once. The path is closed. You don't have to use only one point to close a path. If the ending point is not near, you may want to place points along the way and then select the closing point.
Continuing a path
Adding to a previous path is similar to closing a path, except you don't have to close a path to add on to it. If you want to add on to a previous path, follow these steps:
-
With the Pointer tool, select the path you want to add on to.
-
Select the Pen tool, move your cursor over one of the end points of the path, and click the end point once. If you want the next line segment to be curved, click and drag.
-
Move your cursor to the next location in which you want to add a point and then click once; continue clicking to add points until you have the path you want.
Joining paths
After you draw multiple paths, you can join them together using the Pen tool. This may sound like the same thing as closing paths, and it is almost the same procedure; the difference is that you don't have to close the joined paths. To join paths together, follow these steps:
-
With the Pointer tool, select the path you want to join.
-
Select the Pen tool, move your cursor over one of the end points of the path, and click the end point once.
-
Move your cursor to the end point of the other path you are connecting to and click once. You can combine as many paths as you like in this way.
Adding and deleting points
If you want a path to change direction, you may need to add at least one point. Use the Pen tool to add points to an existing path:
-
Select the path using the Pointer tool.
-
Click once on the line segment using the Pen tool to add a corner point. To add a smooth curve point, click and drag to pull out the curve control handles.
Using the Vector Path tool often adds more points than are necessary for the shape desired. Extra points can make a shape or path look choppy or not as smooth as you might want. To remove points, follow these steps:
-
Select the path you want to edit with the Pointer tool.
-
Select the Pen tool. Move to the point that you want to delete. When the minus sign appears beside the cursor, click once on the point.
-
Another way to remove unwanted points is to choose Modify ® Alter Path ® Simplify and then type the number of points you want removed and click OK. Although this option doesn't give you precise control, it is a fast way to make simple changes.
Using the Pen tool to edit a shape
Habitat Alert site The shapes used in the Habitat Alert site are complex and use Pen tool techniques and the Path Combine features shown in the following section.
Adding guides
Before altering the shape we need to set up some guides to use. To set the guides, follow these steps:
-
Navigate to the
 habitat_alert_final\designfiles\Fireworks folder and open the ha1.png file. Or open the myha1.png file from the habitat_alert_start\ designfiles\Fireworks folder if you saved it there in Chapter 16.
 -
You'll be using guides for this exercise. Enable rulers by choosing View ® Rulers. To place a guide, click in the horizontal ruler area and drag into the document to place a guide, which is green by default.
-
To position the guide precisely, double-click the guide to open the Move Guide dialog box. Type in 24 for the Position and click OK. Set the following guides:
-
Horizontal: One at 74 and one at 100
-
Vertical: One at 231 and one at 160
-
Editing a shape
We are going to add a curve to the left side of the blue rectangle for the Habitat Alert site. To alter the shape of the rectangle, follow these steps:
-
Select the blue rectangle and ungroup it (Modify ® Ungroup or Control (Command)+ Shift+G).
-
Select the rectangle with the Subselection tool.
-
Click the Pen tool to select it. Place your cursor over the guide at 160 and the bottom horizontal guide at 100 and click to place another point (Figure 17-17). Add one at the 231 intersection as well.
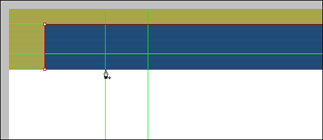
Figure 17-17: A point being added to the intersection of the guide at 160 and 100 -
Using the Subselection tool, Shift+select the bottom-left point and the one directly to the right of it (at the 160 guide). Using the keyboard up arrow, press Shift and press up arrow two times. Release the Shift key and press up arrow five more times. You moved only two points up to the guide at the position of 74 as shown in Figure 17-18.
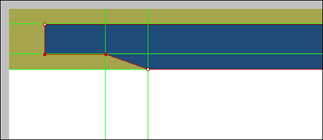
Figure 17-18: The two bottom left points moved up 25 pixelsNote Pressing the Shift key as you press the arrow keys moves in increments of 10 pixels.
-
You want to add a bit of a curve to the straight diagonal line. Using the Subselection tool, press the Alt (Option) key and click toward the 231 guide. Press Alt (Option) and click the lower point and drag toward the 160 guide a tiny bit. Refer to Figure 17-19 to see where the handles are dragged out to for the proper shape.
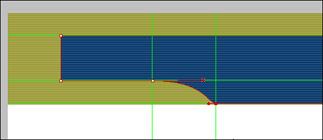
Figure 17-19: The curve added by using the Alt (Option) key and dragging the handles to form the curve shapeTip It can be difficult to pull the correct handle, especially when using the Atl+drag (Option+drag) method to pull a handle from an existing corner point. Use the Pen tool instead. As you move the Pen tool over the point, you see a minus sign. Click and drag a short distance to pull out control handles, following the exact direction of the line. Then press the Alt (Option) key while editing a handle with the Subselection tool to form the desired curved line segment.
-
Save this in the habitat_alert_start\designfile\Fireworks folder as myha2.png.
|
| < Day Day Up > |
|
EAN: 2147483647
Pages: 491