Working with the Panel Layout
|
| < Day Day Up > |
|
The use of docked panel groups is new to Fireworks MX. The docked panels are locked into the interface for Windows users and free floating on a Mac. There are also some new terms to learn, some missing panels to discover, and some new panels to explore. The most notable addition in MX is the Property inspector. Many functions that were previously accessed only by panels are now accessed from the Property inspector.
Those familiar with earlier versions of Fireworks will notice that the Stroke, Fill, Effect, Object, Tool Options, and Color Table panels are gone. The Property inspector replaces the functions of these panels. Two new panels, Answers and Align, have been added, bringing welcome features!
Figure 15-2 shows the areas common to many panels. Clicking the little white arrow (expander arrow) opens the panel.
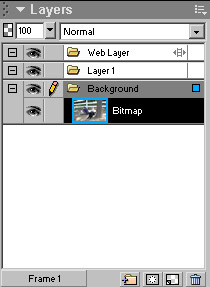
Figure 15-2: The Layers panel, marked to show the new names and features of all the panels in Fireworks
Customizing the panel layout
You may dock, undock, close, or rearrange panels within a group anyway you want. To move a specific panel into a different panel group, follow these steps:
-
Click the Options menu of the panel you want to move.
-
Click Group (panel's name) with, and select the panel group you want to move it to.
To make a new panel group, follow these steps:
-
Click the Options menu of the panel you want to make a new group for.
-
Hover your mouse over Group (panel's name) with and click on New Panel Group.
| Note | The New Panel Group option effectively undocks a specified panel. You may reposition or close it as desired. |
To rename a panel group, follow these steps:
-
Click the Options menu of the panel you want to rename.
-
Click Rename Panel Group and enter a name.
To dock a panel, follow these steps:
-
Select the desired panel from the Windows menu. The new panel opens below all current panels.
-
Click and drag the Gripper (little dots on top-left side) and drag the panel into position.
-
Release the mouse when the solid blue line indicates the location where you want the panel to be docked. In Figure 15-3, the bottom solid line marks where the panel was. The top solid line (blue) shows where it will be docked when you release the mouse.
Figure 15-3: The solid line indicates where the panel will be docked. -
To close a panel group, click its Options menu and select close Panel Group. The panel group will remain closed unless you open it again using the Window menu. If you want it docked, you have to dock it again.
| Tip | If you want to rearrange the order of panels within a group, simply regroup it with the same group using the same method used to move a panel to a new group. This action has the effect of placing that panel last in the group. With a little forethought, it is easy to arrange your panels in your preferred order. |
Features common to most panels
This is a list to show you some of the features that you'll find in the various panels (Figure 15-4). You'll work with specific panels throughout the Fireworks section as you learn how to use the wide array of tools.
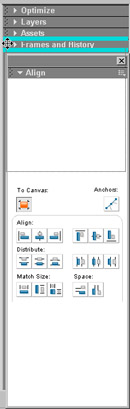
Figure 15-4: Typical panel features
-
You'll find an options pop-up menu for each panel, which you access by clicking the little icon in the top-right corner of the panel. This menu contains additional options relative to that panel.
-
Slider controls are present in many panels. When a number is required for a percentage or size, you can click the down arrow and then click and drag the slider to select the number. You can also type in the amount. If you choose to type in a number, you need to press Enter/Return to accept the setting.
-
A Color box is present whenever a color option is available. When you see a color box (square with a color in it) and you want to change a color, simply click the color box and choose a color from the swatches panel with the Eyedropper tool. Alternatively you can use the Eyedropper to select a color from anywhere in the workspace. If you know the hexadecimal number you want to use, you can type it into the Color panel that opens when you click the color box. If you type in the number, you need to press the Enter/Return key. You may also access the system picker by clicking the color wheel or choose to remove all color by clicking the square with the red slash mark.
|
| < Day Day Up > |
|
EAN: 2147483647
Pages: 491
- Article 220 Branch-Circuit, Feeder, and Service Calculations
- Article 344 Rigid Metal Conduit Type RMC
- Article 354 Nonmetallic Underground Conduit with Conductors Type NUCC
- Article 427: Fixed Electric Heating Equipment for Pipelines and Vessels
- Example No. D8 Motor Circuit Conductors, Overload Protection, and Short-Circuit and Ground-Fault Protection