MAKING A CARD GAME
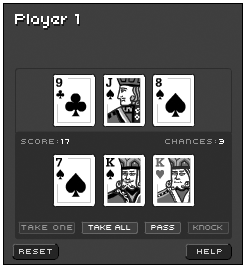
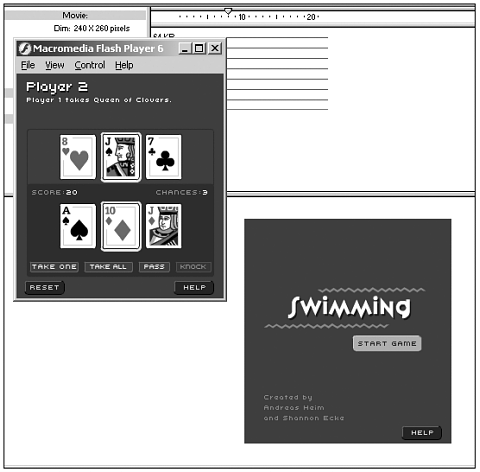
| As the example application for this chapter, I picked a card game called Swimming. The rules are not too complex and are easy to learn and to translate into ActionScript. Although I programmed the game, Shannon Ecke (http://www.shannonecke.com) helped me out with the design. The RulesSwimming is a game for two or more players. It is usually played with a 32-card deck (card values worth seven and higher). Each player starts with three chances. After he or she loses all three, he or she is swimming. On the next loss, the player drowns and is "out." The goal of the game is to get the highest score with three cards on hand. Each numbered card counts for its value: cards 7 through 10 have their numbered value, the face cards (jack, queen, and king) all count 10, and the ace counts 11. Only cards of the same suit can be added up. Thus the maximum score that can be reached is 31 (for instance, if someone has the 10, king, and ace of spades). As an exception to the same suit rule, three of a kind (for instance, 3 eights) will count as 30.5. The Game PlayEach player gets dealt three cards, and there are three cards open next to the stack. The person to the right of the dealer gets the first turn (see Figure 7.3). You have four options for your turn: Figure 7.3. Swimming after the initial deal.
The game ends as soon as someone has 31 in his hand or after someone has knocked and all other players have their last turn. There is one loser per round either the one player with the lowest score or the player that knocked if he or she did not reach the highest score. A draw means he or she does not have the highest score and loses. Otherwise if two players have the same score, both lose. As the game goes on, more and more players lose their chances, drown, and have to drop out of the game. Finally, there are only two players left to play the final rounds. The game ends when there is only one player left. Programming the GameThe following sections of this chapter walk you through the construction of the game step by step.
The computer player comes last because it is easier to test if the game rules are implemented properly with a human player. It also doesn't make much sense to have the computer play against itself, while you can already play the game with two human players. To play against the computer, you also need a human player. The FoundationThis game was written in Flash 5 using an object-oriented programming (OOP) technique that was made possible in Flash by Branden Hall. This technique allows you to define classes and to have movie clips implement them.
The movie clips need little to no ActionScript placed inside of them. You can separate code and graphics this way, which makes it a lot easier to recycle parts or an entire game so you could create a game once and then brand it for different clients. You can do this with Flash already, but now you can keep the code in one place and maintain it. Changes to the artwork are less likely to break code accidentally.
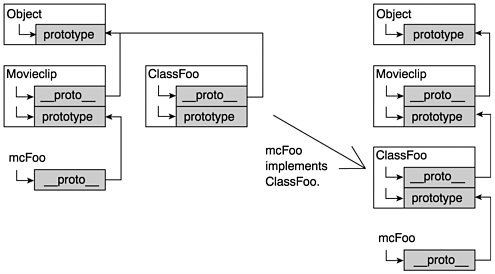
By defining classes for specific tasks, you increase the modularity of your project. You can extend the functionality of the game by building on top of existing classes. In the case of this game, it will be easy to create new screens by basing them on an existing one with a predefined behavior. And as the icing on the cake, a computer player will be derived from a generic player class. Classes let you use a higher level of abstraction than traditional Flash programming for instance, a card class or a hand class. From there on you can modify these classes for different types of games, and can still reuse a lot of the existing code. The card class used in this game turns a movie clip with a visual representation on a playing card into a card object that is part of a suit, has a face, and values associated with the suit and the face. Let's assume you have a movie clip called myCard that has been made an instance of the card class. If you look at it, you will see an ace of spades. With some ActionScript you could do, for example, the following: trace ( myCard.getFace() ); trace ( myCard.getDesc() ); trace ( myCard.getValue() ); The output window will show this: Ace Ace of Spades 11 Now you can create some completely different artwork and reuse the exact same code. A new game of yours may need more functionality for a card than the class used here provides. For example, you may need to show the back of the card first and then flip it. You can either extend the existing class to accomplish the task, or write a new CardFlip class based on the Card class and add the new flip feature. You don't have to start all over again. Flash allows the creation of classes using the prototype property of a function object. The prototype is an object with properties and methods that are used as a template to create instances when the function is used as constructor. A function turns into a constructor when it's used in conjunction with new to create an instance. By modifying the prototype, you can add properties and methods to the constructor of an object. All instances of this object will inherit what you add. For example: function Say () { trace ("Instance of Say created"); } Say.prototype.hello = function () { trace ("hello world"); } mySay = new Say(); mySay.hello(); Now all instances of Say will have a hello method. Advanced inheritance is made possible by using the proto property of an instance of an object. While prototype is being used to define the class, proto points back to the constructor object of an instance. This is how Flash will look up inherited methods and properties. An instance usually does not have only one proto . If you define a new array with var foo = new Array (); Then foo. proto will be Array.prototype . Array is based on the mother of all objects Object . So, foo. proto proto_ will be Object.prototype (see Figure 7.4). Figure 7.4. The proto inheritance chain of an array called foo. proto is a read and write property. When used carefully, this fact can be used to create classes that inherit from super classes. Multiple inheritances also are possible, so a class can become a member of two independent super classes. This works by inserting the new class at the right point in the proto chain. Implementing Classes for Movie ClipsMovie clips also have a proto property, which points to Movieclip . Because a movie clip should remain a movie clip after implementing a new class, its original proto needs to be saved first, and then the new class will be attached as the new proto before adding the original back at the end: Movieclip.prototype.implement = function (classObject) { var temp = this.__proto__; this.__proto__ = classObject; this.__proto__.__proto__ = temp; } By assigning the implement method to the Movieclip.prototype , it becomes available to all movie clips, no matter what timeline they are in (see Figure 7.5). Figure 7.5. Inserting a class for a movie clip with the implement method. I stored this method in an external file, implement.as, and it will be used throughout the examples in this chapter.
A class object to be used as proto of a movie clip needs to be built from the ground up. It can have methods, but it cannot be an instance of a class created with a function as constructor. The following example will not work: foo = function () { } foo.prototype.hello = function () { trace ("hello"); } this.implement ( new foo() ); this.hello(); Here is how to do it instead: foo = {}; foo.hello = function () { trace ("hello"); } this.implement ( foo ); this.hello(); First, you need to create a blank class object. You can attach any number of methods to this object. Then a movie clip can implement the class object and will have the class's methods available. To make the class objects from anywhere in your movie, it is a good idea to attach them to the Global Object object: if (Object.foo == null) { Object.foo = {}; } Object.foo.hello = function () { trace ("hello"); } this.implement ( Object.foo ); this.hello();
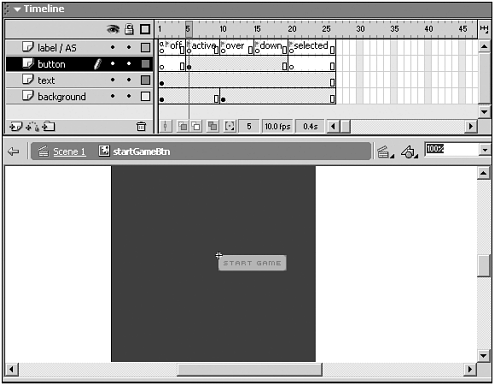
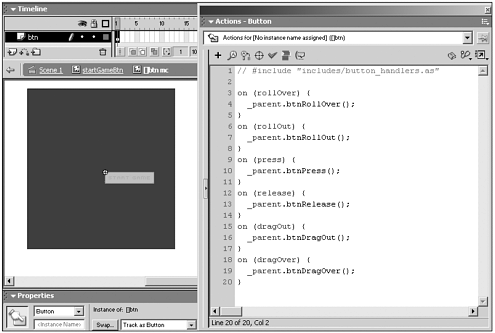
Defining Classes A Button ClassButton is a fundamental class that is being used throughout the game. For better overview and better modularity, I store each class and other key code in their own AS files. Regular buttons in Flash lack the ability to have off states. You often want a button to be grayed out or highlighted but not be able to click on it. Maybe you even want to make the button invisible. You can achieve this by wrapping a button inside a movie clip. To illustrate how this works, I have prepared button_class.fla for you. Open it and you will see a Start Game button placed on the main timeline. Double-click it to enter in place mode. You will see that it is actually a movie clip with frame labels indicating the different states: off, active, over, down, and selected. You also can see that an invisible button is spawned over the active, over, and down keyframes, indicated by a turquoise rectangle. The off and selected frames show artwork only, no button because the movie clip button will be inactive in these states (see Figure 7.6). Figure 7.6. The timeline of a movie clip button with an invisible button inside. If you examine that invisible button by double-clicking it to edit it in place, you will find out that it is actually a movie clip with the invisible button inside. This time it is a button for real, with the following actions attached to it (see Figure 7.7). By wrapping the actual button inside a movie clip, it can be reused over and over again, but the button event handlers need to be defined only once. In this example the ActionScript is directly placed on the button later on it will be used from button_handlers.as. This way you can use the same code on a differently shaped button; for example, if you need a round button instead. Figure 7.7. The invisible button is actually inside another movie clip. on (rollOver) { _parent.btnRollOver(); } on (rollOut) { _parent.btnRollOut(); } on (press) { _parent.btnPress(); } on (release) { _parent.btnRelease(); } on (dragOut) { _parent.btnDragOut(); } on (dragOver) { _parent.btnDragOver(); } All possible button events are taken care of, even if you don't need them for now and get passed on to the outer movie clip, which will become a "movie clip button."
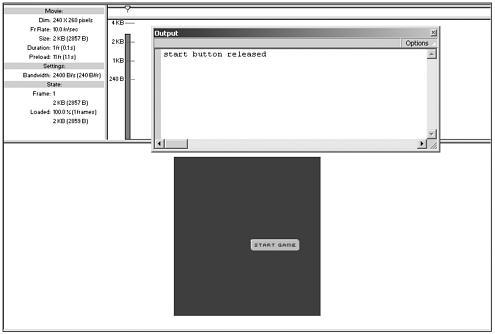
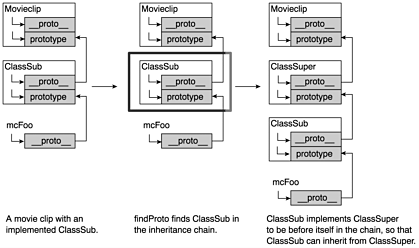
The outer movie clip the movie clip button can then implement the button class (button_ppc.as): if (Object.Button == null) { Object.Button = {}; } Object.Button.initButton = function (mode) { this.states = { off : "off" ,active : "active" ,over : "over" ,down : "down" ,selected : "selected" ,hide : "hide" } if (mode != null && this.states[mode] != null) { this.set ( mode ); } else { this.set ( this.states["off"] ); } } Object.Button.set = function (mode) { if (mode != null && this.states[mode] != null) { this.state = this.states[mode]; if (this.state != this.states.hide) { this._visible = true; this.gotoAndStop (this.state); } else { this._visible = false; this.gotoAndStop (this.states.off); } } } Object.Button.hide = function () { this.set (this.states.hide); } Object.Button.get = function () { return this.state; } Object.Button.btnRollOver = function () { this.set (this.states.over); } Object.Button.btnRollOut = function () { this.set (this.states.active); } Object.Button.btnPress = function () { this.set (this.states.over); _parent.buttonPress (this); } Object.Button.btnRelease = function () { _parent.buttonRelease (this); } Object.Button.btnReleaseOutside = function () { this.set (this.states.active); } Object.Button.btnDragOut = function () { this.set (this.states.active); } Object.Button.btnDragOver = function () { this.set (this.states.over); } First, you must define the button class object. Next you should define an initButton constructor method, which will have to be called after implementing the class. A constructor initializes all the properties of an instance of a class, based on the parameters passed to it. Here initButton defines the states the button can have, matching the frame labels we saw earlier, plus a hide state. Then we set the initial state of the button, which can be passed in as a parameter. If nothing is specified, or an invalid state is trying to be set, the button will go to an off state. The set method will be called a lot it sets the state of the button. That means going to a certain frame label in most cases, and setting the _visible property to false if the state is hide. There are methods to set a button state and to receive the current button state. And there are the handlers for each button event. At this point, only two of them actually interact with the outside world btnPress and btnRelease . They will pass the button movie clip (this) on to the parent timeline. If you need the other handlers to react in a different way, you can either overwrite them for a specific instance or create a sub class of the button class with different behaviors for some or all handlers. More about overwriting inherited methods later. This button class has been created to suit the environment of a Pocket PC. There is no rollover on a Pocket PC because the stylus can only be tracked when pressed on the screen. The content you create should work on both the desktop and the handheld device, so we keep a rollover state; however, it is identical with the down state, and we will not react to the rollover event other than showing the rollover state. To emulate a rollover on the Pocket PC, you can use btnPress to go to the over state and have the button react on btnRelease . btnReleaseOutside reacts like a rollout here. By using btnDragOut and btnDragOver to switch between the active and over states, there is always a visual indication of whether the button will react when you release the stylus at the current position. In button_class.fla we have placed a movie clip button on the stage. We already examined the inside of it. To access it via ActionScript, it needs an instance name startButton . To bring the button to life, you need a few lines of code on the main timeline: #include "includes/implement.as" #include "includes/button_ppc.as" startButton.implement (Object.Button); startButton.initButton ("active"); buttonRelease = function (button) { if (button == this.startButton) { trace ("start button released"); } } First, you include the implementer and the button class. Then you have the startButton implement and initialize the button class. And finally you define a buttonRelease handler, which will be able to react to all release events of all movie clip buttons in this timeline (see Figure 7.8). Figure 7.8. Test the movie to see the movie clip button in action. At this point, what we did just to track a button release might seem like overkill. This button does, however, already react in certain ways to stylus actions and has predefined behavior of our choosing. This is just the beginning. Now that we did that part, we only need to implement all future movie clip buttons without having to edit any ActionScript placed on them or inside their timelines. To create new movie clip buttons they need to have a certain timeline structure with frame labels for the button states, and the inner movie clip with the invisible button inside placed in the active frames. The beauty of this construct is that all the code you need to worry about is in the timeline on which you placed the movie clip button where you usually want to deal with it. Inheritance A Screen Class and a Child Title ClassWhen programming in Flash, you often have to program similar code for different objects before diverging into specific tasks. So you want to have a quick way to integrate the common tasks. The class model described here allows this. To illustrate how inheritance works, we'll showcase a generic screen super class (screen_ generic.as) and a sub class of it that will be used for the opening title screen of the game (game_screens_title.as). To make inheritance work, the sub class needs to be closer to the movie clip instance in the __proto__ chain than to the super class: myMovieClip.__proto__ = subClass; myMovieClip.__proto__.__proto__ = superClass; This way, the sub class can inherit from the super class. The way the implementer works is that it will always insert the class object you specify as the first __proto__ of the chain. So to get to this structure, you could include the following: myMovieClip.implement (superClass); myMovieClip.implement (subClass); Finding a Super ClassThe super class will be shifted to the right with the second implement. However, it is not very convenient to have to manually implement the super class. It should be possible to just implement the sub class. To do that, the sub class needs to implement super class on its own (see Figure 7.9). Figure 7.9. Implementing a super class with the help of findProto. Therefore, a little helper function is needed to find the __proto__ of the sub class, after which you want to insert the super class (findProto.as): Movieclip.prototype.findProto = function (classObj) { var myProto = this.__proto__; while (myProto != null && myProto != classObj) { myProto = myProto.__proto__; } return myProto; } An abstract example of using findProto (findProto.fla): Object.superClass = {}; Object.superClass.initSuperClass = function (foo) { this.foo = foo; } Object.subClass = {}; Object.subClass.initSubClass = function (foo, bar) { // find myself in __proto__ chain var myProto = findProto (Object.subClass); // insert super class myProto.implement (Object.superClass); this.initSuperClass(foo); this.bar = bar; } myMovieClip.implement (Object.subClass); myMovieClip.initSubClass ("foo", "bar"); trace ("foo:" + myMovieClip.foo); trace ("bar:" + myMovieClip.bar); Defining a Screen Super ClassAfter the sub class is defined, you only need to implement the sub class and don't have to worry about implementing the super class. It will happen implicitly after you call the constructor. Let's move on to the generic screen class, Screen.Generic (screen_generic.as). You can define a screen as any kind of display that can appear on the screen. Thus a few generic methods won't hurt: show , hide , and because a screen will often have buttons, buttonPress and buttonRelease . if (Object.Screen == null ) { Object.Screen = {}; } if (Object.Screen.Generic == null) { Object.Screen.Generic = {}; } Object.Screen.Generic.initScreenGeneric = function (showMe) { (showMe) ? this.show() : this.hide(); } Object.Screen.Generic.hide = function () { this._visible = false; } Object.Screen.Generic.show = function () { this._visible = true; } Object.Screen.Generic.buttonRelease = function (buttonName) { } Object.Screen.Generic.buttonPress = function (buttonName) { }
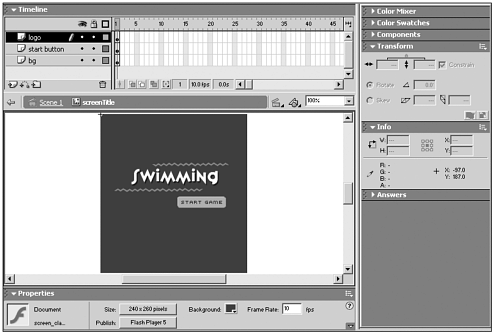
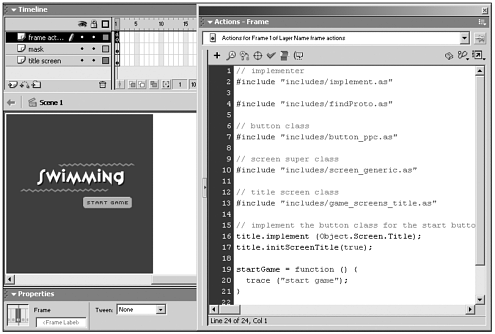
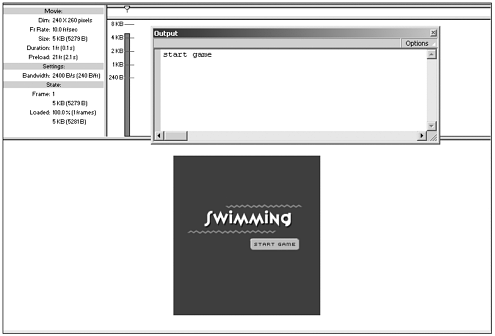
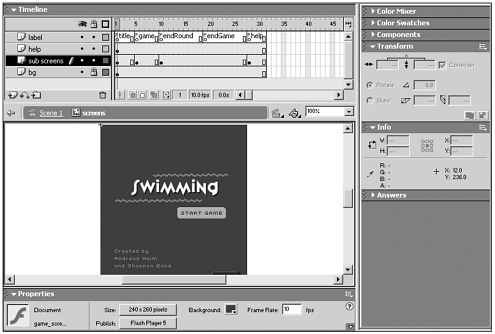
The generic show and hide methods change the just _visible property. The initScreenGeneric constructor has a showMe trigger, which determines whether the screen instance will start off visible. buttonRelease and buttonPress don't do anything they are just placeholders. Although Flash doesn't complain if you try to call a function that doesn't exist, it is preferable to have a placeholder in place. It was discussed earlier that on devices such as the Pocket PC, buttonRelease would be the preferred handler. There may, however, be reasons for which you will need buttonPress as well. For example, if you want to drag a movie clip or if you want to create a scroll bar, onPress is still needed. Creating a Sub ClassYou implement this super class in a title screen sub class (game_screens_title.as), which will be referred to as Screen.Title for the remainder of the chapter: if (Object.Screen.Title == null ) { Object.Screen.Title = {}; } Object.Screen.Title.initScreenTitle = function (showMe) { var myProto = findProto (Object.Screen.Title); myProto.implement (Object.Screen.Generic); this.initScreenGeneric(showMe); this.startGameBtn.implement (Object.Button); this.startGameBtn.initButton ("active"); } Object.Screen.Title.buttonRelease = function (button) { if ( button == this.startGameBtn ) { _parent.startGame(); } } The Screen.Title class will implement the Screen.Generic class after you call the constructor. It will also implement the Button class for a startGameBtn movie clip button placed inside. Implementing the Screen ClassesIn screen_class.fla you make use of Screen.Generic and Screen.Title . We moved the start button inside a title movie clip. Screen.Title inherits the show , hide , buttonPress , and buttonRelease methods from Screen.Generic (see Figure 7.10). To be able to react to the Start button's release action, it needs its own buttonRelease method, which will overwrite the default one that was inherited from Screen.Generic . Figure 7.10. The elements of the title screen on its timeline. The title screen is just a screen. It doesn't really do anything else for a living but let the user click the Start button. After this happens, it just passes on the event to the parent timeline, which will then react appropriately. The button event handlers that are placed on the invisible button inside the start game movie clip button is the only ActionScript that has to be directly placed on an object or as a frame action inside a movie clip (see Figure 7.11). All other code is placed on the main timeline, which makes it easier to overview the scripts in your movie. Figure 7.11. All the ActionScript to make the title screen work is placed on the main timeline. #include "includes/implement.as" #include "includes/findProto.as" #include "includes/button_ppc.as" #include "includes/screen_generic.as" #include "includes/game_screens_title.as" title.implement (Object.Screen.Title); title.initScreenTitle(true); startGame = function () { trace ("start game"); } First, you include the implement and findProto methods. These two methods extend the Movieclip.prototype and are the essential helpers to enable classes for movie clips here. This is followed by including the classes needed for this example Button , Screen.Generic , and Screen.Title . Then, you implement Screen.Title for the title movie clip instance on the main timeline. Calling the constructor initScreenTitle makes title inherit Screen.Generic , and implements and initializes the Start button inside. All that is left to do is to define a startGame method that will be called by the title screen after the user releases the Start Game button (see Figure 7.12). Figure 7.12. The title screen with the Start Game button at work. The Main Screens of the GameFor the game we created four major screens: the title screen, the game screen, the screens for the end of a round and the end of the game, and the help screen. All these are based on the screen class. You move from one screen to another either by certain events in the game, or by clicking buttons within the screens, which are all based on the button class. The different screens are brought together in a screens movie clip, for which we defined a Screen.GameScreens class. The screens movie clip uses frames to place the sub screens (see Figure 7.13). Each sub screen is an individual movie clip and will be initialized by calling the constructor for each of them when you go there. The visual elements, including buttons, are inside the individual screens, except for the Help button. Because the Help button is available everywhere except on the help screen, it is placed directly on the screens timeline. Figure 7.13. The timeline of the screens movie clip. Let's go over the individual screens and the class files associated with them:
The individual screens are structured similar to the title screen. They show up on the screen, and if you release a button, that event is passed on to the parent timeline. If there was any sub navigation, it would happen within that screen. For example, if there were more than one help page, navigating through the help pages would completely happen within the help screen. This example, however, has only one help page. Because the code for the individual screens is so similar to the title screen, it will not be covered here. Instead, please explore the following files on your own:
Defining a Class to Hold the Game ScreensThe Screen.GameScreens class in game_screens.as brings the screens together. Because the code in the individual scripts becomes lengthier with increasing functionality, we will focus on the key methods from this point on. The other methods will be displayed in table form for a quick overview. For details of the implementation, please look at the source code provided. The following is an excerpt from the Screen.GameScreens class: Object.Swim.GameScreens.initGameScreens = function (page) { var showMe = true; findProto(Object.Swim.GameScreens).implement(Object.Screen.Generic); this.initScreenGeneric(showMe); this.pages = { title : "title" ,game : "game" ,endRound : "endRound" ,endGame : "endGame" ,help : "help" } this.helpBtn.implement (Object.Button); this.helpBtn.initButton ("active"); this.activate(); this.gotoPage (page); } Object.Swim.GameScreens.gotoPage = function (page, msg, rounds) { var myPage; if (page == null) { myPage = this.pages.title; } else { myPage = page; } if (myPage != this.currentPage) { this.gotoAndStop(myPage); if ( myPage == this.pages.title ) { this.screen.implement (Object.Screen.Title); this.screen.initScreenTitle(true); } else if (myPage==this.pages.endGame || myPage==this.pages.endRound) { this.screen.implement (Object.Screen.End); this.screen.initScreenEnd(true); this.msg = msg; this.rounds = rounds; this.screen.showEndScreen (_parent, myPage, msg, rounds); } else if (mypage == this.pages.game) { this.screen.implement (Object.Screen.Game); this.screen.initScreenGame (true); _parent.showGame(); } if (myPage == this.pages.help) { this.screen.implement (Object.Screen.Help); this.screen.initScreenHelp(true); this.helpBtn.set ("hide"); } else { this.helpBtn.set ("active"); } if (this.currentPage != null) { this.lastPage = this.currentPage; } this.currentPage = myPage; } } The initGameScreens constructor defines the pages to exist within its timeline that will hold the individual screens, much like the button class defines the different button states. For each page there is a matching frame label in the timeline. The Help button gets implemented and activated. gotoPage is the dispatcher method that takes care of opening and initializing the correct screen. If no screen is specified, it defaults to title. Then it goes to the frame for that screen and implements the screen. In the case of the end screen, it will remember the additional parameters msg and rounds if you go to the help screen, you want to restore the end screen with the same content when you come back. Table Table7.1 provides an overview of the methods used in Screen.GameScreens .
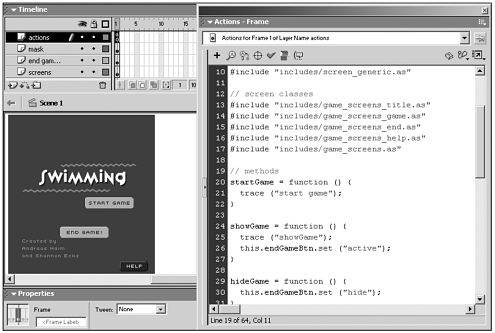
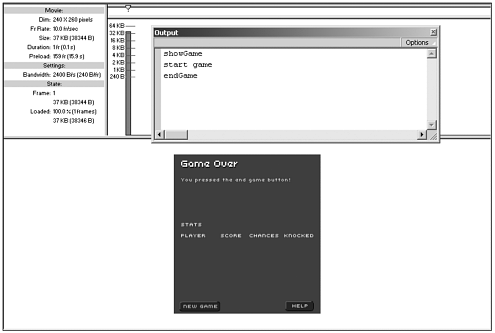
There are calls to _parent.hideGame() from buttonRelease and _parent.showGame() if a gotoPage ("game") is issued. This is due to the coexistence of the game elements and the screens. When a screen needs the entire screen, it has to hide the game elements first and show them again when returning to the game screen. Implementing Screen.GameScreensTo make use of the Screen.GameScreens class, you need to include the new classes, after the usual implementer and findproto methods, and the button and screen generic classes are included (see Figure 7.14). Then methods to be called by the screens are defined, before we have the screens movie clip implement Screens.GameScreens . Figure 7.14. The ActionScript to bring the screens to life is, again, all placed on the main timeline and not inside the movie clips. #include "includes/game_screens_game.as" #include "includes/game_screens_end.as" #include "includes/game_screens_help.as" #include "includes/game_screens.as" startGame = function () { trace ("start game"); } showGame = function () { trace ("showGame"); this.endGameBtn.set ("active"); } hideGame = function () { this.endGameBtn.set ("hide"); } resetGame = function () { trace ("resetGame"); hideGame(); } endGame = function () { trace ("endGame"); var msg = "You pressed the end game button!"; this.screens.gotoPage("endGame", msg); hideGame(); } buttonRelease = function (button) { if (button == this.endGameBtn) { endGame(); } } this.endGameBtn.implement (Object.Button); this.endGameBtn.initButton("hide"); this.screens.implement (Object.Swim.GameScreens); this.screens.initGameScreens(true, "title"); showGame hideGame turns the End Game button on and off, which is all you have for a game right now. Releasing the End Game button shows the end game screen, from where you get back to the title screen with the Reset button (see Figure 7.15). Opening the help screen will work as well. Figure 7.15. Test the movie to see how the screens work and to confirm that the navigation for the game is in place. The CardsThe cards get their own class. They don't get placed on the timeline but rather get stored in the library and then initiated using attachMovie . This requires less maintenance in the timeline you don't have to name the instances manually, and only cards that you actually make use of will be created. This could also come in handy if you wanted to play with a double deck, for example. You don't have to duplicate each card on the timeline and give it a new instance name, but rather create the cards dynamically as needed. Instead of creating symbols for every card, we chose to create one master symbol, which contains the images for all of them one card per frame. This makes it easier to edit the cards together if necessary, for example if you want to change the background, and it also is easy to ensure they are all the same size and aligned properly. Table 7.2 introduces you to the methods used in the Swim.Card class.
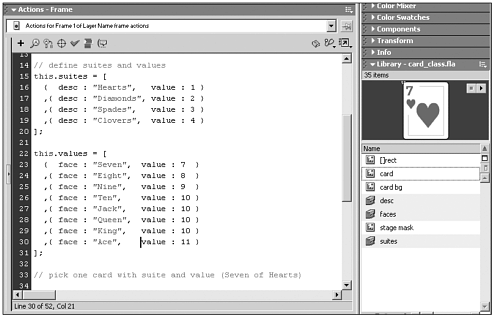
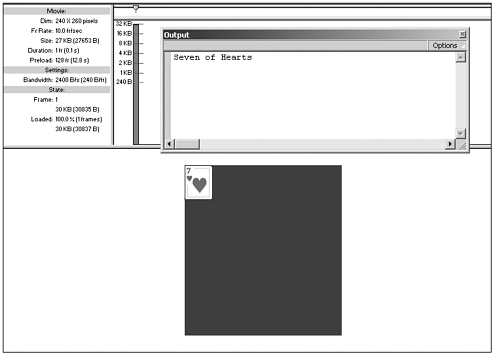
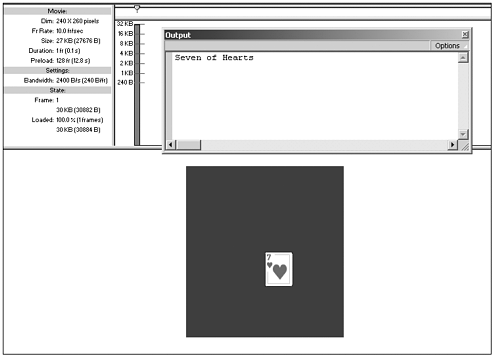
The card class implements Screen.Generic , so it has hide and show methods. Because Screen.Generic defaults to hide when initializing, the card will be invisible at first. To create a card, as shown in Figure 7.16, use the following code after including the methods and classes used before: Figure 7.16. Creating a card. #include "includes/card.as" this.suits = [ { desc : "Hearts", value : 1 } ,{ desc : "Diamonds", value : 2 } ,{ desc : "Spades", value : 3 } ,{ desc : "Clovers", value : 4 } ]; this.values = [ { face : "Seven", value : 7 } ,{ face : "Eight", value : 8 } ,{ face : "Nine", value : 9 } ,{ face : "Ten", value : 10 } ,{ face : "Jack", value : 10 } ,{ face : "Queen", value : 10 } ,{ face : "King", value : 10 } ,{ face : "Ace", value : 11 } ]; var suit = suits[0]; var value = values[0]; var id = 1; this.attachMovie ("card", suit.desc + value.face, id); card = this[suit.desc+ value.face]; card.implement (Object.Swim.Card); card.initCard (id, suit.value, value.value, suit.desc , value.face); trace ( card.getDesc () ); card.show(); First, you define the suits and card values used in the game. Each gets a numeric representation as well as a description. The card value is used to add up scores and to compare scores. The suits are compared using the numeric representation, because this is faster and less processor-intensive than comparing strings Only the face is used later as a string to find three-of-a-kind in a hand. In another card game, the suit may actually have a value according to the rules; for example, a seven of hearts could be worth more than an ace of diamonds. By associating both a numeric value and a descriptive string to a suit in this card class, you will more likely be able to reuse it as is. You pick one card in this case the seven of hearts (see Figure 7.17). First create a card movie clip instance on the stage and then have it implement the card class. Figure 7.17. The first card has been created with Swim.Card. At this point, the card is in the upper-left corner of the screen at the position (0,0). You could move it by modifying its _x and _y properties directly. This, however, always requires two actions, and the position is relative to the parent timeline in this case _root . Instead use a placeClip method attached to the Movieclip prototype to set a movie clip to a certain position that can optionally be relative to another movie clip, even in a different timeline. This means you could independently from layer depth set up a slot movie clip and quickly align any other movie clip with it. In some cases this can save you some calculating and headache because you can visually define the spot where the clip needs to go. This is achieved by first converting the target clip's coordinates to global coordinates. Then those get converted to coordinates relative to the parent's timeline of the movie clip because that is the space the movie clip is positioned in. Movieclip.prototype.placeClip = function (point, clip) { if (clip != null) { var clipPos = { x: clip._x, y: clip._y }; clip._parent.localToGlobal (clipPos); this._parent.globalToLocal (clipPos); } this._x = clipPos.x + point.x; this._y = clipPos.y + point.y; } The new position has to be passed in as a point object, which has the form of an object with an x and a y property: point = { x : xPosition, y: yPosition }; This method also is stored in an external file so that it can be included and so you can place the card almost in the center of the screen, as shown in Figure 7.18. Figure 7.18. The card has been placed in the desired position with the placeClip method. #include "includes/placeClip.as" card.placeClip ( { x:120, y: 130 } , this );
Holding Cards in a HandAs defined by the rules in Swimming, a hand consists of three cards. Cards can be set one at a time or all three at once. You define Swim.Hand as a class to offer all the functionality needed by a hand. Table 7.3 gives you a look at the methods used here.
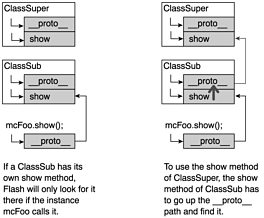
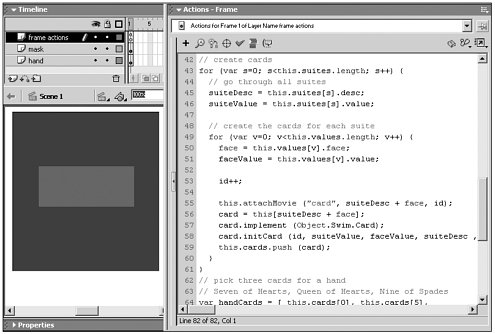
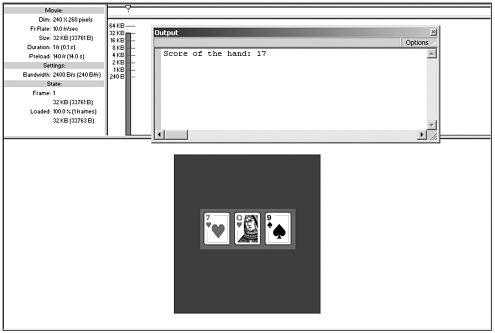
The cards are movie clips. They will be created and owned by the game. A hand is another movie clip within the game; it can hold cards, but they don't get transferred into the hand's timeline. Thus to show and hide them, you have to call their own show and hide methods. More on Overwriting MethodsThe Swim.Hand class is a sub class of Screen.Generic . Thus it inherits a show method from Screen.Generic . The generic show method inherited by the hand doesn't take care of our needs; it only turns the hand itself visible. You need to define your own show method to fulfill the task. The act of defining a new method with the same name in a sub class is called overwriting a method. Instead of the inherited class, the sub classes' own method will be used. Let's take a look at the showHand and show methods of Swim.Hand : Hand.showHand = function () { for (var i=0; i<maxCards; i++) { this.cards[i].show(); } } The cards of the hand are kept in the cards array. To show the hand, you loop through the array and call the show method of each card. Hand.show = function () { this.showHand(); } By defining a show method in the hand class, the inherited show function is overwritten. At this point all it does is call showHand , which will show all the cards. If the hand itself had visual elements, they would not be shown yet. Because you overwrote show, it doesn't get called any more. Now we could look up what code is in the original show and just copy and paste it. Then the show method would act like a normal show, plus it would show the hand. However, if the formerly inherited show method would ever change, you would have to manually update it in the hand class as well. Luckily, there is a better way to do this. The inherited method does still exist but it's hidden. Let's look at how Flash finds inherited methods. When you call the show method, Flash first looks at whether there is a show method defined in the current object. If not, it checks whether the __proto__ has a show method. If it finds it, it will call it and stop the search. Otherwise it checks the __proto__ of the __proto__ and so on until it gets to Object.prototype , where there is no more __proto_ _. Because Flash stops looking for an inherited method once it finds one, you have to look up the inherited one yourself, if you want to still use it after overwriting (see Figure 7.19). Because the super class of the hand class is Screen.Generic you will look it up using the findProto method used to implement it at the right spot in the __proto__ chain. Figure 7.19. Looking up an overwritten method. var handSuperClass = findProto (Object.Screen.Generic); Now handSuperClass is actually the class object. If you tried to call a method of it, it would execute it within the class object, not the instance that you want to run it in. So you need to assign it temporarily to the method of the instance and then call it. Afterward you remove it again. this._show = handSuperClass.show; this._show(); delete this._show; Because another sub class could overwrite the show method again, the inherited method needs to be looked up inside of the new method. Completed it looks like this: Hand.show = function () { this.showHand(); this._show = findProto (Object.Screen.Generic).show; this._show(); delete this._show; } Implementing the Hand ClassNow that we have covered how to overwrite an inherited method and still call the original method, let's move on and make use of it by implementing the Swim.Hand class for a sample hand in hand_class.fla, again by using the implement and findProto methods (see Figure 7.20). Figure 7.20. The hand_class.fla and how we implement Swim.Hand. #include "includes/hand.as" this.cards = []; this.cardsPerHand = 3; var card, suitDesc, suitValue, face, faceValue; var id = 0; for (var s=0; s<this.suits.length; s++) { suitDesc = this.suits[s].desc; suitValue = this.suits[s].value; for (var v=0; v<this.values.length; v++) { face = this.values[v].face; faceValue = this.values[v].value; id++; this.attachMovie ("card", suitDesc + face, id); card = this[suitDesc + face]; card.implement (Object.Swim.Card); card.initCard (id, suitValue, faceValue, suitDesc , face); this.cards.push (card); } } var handCards = [ this.cards[0], this.cards[5], this.cards[18] ]; this.hand.implement (Object.Swim.Hand); this.hand.initHand (this.cardsPerHand); this.hand.setAllCards (handCards); this.hand.analyzeHand(); this.hand.show(); trace ("Score of the hand: "+ this.hand.getScore() ); To fill the hand with cards, you need more cards. Instead of just creating two more, you create all the cards needed for the game. Then you pick three cards that you want in the hand (for example, seven of hearts, queen of hearts, and nine of spades) and place them in a handCards array. You implement the hand class for the hand movie clip instance on the stage and set the cards. You can then analyze the score of the hand before showing it. Finally, you display the score. As Figure 7.21 shows, it will show 17, the added values of the seven of hearts (7) and the queen of hearts (10). Figure 7.21. The hand holds its three cards and can analyze the score of its cards.
The Player ClassA player needs to be able to do more than hold cards so you define a player class that uses the hand class as super class. If a class B inherits from another class A, that class A becomes a super class for class B. At the same time B becomes a sub class of A. Because Swimming is a turn-based game, there is a yourTurn method to begin your turn. You add methods to let the player perform the actions defined in the game's rules take one card from the stack, take all three cards, pass, and knock. After making a move, endOfTurn will be called to report the move back to the game. You also store the chances a player has and define methods (as shown in Table 7.4) to return the chances a player has left and define one that causes the player to lose a chance.
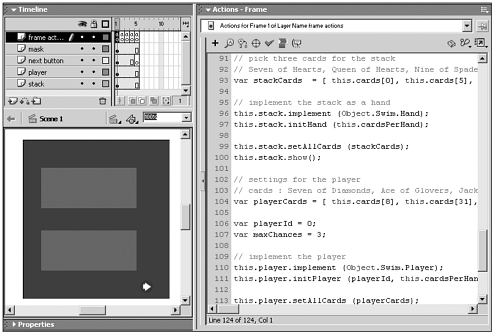
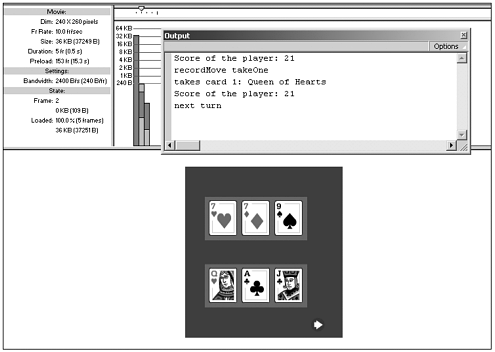
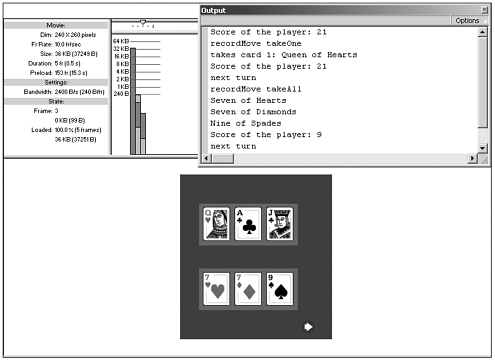
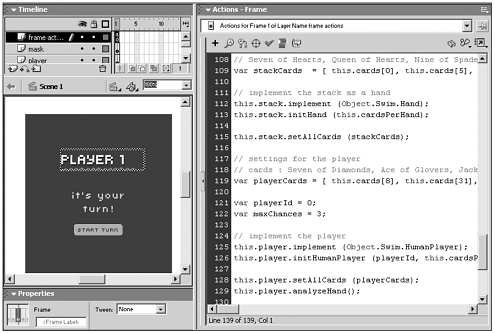
As you can see in Table 7.4, there are two calls to the game after each move: _parent.recordMove() and _parent.nextTurn() . For Swimming, these calls could be combined into one, as you can only make one single move per turn. Other games, however, might let you do multiple moves per turn for instance, you could move again in a dice-based game after you throw a six. So to be able to reuse this code or parts of it more easily for other games, it's a good idea to keep the two events separate. player_class.fla uses the exact same symbols as hand_class.fla the hand movie clip now has two instances on the stage, stack and player. In the frame actions for Frame 1, you need to make some modifications. Because the two movies are very similar, we will only describe the changes. The player will look for two methods to call back, recordMove and nextTurn . For now we'll define placeholder methods that will show that they get called and which arguments got passed on to them (see Figure 7.22). Figure 7.22. Implementing Swim.Hand for the stack and Swim.Player for the player. #include "includes/player.as" recordMove = function (move, arg1, arg2) { trace ("recordMove "+ move); if (move == "takeOne") { var stackSlot = arg1; var card = arg2; trace ("takes card "+ stackSlot + ": "+ card.getDesc() ); } else if (move == "takeAll") { var cards = arg1; for (i=0; i<cards.length; i++) { trace ( cards[i].getDesc() ); } } } nextTurn = function () { trace ("Score of the player: "+ this.player.getScore() ); trace ("next turn"); } Instead of a hand, you now define the stack the stack being an instance of the hand class followed by implementing the player: var stackCards = [ this.cards[0], this.cards[5], this.cards[18] ]; this.stack.implement (Object.Swim.Hand); this.stack.initHand (this.cardsPerHand); this.stack.setAllCards (stackCards); this.stack.show(); var playerCards = [ this.cards[8], this.cards[31], this.cards[28] ]; var playerId = 0; var maxChances = 3; this.player.implement (Object.Swim.Player); this.player.initPlayer (playerId, this.cardsPerHand, maxChances); this.player.setAllCards (playerCards); this.player.analyzeHand(); this.player.show(); trace ("Score of the player: "+ this.player.getScore() ); So far this doesn't look much different than initializing the stack. Only initPlayer requires more arguments. Because the Swim.Player is intended to be the foundation for the actual player being used, it doesn't have any methods for a user interface. To test its functionality, we need to remote control it. To illustrate the changes that happen when the player makes his moves, you stop the movie at this point: stop(); To demonstrate the functionality of the player class, we added a new layer to the main timeline for a regular button with the following action on it: on (release) { nextFrame(); } The main timeline got extended to five frames compared to previous examples, so that we can trace through different actions the player can take frame by frame. In each keyframe, we placed a few lines of ActionScript to control the player. Frame 2: this.player.yourTurn(); this.player.takeOne (0,1); Frame 3: this.player.yourTurn(); this.player.takeAll (); Frame 4: this.player.yourTurn(); this.player.pass(); And Frame 5: this.player.yourTurn(); this.player.knock(); If you now test the movie, you will see the cards of the stack and the cards of the player, along with the Arrow button. Click the button, and you see how one card changes (see Figure 7.23). Figure 7.23. After taking one card. If you press Next again, all the cards get swapped, and the move gets traced into the output window as well (see Figure 7.24). You can do two more moves for pass and knock . There the cards don't change, but you still see the moves traced into the output window. Figure 7.24. After taking all three cards.
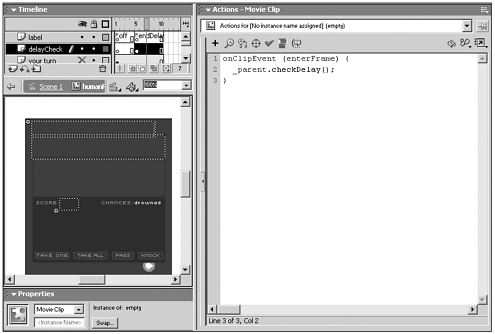
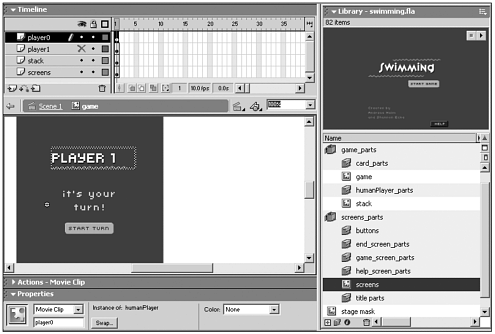
The Human PlayerThe player class does not have any visual elements that let you interact with the game. The humanPlayer class adds the functionality for that. In a turn-based game such as Swimming, where the device gets passed around between turns, you don't want to reveal the hand right away. Rather than that, you want to show an opening screen that stays on until you get the device and press the Start button. Next, the hand and the stack get shown, along with buttons for the actions you can take, and the score of the hand and remaining chances are displayed. When you look at the humanPlayer_class.fla , you will find a new player movie clip instance on the stage with all these elements in it. Double-click the instance to see inside of it (see Figure 7.25). On the top layer, there is an opening screen with a Start button inside. The Start button is setup to implement the button class. Make the layer with the opening screen invisible to see the other elements. Figure 7.25. The inside of the human player movie clip with the opening screen hidden. There are dynamic text fields that will display the player name, the moves of the other players, and the score of your hand. There is a chance meter movie clip with different states. By using a movie clip here instead of a text field, you can use a graphical representation instead. And last but not least, there are buttons for Take One, Take All, Pass, and Knock. In Frame 5 you will find an empty movie clip with the following on it: onClipEvent (enterFrame) { _parent.checkDelay(); } This is being used to keep the screen visible for a little bit after you make a move so that you can see the changes you made before it closes. Table Table7.5 shows the methods of Swim.HumanPlayer .
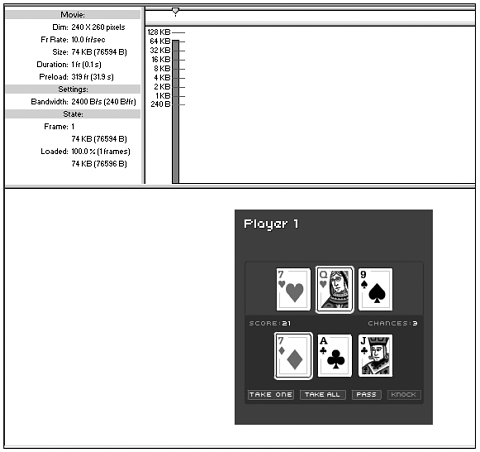
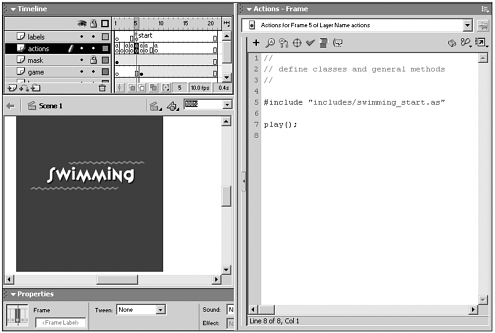
To make the human player work, you need less code in the main timeline than when we used the generic player class by itself in player_class.fla (see Figure 7.26). The human player class takes care of most of it. Figure 7.26. Implementing the human player on the main timeline. First, you need to include the class objects needed. The Next button has changed to a movie clip button. So, you need a buttonRelease method. The nextTurn method has to be modified to re-enable the Next button when the player is done with his turn. #include "includes/button_ppc.as" #include "includes/human_player_opening.as" #include "includes/human_player.as" buttonRelease = function (button) { if (button == nextBtn) { player.yourTurn(); nextBtn.set("hide"); } } nextTurn = function () { trace ("Score of the player:" + this.player.getScore() ); trace ("next turn"); nextBtn.set("active"); } To implement the human player class for the player and the Next button with the arrow, the following code is placed after var maxChances = 3;: this.player.implement (Object.Swim.HumanPlayer); this.player.initHumanPlayer (playerId, this.cardsPerHand, maxChances); this.player.setAllCards (playerCards); this.player.analyzeHand(); nextBtn.implement (Object.Button); nextBtn.initButton("active"); Now when testing the movie, you will only see the Next button. When clicking on it, the opening screen for the player will show up (see Figure 7.27). After clicking the Start Turn button, you will see the hand, the stack, the action buttons, and your score. You can select a card from your hand and a card from the stack. After you do so, the Take One button becomes active. You can Take One, Take All, or Pass. The Knock button is disabled because you can't knock on your first turn. After you choose a move, the move will be made, and the player hides. Figure 7.27. The human player is active you can make all moves. The Next button becomes visible again. You can click it, and the player comes back up. This time you also can knock if you choose. Bringing the Pieces Together The GameIt's time to put all the pieces together. Instead of one player, we need two. The game screens title, help, and end screens need to be brought in. And finally the game needs to deal the cards, set the players' turns and determine game ending situations. In swimming.fla I put all the items just listed into one game movie clip (see Figure 7.28). On the main timeline, there is not much left (see Figure 7.29). Figure 7.28. The game movie clip with all the game elements placed on its timeline. Figure 7.29. A small and clean main timeline for the game. The ActionScript in the Main TimelineIn the first frames we have a little load check in the frame actions layer in Frame 3: if (getBytesLoaded () == getBytesTotal () ) { gotoAndPlay ("start"); } else { play(); } Frame 4: prevFrame(); This is just to be sure the game is really loaded before you go to the start layer.
At frame label "start" (Frame 5): #include "includes/swimming_start.as" play(); This includes all the classes and methods needed for the game. Inside swimming_start.as you will find all the includes we have used so far as well as: #include "includes/game.as" Game.as holds the Swim.Game class for the actual game. The methods are listed in Table 7.6.
Putting the Cards into the DeckThe game has a sub object for the deck, with its own methods to shuffle the deck, draw cards, and to keep track of any discarded cards.
Because devices have limited processor power, you give the processor a little break before implementing the game in Frame 6: game.implement (Object.Swim.Game); game.initGame();
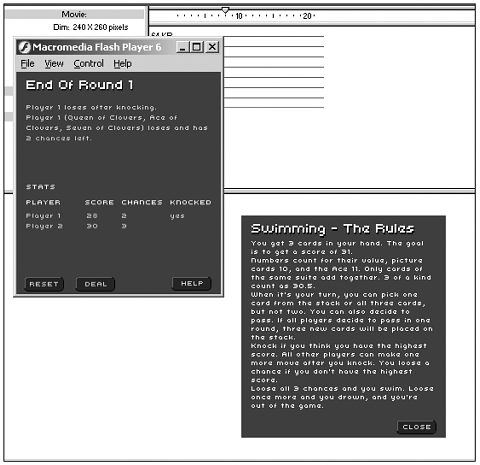
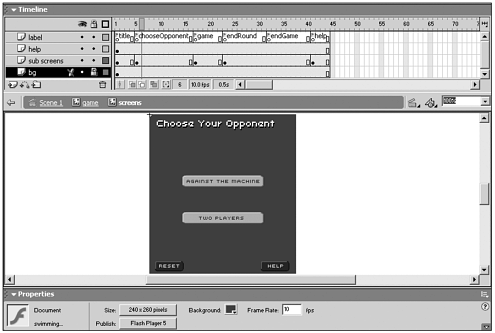
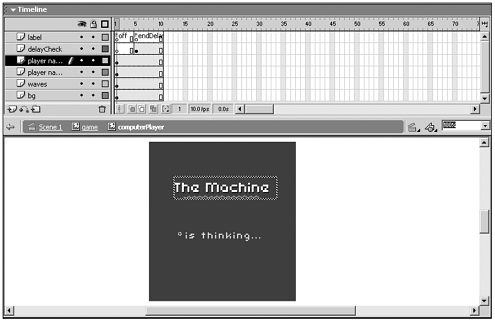
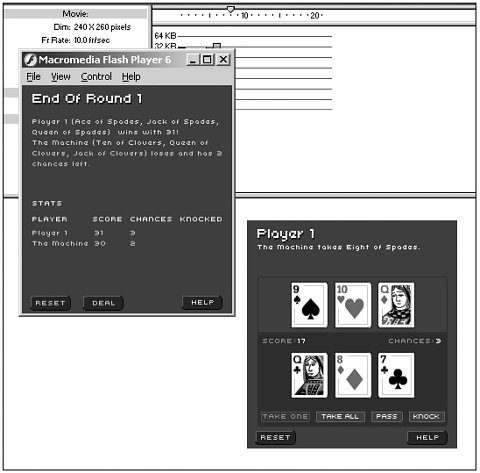
Running the Gamegame.initGame(); in Frame 6 initializes the game. It creates the cards as seen before and implements the players and the stack. Then it implements and initializes the game screens, which will bring up the title screen. Now the game will wait until you click the Start button. The screen's buttonRelease method will call the game's startGame method. startGame resets all the game data and tells all active players to get ready for the beginning of the first round. Then it calls the deal method. deal initializes and shuffles the deck. It gives each player three cards before placing three more cards on the stack. Then startGame begins the first round with a call to firstTurn (see Figure 7.30). The first turn is special in so far as one or more players could have been dealt a winning hand which would end the round immediately. If no winner is found, the first player of the round will be picked, and that player's yourTurn method will be called. Figure 7.30. Playing the game. This brings up the opening screen of the player. After clicking the Start Turn button, you can make your move. When you make your move, the game's nextTurn method will be called. nextTurn checks whether the player won or if the game is over after one player knocked and all other players had their last move. It also checks if new cards need to be placed on the stack. If the game is not over yet, it will find the next active player and call its yourTurn method. In case the game is over, it checks if only one player is left in the game. If so, it will bring up the end game screen, otherwise the end of round screen (see Figure 7.31). Figure 7.31. End of playing a round of Swimming Player 1 wins. Playing Against the ComputerThe majority of the work has been done. Adding a computer player is a piece of cake now. First you need to add a new screen to the screens movie clip in swimming_computer.fla so that you can choose whether you want to play against the computer or against another human (see Figure 7.32). Figure 7.32. Introducing the screen that lets you choose whom you play against. The title screen class gets a slight modification so that it calls initGame instead of startGame in the screens movie clip. The screens movie clip will then show the choose opponent screen instead of starting the game right away. There the Against The Machine and Two Players buttons will call gameComputer and gameTwoPlayers methods in the screen movie clip. These two will call a new setOpponent method in the game. setOpponent picks the second player based on the parameter passed. GameObj.setOpponent = function (opponent) { if (opponent != null && opponent == "computer") { this.players = [ this.humanPlayers[0], this.computer0 ]; } else { this.players = this.humanPlayers; } this.startGame(); } For the computer player, you can place a new computer player movie clip inside the game movie clip. It is a very stripped-down version of the human player movie clip. All that is left is a text field indicating the player name and the delay movie clip (see Figure 7.33). Figure 7.33. The inside of the computer player movie clip not much to look at. In the initGame handler in game_computer.as, you implement the computerPlayer class for the computer player. this.humanPlayers = []; var myPlayer; for (i = 0; i<this.playerCount; i++) { myPlayer = this["player" + i]; myPlayer.implement (Object.Swim.HumanPlayer); myPlayer.initHumanPlayer (i, this.cardsPerHand, this.maxChances); this.humanPlayers.push (myPlayer); } this.computer0.implement (Object.Swim.ComputerPlayer); this.computer0.initComputerPlayer (2, this.cardsPerHand, this.maxChances, false, "The Now let's look at what happens in the computer player. Like the human player, the computer player is based on the generic player class. So it already has all the methods to make a move. It doesn't need all the visual elements that the human player has, so the methods for handling those drop out. All the computer player needs to do is wait for its turn, calculate and make its move, and then, like the human player, stay on for a little bit so that it doesn't just Flash. The core of the move calculation is the think method (computer_player.as): ComputerPlayer.think = function () { var stack = _parent.stack; stack.analyzeHand(); var stackScore = stack.getScore(); var stackCards = stack.getAllCards(); var myCards = this.getAllCards (); var myScore = this.getScore(); var stackSlot, changeSlot, mySlot, stackCard; var anCards, anScore; var hiStackSlot, hiChangeSlot; var hiScore = myScore; for (stackSlot = 0; stackSlot<this.maxCards; stackSlot++ ) { stackCard = stackCards[stackSlot]; for (changeSlot = 0; changeSlot < this.maxCards; changeSlot++) { anCards = []; for (mySlot = 0; mySlot < this.maxCards; mySlot++) { mySlot != changeSlot ? anCards[mySlot] = myCards[mySlot] : anCards[mySlot] = stackCard; } analyzeHand (anCards); if (this.getScore() > hiScore) { hiStackSlot = stackSlot; hiChangeSlot = changeSlot; hiScore = this.getScore(); } } } if (hiScore > myScore || stackScore > myScore) { if (hiScore > stackScore) { this.takeOne (hiChangeSlot, hiStackSlot); } else { this.takeAll (); } } else { var knocking = false; if (!this.firstTurn && _parent.getKnockPlayer == null && myScore >= 27) { var rnd = Math.floor (Math.random() * 3); if (rnd < 1) { knocking = true; } } knocking ? this.knock() : this.pass(); } this.analyzeHand(); } This is a straightforward computer player. It checks the score of its hand and the score of the cards on the stack. Then it tries to replace each card from the stack with each card in the hand and remembers the highest score. At the end it will make the move that offers the best score improvement. If it can't improve its score, it passes or might knock if the score is high enough. The intelligence of the computer player could be further improved. It could try to go prepare a three-of-a-kind if it can't improve otherwise. Right now it will only pick three-of-a-kind if it already has a pair. It also doesn't check whether it leaves a high score on the stack by making a move. And neither does it keep track of the moves of the other player. I leave this up for you to explore on your own. But first play against the computer and try to beat it (see Figure 7.34). Figure 7.34. Player 1 wins… | |||||||||||||||||||||||||||||||||||||||||||||||||||||||||||||||||||||||||||||||||||||||||||||||||||||||||||||||||||||||||||||||||||||||||||||||||||||||||||||||||||||||||||||||||||||||||||||||||||||||||||||||||||||||||||||||||||||||||||||||||||||||||||||||||||||||||||||||||
EAN: N/A
Pages: 178
