Using Actions to Control the Timeline


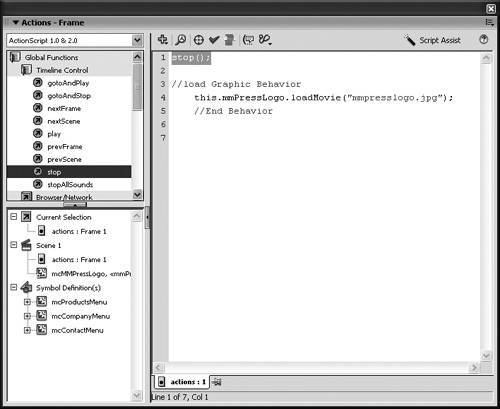
ActionScript can be used to control many features in Flash. One of the more common uses of ActionScript is to control the Timeline of the main Flash document or the Timelines of movie clip symbols. In this exercise, you will add an action to control the main document Timeline with the Actions toolbox.

You should still be working with bookstore10.fla in this example.

1.

Select the actions layer and then open the Actions panel.

If the Actions panel is not open in the layout, open it using Window > Actions panel. You can also open the Actions panel with the keyboard shortcut F9 on Windows and Option+F9 on Mac OS X. Expand the Actions panel. In the first exercise in this lesson, you created keyframes for each page of the Tech Bookstore. In this step, you will add a stop(); action on each page.

2.

Select each keyframe on the actions layer, starting with frame 1, and add the stop(); action to each keyframe using the Actions panel.

If Script Assist is still turned on in the Actions panel, press the Script Assist button to turn it off. Because the stop(); action doesn't require any special parameters to make it work, you will simply add it with the Actions toolbox.

At the very top of all the ActionScript in the Actions pane, make a blank line. Position your cursor in the blank line, and in the Actions toolbox, expand the Global Functions > Timeline Control categories. Double-click on stop to add the stop(); action to your Timeline. Select the next keyframe on the actions layer and add the same action. The stop(); action causes the playhead to stop once it reaches each of these keyframes, which is a navigation feature of the Tech Bookstore that will be put to good use in Lessons 9 and 10.

3.

Test the FLA file and then save the changes you made to the file.

Press Ctrl+Enter (or Command+Enter on the Mac) to test the document in the testing environment. If you tested the bookstore before now, the SWF file played through each page. Now the document stops on Frame 1 (the home page). Each new page that you navigate to will stop when the playhead arrives at the frame, which will happen when you get the menu buttons working and you can navigate the site's pages. Also notice the JPEG image being loaded into the SWF file while in the testing environment. The JPEG is now dynamically loaded into the movie clip holder you created for it in the earlier exercise.

Note

You won't be able to navigate through each page yet. You can do so after you add the ActionScript that makes the buttons and menu system work in Lesson 9.

Select File > Save to save the modifications you made to the FLA file.


Macromedia Flash 8. Training from the Source
Macromedia Flash 8: Training from the Source
ISBN: 0321336291
EAN: 2147483647
Year: 2004
Pages: 230
Authors: James English

flylib.com © 2008-2017.
If you may any questions please contact us: flylib@qtcs.net