Creating a New Virtual Web Site
| Our next task is to create a new IIS virtual Web site that will serve as an entry point to the CMS server. This Web site will get requests from the users and send back responses with dynamically generated CMS pages. Before you start to create a Web site, decide how you are going to uniquely identify your new site. Each Web site is identified by a combination of three parameters: an IP address, a TCP port number, and a HTTP host header name. The default for a TCP port number is 80; host headers are not enabled by default. For example, in a staging environment you may have several Web sites on a computer with a single IP address and different port numbers (i.e., http://<server IP address>:80 and http://<server IP Address>:8080). However, this is not a good option in a production environment, because URLs may appear confusing and difficult to memorize for your users. In a production environment, you can either assign different IP addresses to different virtual Web sites running on the same machine, or use a single IP address and identify the sites by using HTTP host headers. In any case, make sure you have a registered DNS name and the IP address for the site.
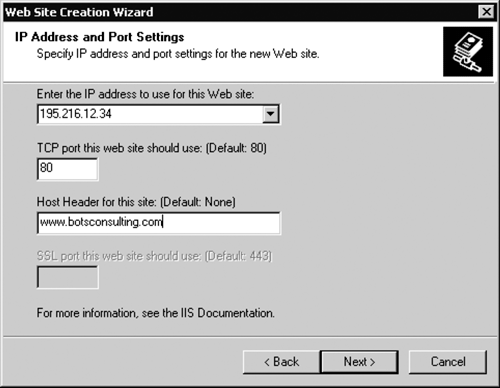
NOTE: Refer to Appendix A for reference information on HTTP and the use of HTTP host headers. We need to start with creating a physical directory that will be used as a home directory for the new Web site for example, C:/CMSsite. We will now create a virtual Web site that uses this directory as its home directory. To create a new Web site, open the Internet Information Services snap-in (on Windows 2000 select Start > Programs > Administrative Tools > Internet Services Manager, or Start > Programs > Administrative Tools > Computer Management, and expand Services and Applications; on Windows 2003 select Start > Administrative Tools > Internet Information Services (IIS) Manager, or Start > right-click My Computer > Manage, and expand Services and Applications). The next step is slightly different depending on whether you are running Windows 2000 with IIS 5, or Windows 2003 with IIS 6. In IIS 5, navigate to your server, right-click it, select New, and then select Web Site. In IIS 6, expand your server, right-click the Web Sites folder, select New, and then select Web Site. On both platforms, the Web Site Creation Wizard Welcome page appears; click Next. On the Web Site Description page, type a description for the Web site in the Description box for example, BOTS CMS site and click Next. On the IP Address and Port Settings page, select the IP address that your site will use; then specify the TCP port number if you are using other than 80. If you are using an HTTP host header, which is the site DNS name, type it in (Figure 8-5). Figure 8-5. IP address and port settings
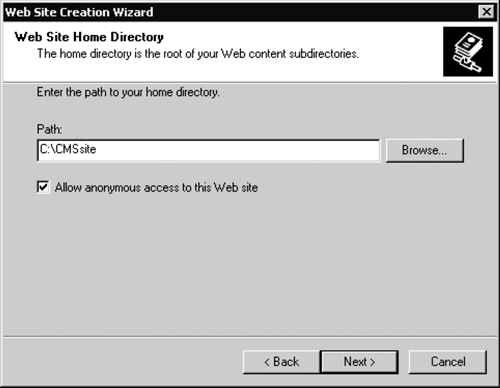
For example, the new site shown in Figure 8-5 will share an IP address and TCP port number with other sites installed on the same IIS box, but will use the host header name www.botsconsulting.com to be uniquely identified by IIS. On the Web Site Home Directory page, click Browse and navigate to the directory you'd like to use as the site home directory for example, C:/CMSsite (as shown in Figure 8-6). Click Next. On the Web Site Access Permissions page, accept the defaults and click Next, then click Finish. Figure 8-6. Home directory
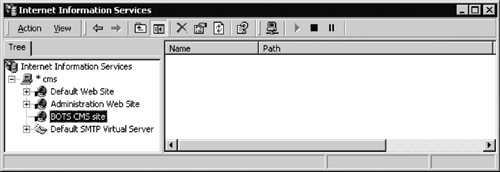
The virtual Web site has been created and is shown in the IIS snap-in; it is an empty site with no content (Figure 8-7). Don't close the IIS snap-in yet; we will need it later on. Figure 8-7. New virtual Web site
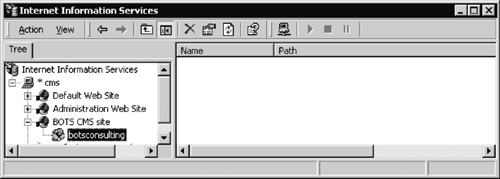
If you are creating a CMS site that will run from the off-root virtual directory, there are several additional steps you need to perform. First, create the directory on the hard disk that will be a home directory for a Web application that will contain your CMS site. Second, using the IIS snap-in, configure the virtual directory on the existing IIS site to point to this physical directory (right-click the IIS site and select New > Virtual Directory; click Next in the Virtual Directory Creation Wizard Welcome dialog; in the Virtual Directory Alias dialog type the name for your CMS site and click Next; in the Web Site Content Directory dialog, browse to the physical directory you created in the first step and click Next; in the Access Permissions dialog, accept the defaults and click Next; click Finish). Make sure the virtual directory is configured as a Web application starting point; it will be shown in the IIS snap-in. To configure the virtual directory as an application starting point, right-click the directory, select Properties, select the Virtual Directory tab, and in the Application Setting section click Create. For example, Figure 8-8 shows the /botsconsulting Web application on the www.botsconsulting.com virtual Web site running on IIS 5. Figure 8-8. New Web application
|
EAN: 2147483647
Pages: 298


