Rights Groups
| In CMS a user cannot be directly mapped to a role. The reason is that roles are tied to containers, and the same user can have different roles in different containers. For example, a user can be an author in one channel and a subscriber in another. In order to allow users the ability to perform different roles in different containers, we need to have a unique instance of a role mapped to a container. This is done via CMS rights groups. Rights groups allow us to define a unique instance of a role. For example, there is only one author's role, but for different channels we may need to define two distinct author groups. A CMS rights group must contain one or more user and user group accounts, and usually consists of user groups. In most cases, users and user groups are set up in the Active Directory. However, the accounts can also be NT domain accounts as well as local Windows 2003/2000/NT accounts. Each rights group must have a unique name within each role. Each rights group belongs to one of the CMS user roles, which determines the rights the members of the group will have in a container. Each role has its own set of rights groups. A user or user group may belong to many rights groups within the same user role. For example, a user can be an author for two different channels. A user can have many different roles. For example, the same user can be a subscriber in one channel and a template designer in another. A user's roles can overlap; for example, the user can have both author and editor roles in a channel. Each role may have one or more rights groups except the administrator role. There is only one rights group within the administrator role. It is called Administrator and is created when CMS is installed (refer back to Figure 17-1). After the installation, this rights group has only one member: the user account set up during the installation to be a CMS administrator account. When you start the Site Manager for the first time, you have to log in with this account. You can then add more members to the Administrator rights group if required. However, to centralize administrative control of your site, it is a good practice to keep the number of members in this group low. Members of the Administrator rights group have all rights to all containers. Therefore, you don't assign the Administrator rights group to a container. It is always there by default and cannot be removed. To assign rights on a container to a user, you must perform the following three steps:
NOTE: In CMS, a container is the most granular object on which security can be applied. Only members of the Administrator rights group within the administrator role can create rights groups and assign members to rights groups. We will now look into this process step-by-step.
NOTE: Creating CMS rights groups and assigning members to these groups can only be done by a CMS administrator using the Site Manager. It cannot be done programmatically; there is no API for working with the rights groups. Creating a Rights GroupRights groups are created within a user role. To access user roles, click the User Roles icon in the left pane of the Site Manager window (refer back to Figure 17-1). Right-click one of the user roles you want to associate the new rights group with; then click New Rights Group. Alternatively, right-click any of the existing groups within the user role and select New Group. The new rights group is created and displayed in the left pane of the Site Manager window as the last entry in the list. It is called New Rights Group. The icon beside the rights group indicates the role to which the group belongs. You can create new rights groups for all roles but the administrator. There is only one Administrator rights group that belongs to this role. To name a new rights group, right-click New Rights Group, select Rename, and then type a name for the new group. The name should be less than 100 characters in length and shouldn't contain non-US-ASCII alphanumeric characters. You can use spaces in the rights group name. It is a good practice to use self-explanatory names. For example, if the rights group we are creating is for editors who edit content in the Manufacturing channel, we can name it "Manufacturing Editors" (Figure 17-2). Figure 17-2. Adding a new rights group
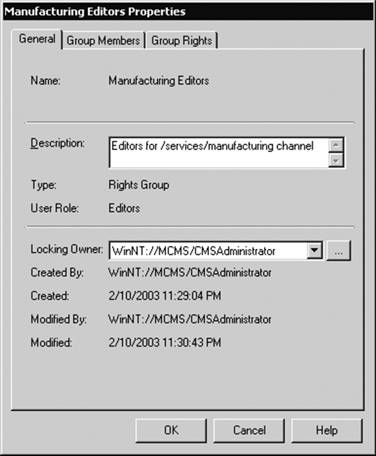
After you have created and named a new rights group, it's a good practice to add a description for this group. The description is optional, but it may help in administering the group in the future if the description provides useful information about the group for example, to what containers the group is assigned. To add a description, right-click the rights group, select Properties, and fill in the Description box in the General tab. As shown in Figure 17-3, the General tab, apart from Description, provides some other useful data about the group, such as when it was created and by whom, when it was last modified and by whom, and who is the locking owner of the group. The ownership lock blocks users from assigning the same rights group concurrently to containers. Provided you have CMS administrative rights, you can change the locking owner. Figure 17-3. The General tab of Properties
Assigning Members to Rights GroupsThe next step is to add members to the rights group. A member of a CMS rights groups may be a Windows 2003/2000/NT individual user or a group account. The account may be a domain account or a local account. Managing membership in a CMS rights group is done using the group's Properties > Group Members tab. To assign the members to the group, on the Group Members tab click the Modify button. The Modify Members dialog box for the rights group opens. In the NT Domains area, select a domain. Don't be confused by the name of this area: All domains, whether Windows 2003, 2000, or NT, are displayed as NT domains; it is just an interface peculiarity.
NOTE: Domains are added to the CMS environment using the Server Configuration Application (SCA). We will look into adding domains in Chapter 18. After you've selected a domain in the NT Domains section, the domain name, in the format WintNT://<domain name>, appears in the Source field. You cannot type in the Source field. If you'd like to add accounts from a domain, but the domain is not shown in the NT Domains section, this domain has to be configured in the SCA first.
NOTE: The CMS system account must have at least read access to Active Directory Users in the Windows domains from which you are adding the users and groups. To display the domain security groups from the drop-down list, choose "Select from list of all groups," or choose "Select from list of all groups and users" to display both user and group accounts, as shown in Figure 17-4. The accounts are displayed in the Name area. Up to a thousand accounts may be displayed at one time. A text box called Display List allows you to move between the "pages." The number of pages equals the number of total users/groups in the domain divided by 1,000. For example, if a domain contained 5,010 users/groups, the text box would show that there were six pages overall. Figure 17-4. Modify Members dialog box
CMS imports user accounts approximately every 10 to 17 minutes. Any valid account is a potential CMS user. If a user or group you want to add doesn't appear in the Name list, click the Synchronize button to force the import and update the list of users and groups in the domain. To add a Windows security group and all its members to the CMS rights group, select the Windows group account from the Name list and click Add. The group is moved to the Rights Group Members list. Similarly, to add an individual user, select the user account from the list and click Add. Instead of selecting the account and clicking the Add button, to move a user or group account to the Rights Group Members list, you may just double-click the Windows account in the Name list. If the user or group account is not displayed in the list even after you've synchronized it, make sure that "Manually enter groups and users" is chosen, and then type the Windows user or security group account name from this domain in the Group or User Name field; then click Add. The user or group is moved to the Rights Group Members list. You can also look in the Windows group membership if you wish and add individual members to the CMS rights group. To choose members of a Windows group, select the group name and click Members. The NT Group Members dialog box appears, as shown in Figure 17-5. To add an account to the rights group, select the check box beside the name of the account; select as many accounts as you need, and click OK. Figure 17-5. NT Group Members dialog box
It is a good practice to assign members to the CMS rights groups on a Windows group basis. Rather than adding Windows user accounts to each CMS rights groups individually, add Windows security group accounts to the CMS rights group. When you add or remove users from the Windows groups, the CMS rights groups will reflect the changes automatically. Organizing the group membership in this way may significantly minimize the administrative overhead of maintaining user rights in CMS. After you've added all the necessary accounts to the Rights Group Members list, click OK in the Modify Members dialog box. The selected account names appear in the Rights Group Members area on the Group Members tab, as shown in Figure 17-6. You have assigned members to the rights group. Figure 17-6. The Group Members tab of Properties
Removing Members from Rights GroupsTo remove an account from a CMS rights group, right-click the group, go to the Properties > Group Members tab, select the account you want to remove, and click Remove.
NOTE: There is no synchronization between the Active Directory and the CMS database. If a CMS user has been removed from the Windows domain, the user account name still remains in the CMS database. However, the user is no longer able to log on to CMS. When a user account is deleted from the Active Directory, it still appears in any CMS rights groups the user was a member of. It is necessary to use the Site Manager to manually remove the user from the CMS rights groups to which they were assigned. This is one of the reasons why it is not advisable to have individual CMS users as members of a rights group. Instead, create a Windows security group, add users to this group, and add the group account to the CMS rights group. For example, John and Mary are going to become editors in the Manufacturing channel. We can now create a Windows security group called CMS_ManufacturingEditors, add John's and Mary's Windows accounts to this group, and then add the CMS_Manufacturing Editors group account to the Manufacturing Editors CMS rights group we have already created (refer back to Figures 17-2, 17-4, and 17-6). Assigning a Rights Group to ContainersAfter a CMS rights group has been created and members have been added to it, the next step is to set up the containers in which the group members will be working. The mapping between a CMS rights group and a container can be done from either the rights group Properties or the container Properties. To assign a rights group to containers, right-click the rights group and go to the Properties > Group Rights tab. The tab shows the containers hierarchy. Red X marks indicate that the rights group is not assigned to a container; green check marks indicate that the rights group has already been assigned to a container (Figure 17-7). When a rights group is assigned to a container, the members of the group have rights in this container that are defined by the role to which the rights group belongs. For example, you can see from Figure 17-7 that the rights group Manufacturing Editors is assigned to the /botsconsulting/services/manufacturing channel, the resource gallery /BOTS Consulting/general, and the template gallery /BOTS Consulting. Figure 17-7. The Group Rights tab of Properties
The members of the group can create, edit, and submit pages and page content, and approve and decline page content in the /services/manufacturing channel; they have read access to the resource and template galleries to which they are assigned. To assign one container to a rights group, just click once the name of the container you want to assign. The red X beside the container name changes to a green check mark. To assign a container and all its subcontainers, or children, right-click the container and select Propagate Rights to Children. Each red X beside the container and all its children changes to a green check mark. To remove the rights group from the container, click it once, and the green check mark changes to a red X. To remove the rights group from the container and all its subcontainers, right-click the container and select Propagate Rights to Children. Assignment and removal of rights groups to and from containers take effect immediately. Therefore, the Cancel button becomes disabled. To undo your changes, you must reassign rights groups to containers manually. Containers' hierarchies in the Site Manager provide access to an individual container's configuration. You can see a container description, if it has been set up, when you hover your mouse over its name. You can access the full properties of a container by right-clicking its name and selecting Properties. The Properties > Rights tab on a container shows a list of rights groups already assigned to the container. You can also assign rights groups directly from a container. To do this, right-click a container name in the Site Manager hierarchy (a channel, a template gallery, or a resource gallery) and choose the Properties > Rights tab. The Current User Rights list shows rights groups that have been assigned to the channel. To add or remove a rights group, click the Modify button; in the Look In box, select a user role and then the name of the rights group within this role, and click Add. The rights group is added to the Selected Rights Groups box. To assign the channel the same rights groups as its parent folder, click Add Parent's Rights, and the rights groups for the parent channel appear in the Selected Rights Groups box. For example, to assign the authors rights group Manufacturing Authors to the /botsconsulting/services/manufacturing channel, select Authors in the drop-down list, select the Manufacturing Authors rights group you'd like to assign, and then click Add (Figure 17-8). Figure 17-8. Select User Rights for Channel dialog box
Subscriber, Author, Editor, and Moderator RightsWhen you assign the subscribers, authors, editors, or moderators rights groups to a channel, don't forget to assign the same rights groups to the appropriate template galleries and resource galleries. Failure to do that will lead to authors, editors, and moderators being unable to author or edit pages in the channel. Even if you set up the default template and resource galleries for the channel, the rights are not propagated from the channel to the galleries. You need to assign the appropriate rights groups manually. If a channel only has authors and/or editors rights groups assigned and no moderators, then the pages are published after the page content has been approved by a member of the editors rights group. The publishing details will be approved automatically. When you click OK in the channel Properties > Rights > Selected Rights Groups box, the Site Manager displays the message shown in Figure 17-9, asking you to confirm auto-approval. Figure 17-9. Auto-approval message
When any rights group is assigned to a channel, the members of this group are assigned the subscription rights to the channel. This allows the rights group members to view content published to the channel in their browser. If your site dynamic navigation has been set up to display the channels structure in the same hierarchical order as the Site Manager, then to view it in a channel, this channel's subscribers should have rights to the channels above it in the channel hierarchy. To this end, you need to make sure that the channel's subscribers have appropriate rights in the hierarchy above this channel. For example, as shown in Figure 17-10, subscribers in the Research channel need the subscription rights in the Knowledge channel if you want them to be able to navigate to it. Figure 17-10. Subscribers rights in channel hierarchy
|

EAN: 2147483647
Pages: 298