Working With Data Integration
Microsoft made a couple of investments concerning data integration and SharePoint Designer 2007. The SharePoint Designer 2007 data access layer was a proprietary layer that was limited to accessing SharePoint, SQL Server, Simple Object Access Protocol (SOAP), and XML. It has moved to the ASP.NET data-model layer using data source controls. The data source controls that are available for SharePoint Designer 2007 are built for the same data sources as were supported by the previous data access layer, but the key value of the new model is that this is now a developer-supported model. Therefore, you can create custom data source controls, and if you implement the proper interfaces for those controls, they can be used with data-bound controls such as the data view and data form.
SharePoint Designer 2007 now supports read as well as write actions in data views. Data views used to be read only, only suitable for presenting data. Now SharePoint Designer 2007 also supports data forms: single record forms and multiple record forms. In addition, you can use data views to update data sources. Using data forms, you can update data stored in SharePoint, SQL Server, and XML files.
The third important improvement regarding data integration is a feature called the aggregate data source, which refers to the ability to take two data sources and aggregate them into a single data view. You can do things such as join related data from two tables in SQL Server, or you can concatenate or make a union of data coming from disparate data sources such as XML files.
The final new feature in SharePoint Designer 2007 data integration adds new ways to support the passing of parameters to a data view. In FrontPage 2003, you could have parameters originating from another Web Part and pass those to the data view via a Web Part connection. Alternatively, you could have parameters that came from query strings, although it was not very easy to get to those parameters. SharePoint Designer 2007 gives you a new user interface that lets you define parameters that originate ASP.NET controls located on the page, cookies, forms, query strings, or server variables.
| Note | The data integration possibilities of SharePoint Designer 2007 make creating overviews and simple Web forms applications so easy that creating such applications is achievable for site designers. Even developers will be surprised in a positive way with the development time it takes to create such applications. |
The Data Source Library
The Data Source Library is the central repository of all your data sources. It is the location from where the data sources can be managed and accessed. There are different types of data sources that can be accessed using the Data Source Library in SharePoint Designer 2007:
-
SharePoint Lists Here you find all lists that are available on the SharePoint site and the option to create a new SharePoint list.
-
SharePoint Libraries Here you find all the libraries that are available on your SharePoint site.
-
Database Connections You find all the database connections for the SharePoint site here.
-
XML Files You find all the XML files that are used in the SharePoint site here.
-
Server-side Scripts You find all the server-side scripts and Real Simple Syndication (RSS) feeds that are used in the SharePoint site here.
-
XML Web Services You find all Web services that are used in the SharePoint site here.
-
Business Data Catalog You find here all the Business Data Catalog (BDC) views that are created, and you will have the option to create a new view.
-
Linked Sources You find all linked sources that are used in the SharePoint site here.
You can open the Data Source Library by clicking Insert Data View on the Data menu or Data Source Library on the Task Panes menu. Figure 27-29 shows the Data Source Library task pane.
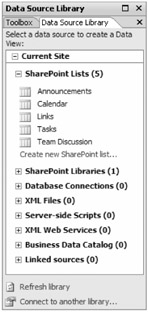
Figure 27-29: Data Source Library task pane
Adding a SharePoint List or Library
When you create a list data source using SharePoint Designer 2007, you can also specify columns, sorting, filtering, and grouping. The following steps show you how to add a SharePoint list as a data source:
-
In SharePoint Designer 2007, from the Data Source Library task pane, expand the SharePoint Lists folder by clicking the plus sign.
-
Click the Create New SharePoint List link to open the File New dialog box.
-
By default, SharePoint Designer 2007 shows the SharePoint Content tab of the File New dialog box containing all available SharePoint lists. The only thing you have to do here is to select the list that you want, specify a name for the new list in the Options section on the right side of the dialog box, and click OK. There is a description available for each one of the lists to make choosing lists easier.
If you want to add a SharePoint library as a data source, follow these steps:
-
In SharePoint Designer 2007, from the Data Source Library task pane, expand the SharePoint Libraries folder.
-
Click the Create New Document Library link to open the File New dialog box.
-
SharePoint Designer 2007 shows the SharePoint Contents tab of the File New dialog box containing all libraries of the SharePoint site. Please note that there is a description available for each library at the right of the window. Once you have selected a library, you can specify a name in the Options section on the right and then click OK.
Adding a Database Connection
Follow these steps to create a database connection:
-
Expand the Database Connections folder in the Data Source Library task pane, and click Connect To A Database. Doing this opens the Database Data Source Properties dialog box with the focus on the Source tab. (See Figure 27-30.)
-
On the Source tab, click the Configure Database Connection button to open the Configure Database Connection Wizard. (See Figure 27-31.)
-
Enter the name of the database server you want to connect.
-
Choose the Provider Name you want to use. There are two options: Microsoft .NET Framework Data Provider For SQL Server or Microsoft .NET Framework Data Provider For OLE DB.
-
The next thing to choose is the authentication type. There are four options:
-
Save This Username And Password In The Data Connection. You can specify a database user name and password to be saved in the connection string.
-
Use Windows Authentication. This option requires integrated security to be supported by the data source because the Windows credentials of the client are used for authentication at the data source. This option is supported only when the data source is located on the same physical machine as the SharePoint server.
-
Use Single Sign-On Authentication. You can use this option only when the SharePoint site is part of a SharePoint portal site and the administrator has enabled and configured Single Sign-On.
-
Use Custom Connection String. When you want fine-grained control over the connection, you use this option. You can specify an OLE DB connection string that is used to connect to the database.
-
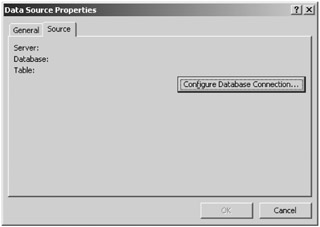
Figure 27-30: Database Data Source Properties dialog box
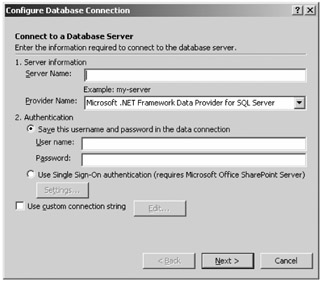
Figure 27-31: The Configure Database Connection Wizard
| Note | For most organizations, Windows authentication, if supported, will be the most appealing authentication model, as it is easy to configure and secure. |
After finishing the specification of the authentication type you want to use, navigate to the next wizard page. On this page, you can select which database you would like to use from a drop-down list. After selecting the database, there are two options to proceed further:
-
Select a table or view from that database. When you select a table or view displayed in the list and you click Finish, a window is displayed that lets you select the fields you want to display, specify filter criteria, and edit the sorting of the fields.
-
Specify a custom select, update, insert, or delete command yourself by making use of SQL or stored procedures. After clicking Finish, you can make your own update, insert, select, and delete commands or edit a stored procedure.
Adding an XML File
You can connect to any given XML file, and SharePoint Designer 2007 automatically creates a data source for the XML file and imports it in the SharePoint site that is currently open in SharePoint Designer 2007. The following steps do not describe the creation of an XML file; you have to take care of that one yourself or choose an existing XML file location on your file system.
-
Go to the Data Source Library task pane, expand the XML Files folder, and click the Add An XML File link.
-
Completing step 1 opens the XML File Data Source Properties dialog box, where you can browse to your XML file.
-
If your XML file is not located on your Web site yet, you will see an alert message box that prompts you to import the file. (See Figure 27-32.)

Figure 27-32: An alert message box
Adding a Server-Side Script or RSS Feed
To add a server-side script or RSS feed data source, follow these steps:
-
Go to the Data Source Library task pane, expand the Server-side Scripts folder, and click the Connect To Script Or RSS Feed link. The server-side script Data Source Properties window opens. (See Figure 27-33.)
-
Select which HTTP method to use to run the script from the HTTP Method dropdown list. The default option is HTTP GET, and the other choice is HTTP POST.
-
Select which data command you want to configure. You can choose between the following commands: Select, Insert, Update, or Delete.
-
Type the path to the script in the Enter The URL text box.
-
If you want to add parameters that should be used when running the script from a Web page, click the Add button to open the Parameter dialog box.
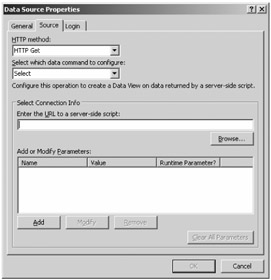
Figure 27-33: Server-side script Data Source Properties window
Adding an XML Web service
To add a new XML Web service, follow these steps:
-
Go to the Data Source Library task pane, expand the XML Web Services folder, and click the Connect To A Web Service link. Doing this opens the XML Web Services Data Source Properties dialog box.
-
In the Service Description Location text box, type the URL of the Web service description file (.wsdl).
-
Click the Connect Now button to make a connection with the XML Web service. (See Figure 27-34.)
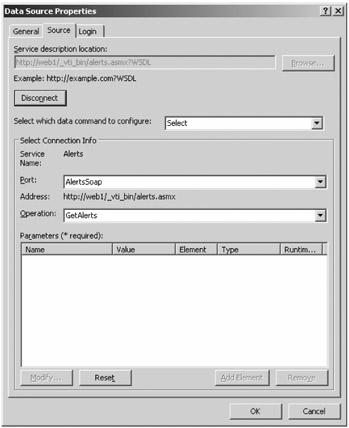
Figure 27-34: XML Web Service Data Source Properties window
Creating a New Business Data Catalog View
Although Business Data Catalogs are not discussed in detail in this chapter, you must be aware that there are different ways to create new views for a Business Data Catalog.
| More Info | For more details on Business Data Catalogs, see Chapter 12, "Administrating Data Connections." |
The SharePoint Designer Data Source Catalog allows you to create a view by making use of a data source that is already available. You can create data views from a wide variety of data sources, such as RSS feeds, XML files, and Microsoft Office System 2007 documents. You can create a view of data located in Word 2007 documents by making use of the new Word XML-based file format and use such files as the data source. Later in this chapter, data views will be discussed in more detail.
Adding a Linked Source
Follow these steps to add a linked source data source:
-
Go to the Data Source Library task pane, expand the Linked Sources folder, and click the Create A New Linked Source link. Doing this opens the Data Source Properties dialog box, shown in Figure 27-35.
-
Click the Configure Linked Source button to open the Linked Data Sources Wizard. (See Figure 27-36.)
-
In the Linked Data Sources Wizard, you see a list of all the data sources that are available for your SharePoint site, including the ones that you have added yourself via the Data Source Library task pane. Select a data source from the Available Data Sources list, and click Add. Click Next when you have finished selecting all data sources that you want to link together.
-
On the next wizard page, you can select the link type between the data sources. (See Figure 27-37.) There are two options:
-
Merge The Content Of The Data Sources. Choose This Option If You'd Like To Sort, Group, And Filter The Data Sources As One Long List. (Recommended)
-
Join The Contents Of The Data Sources By Using The Data Source Details To Insert Data Views And Joined Subviews.
-
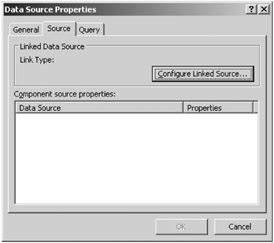
Figure 27-35: Data Source Properties dialog box
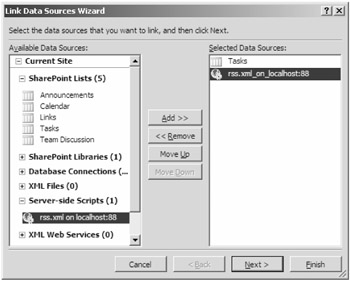
Figure 27-36: Linked Data Sources Wizard-step 1
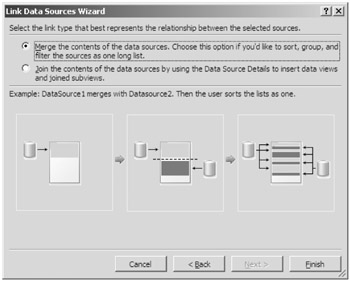
Figure 27-37: Linked Data Sources Wizard-step 2
Connecting to Another Data Source Library
A data source library consists of the lists and libraries that are available in the selected SharePoint site; in addition, you can add other data sources via the Data Source Library task pane. The Data Source Library task pane also makes it possible to connect to another Data Source Library from any SharePoint site. This way, you can share data sources.
Follow these steps to connect to another Data Source Library:
-
Go to the Data Source Library task pane, and click the Connect To Another Library link at the bottom of the task pane. Doing this opens the Manage Library dialog box.
-
Click the Add button to open the Collection Properties dialog box.
-
The Collection Properties dialog box contains two text boxes where you can type the display name and the location of the Data Source Library you want to add.
Using the Data Form Web Part
The Data Source Catalog is the central repository of all your data sources. It is the single location from which all your data can be accessed and managed. In the previous section, we showed the different data sources that are available. This section is dedicated to the use of these data sources via the Data Form Web Part.
The Data Form Web Part is not completely new; in SharePoint 2003, this it is called the Data View Web Part. Using the Data Form Web Part, you are able to use multiple data sources, including data coming from external data sources. The data presented in a Data Form Web Part is also known as a Data View. Follow the next steps to create a Data View.
-
Open your SharePoint site in SharePoint Designer 2007.
-
Go to the Data View menu, and click Insert Data View. Doing this opens the Data Source Library task pane, if it is not already open, and inserts a Data Form Web Part onto your Web Part page. (See Figure 27-38.)
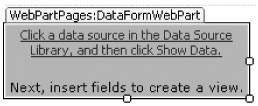
Figure 27-38: Data Form Web Part
The next step is to select a data source to create a data view. You can choose to select an already existing data source or to create a new data source, which was explained in the previous section. Select the data source you want, and choose Show Data from the dropdown list. Doing this opens the Data Source Details task pane containing all the fields that are available for that data source. (See Figure 27-39.)
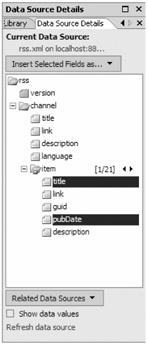
Figure 27-39: Data Source Details task pane
In the Data Source Details task pane, you can choose which fields you want to show in your data view. After selecting those fields, click the Insert Selected Fields As dropdown listbox. You can choose in what way you want to insert your selected fields. The following options are available:
-
Single Item View This view shows one item per page, although you can customize paging to show more items at a time. This mode is read-only.
-
Multiple Item View This view shows all the items that are available in the data source. This mode is read-only.
-
Single Item Form This view shows one item per page, rendered as a form. In this mode, you can write data back to your data source.
-
Multiple Item Form This view shows all items, rendered as a form. This mode allows you to write data back to your data source.
To make your data view exactly the way you want it to be, you can use the Common Data View Tasks action panel. Click on the arrow at the upper right corner of the Data View to open the Common Data View Tasks action panel, as shown in Figure 27-40.
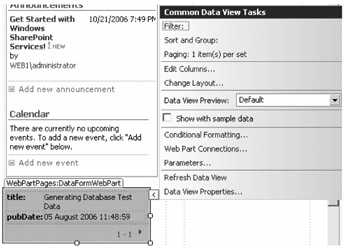
Figure 27-40: Common Data View Tasks action panel
In the Common Data View Tasks action panel, the following options are available:
-
Filter Specify filter criteria to determine which list items are displayed.
-
Sort and Group Specify how the data should be sorted and grouped.
-
Paging Specify how many items you want to display per set.
-
Edit Columns Specify which columns you want to display. A special kind of column is the Formula Column. Here you can build your own XPath expression to create a custom column. Figure 27-41 shows the XPath Expression Builder.
-
Change Layout This option lets you specify which HTML view style or Datasheet view style you want to use for your data view.
-
Data View Preview Here you can specify in what way you want to preview your Data View. You can choose between the following options from a drop-down list:
q
Default This option shows the default Data View.
q
Hide All Filters This options hides all filters that apply to a Data View.
q
Limit To 1 Item This option limits the items being shown in the Data View to 1 item.
q
Limit To 5 Items This option limits the items being shown in the Data View to 5 items.
q
Limit To 10 Items This option limits the items being shown in the Data View to 10 items.
q
Show With Sample data. 'No Matching Items' Template This option gives you a chance to write text that is displayed to the users when no matching items are found.
-
Conditional Formatting If you click the Conditional Formatting link, the Conditional Formatting task pane is opened. This task pane allows you to specify conditions that are applied to fields. For example, you can make sure that items are shown only when the publish date equals today's date. Figure 27-42 shows the Conditional Formatting task pane.
-
Web Part Connections Clicking this link opens the Web Part Connections Wizard. This wizard lets you create new connections or manage existing connections between source and target Web Parts on the same page or another page (cross-page connections).
-
Parameters Here you specify the source of your parameters. If the source is set to •one, the default value is used. Figure 27-43 shows the Data View Parameters dialog box and all the available sources you can use.
-
Refresh Data View Clicking this link refreshes the data view.
-
Data View Properties This opens the Data View Properties dialog box, where you can specify the toolbar, with or without sorting or filtering. You can also decide to show or hide the header or footer. The other tabs of this window let you define layout; the external xls file link source; how paging should be specified; and whether you want to add links to the current view to enable edit, delete, insert, and select modes.
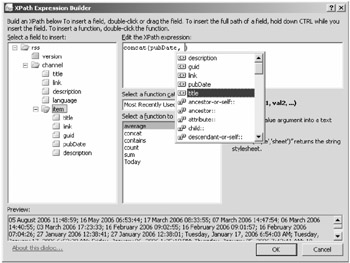
Figure 27-41: XPath Expression Builder dialog box
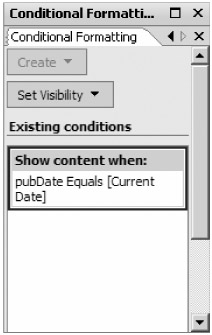
Figure 27-42: Conditional Formatting task pane
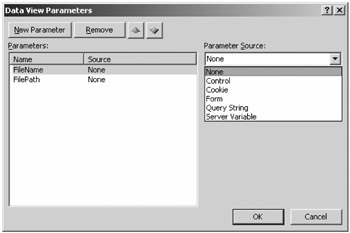
Figure 27-43: Data View Parameters dialog box
The last feature of the data form Web Part that we will discuss in this chapter is field formatting. You will notice how easy it is to format fields by specifying XSL (eXtensible Stylesheet Language) code for a field. XSL is used to describe how XML content should be formatted or transformed. Clicking on the arrow next to a field opens the Common xsl:value-of Tasks action panel that lets you specify how the field must be formatted. (See Figure 27-44.)
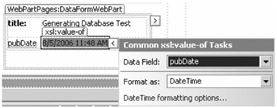
Figure 27-44: Common xsl-value-of Tasks action panel
EAN: 2147483647
Pages: 299