Creating Content Types
You can create and deploy content types throughout SharePoint Server 2007 sites in the following three ways:
-
Administrative user interface
-
SharePoint object model
-
As part of a Feature deployed to new or existing sites
This section focuses on the creation of content types through the administrative user interface. To learn more about deploying content types using the SharePoint object model, refer to the Windows SharePoint Services 3.0 SDK found at http://www.microsoft.com/downloads/details.aspx?FamilyId=&displaylang=en. To learn more about deploying content types using Features, refer to Chapter 26, "Introducing Features," which includes an example of creating a content type Feature and demonstrates methods by which you can deploy Features to new and existing sites.
Permissions for Creating and Modifying Content Types
Table 15-3 shows the user access rights necessary for both creating and deploying content types at the respective levels throughout SharePoint Server 2007.
| Content type level | Action | Minimum access rights |
|---|---|---|
| Parent Site | Create for global site collection. All child sites can access this content type. | Manage Lists Add and Customize Pages |
| Child Site | Create for site. All lists on that site can access this content type. | Manage Lists Add and Customize Pages |
| List or document library | Add content type to specific list on site, and make modifications. | Manage Lists |
Creating a New Content Type at the Site Level
Content types created through the administrative user interface are created at one of two levels within a site collection: the root site level and the child site level.
| Note | This discussion is about the root site of the site collection. However, you can also have parent sites throughout a site collection. As you create new sites and subsites, sites become parent sites of subsites. As you create new content types throughout sites in your site collection, child sites might relate back to a parent site rather than to the root site of the site collection. |
When a content type is created at the root site level, any child site can inherit that content type. However, root or parent sites cannot inherit from child sites. This section will demonstrate how to create a new site content type on the root site of the Litware site collection, Litware, and then inherit that content type on the Fabrikam child site.
Figure 15-7 shows the Litware site's Site Setting page. You can access a site's content types by accessing the Site Content Type Gallery. To access the gallery, click Site Content Types from under the Galleries section.
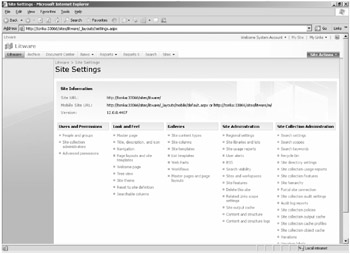
Figure 15-7: Site settings for access to content type gallery
Figure 15-8 shows the Site Content Type Gallery for the child site of Litware, Fabrikam. Notice the Source column to the rightmost of the page, which identifies the site on which the content type has been created, includes the sites Litware and Fabrikam. The parent site, Litware, is highlighted in blue, while the current site, Fabrikam, is grayed out. The leftmost column represents the Site Content Types and shows the custom content type group, Litware. The content types created on the current site (such as Project Procurement) are highlighted in blue, while the content types created on the parent site (such as Memo) are grayed out. Fabrikam content types will not be listed at all in the Site Content Type Gallery of the Litware parent site because child sites inherit content types from the parent site; the parent site does not inherit content types from the child sites.
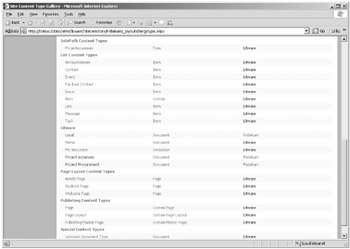
Figure 15-8: Content Type Gallery custom Litware group
To create a new content type for the Litware site, navigate to the Litware site and open the Site Content Type Gallery. Complete the following steps:
-
Click Create in the top tool pane to open the New Site Content Type page, as shown in Figure 15-9.
-
Type Project Meetings in the Name text box to create a content type for Project Meetings.
-
In the Select Parent Content Type From list, select Document Content Types.
This list enumerates all the existing Site Content Type groups within the context of the current site, including the default and custom content type groups. This includes Site Content Type groups created in the current site or the parent sites of the current site.
-
In the Parent Content Type list, select Document.
This list contains the content types for the Site Content Type group you selected from the Select Parent Content Type From list.
-
In the Group section, under the Put This Site Content Type Into, choose the Existing Group option and then select the Litware group from the list. Click OK.
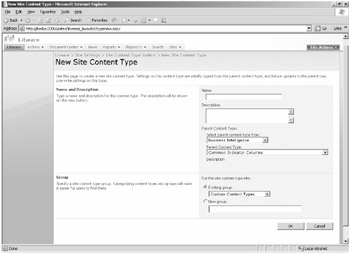
Figure 15-9: New Site Content Type page
| Note | If you had not already created a custom content type group, you could at this point have used the built-in group of Custom Content Types to store your new content type or created a new group. |
The new content type, Project Meetings, has been created on the Litware parent site in the Litware group. Figure 15-10 shows the configuration page for the Project Meetings content type. The Project Meetings content type configuration page also reveals the parent content type-in this case, the Document content type.
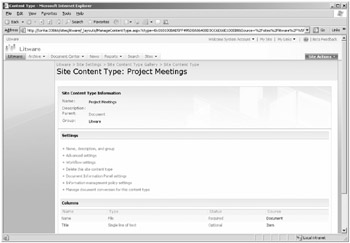
Figure 15-10: Content Type Configuration page
Also note the two default columns created as part of the Project Meetings content type, Name and Title. These two columns have been inherited from the parent content type, Document. You will now add some new columns to the Project Meetings content type to encapsulate the metadata specific to this content type.
Configuring Columns for Content Types
You can add new columns (metadata) to site and list content types. New columns can be added to site content types either by selecting from existing site columns or creating new site columns and associating those columns to a content type. When adding columns to list content types, for instance those content types used throughout a site's document libraries and lists, you can select from both existing site and list columns. To understand how to add columns to list content types, see the section titled "Adding Columns to a Content Type in a Document Library" later in this chapter.
To add a new column to the Project Meetings site content type from existing site columns, follow these steps:
-
From the Litware Site Content Type Gallery page, click on the Project Meetings content type you just created.
-
On the Site Content Type: Project Meetings page, scroll to the bottom of the page, and locate the Columns section.
-
Click Add From Existing Site Columns.
A page with the option to add site columns to the Project Meeting content type will appear, as shown in Figure 15-11.
Note The available site columns are stored and sorted by group. If you wanted to create a new site column, you could also create a custom group in which to store all custom site columns or site columns for a specific content type.
-
In the Select Columns From list, select All Groups.
-
In the Available Columns list, select Comments and then click Add to add the Comments site column to the Project Meetings content type.
Note With the Update All Content Types Inheriting From This Type option, any time you make changes to the content type list columns you can choose to push those changes to child sites where the content type is already being used. In this case, you'd choose not to update all content types because the Project Meetings content type is new and has not yet been deployed.
-
Select No and click OK.
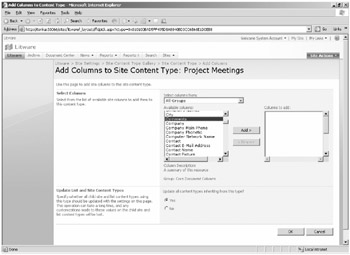
Figure 15-11: Add site columns to site content type
The Comments list column has been added to the Project Meetings content type as an optional column, which means that the user will not be forced to enter information in that column when saving a document to a SharePoint site. If you make this a required column, it must contain information before a document can be saved back to SharePoint.
Configuring a Required Column
To make the Comments list column a required column for the Project Meetings content type, follow these steps:
-
On the Site Content Type: Project Meetings page, scroll down to the Columns section and click Comments.
-
On the Change Site Content Type Column: Project Meetings page, in the Column Settings section, under This Column is:, check the Required (Must contain information) radio button. Click OK.
By making the Project Meetings content type Comments column a required column, users will not be able to save documents associated with the Project Meetings content type back to a SharePoint site, or list, without populating the Comments column.
| Best Practices | When configuring your content type columns, you should determine up front which columns are to be required columns. This is essential for capturing metadata associated with documents. However, you should also take care not to exaggerate the number of required columns for each content type and to limit required columns to that metadata essential to fulfilling your search criteria for given content types. Users will soon become fatigued at being overly prompted to enter data each time they attempt to save documents. |
Configuring Document Libraries
In this section, you'll look at using the new Project Meetings content type in one of the existing document libraries, Projects, on the Fabrikam child site. You will also make some further modifications to the content type when you add it to the document library, including adding another column and associating a new custom template.
When a new document library is created, by default it includes the Document content type. Also, by default, document libraries are not configured for multiple content types. Therefore, the first step is to configure the document library to manage multiple content types so that you can add more content types to the same document library.
Configuring Document Libraries for Multiple Content Types
To configure the Projects document library for multiple content types, do the following:
-
Go into the Projects document library and click Settings
-
Choose Document Library Settings.
-
On the Customize Projects page, under General Settings, choose Advanced Settings.
-
On the Document Library Advanced Settings page, under Allow Management Of Content Types, select Yes and click OK to return to the Customize Projects page.
On the Customize Projects page, you now have a new section midway down the page called Content Types. This section is where you can add content types to this document library.
Also notice the Document content type under the Content Type column of the Content Types section. This was the default content type added at the time of creating the document library.
The Document content type can later be removed from the document library, but first you'll include your new Project Meetings content type.
Adding a Content Type
To add the Project Meetings content type to the document library, complete the following steps:
-
Under the Content Types section on the Customize Projects page, choose Add From Existing Site Content Types.
-
On the Add Content Types: Projects page, under the Select Site Content Types From drop-down list, select Litware. Litware is the custom Site Content Type Group created on the Litware site to contain custom content types for the Litware site collection.
-
From the Available Site Content Types list, select Project Meetings and click Add, as shown in Figure 15-12.
-
Click OK to return to the Customize Projects page.
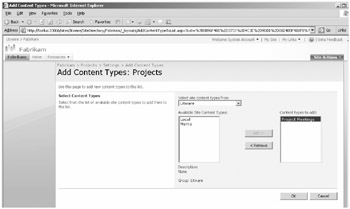
Figure 15-12: Adding content types to a document library
Under the Content Types section on the Customize Projects page, note the additional content type, Project Meetings.
| Planning | You could also choose at this stage to add more content types to the same document library. |
If you now navigate back to the default, or home, page of the document library and select from the New drop-down menu, you'll see the content types available to that library, denoted by the document templates associated with each content type. (See Figure 15-13.)
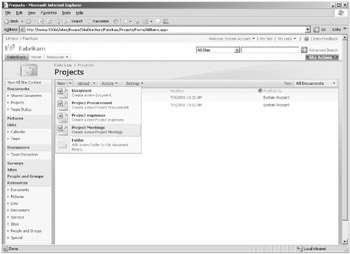
Figure 15-13: Selecting from available document templates in a document library
| Note | Clicking directly on the New button rather than on the drop-down arrow beside the New button will launch the default document template in the associated Office application. See the "Setting the Document Templates Order and the Default Content Type" section in this chapter for further discussion. |
Changing the Template
In the case of the Project Meetings content type, the associated document template is a Word 2007 template. To change the document template associated with the document library instance of the Project Meetings content type, complete the following steps:
-
Go to the Customize Projects page and, under the Content Types section, click the Project Meetings content type.
-
Review the Settings section on the List Content Type: Project Meetings page. These are the settings available for the Project Meetings content type for the instance of the document library. Table 15-4 summarizes the settings.
Note After you have allowed for management of content types on a document library, the Information Management Policy settings are no longer available at the library level but will apply to each content type in the library. You'll need to explicitly set information policy against each content type.
-
On the List Content Type page for Project Meetings, under the Settings section, click Advanced Settings.
-
On the List Content Type Advanced Settings page for Project Meetings, select Upload A New Document Template.
-
Browse to the location of the new document template, and upload a new template, as shown in Figure 15-14.
-
Click OK to save the new document template, and return to the List Content Type For Project Meetings page.
| Content type configuration setting in document library | Purpose |
|---|---|
| Name And Description | Default name will be inherited from parent content type name. For instance, you chose to add the site content type, Project Meetings, to your document library. The document library instance is automatically named Project Meetings. You can choose to change the name of the content type subsequent to adding it to your document library. If the parent content type or site content type from which the document library content type was inherited is Read Only, then you will need to change the Read Only status on the document library instance of the content type before you can change the content type name. |
| Advanced Settings | Edit the existing template associated with the content type, or upload a new template instance. These settings include the option to make the content type Read Only. |
| Workflow Settings | Add or remove a workflow specific to the instance of the content type-that is, the document library instance. |
| Delete This Content Type | Remove the content type from the current document library. Note that you will not be able to delete the content type if there are currently documents in the document library associated with that content type. |
| Document Information Panel (DIP) Settings | Adjust the properties that get exposed in the associated template application-for example, the columns in a Word document. These settings also include the option to edit the existing DIP or upload a new custom DIP template. These settings include the option to always show the DIP when opening a document. |
| Information Management Policy Settings | Define a specific records policy against the content type in the document library instance, such as expiration date. |
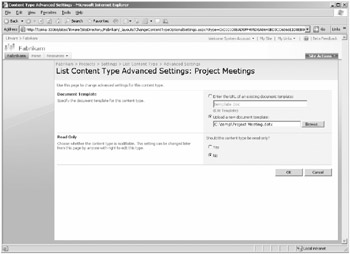
Figure 15-14: Uploading a new document template for a content type
| Note | Bear in mind that the Microsoft Office version of the template you use may determine the list column, or metadata, properties exposed in the DIP. For example, if you are using Word 2007 and use a template based on either Word 2007 or Word 97-2003 format, then the server side metadata will be shown in the DIP. Templates based on a version of Word pre Word 97-2003 format will not expose the metadata in the DIP. See the section "Associating Documents with Content Types" later in this chapter for a discussion on DIP views and properties. |
Adding Columns to a Document Library Content Type
Next, add more columns to the document library instance of the Project Meetings content type by completing the following steps:
-
On the List Content Type: Project Meetings page, under the Columns section, click Add From Existing Site Or List Columns.
-
On the Add Columns To List Content Type: Project Meetings page, under the Select Columns From list, select All Groups.
-
In the Available Columns box, select Location and click Add to add the Location column to the Project Meetings content type.
| Note | When you create a new site column at the site level, you are asked if you want to apply that site column to all content types. This is an alternative way of adding columns to site content types and making those columns available to both site and list content types. |
You have now updated the instance of the Project Meetings content type for the current document library. If you added the Project Meetings content type to another document library, either on the current site or another site within the site collection, the original configuration of the parent instance of this content type would apply. The new template and additional list column, named Location, would not be included. If you wanted to have all instances of the Project Meetings content type include these updates, you would need to update the global instance of the Project Meetings content type, located in this case on the Litware site, and then push those changes to all existing instances of the Project Meetings content type throughout the site collection.
Removing a Content Type from a Document Library
When you created your new document library, the default Document content type was automatically added. Because you've added your own custom content type, you can go ahead and remove the Document content type.
| Note | When you delete a content type, the list columns associated with that content type are not deleted and remain listed under Columns on the Customize Document Library page. |
-
On the Customize Projects page, under Content Types, select Document.
-
On the List Content Type page for Document, under Settings, click Delete This Content Type.
A warning dialogue appears, with the question "Are you sure you want to delete this list content type?".
-
Click OK.
| Note | You cannot delete a content type if that content type is being used. For example, if documents in the document library had already been associated with the Document content type, you would need to re-associate those documents with another content type before deleting the Document content type. To associate a document with an alternate content type, select Edit Properties from the document contextual menu. Then on the Edit Item page for the document, select a content type from the Content Type drop-down menu. As you select a new content type, the associated list columns, or metadata, for that content type will be displayed and you will need to populate any required columns before clicking OK to save and associate the document with the new content type. |
Next, you can change the order of the content types.
Setting the Document Templates Order and the Default Content Type
The order of the content types determines the sequence in which the document templates from the New menu are shown on the document library home page. You can also set the default content type for the document library. The default content type is the one that is chosen if you click New instead of clicking the arrow next to New.
-
On the Customize Projects page, under Content Types, select Change New Button Order And Default Content Type.
-
On the Change New Button Order And Default Content Type page, shown in Figure 15-15, choose the order in which you want to have the content types sorted in the New drop-down list. The content type you select as the first will be the default content type for the document library.
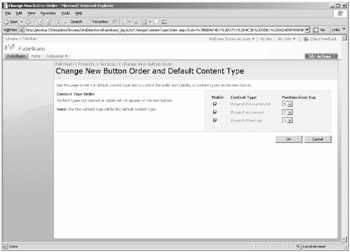
Figure 15-15: Changing the content type order, and setting the default content type
At this point, you could proceed to configure the additional settings for the Project Meetings content type, such as Workflow settings and Information Management Policy settings. There is a walk through on configuring workflow settings in the section titled "Attaching Workflow to a Content Type" later in this chapter.
Configuring Document Library Views for Multiple Content Types
When you add new columns to a content type, all the resultant list columns are exposed in the document library's default view. If you have multiple content types in the document library, by default all list columns are exposed and you could end up with one very busy default view page for the document library. One alternative is to create a view based on a content type. By default, a document library is configured with two views:
-
All Documents view, which is the default view
-
Explorer view
Because the content types give you additional columns of metadata, you might find that it's advantageous to create a view of this metadata. To create a new view for content types, complete the following steps:
-
Open the Customize Projects page.
-
Under the Views section, click Create View.
-
On the Create View: Projects page, select Standard View.
-
On the subsequent Create View: Projects page, type a name for the new view.
-
In the Group By section, under First Group By The Columns drop-down list, select Content Type and click OK.
The new view, which for this example you have chosen the name Summary, has been created and included under the Views section on the Customize Projects page, as shown in Figure 15-16. The Summary view is also available from the View drop-down list on the default page of the document library. You can also filter and sort your views based on content type.
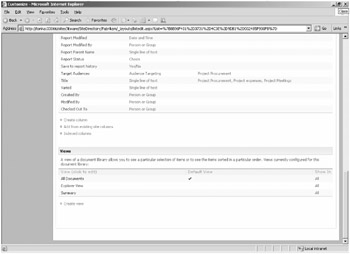
Figure 15-16: New document library View configuration based on content types
Associating Documents with Content Types
Assuming you have your document library configured to manage multiple content types and multiple content types are included, new and existing documents can be associated with one of those content types. For example, you might add existing documents to a document library and subsequently associate them with one of the document library content types if you are migrating your existing files from a file server or public folder store on your Microsoft Exchange server.
When creating a new document from the New menu in the document library, you can choose either the default content type or another content type, such as Project Procurement, Project Expenses, or Project Meetings.
External documents uploaded to a document library configured for multiple content types are associated with one of the content types at the time of uploading, as shown in Figure 15-17. In the figure, the message at the top indicates that an existing document has been successfully uploaded to a SharePoint document library configured for multiple content types. The Content Type list shows the available Content Types. The document can be associated with either the default content type, Project Procurement, or one of the other two content types. Depending on the content type, the associated list columns set as required, denoted by a red asterisk, will need to be populated before the document is checked in to the document library.
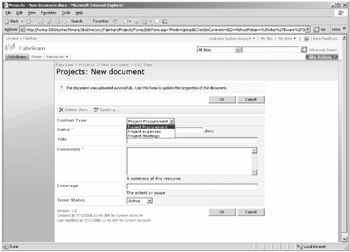
Figure 15-17: Associating external documents with existing content types
The metadata, or list columns, associated with the selected content type will be applied to the document on upload. If the document being uploaded, for instance a Word 2003 or Word 2007 document, includes any existing core document properties, such as title, comments, subject or keywords, then you can select the corresponding Content Type list column properties from the pre-defined Core Document Columns and those properties will be synched on file upload. This means that the original document property, such as keywords, will be exposed in the matching list column, keywords, and dynamically populated with the values from the original document. Any of the original document properties not exposed in SharePoint, such as custom properties, are retained in the document and can be viewed via the displayed properties in the associated Office application Document Information Panel (DIP).
In Word 2007, you will have the following three document property display options:
-
Document library properties, which are the server properties, or those list columns assigned the content type
-
Document properties, which includes properties included on the original document (such as Title, Subject, Keywords, Category, Status, and Comments)
-
Advanced properties, which shows a popup of the properties window for the document (the window seen with the earlier versions of Word 2000 and 2003)
These options are shown in Figures 15-18 and 15-19.
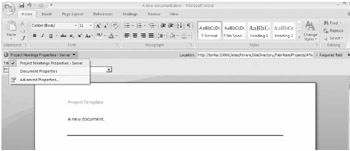
Figure 15-18: How to access content type metadata in Word 2007
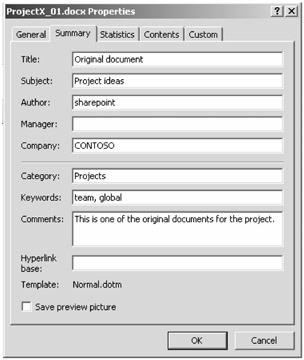
Figure 15-19: Word document original properties
Uploading Multiple Documents to a Multiple Content Type Document Library
You can choose to upload multiple documents either by using the Upload option on the tool pane on the default page of the document library or via the Explorer view, where you can drag and drop multiple documents into a document library.
When you upload multiple documents, those documents will be added to the document library, but they will be left as checked out to you or the person uploading the documents and won't be checked in until you populate the custom metadata, or actions, associated with the content types.
Versioning and Modifications to Existing Content Types
If you make modifications to a site-level content type, you are given the option to update all content types inheriting from this type. If you make modifications to a list content type (such as adding more list columns to a document library content type), those changes will apply only to that instance of the content type. Changes do not get pushed back to the parent content type.
If you change the list columns for a content type (for example, add a new site column to content type X on document library A), all existing documents in that document library using that content type will inherit the new column. If you delete a list column from a content type, SharePoint will remove that column from documents using that content type. This includes columns previously configured as required columns.
But what happens when you delete a document from a multiple content type list and then decide to restore that document from the Recycle Bin? If you restore a document from the Recycle Bin, the document and its content type association (and versions) are restored to the originating document library based on the content type at the time of deletion.
If you have versioning enabled and have at some point changed the content type association with a document in between versions and want to restore an earlier version, the version of the document you restore will be restored with the content type that was associated with it at the time it was versioned. So, if the current version of the document is of content type A and you restore version 2 of the same document, which is of content type B, content type B is the type restored with the document version.
You cannot delete a content type if it is currently being used throughout a site or site collection. This restriction also applies to the content types employed by the lists and document libraries on a site. You must either delete any associated instances of the content type or re-associate any documents using that content type to another content type. Associating documents with alternate content types is explained earlier in this chapter, in the section titled "Removing a Content Type from a Document Library."
When you delete a content type from a list, or document library, you are only deleting that instance of the content type. The content type will still be available from the site and global content types. If you delete a site content type, the content type will no longer be available to any lists on that site. If you delete a content type from the parent site or the global content type, it is no longer available to any sites in that site collection.
Real World Handling Global Content Types
Deleted content types do not get sent to the Recycle Bin! Best practice is to make global content types read-only to avoid unintended changes or deletion and also to standardize on content type configuration throughout your site collection. Global content types are created on the root site of a site collection and then are inherited by sites and lists, or document libraries, throughout the site collection.
If you set a global content type to read-only, then by default the inherited list instances of that content type will be set to read-only. For example, say you've created a Project Meetings content type on the root site of the Litware site collection, Litware, and you've added a custom workflow, custom columns, retention policy and template to that content type, and then set that content type to read-only. Then, on the Fabrikam site, a child site of the Litware site, you add the Project Meetings content type to your Shared Documents document library. The content type will include the settings applied to the parent but by default you will not be able to delete the content type, rename it or apply a custom template. It is possible to change the read-only status of the inherited, list instance content type, but you need to do this explicitly by accessing the list content type's Advanced Settings page and changing the Read Only status from Yes to No.
To set a content type to read-only, do the following:
-
Select the content type you want to set as read-only from the Site Content Type Gallery, for example, Project Meetings.
-
On the Site Content Type: Project Meetings page, under the Settings section, click on Advanced Settings.
-
On the Site Content Type Advanced Settings: Project Meetings page, in the Read Only section, check the Yes radio button, then click OK.
Back on the Site Content Type: Project Meetings page, the number of available Settings will be minimized to include only the Advanced Settings and Workflow Settings, and the content type will be denoted as read-only in the page title, that is, Site Content Type: Project Meetings (Read Only).
Creating Content Types when Deploying InfoPath Forms
A new feature of InfoPath 2007 is the ability to create an InfoPath form and save that form directly back to the SharePoint Server 2007 server as both an InfoPath template and as a new, or existing, content type.
| On the CD | A step-by-step tutorial on how to do this is included on this book's Companion CD. |
EAN: 2147483647
Pages: 299